Herunterladen Diese Seite drucken
Bestron DT48C Bedienungsanleitung
Vorschau ausblenden Andere Handbücher für DT48C:

Werbung

Verfügbare Sprachen
  • DE

Verfügbare Sprachen

  • DEUTSCH, seite 1
SUMMER BREEZE
220
60
50
240
Watts
Hz
Volts
DE
Bedienungsanleitung
FR
Mode d'emploi
NL
Handleiding
INSTRUCTION MANUAL
EN
Instruction manual
IT
Istruzioni per l'uso
ES
Manual del usuario
DT48C

Werbung

loading

Inhaltszusammenfassung für Bestron DT48C

  • Seite 1 SUMMER BREEZE DT48C INSTRUCTION MANUAL Watts Volts Bedienungsanleitung Instruction manual Mode d’emploi Istruzioni per l’uso Handleiding Manual del usuario...
  • Seite 2: Benutzung Durch Kinder

    HERZLICHEN GLÜCKWUNSCH! Herzlichen Glückwunsch zum Erwerb dieses Bestron-Produktes. In dieser Gebrauchsanweisung erläutern wir die Funktion und die Benutzung. Lesen Sie somit diese Gebrauchsanweisung aufmerksam durch, bevor Sie das Gerät benutzen. Verwenden Sie das Gerät nur so, wie es in der Gebrauchsanweisung beschrieben ist. Bewahren Sie die Gebrauchsanweisung danach sorgfältig auf.
  • Seite 3: Was Sie Über Dieses Gerät Wissen Müssen

    ausreichend frei ist und nicht mit brennbarem Material in Kontakt kommen kann. Elektrogeräte dürfen nie bedeckt werden. • Sorgen Sie dafür, dass Elektrogeräte, Kabel oder Stecker nicht mit Wasser in Berührung kommen. • Tauchen Sie Elektrogeräte, Kabel oder Stecker nie in Wasser oder eine andere Flüssigkeit.
  • Seite 4: Ce-Konformitätserklärung

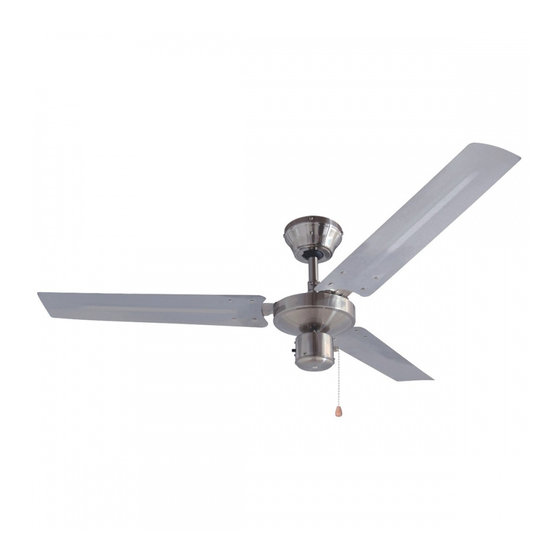
    UMWELT • Werfen Sie Verpackungsmaterial, wie zum Beispiel Plastik und Karton, in die dazu bestimmten Container. • Dieses Produkt am Ende der Nutzungsdauer nicht als normalen Haushaltabfall entsorgen, sondern bei einer Sammelstelle zur Wiederverwendung von elektrischem und elektronischem Gerät. Achten Sie auf das Symbol auf dem Produkt, der Gebrauchsanweisung oder Verpackung.
  • Seite 5 FUNKTION - Allgemein Das Gerät ist nur für den Hausge- brauch vorgesehen und nicht für die professionelle Verwendung. 1. Montageplatte 2. Zierkappe 3. Stab 4. Motor 5. Lüfterflügel (3x) 6. Schrauben (2x) MONTAGE - Installieren der Montageplatte ACHTUNG: • VERGEWISSERN SIE SICH, DASS DER HAUPTSTROM IMMER ABGESCHALTET IST, BEVOR SIE MIT DER INSTALLATION DES DECKENVENTILATORS BEGINNEN.
  • Seite 6 7. Schrauben Sie nun die Drähte auf dem richtigen Weg gut in die Lüsterklemme (G): • Blauer Draht → N • Braune oder schwarze Draht → L • Erde-Draht (gelb-grün) → MONTAGE - Montieren der Stab am Motor 1. Entfernen Sie den Splint und Bolzen vom Stab (siehe Abbildung H). 2.
  • Seite 7 Die Lüfterflügel sind nun richtig am Motor montiert. MONTAGE - Montieren der Ventilator am Montageplatte 1. Heben Sie den Ventilator auf und stecken Sie ihn in den “J-Haken” auf der Montageplatte durch die Öffnung der Zierkappe (siehe Abbildung Q). Sie haben nun beide Hände frei für die Montage der Drähte. 2.
  • Seite 8 3. Schrauben Sie nun die Drähte vom Stab auf dem richtigen Weg gut in die Lüsterklemme (S): • Blauer Draht → N • Braune und schwarze Drähte → L...
  • Seite 9 4. Entfernen Sie den Ventilator vom “J-Haken”, befestigen den Ventilator über die 2 Schrauben in die Montageplatte und drehen die Schrauben fest (T). 5. Schrauben Sie die 2 Schrauben züruck in die Montageplatte und drehen Sie auch fest (T). 6. Fixieren Sie den Stab wie dargestellt in Abbildung U. Der Ventilator ist nun richtig montiert.
  • Seite 10 übermäßig. GARANTIEBESTIMMUNGEN Bestron handhabt unter den folgenden Bedingungen eine Garantie von 60 Monaten ab Kaufdatum gegen Defekte, die durch Herstellungs- und/oder Materialfehler entstanden sind. 1. Im genannten Garantiezeitraum werden keine Kosten für Arbeitslohn und Material berechnet. 2. Die unter der Garantie ausgeführte Reparatur verlängert nicht die Garantiefrist.
  • Seite 11 FÉLICITATIONS ! Nous vous félicitons pour l’achat de votre produit Bestron. Dans le présent manuel d’utilisation, nous vous expliquons comment celui fonctionne et comment vous devez l’utiliser. Nous vous invitons par conséquent à lire attentivement les instructions d’utilisation avant d’utiliser l’appareil. Lorsque vous l’utilisez, prenez soin de suivre parfaitement les instructions d’utilisation.
  • Seite 12 • Les appareils électriques doivent pouvoir libérer la chaleur qu’ils produisent de sorte à éviter tout risque d’incendie. Vérifiez par conséquent s’il y a suffisamment d’espace autour de l’appareil et faites en sorte que celui-ci ne puisse entrer en contact avec du matériel inflammable.
  • Seite 13: Déclaration De Conformité Ce

    ENVIRONNEMENT • Débarrassez-vous du matériel d’emballage comme le plas- tique et les boîtes dans les containers destinés à cet effet. • À la fin de sa durée de vie, ne jetez pas ce produit comme un simple déchet ménager mais remettez-le à un centre de collecte de recyclage des produits électriques et électroniques.
  • Seite 14 FONCTIONNEMENT - Généralités Cet appareil est destiné uniquement à l’utilisation domestique, et non à l’usage professionnel. 1. Plaque de montage 2. Couvercle décoratif 3. Tige descendante 4. Moteur 5. Pales du ventilateur (3x) 6. Vis (2x) MONTAGE - Installer la plaque de montage ATTENTION: •...
  • Seite 15 7. Raccordez le câblage sur le bornier de la plaque de montage, de la manière suivante (G): • Le fil bleu → N • Le fil brun ou noir → L • Le fil de terre (jaune et vert) → MONTAGE - Installer la tige descendante au moteur 1. Retirez la goupille fendue et la broche métallique de la tige descendante (voir la figure H). 2.
  • Seite 16 Les pales du ventilateur sont maintenant correctement installées. MONTAGE - Installer le ventilateur sur la plaque de montage 1. Soulevez le ventilateur et insérer le “crochet J” sur la plaque de montage au travers d’une des ouvertures dans le couvercle décoratif (figure Q). Cela vous permet d’avoir les mains libres pour connecter le câblage. 2.
  • Seite 17 3. Raccordez le câblage émergent de la tige descendante sur le bornier de la plaque de montage, de la manière suivante (S): • Le fil bleu → N • Les fils brun et noir → L...
  • Seite 18 4. Maintenant retirez le ventilateur du “crochet J”, placez le ventilateur au-dessus des deux vis dans la plaque de montage et serrez les vis fermement (T). 5. Insérez les deux vis dans la plaque de montage et serrez-les fermement (T). 6.
  • Seite 19 DISPOSITIONS CONCERNANT LA GARANTIE Le présent produit Bestron bénéficie – aux conditions ci-après – d’une garantie de 60 mois suivant la date d’achat et couvrant toute panne résultant d’un défaut/vice de fabrication et/ou de fonctionnement. 1. Pendant la période de garantie précitée, aucun frais ne sera facturé au titre des coûts de main-d’œuvre et de matériel.
  • Seite 20 PROFICIAT! Proficiat met de aankoop van dit Bestron-product. In deze gebruiksaanwijzing leggen we de werking en het gebruik uit. Lees de gebruiksaanwijzing dus aandachtig door vóór u het apparaat gaat gebruiken. Gebruik het apparaat alleen zoals beschreven in de gebruiksaanwijzing. Bewaar de gebruiksaanwijzing daarna zorgvuldig.
  • Seite 21 • Zorg ervoor dat elektrische apparaten, snoeren of stekkers niet in aanraking komen met water. • Dompel elektrische apparaten, snoeren of stekkers nooit onder in water of een andere vloeistof. • Pak elektrische apparaten niet op wanneer ze in het water zijn gevallen.
  • Seite 22: Eu-Conformiteitsverklaring

    MILIEU • Werp verpakkingsmateriaal zoals plastic en dozen in de daarvoor bestemde containers. • Dit product aan het eind van de gebruiksduur niet inleveren als normaal huishoudelijk afval, maar bij een inzamelpunt voor hergebruik van elektrische en elektronische apparatuur. Let op het symbool op het product, de gebruiksaanwijzing of de verpakking.
  • Seite 23 WERKING - Algemeen Het apparaat is alleen bedoeld voor huishoudelijke doeleinden, niet voor professioneel gebruik. 1. Montageplaat 2. Sierkap 3. Neerwaartse stang 4. Motor 5. Ventilatorbladen (3x) 6. Schroeven (2x) MONTAGE - Het installeren van de montageplaat LET OP: • SCHAKEL ALTIJD IN UW METERKAST DE STROOM AF, VOOR U BEGINT MET DE MONTAGE VAN DE PLAFONDVENTILATOR.
  • Seite 24 7. Schroef nu de bedradingen op de juiste manier goed in het aansluitblokje vast (G): • Blauwe draad → N • Bruine of zwarte draad → L • Aardedraad (groen/geel) → MONTAGE - Het monteren van de neerwaartse stang aan het motorhuis 1. Verwijder de splitpen en metalen pin uit de neerwaartse stang (zie figuur H). 2.
  • Seite 25 De ventilatorbladen zijn nu op de juiste manier gemonteerd. MONTAGE - Het monteren van de ventilator aan de montageplaat 1. Til de ventilator op en steek de “J-haak” op de montageplaat door een opening van de sierkap (zie figuur Q). U heeft nu uw handen vrij om de bedrading van de ventilator te monteren. 2.
  • Seite 26 3. Schroef vervolgens de bedradingen die uit de neerwaartse stang komen op de juiste manier goed in het aansluitblokje vast (S): • Blauwe draad → N • Zwarte en bruine draden → L...
  • Seite 27 4. Haal de ventilator van de “J-haak”, plaats de ventilator over de twee schroeven in de montageplaat en draai de schroeven stevig vast (T). 5. Plaats de twee schroeven terug in de montageplaat en draai ook deze stevig vast (T). 6.
  • Seite 28 9. Aanspraak op garantie kan alleen bij uw (web-)winkelier of rechtstreeks bij de Bestron Service Dienst. Stuur echter nooit zomaar iets op. Het pakket kan dan namelijk geweigerd worden en eventuele kosten zijn voor uw rekening.
  • Seite 29 CONGRATULATIONS! Congratulations with the purchase of this Bestron product. These instructions tell you how the product works and how to use it. Read the instructions carefully before you start using the appliance. Only use the appliance in the manner described in the instructions. Keep these instructions in a safe place for future reference.
  • Seite 30 Never immerse electrical appliances, cords or plugs in water or any other liquid. • Do not touch electrical appliances if they have fallen in the water. Immediately pull the plug out of the socket. Stop using the appliance. • Make sure that electrical appliances, cords and plugs do not come into contact with heat sources, such as a hot hob or open fire.
  • Seite 31: Ce Declaration Of Conformity

    ENVIRONMENT • Dispose of packaging material such as plastic and cardboard boxes in the designated containers. • Do not dispose of this product as normal domestic waste at the end of its life, but hand it in at a collection point for the reuse of electric and electronic equipment.
  • Seite 32 OPERATION - General The appliance is intended only for domestic use, not for professional use. 1. Mounting Plate 2. Canopy 3. Down rod 4. Motor 5. Fan blades (3x) 6. Screws (2x) MONTAGE - Installing the mouting plate WARNING: • ALWAYS SWITCH OFF THE MAINS POWER BEFORE INSTALLING OR CARYING OUT ANY WORK ON THE CEILING FAN.
  • Seite 33 7. Now connect the wires to the terminal block on the mounting plate in the following way (G): • Blue wire → N • Brown or black wire → L • Earth wire (yellow-green) → MONTAGE - Installing the down rod onto the motor 1. Remove the cotter pin and metal pin from the down rod (see figure H). 2.
  • Seite 34 The fan blades have now been installed correctly. MONTAGE - Installing the fan to the mounting plate 1. Lift up the fan and insert the “J-hook” on the mounting plate through one of the openings in the canopy (see figure Q). This will leave your hands free for connecting the fan’s wiring. 2.
  • Seite 35 3. Connect the wiring coming from the down rod to the terminal block on the mounting plate in the following way (S): • Blue wire → N • Brown and black wires → L...
  • Seite 36 4. Now lift the fan from the “J-hook”, place the fan over the two screws in the mounting plate and tighten the screws firmly (T). 5. Insert the two screws into the mounting plate and tighten them firmly as well (T). 6.
  • Seite 37 8. The warranty does not entitle the purchaser to compensation for any damage other than replacement or repair of the faulty parts. Bestron cannot in any event be held liable for any indirect or consequential losses caused by or in relation to the equipment it has provided.
  • Seite 38 COMPLIMENTI! Congratulazioni per l’acquisto di questo prodotto Bestron. Nelle presenti istruzioni per l’uso viene spiegato il funzionamento e l’impiego dell’apparecchio. Pertanto, prima di utilizzarlo, leggerle attentamente. Utilizzare l’apparecchio esclusivamente come di seguito descritto. Conservare queste istruzioni in luogo sicuro. In caso di guasto: Nel caso indesiderato in cui l’unità...
  • Seite 39 • Mai immergere apparecchi elettrici, cavi o spine in acqua o in altri liquidi. • Se gli apparecchi elettrici dovessero cadere in acqua, mai tentare di raccoglierli. Scollegare immediatamente la spina dalla presa elettrica e non riutilizzare l’apparecchio. • Assicurarsi che gli apparecchi elettrici, i cavi e le spine non entrino in contatto con fonti di calore, come piastre calde o fiamme libere.
  • Seite 40: Dichiarazione Di Conformità Ce

    DISPOSIZIONI AMBIENTALI • Smaltire i materiali di imballaggio, come plastica e scatole di cartone, negli appositi contenitori. • Al termine della sua vita utile, non smaltire il prodotto come un normale rifiuto domestico, ma conferire presso un punto di raccolta per il riciclaggio di apparecchiature elettriche ed elettroniche.
  • Seite 41 FUNZIONAMENTO - Generale Questo apparecchio è destinato esclusivamente a uso domestico, non a uso professionale. 1. Piastra di sostegno 2. Calotta superiore 3. Asta di sostegno 4. Motore 5. Eliche del ventilatore (x3) 6. Viti (x2) MONTAGGIO - Installazione della piastra di sostegno ATTENZIONE: •...
  • Seite 42 7. Collegare i cavi alla morsettiera presente sulla piastra di montaggio nel modo che segue (figura G): • Cavo blu → N • Cavo marrone o nero → L • Cavo di messa a terra (giallo-verde) → MONTAGGIO - Inserimento dell’asta nel motore 1. Rimuovere la coppiglia e il perno metallico di fissaggio dall’asta (vedere figura H). 2.
  • Seite 43 Le pale del ventilatore sono ora montate correttamente. MONTAGGIO - Installazione del ventilatore sulla piastra di sostegno 1. Sollevare il ventilatore e inserire il gancio sulla piastra di sostegno attraverso una delle aperture nella calotta (vedere figura Q). In questo modo si avranno le mani libere per collegare i cavi del ventilatore. 2.
  • Seite 44 3. Collegare i cavi che fuoriescono dall’asta alla morsettiera sulla piastra di sostegno nel modo che segue (figura S): • Cavo blu → N • Cavi marroni e neri → L...
  • Seite 45 4. Rimuovere il ventilatore dal gancio, posizionarlo in corrispondenza dei fori delle due viti posti sopra la piastra di sostegno e avvitare le viti (figura T). 5. Inserire le due viti nella piastra di sostegno e stringerle (figura T). 6. Fissare l’asta come illustrato nella figura U. Il ventilatore ora è...
  • Seite 46 DISPOSIZIONI DI GARANZIA In base alle seguenti condizioni, Bestron garantisce questo apparecchio per la durata di 60 mesi dalla data di acquisto contro i guasti causati da difetti di fabbricazione e/o del materiale. 1. Durante il periodo di garanzia non verranno addebitati costi di manodopera e per i materiali necessari.
  • Seite 47 ¡FELICIDADES! Felicidades por la compra de este producto Bestron. En estas instrucciones le explicamos su funcionamiento y cómo usarlo. Antes de usar el aparato, lea bien el manual de instrucciones. Utilice el aparato únicamente tal y como se describe en el manual de instrucciones.
  • Seite 48 • Nunca sumerja los aparatos eléctricos, cables o enchufes en agua ni en ningún otro líquido. • No toque los aparatos eléctricos si se han caído al agua. Desenchúfelo inmediatamente de la toma de corriente. No vuelva a usar el aparato. •...
  • Seite 49: Medio Ambiente

    MEDIO AMBIENTE • Tire el material de embalaje, como plástico y cajas, en el contenedor apropiado. • Al final de su vida útil, no se desprenda de este producto como un residuo normal. Llévelo a un punto blanco de su ciudad para el reciclaje de aparatos eléctricos y electrónicos.
  • Seite 50 USO - General El aparato está destinado únicamente para uso doméstico, no para uso profesional. 1. Placa de montaje 2. Cubierta 3. Barra de suspensión 4. Motor 5. Aspas (3) 6. Tornillos (2) MONTAJE - Instalación de la placa de montaje ADVERTENCIA: •...
  • Seite 51 7. Ahora conecte los cables a la terminal de la placa de montaje de la siguiente forma (G): • Cable azul → N • Cable marrón o negro → L • Cable de tierra (amarillo-verde) → MONTAJE - Instalación de la barra de suspensión en el motor 1. Quite la clavija y el perno de metal de la barra de suspensión (véase la figura H). 2.
  • Seite 52 Las aspas ya están instaladas correctamente. MONTAJE - Instalación del ventilador en la placa de montaje 1. Levante el ventilador e inserte el “gancho en forma de J” en la placa de montaje a través de una de las aberturas de la cubierta (véase la figura Q). Esto le permitirá tener las manos libres para conectar el cableado.
  • Seite 53 3. Conecte los cables que vienen de la barra de suspensión al terminal de la placa de montaje de la siguiente forma (S): • Cable azul → N • Cables marrones y negros → L...
  • Seite 54 4. Ahora levante el ventilador por el “gancho en forma de J”, coloque el ventilador sobre los dos tornillos en la placa de montaje y apriételos firmemente (T). 5. Inserte los dos tornillos en la placa de montaje y apriételos también (T). 6.
  • Seite 55 CONDICIONES DE GARANTÍA Bestron ofrece 60 meses de garantía después de la fecha de compra de este equipo. La garantía cubre las averías por errores de fabricación y/o material y se atiene a las siguientes condiciones. 1. La garantía no cubre ningún gasto por mano de obra ni material.
  • Seite 56 v210421-02 NEED HELP? CHAT WITH US! WHATSAPP CUSTOMER SERVICE B E S T R O N . C O M / W H A T S A P P...