Herunterladen Inhalt Inhalt Diese Seite drucken

Werbung

Verfügbare Sprachen
  • DE

Verfügbare Sprachen

  • DEUTSCH, seite 18
Classic 120
Metal fan with
smart functions
For keeping your
home cooled in
English
a smart way.
Deutsch
Français
Español
Italiano

Werbung

Inhaltsverzeichnis

Fehlerbehebung

loading

Inhaltszusammenfassung für djive Flowmate Classic 120

  • Seite 1 Classic 120 Metal fan with smart functions For keeping your home cooled in English a smart way. Deutsch Français Español Italiano...
  • Seite 2: Inhaltsverzeichnis

    Contents Notice before use Product overview Assembly Operating instructions Care & Maintenance Storage Troubleshooting Technical specifications Smartphone and Alexa operation...
  • Seite 3 If you have any questions, please contact our customer service. Enjoy every day with cooled air with your Flowmate. Customer care Phone +49 (0) 209 5130340 support@djive.eu www.djive.eu flowmate Robovox Distributions GmbH | Hamburger Straße 11, D - 45889 Gelsenkirchen...
  • Seite 4: Notice Before Use

    NOTICE BEFORE USE \\\ ATTENTION To avoid fire, electric shock and personal injury, please be sure to observe the following requirements. Please follow the relevant national and local electrical regulations: The appliance is not intended for use by children, elderly or disabled people, or any individual lacking experience and knowledge concerning the use of the fan, unless they have been given supervision or instruction by a person responsible for their safety.
  • Seite 5 Turn off all functions before unplugging the fan. When it is not in use for a long time, unplug it from the socket. To avoid the risk of tripping, securely store the wires. 10. Do not put any object on the rotors to make sure the tey are free from dust, lint, hair, and any obstacle that may reduce airflow.
  • Seite 6: General Safety Information

    NOTICE BEFORE USE \\\ ATTENTION To ensure proper usage and maintenance of the fan, please read the instruction manual carefully before use and take good care of this manual for future reference. DANGER If the dangerous situation is not avoided, this can lead to death or serious injuries.
  • Seite 7 DANGER Only qualified electricians, who have been trained by the manufacturer, may carry out any repairs that may be needed. This appliance is used in the household only. Please use a separate outlet in accordance with the appliance current/voltage. Don’t use more than one electrical appliance at the same time on the same outlet.
  • Seite 8 NOTICE BEFORE USE \\\ DANGER – RISK OF FIRE Never cover the appliance when it is in operation. Do not put the appliance in the vicinity of easily inflammable materials such as paint, varnish or gas. Allow a gap of at least 1 m between the fan and all flammable and heatsensitive materials (furniture, curtains, paper, clothes etc.).
  • Seite 9 ATTENTION Place the appliance on a firm, dry, flat and waterproof surface. Do not install the appliance in a hot, wet or very humid environment. Never place the appliance or parts of the appliance in the vicinity of strong heat sources and hot surfaces (e.g., heating, oven, and grill). Do not place the fan in a narrow place, a corner or in narrow areas between furnitures.
  • Seite 10: Product Overview

    PRODUCT OVERVIEW \\\ TIMER SPEED SWING ON/OFF...
  • Seite 11: Assembly

    ASSEMBLY \\\ Remove all small parts from the box. Base assembly Loosen and remove the base locking screw and washers from the bottom of the pipe. 2. Fit the pipe into the recess in the top side of the base; and while holding it, turn it over to access the underneath.
  • Seite 12: Tilt Adjustment

    ASSEMBLY \\\ Fan assembly Loosen the locking screw on the bottom of the fan head and align the fan head to the top of the inner pole. Tighten the locking screw to attach the fan head to the fan body. Tilt adjustment To adjust the air flow, the tilt angle can be adjusted.
  • Seite 13: Operating Instructions

    OPERATING INSTRUCTIONS \\\ Remote control All available functions can be operated with the remote control. ON / OFF Turn the power on/off TIMER SPEED SPEED Change the air speed to 3 levels SWING ON/OFF in total ( Low / Medium / High) TIMER Set a shutdown timer ( 2 / 5 / 7 h) SWING...
  • Seite 14: Fan Control

    OPERATING INSTRUCTIONS \\\ Fan control ON / OFF LED indicators Turn the power on/off SPEED Change the air speed to 3 levels in total ( Low / Medium / High) WIFI SWING TIMER Set a shutdown timer ( 2 / 5 / 7 h) ON/OFF SPEED TIMER SWING SWING...
  • Seite 15: Care & Maintenance

    CARE & MAINTENANCE \\\ ATTENTION Always switch off and unplug the fan before performing any cleaning. Don’t splash water on the fan. It may damage the fan. Please don’t use banana oil, gasoline, alcohol, bleach or metal object to clean the surface of the fan.
  • Seite 16: Storage

    STORAGE \\\ ATTENTION – Storage Place the fan in a large plastic bag for dust protection after care and maintenance. Please avoid unstable places and electrical appliances with refrigeration/heating functions. Avoid placing it in direct sunlight, hot and wet places. Please store the fan in the clean and dry place.
  • Seite 17: Technical Specifications

    TECHNICAL SPECIFICATIONS \\\ FLOWMATE Classic 120 Model DJ50004 (FD-40ME2) Voltage 220V~50HZ Power 35 W Fan Diameter 45 cm Timer range 2 / 5 / 7 hours Body material Brushed steel Dimensions H 120 cm x W 47 cm x D 41 cm...
  • Seite 18 Inhalt Wichtige Warnhinweise Bestandteile Montage Bedienung Pflege & Wartung Aufbewahrung Problembehandlung Technische Spezifikationen Smartphone und Alexa-Bedienung 33...
  • Seite 19 Sehr geehrte Kundin, sehr geehrter Kunde, Ihr neuer Flowmate Classic 120 steht für seinen ersten Einsatz zur Kühlung in Ihrem zuhause bereit. Bitte nehmen Sie sich einen Moment Zeit, dieses Handbuch zu lesen und sich mit Ihrem neuen Flowmate Classic Ventilator vertraut zu machen.
  • Seite 20: Wichtige Warnhinweise

    WICHTIGE WARNHINWEISE \\\ ACHTUNG Um Brandgefahr, Stromschläge und körperliche Verletzungen zu vermeiden, beachten Sie bitte folgende Sicherheitshinweise und internationale Regulierungen: Dieses Gerät sollte nicht von Kindern, älteren Personen mit fehlender Erfahrung im Umgang mit ähnlicher Elektronik, sowie beeinträchtigten Personen ohne die Aufsicht eines Schutzbeauftragten bedient werden. Bei diesem Gerät handelt es sich nicht um Spielzeug! Bitte nutzen Sie für das Gerät eine seperate Steckdose, die den techni- schen Anforderungen des Gerätes entspricht und verzichten Sie auf eine...
  • Seite 21 Schalten Sie das Gerät bitte immer aus, bevor Sie das Stromkabel aus der Steckdose herausziehen. Sollte Sie das Gerät längere Zeit nicht benöti- gen, ziehen sie das Stromkabel aus der Steckdose und lagern Sie es an einem sicheren Ort. 10. Bitte Stecken Sie keine Objekte in die Lüftungs-Öffnungen. Sorgen Sie bitte immer dafür, dass kein Staub, Haare oder andere störende Objekte die Lüftungs-Öffnungen beeinträchtigen.
  • Seite 22 WICHTIGE WARNHINWEISE \\\ ACHTUNG Um einen sicheren Betrieb des Gerätes zu gewährleisten, lesen Sie bitte vor der ersten Inbetriebnahme des Gerätes diese Anleitung sorgfältig durch und bewahren Sie sie für spätere Fragen auf. GEFAHR Missachten des Hinweises kann zu Unfällen und schweren Verletzungen führen.
  • Seite 23 GEFAHR Nur qualifizierte Fachkräfte, die vom Hersteller eingewiesen wurden, dürfen Reparaturen am Gerät vornehmen. Dieses Gerät darf nur in trockenen, überdachten Orten betrieben werden. Es darf nicht bei Nässe oder im Freien betrieben werden. Bitte nutzen Sie für das Gerät eine seperate Steckdose, die den techni- schen Anforderungen des Gerätes entspricht und verzichten Sie auf eine gleichzeitige Benutzung der Steckdose mit anderen Geräten.
  • Seite 24 WICHTIGE WARNHINWEISE \\\ BRANDGEFAHR Bedecken Sie niemals das Gerät während des Betriebs. Stellen Sie das Gerät nicht in der Nähe von leicht enzündlichen Objekten auf. Sorgen Sie für einen Abstand von mind. 1 Meter zwischen dem Gerät und hitzeempfindlichen Objekten. Schalten Sie bei Anzeichen wie Rauchentwicklung, -geruch o.ä.
  • Seite 25 VORSICHT Stellen Sie bitte das Gerät auf eine flache, trockene und feste Fläche. Betreiben Sie das Gerät nicht an besonders feuchten oder heißen Orten. Stellen Sie das Gerät niemals in der Nähe von Objekten auf, die große Hitze erzeugen (z.B. Öfen, Heizungen, Grille) Stellen Sie das Gerät nicht an eingeengten Orten auf.
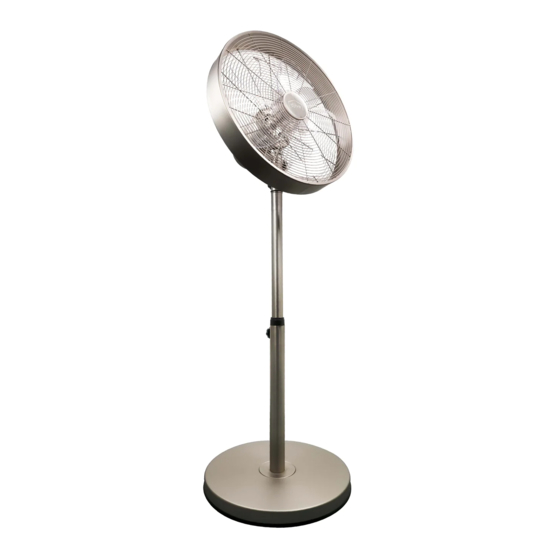
  • Seite 26: Bestandteile

    BESTANDTEILE \\\ TIMER SPEED SWING ON/OFF...
  • Seite 27: Montage

    MONTAGE \\\ Entnehmen sie alle Einzelteile aus der Verpackung. Sockel Lösen und entfernen Sie die Sicherungs- schraube vom Sockel und die Unterleg- scheiben von der Unterseite des Rohres. 2. Stecken Sie das Rohr in die Aussparung an der Oberseite des Sockels und drehen Sie es um, während Sie es festhalten, um an die Unterseite zu gelangen.
  • Seite 28: Winkel-Einstellung

    MONTAGE \\\ Gehäuse Lösen Sie die Feststellschraube an der Unterseite des Lüfterkopfes und richten Sie den Lüfterkopf an der Oberseite der Innenstange aus. Ziehen Sie die Feststellschraube an, um den Lüfterkopf am Lüftergehäuse zu befestigen. Winkel-Einstellung Um den Luftstrom einzustellen, kann der Neigungswinkel eingestellt werden. Lösen Sie dazu die Neigungseinstellschraube und stellen Sie den Lüfterkopf auf den gewünschten Winkel ein.
  • Seite 29: Bedienung

    BEDIENUNG \\\ Fernbedienung Alle Funktionen können auch per Fernbedienung gesteuert werden. ON / OFF Zum Ein- / Ausschalten des Ventilators TIMER SPEED SPEED Geschwindigkeitseinstellung mit SWING ON/OFF insgesamt 3 Stufen (Gering / Mittel /Hoch) TIMER Schaltet das Gerät nach Ablauf aus ( 2 / 5 / 7 h) SWING Zum Starten/Stoppen der Ventilator-Drehung...
  • Seite 30: Pflege & Wartung

    BEDIENUNG \\\ Ventilator ON / OFF Zum Ein- / Ausschalten des Ventilators LED-Leuchten SPEED Geschwindigkeitseinstellung mitinsgesamt 3 Stufen (Gering / Mittel /Hoch) WIFI SWING TIMER Schaltet das Gerät nach Ablauf aus ( 2 / 5 / 7 h) ON/OFF SPEED TIMER SWING SWING Zum Starten/Stoppen...
  • Seite 31: Reinigung Des Ventilators

    Reinigung des Ventilators Verwenden Sie einen Staubsauger mit einem Bürstenaufsatz, um den Ventilator-Kopf zu reinigen. Benutzen Sie ein weiches Staubtuch oder einen Lappen, um alle Oberflächen abzustauben. Um den Rotor zu reinigen, entfernen Sie zunächst das vordere Gitter und die Abdeckung, indem Sie die kleinen Schrauben um den Rand des hinteren Gitters herum herausdrehen.
  • Seite 32: Aufbewahrung

    LAGERUNG \\\ ACHTUNG – Lagerung Legen Sie den Ventilator zum Schutz vor Staub nach der Pflege und Wartung in eine große Plastiktüte. Stellen Sie den Ventilator nicht an beweglichen Stellen oder nahe an an elektrischen Geräten mit Kühl-/Heizfunktion auf. Vermeiden Sie es, ihn direktem Sonnenlicht auszusetzen oder ihn an heiße und nasse Orte zu stellen.
  • Seite 33: Technische Spezifikationen

    TECHNISCHE SPEZIFIKATIONEN \\\ FLOWMATE Classic 120 Modell DJ50004 (FD-40ME2) Spannung 220V~50HZ Leistung 35 W Durchmesser Rotor 45 cm Timer-Bereich 2 / 5 / 7 Stunden Gehäuse-Material Gebürsteter Stahl Produkt-Maße H 120 cm x B 47 cm x T 41 cm...
  • Seite 34 Sommaire Avertissements importants Composants Assemblée Utilisation Entretien et maintenance Entreposage Résolution des problèmes Spécifications techniques Contrôle via Smartphone et Alexa 49...
  • Seite 35 Cher client, cher client, Votre nouvelle Flowmate Classic 120 sera bientôt prête pour sa première utilisation dans votre maison. Veuillez prendre un moment pour lire ce manuel et vous familiariser avec votre nouveau ventilateur Flowmate. Si vous avez des questions, veuillez contacter notre service clientèle.
  • Seite 36: Avertissements Importants

    AVERTISSEMENTS IMPORTANTS \\\ ATTENTION Afin d’éviter le risque d’incendie, les chocs électriques et les blessures physiques, veuillez respecter les consignes de sécurité suivantes et les régulations internationales: Cet appareil ne doit pas être utilisé par des enfants, des personnes âgées avec un manque d’expérience dans la manipulation de dispositifs élec- troniques similaires, ni des personnes avec des déficiences, hors de la surveillance d’une personne chargée de leur protection.
  • Seite 37 Veuillez toujours éteindre l’appareil avant de débrancher le câble de la prise. Si vous n’utilisez pas l’appareil pendant une période prolongée, débranchez le câble de la prise et entreposez-le à un endroit sûr. 10. Ne pas introduire d'objets dans les ouvertures d'aération. Veillez toujours à...
  • Seite 38: Consignes De Sécurité Générales

    AVERTISSEMENTS IMPORTANTS \\\ ATTENTION Afin de garantir une utilisation de sécurité de l’appareil, veuillez lire attentivement ce manuel avant la première mise en service de l’appareil et le conserver en cas de questions futures. DANGER Le non-respect de cette remarque peut entraîner des accidents et des blessures graves.
  • Seite 39 DANGER Cet appareil ne doit être utilisé qu’à des emplacements secs et couverts. Il ne doit pas être utilisé dans des endroits humides ou à l’extérieur. Veuillez utiliser pour l’appareil une prise séparée qui satisfait aux exigen- ces techniques de l’appareil et n’utilisez pas la prise simultanément avec d’autres appareils.
  • Seite 40 AVERTISSEMENTS IMPORTANTS \\\ DANGER – RISQUE D’INCENDIE: Ne recouvrez jamais l’appareil pendant le fonctionnement. N’installez pas l’appareil à proximité d'objets facilement inflammables. Veillez à un espace d’au moins un mètre entre l’appareil et les objets sensibles à la chaleur. En cas de signe de développement ou d’odeur de fumée ou similaire, éteignez immédiatement l’appareil et débranchez-le du secteur.
  • Seite 41 ATTENTION Installez l’appareil sur une surface plane, sèche et solide. N’utilisez pas l’appareil à des emplacements particulièrement humides ou chauds. N’installez jamais l’appareil à proximité d’objets qui génèrent une forte chaleur (par ex. poêles, chauffages, grils) N'installez pas l’appareil dans des endroits exigus. Veillez à une possibilité suffisante de circulation d’air autour de l’appareil.
  • Seite 42: Composants

    COMPOSANTS \\\ TIMER SPEED SWING ON/OFF...
  • Seite 43: Assemblée

    ASSEMBLÉE \\\ Retirez toutes les pièces de l'emballage. La base Desserrer et retirer la vis de blocage de la base et les rondelles du fond du tube. 2. Insérez le tube dans l'évidement en haut de la base et retournez-le en le tenant pour arriver au fond.
  • Seite 44: Ajustement De La Hauteur

    ASSEMBLÉE \\\ Corps Desserrer la vis de blocage située en bas de la tête du ventilateur et alig- ner la tête du ventilateur avec le haut de la tige intérieure. Serrez la vis de blocage pour fixer la tête du ventilateur au boîtier du ventilateur. Ajustement de l'angle Pour régler le débit d'air, l'angle d'inclinaison peut être ajusté.
  • Seite 45: Utilisation

    INSTRUCTIONS D’UTILISATION \\\ Télécommande Toutes les commandes peuvent être contrôlées avec la télécommande. ON / OFF Pour allumer / éteindre le ventilateur TIMER SPEED SPEED Modifier la vitesse avec un total de 3 SWING ON/OFF étapes (Faible / Moyen / Elevé) TIMER Minuterie de 2 / 5 / 7 heures au total SWING...
  • Seite 46: Entretien Et Maintenance

    INSTRUCTIONS D’UTILISATION \\\ ON / OFF Pour allumer / éteindre le ventilateur Indicateurs LED SPEED Modifier la vitesse avec un total de 3 étapes (Faible / Moyen / Elevé) WIFI SWING TIMER Minuterie de 2 / 5 / 7 heures au total ON/OFF SPEED TIMER SWING SWING...
  • Seite 47: Nettoyage Du Ventilateur

    Nettoyage du ventilateur Utilisez un aspirateur avec une brosse pour nettoyer la tête du ventilateur. Utilisez un chiffon doux pour dépoussiérer toutes les surfaces. Pour nettoyer le rotor, il faut d'abord retirer la grille avant et le couvercle en serrant les petites vis autour du bord de la grille. de la grille arrière qui l'entoure.
  • Seite 48: Entreposage

    ENTREPOSAGE \\\ ATTENTION – Entreposage En vue de la protection contre la poussière, placez le ventilateur dans un grand sac plastique après l’entretien et la maintenance. N’installez pas le ventilateur à des endroits mobiles ou à proximité d’appareils électriques avec une fonction de refroidissement / chauffage. Évitez de l’exposer à...
  • Seite 49: Spécifications Techniques

    Cet appareil peut aussi être contrôlé avec une application et Alexa. Vous trouverez les instructions pour le téléchargement de l’application et pour l’utilisation de l’appareil avec l’application sur www.djive.eu Service d’assistance Si votre Flowmate ne fonctionne plus du tout, veuillez tout d’abord prendre contact avec nous par e-mail.
  • Seite 50 Índice Indicaciones de advertencia importantes 52 Componentes Asamblea Manejo Limpieza y mantenimiento Almacenamiento Resolución de problemas Especificaciones técnicas Operación del Smartphone y de Alexa...
  • Seite 51 Querido cliente, querido cliente, Su nuevo Flowmate Classic 120 estará listo para su primer uso en su casa en breve. Tómese un momento para leer este manual y familiarizarse con su nuevo ventilador Flowmate Classic. Si tiene alguna pregunta, por favor con- tacte con nuestro servicio de atención...
  • Seite 52: Indicaciones De Advertencia Importantes

    INDICACIONES DE ADVERTENCIA IMPORTANTES \\\ ADVERTENCIA Para evitar riesgo de incendio, descarga eléctrica y lesiones, respete las siguientes indicaciones de seguridad y las reglamen- taciones internacionales: Este dispositivo no debe ser manejado por niños, personas mayores sin experiencia en el uso con dispositivos electrónicos similares ni personas con impedimentos físicos sin la supervisión de una persona encargada de la seguridad.
  • Seite 53 Apague siempre el dispositivo antes de sacar el cable eléctrico de la toma eléctrica. Si no necesita el dispositivo por un periodo de tiempo prolongado, saque el cable eléctrico de la toma eléctrica y guarde el dispositivo en un lugar seguro. 10.
  • Seite 54 INDICACIONES DE ADVERTENCIA IMPORTANTES \\\ ATENCIÓN Para garantizar un funcionamiento seguro del dispositivo, lea detenidamente estas instrucciones antes de la primera puesta en funcionamiento y consérvelas para consultas posteriores. PELIGRO El incumplimiento de las indicaciones puede provocar accidentes y lesiones graves. ATTENTION El incumplimiento de las indicaciones puede provocar accidentes y lesiones graves.
  • Seite 55 PELIGRO Las reparaciones del dispositivo únicamente puede realizarlas personal especializa- do debidamente instruido por el fabricante. Este dispositivo únicamente se puede utilizar en lugares secos y cubiertos. No se puede utilizar en condiciones de humedad o al aire libre. Utilice una toma eléctrica por separado para el dispositivo que cumpla con los requisitos técnicos de este y no utilice la toma eléctrica simultáneamente con otros dispositivos.
  • Seite 56 INDICACIONES DE ADVERTENCIA IMPORTANTES \\\ PELIGRO DE INCENDIO No cubra nunca el dispositivo mientras esté funcionando. No coloque el dispositivo cerca de objetos fácilmente inflamables. Deje un espacio de al menos 1 metro entre el dispositivo y los objetos sensibles al calor. Desconecte inmediatamente el dispositivo ante cualquier indicio de presencia de humo, olor o similar y desenchúfelo de la red eléctrica.
  • Seite 57 PRECAUCIÓN Coloque el dispositivo sobre una superficie plana, seca y firme. No utilice el dispositivo en lugares especialmente húmedos o excesivamente calientes. No coloque nunca el dispositivo cerca de objetos que generen altas temperaturas (p. ej., hornos, calefacciones, parrillas). No coloque el dispositivo en lugares inapropiados. Asegúrese de que haya una circulación de aire suficiente alrededor del dispositivo.
  • Seite 58: Componentes

    COMPONENTES \\\ TIMER SPEED SWING ON/OFF...
  • Seite 59: Asamblea

    ASAMBLEA \\\ Retire todas las piezas del embalaje. Enchufe Afloje y retire el tornillo de bloqueo de la base y las arandelas del fondo del tubo. 2. Inserte el tubo en el hueco de la parte superior de la base y délo vuelta mientras lo sostiene para llegar al fondo.
  • Seite 60: Ajuste Del Ángulo

    ASAMBLEA \\\ Cuerpo Afloja el tornillo de bloqueo en la parte inferior de la cabeza del ventilador y alinea la cabeza del ventilador con la parte superior de la varilla interior. Apriete el tornillo de bloqueo para asegurar la cabeza del ventilador a la carcasa del mismo.
  • Seite 61: Manejo

    MANEJO \\\ Mando a distancia Todas las funciones se pueden controlar también con el mando a distancia. ON / OFF Para conectar/desconectar el ventila- dor. TIMER SPEED SPEED Cambie la velocidad con 3 pasos en total. SWING ON/OFF (Bajo / Medio / Alto) TIMER Apaga la unidad después de la expiración.
  • Seite 62: Limpieza Y Mantenimiento

    MANEJO \\\ Ventilador ON / OFF Para conectar/desconectar Indicadores LED el ventilador. SPEED Cambie la velocidad con 3 pasos en total. (Bajo / Medio / Alto) WIFI SWING TIMER Apaga la unidad después de la expiración ( 2 / 5 / 7 h) ON/OFF SPEED TIMER SWING SWING...
  • Seite 63 Limpiar el ventilador Use una aspiradora con un cepillo para limpiar la cabeza del ventilador. Use un paño o un trapo suave para limpiar todas las superficies. Para limpiar el rotor, primero quita la rejilla delantera y la cubierta destornillando los pequeños tornillos alrededor del borde de la rejilla trasera.
  • Seite 64: Almacenamiento

    ALMACENAMIENTO \\\ PRECAUCIÓN – Almacenamiento Después de realizar la limpieza y el mantenimiento, meta el ventilador en una bolsa de plástico grande para protegerlo del polvo. No coloque el ventilador sobre sitios que se muevan o cerca de dispositi- vos eléctricos con función de refrigeración o calefacción. Evite exponerlo a la luz directa del sol o a lugares húmedos o excesivamente calientes.
  • Seite 65: Especificaciones Técnicas

    Este dispositivo también se puede manejar mediante una aplicación y Alexa. Las instrucciones sobre cómo descargar la aplicación para poder manejar el dispositivo se encuentran en www.djive.eu Servicio de asistencia técnica Si su Flowmate dejara realmente de funcionar, póngase en contacto con nosotros primero por correo electrónico.
  • Seite 66 Contenuto Avvertenze importanti Componenti Assemblea Istruzioni per l’uso Cura e manutenzione Almacenamiento Risoluzione dei problemi Specifiche tecniche Funzionamento dello Smartphone e di Alexa 81...
  • Seite 67 Gentile cliente, Il vostro nuovo Flowmate Classic 120 sarà pronto per rinfrescare l’aria a casa vostra a breve. Vi preghiamo di leggere questo ma- nuale e di familiarizzare con il vostro nuovo Ventilatore Flowmate Classic. Per qualsiasi domanda, si prega di con- tattare il nostro servizio clienti.
  • Seite 68: Avvertenze Importanti

    AVVERTENZE IMPORTANTI \\\ AVVERTIMENTO Per evitare il rischio di incendio, scosse elettriche e lesioni fisiche osservare le seguenti avvertenze sulla sicurezza e le normative internazionali: Questo dispositivo non deve essere utilizzato da bambini, persone an- ziane con scarsa esperienza con dispositivi elettrici simili e da persone con disabilità...
  • Seite 69 Spegnere sempre il dispositivo prima di estrarre il cavo dalla presa di corrente. Se non si ha bisogno di utilizzare il dispositivo per molto tempo, estrarre il cavo dalla presa di corrente e riporlo in un luogo sicuro. 10. Non infilare oggetti nelle aperture di ventilazione. Fare sempre atten- zione che polvere, capelli o altri oggetti non ostruiscano le aperture di ventilazione.
  • Seite 70: Indicazioni Generali Sulla Sicurezza

    AVVERTENZE IMPORTANTI \\\ ATTENZIONE Per garantire la sicurezza del dispositivo, prima della messa in servizio leggere attentamente questo manuale di istruzioni e conservarlo per una futura consultazione. PERICOLO La mancata osservanza delle avvertenze di sicurezza può provocare incidenti o lesioni gravi. ATTENZIONE La mancata osservanza delle avvertenze di sicurezza può...
  • Seite 71 PERICOLO Questo dispositivo deve essere utilizzato in luoghi asciutti e coperti. Non deve essere utilizzato in luoghi umidi o all’aperto. Utilizzare per il dispositivo una presa di corrente separata che soddisfi i requisiti tecnici del dispositivo e rinunciare all’utilizzo contemporaneo della stessa presa di corrente con altri dispositivi.
  • Seite 72 AVVERTENZE IMPORTANTI \\\ PERICOLO DI INCENDIO Non coprire mai il dispositivo durante il funzionamento, Non posizionare il dispositivo nelle vicinanze di oggetti facilmente infiammabili. Garantire una distanza minima di 1 metro tra il dispositivo e oggetti sensibili al calore. Spegnere immediatamente il dispositivo se emana fumo o odori e scollegare il cavo dalla presa di corrente.
  • Seite 73 ATTENZIONE Posizionare il dispositivo su una superficie piana, asciutta e stabile. Non azionare il dispositivo in luoghi particolarmente umidi o caldi. Non posizionare mai il dispositivo nelle vicinanze di oggetti che producono grande calore (ad es. forni, riscaldamenti, griglie). Non posizionare il dispositivo in luoghi troppo stretti. Garantire una buona circolazione dell'aria intorno al dispositivo.
  • Seite 74: Componenti

    COMPONENTI \\\ TIMER SPEED SWING ON/OFF...
  • Seite 75: Assemblea

    ASSEMBLEA \\\ Rimuovere tutte le parti dall'imballaggio. Presa Allentare e rimuovere la vite di bloccag- gio dalla base e le rondelle dal fondo del tubo. 2. Inserire la provetta nell'incavo nella parte superiore della base e capovolgerla tenendola in mano per arrivare al fondo. 3.
  • Seite 76: Regolazione In Altezza

    ASSEMBLEA \\\ Corpo Allentare la vite di bloccaggio sul fondo della testa del ventilatore e allineare la testa del ventilatore con la parte superiore dell'asta interna. Serrare la vite di bloccaggio per fissare la testa della ventola all'alloggia- mento della ventola. Regolazione dell'angolo Per regolare il flusso d'aria, l'angolo di inclinazione può...
  • Seite 77: Istruzioni Per L'uso

    ISTRUZIONI PER L’USO \\\ Mando a distancia Tutte le funzioni possono essere comandate anche con il telecomando. ON / OFF Per accendere/spegnere il ventilatore. TIMER SPEED SPEED Cambio di velocità con un totale di 3 livelli SWING ON/OFF di velocità (Basso / Medio / Alto). TIMER Spegne l'unità...
  • Seite 78: Cura E Manutenzione

    ISTRUZIONI PER L’USO \\\ Ventilatore ON / OFF Per accendere/spegnere il ventilatore. Indicatori LED SPEED Cambio di velocità con un totale di 3 livelli di velocità (Basso / Medio / Alto). WIFI SWING TIMER Spegne l'unità dopo la scadenza ( 2 / 5 / 7 h). ON/OFF SPEED TIMER SWING SWING...
  • Seite 79 Pulizia del ventilatore Per pulire la testata della ventola utilizzare un aspirapolvere con un attrezzo a spazzola. Utilizzare un panno o uno straccio morbido per spolverare tutte le superfici. Per pulire il rotore, rimuovere prima la griglia anteriore e il coperchio svitando le piccole viti intorno al bordo della griglia posteriore.
  • Seite 80: Risoluzione Degli Errori

    CONSERVAZIONE \\\ ATTENZIONE – Conservazione Dopo la cura e la manutenzione conservare il ventilatore in una busta di plastica grande per proteggerlo dalla polvere. Non posizionare il ventilatore in luoghi instabili o nelle vicinanze di dispositivi elettrici con funzioni di raffreddamento/riscaldamento. Evitare di esporre il ventilatore sotto i raggi diretti del sole o vicino a luoghi caldi o umidi.
  • Seite 81: Specifiche Tecniche

    SPECIFICHE TECNICHE \\\ FLOWMATE Classic 120 Modello DJ50004 (FD-40ME2) Voltaggio 220V~50HZ Potenza 35 W Diametro del rotore 45 cm Intervallo del timer Da 2 / 5 / 7 ore Materiale del corpo Acciaio spazzolato Dimensioni del (H) 120 cm; (W) 47 cm ; (L) 41 cm...
  • Seite 84 Classic www.djive.eu flowmate AN#: DJ50004 \\\ Voltage: 220V~50HZ \\\ Power: 35W...

Inhaltsverzeichnis