Herunterladen Inhalt Inhalt Diese Seite drucken
ARDES AR5W40R Bedienungsanleitung

ARDES AR5W40R Bedienungsanleitung

Wandventilator
Vorschau ausblenden Andere Handbücher für AR5W40R:

Werbung

Verfügbare Sprachen
  • DE

Verfügbare Sprachen

  • DEUTSCH, seite 43
VENTILATORE DA PARETE CON TELECOMANDO
WALL FAN WITH REMOTE CONTROL
VENTILADOR DE PARED CON TELEMANDO
VENTILATEUR MURAL AVEC TÉLÉCOMMANDE
VENTILÁTOR NA STĚNU S DÁLKOVÝM OVLADAČEM
VENTILÁTOR NA STENU S DIAĽKOVÝM OVLÁDAČOM
Il presente apparecchio può essere
utilizzato dai bambini a partire da 8 anni in su
e da persone dalle ridotte capacità fisiche,
sensoriali o mentali, oppure con mancanza
di esperienza e di conoscenza se a loro è
stata assicurata un'adeguata sorveglianza,
oppure se hanno ricevuto istruzioni circa
l'uso in sicurezza dell'apparecchio e hanno
compreso i pericoli correlati.
I bambini non devono giocare con
l'apparecchio. Le operazioni di pulizia e di
manutenzione non devono essere effettuate
dai bambini senza sorveglianza.
IT
ISTRUZIONI PER L'USO
EN
INSTRUCTIONS FOR USE
ES
INSTRUCCIONES PARA EL USO
FR
MODE D'EMPLOI
DE
BEDIENUNGSANLEITUNG
CZ
NÁVOD K POUŽITÍ
SK
NÁVOD NA OBSLUHU
WANDVENTILATOR
AR5W40R

Werbung

Inhaltsverzeichnis
loading

Inhaltszusammenfassung für ARDES AR5W40R

  • Seite 1 VENTILATEUR MURAL AVEC TÉLÉCOMMANDE WANDVENTILATOR VENTILÁTOR NA STĚNU S DÁLKOVÝM OVLADAČEM VENTILÁTOR NA STENU S DIAĽKOVÝM OVLÁDAČOM AR5W40R Il presente apparecchio può essere utilizzato dai bambini a partire da 8 anni in su e da persone dalle ridotte capacità fisiche, sensoriali o mentali, oppure con mancanza di esperienza e di conoscenza se a loro è...
  • Seite 2 Se il cavo di alimentazione dovesse essere danneggiato, deve essere sostituito solamente presso i centri di assistenza autorizzati dal costruttore. Assicurarsi che il ventilatore sia scollegato dalla rete di alimentazione prima di togliere le griglie di protezione.
  • Seite 3 Avvertenze ATTENZIONE: leggere attentamente il presente libretto in quanto contiene importanti istruzioni per la sicurezza di installazione, uso e manutenzione. Istruzioni importanti da conservare per riferimenti futuri. I bambini NON devono giocare con il dispositivo. Questo apparecchio dovrà essere destinato solo all’uso per il quale è stato espressamente concepito;...
  • Seite 4 localizzate (caloriferi, stufe etc.). NON immergere l’apparecchio in acqua o altri liquidi; in caso di caduta accidentalmente in acqua NON cercare di recuperarlo ma innanzitutto scollegare immediatamente il cavo di alimentazione dalla presa elettrica. Utilizzando l’apparecchio per la prima volta, assicurarsi di aver tolto ogni etichetta o foglio di protezione che ne impedisca il corretto funzionamento.
  • Seite 5 NON alimentare il dispositivo senza prima averlo correttamente assemblato seguendo le istruzioni del presente manuale. Posizionare l’apparecchio ad una adeguata distanza da oggetti o pareti circostanti in modo tale che il suo funzionamento non possa essere causa di danni accidentali. NON utilizzare il dispositivo in prossimità...
  • Seite 6: Informazioni Tecniche

    13. Non buttare e non smaltire le batterie nel fuoco. 14. Non mettere a contatto con l’acqua o l’umidità, in particolare nel caso in cui il contenitore della batteria dovesse essere danneggiato. 15. Non incapsulare e non modificare le batterie. 16.
  • Seite 7 Kit installazione a muro: 11. Piastra di fissaggio a muro 12. Viti e tasselli Istruzioni d’uso Svitare la ghiera di fissaggio della griglia posteriore (5) dall’albero motore (7) ruotandola in senso antiorario. Inserire la griglia posteriore (6) sull’abero motore (7) e fissarla con l’apposita ghiera di fissaggio (5) ruotandola in senso orario.
  • Seite 8 Terminata l’installazione, inserire la spina in una presa di corrente adeguata. Il ventilatore è comandabile sia dal pannello comandi posto sul corpo principale sia dal telecomando fornito in dotazione. Pannello comandi Telecomando Pulsanti A. Off B. On/Speed C. Mode (solo sul telecomando) D.
  • Seite 9 Pulsante MODE (C) solo sul telecomando: Premere questo pulsante a ventilatore acceso per selezionare la modalità di funzionamento desiderata a scelta tra: normale (indicatore luminoso “NOR”), naturale (indicatore luminoso “NAT”) o notturna (indicatore luminoso “SLP”). Pulsante TIMER (D): Premere questo pulsante a ventilatore acceso per programmare lo spegnimento differito del ventilatore in un intervallo tra 0,5 ore e 7,5 ore dal momento della programmazione.
  • Seite 10 Manutenzione Prima di eseguire le normali operazioni di pulizia spegnere il ventilatore e scollegarlo dalla rete di alimentazione elettrica. Per la pulizia esterna utilizzare un panno soffice ed asciutto. NON SMONTARE il ventilatore: questo ventilatore non è smontabile. NON immergere il ventilatore in acqua, nè spruzzarlo con liquidi di alcun tipo.
  • Seite 11: Smaltimento

    Smaltimento BATTERIE - Rimuovere le batterie dall’apparecchio prima dello smaltimento. Non gettare le batterie nei rifiuti domestici. Lo smaltimento delle batterie deve avvenire negli appositi contenitori o negli specifici centri di raccolta. L’adeguata raccolta differenziata contribuisce ad evitare possibili effetti negativi sull’ambiente e sulla salute.
  • Seite 12 GARANZIA Condizioni La garanzia ha validità 24 mesi dalla data d’acquisto. La presente garanzia è valida solo se viene correttamente compilata ed accompagnata dallo scontrino fiscale che ne prova la data di acquisto. L’apparecchio deve essere consegnato esclusivamente presso un nostro Centro Assistenza autorizzato.
  • Seite 13 This appliance may be used by children 8 years of age and older and people with reduced physical, sensory or mental capacities or with a lack of experience and knowledge if they are adequately supervised or have been instructed on the safe use of the appliance and are aware of the related dangers.
  • Seite 14 Warnings ATTENTION : read this booklet carefully it contains important instructions for a safe installation, use and maintenance. Important instructions to be kept for future reference. It is forbidden for the children to play with the device. This device must be used only for the purpose it was expressly designed; any use not complying with the instructions contained in the manual is considered inappropriate and dangerous.
  • Seite 15 If possible, avoid the use of adapters and/or extension cables; if their use is absolutely necessary, use only materials in compliance with the current safety regulations and according to the electrical parameters of the adapters. The device must not be switched on using external timers and/or other remote control devices which are not specified in this manual.
  • Seite 16 Place the device at a proper distance from the objects or surrounding walls making sure that its functioning will not cause accidental damages. DO NOT use the device near gas stoves or open flames in general. DO NOT use the device near curtains or textiles. DO NOT hang the fan on the wall or ceiling unless this type of installation is provided and explained in this manual.
  • Seite 17: Technical Informations

    extended period of time unless it is for emergency purposes. 18. Clean the battery contacts and also those of the equipment prior to battery installation. 19. In case of leak from batteries, avoid any contact with it; in case of contact, wash the affected part with water and seek medical attention.
  • Seite 18 Instructions for use Unscrew the lock ring of the back grille (5) from the motor shaft (7) by turning counter clockwise. Insert the back grille (6) on the motor shaft (7) and fix it by screwing clockwise the lock ring of the back grille (5). Insert the fan (4) on the motor shaft (7) and fix it by screwing counter clockwise the lock ring of the fan (3).
  • Seite 19 Control panel Remote control Buttons A. Off B. On/Speed C. Mode D. Timer E. Swing Batteries Remote control is supplied without batteries; before use remote control open the batteries holder placed on the back of remote control and insert 2 batteries LR03 1,5V AAA. To remove batteries, open the batteries holder placed on the back of the remote control, by sliding the cover to the outwards.
  • Seite 20 TIMER Button (D): When the unit is operating, you can set the timer to switch the fan off automatically after the set time. Press this button repeatedly to select the desired time period in half hours increments from 0,5 hours to 7,5 hours. The related indicator light (0,5H, 1H, 2H, 4H) will illuminate on the control panel.
  • Seite 21: User Information

    User Information BATTERIES - Remove the batteries from the appliance before its disposal. Do not dispose the batteries with domestic waste. The batteries must be disposed of in the appropriate containers or in the specific collecting centre. Suitable segregated collection helps prevent damage to the environment and to human health.
  • Seite 22 GUARANTEE Terms and Conditions The guarantee is valid for 24 months. This guarantee applies only if it has been duly filled in and is submitted with the receipt showing the date of purchase. The guarantee covers the replacement or repair of parts making up the appliance which were faulty at source due to manufacturing faults.
  • Seite 23 El presente aparato puede ser utilizado por niños de 8 años en adelante y por personas con capacidades físicas, sensoriales o mentales reducidas, o con falta de experiencia o conocimiento si se les garantiza una vigilancia adecuada, o si han recibido instrucciones acerca del uso con seguridad del aparato y han comprendido bien los peligros asociados.
  • Seite 24 Advertencias ATENCIÓN: leer atentamente el presente manual ya que contiene instrucciones importantes para la seguridad durante la instalación, uso y mantenimiento. Instrucciones importantes de conservar para futuras referencias. Los niños NO deben jugar con el dispositivo. Este aparato deberá estar destinado solo al uso para el cual ha sido expresamente creado;...
  • Seite 25 NO utilizar ni conservar el dispositivo cerca de fuentes de calor localizadas (calentadores, estufas etc.). NO sumergir el aparato en agua u otros líquidos; en caso de caída accidentalmente en agua NO tratar de recuperarlo sino primero que nada desconectar inmediatamente el cable de alimentación de la toma eléctrica.
  • Seite 26 alimentar dispositivo primero haberlo ensamblado correctamente siguiendo las instrucciones del presente manual. Colocar el aparato a una distancia adecuada de objetos o paredes circundantes de modo tal que su funcionamiento no pueda ser causa de daños accidentales. NO utilizar el dispositivo cerca de hornillas de gas o llamas libres en general.
  • Seite 27: Informaciones Técnicas

    13.No arrojar ni eliminar las baterías en el fuego. 14. No poner en contacto con agua ni humedad, especialmente si el compartimiento de baterías estuviera dañado. 15.No encapsular ni modificar las baterías. 16. Conservar las baterías no usadas en su embalaje original, lejos de objetos metálicos.
  • Seite 28 Kit instalación en pared: 11. Placa de fijación en pared 12. Tornillos y tacos Instrucciones de uso Desenroscar la abrazadera de fijación de la rejilla posterior (5) de árbol motor (7) girándola en sentido antihorario. Introducir la rejilla posterior (6) en el árbol motor (7) y fijarla con la respectiva abrazadera de fijación (5) girándola en sentido horario.
  • Seite 29 Terminada la instalación, conectar el enchufe en una toma de corriente adecuada. El ventilador se puede ordenar tanto desde el panel de mandos colocado en el cuerpo principal como desde el telemando suministrado en dotación. Panel de mandos Telemando Botones A.Off B.On/Speed C.Mode (solo en el telemando)
  • Seite 30 velocidad deseada a escoger entre: mínima (indicador luminoso “LOW”), media (indicador luminoso “MED”) o máxima (indicador luminoso “HIG”). Botón MODE (C) solo en el telemando: Presionar este botón con el ventilador encendido para seleccionar la modalidad de funcionamiento deseada a escoger entre: normal (indicador luminoso “NOR”), natural (indicador luminoso “NAT”) o nocturna (indicador luminoso “SLP”).
  • Seite 31 Eliminación BATERÍAS - Retire las baterías del aparato antes de eliminarlas. No arrojar las baterías en los residuos domésticos. Las baterías deben ser eliminadas en los recipientes específicos o llevándolas a los centros de recogida correspondientes. La recogida selectiva adecuada contribuye a evitar los posibles efectos negativos para el medio ambiente y la salud.
  • Seite 32 GARANTÍA Condiciones La garantía tiene validez de 24 meses desde la fecha de la compra. La presente garantía es válida solo si es correctamente llenada y acompañada de la factura fiscal que certifica la fecha de la compra. El aparato debe ser entregado exclusivamente en un Centro de Asistencia nuestro autorizado.
  • Seite 33 L’appareil peut être utilisé par les enfants de plus de 8 ans et par des personnes aux capacités physiques, sensorielles ou mentales réduites ou sans l’expérience ni les connaissances nécessaires, à condition d’être surveillées ou après avoir reçu les instructions relatives à l’utilisation sûre de l’appareil et avoir compris les risques inhérents.
  • Seite 34 Mises en garde ATTENTION : lire attentivement cette notice car elle contient d’importantes instructions pour la sécurité en matière d’installation, usage et entretien. Instructions importantes à conserver pour des références futures. Les enfants NE doivent PAS jouer avec l’appareil. Cet appareil devra être destiné uniquement à l’utilisation pour laquelle il a été...
  • Seite 35 tomber accidentellement dans l’eau, il NE faut PAS le récupérer avant d’avoir débranché le cordon d’alimentation de la prise électrique. Pour utiliser l’appareil pour la première fois, s’assurer d’avoir enlevé toutes les étiquettes ou film de protection qui en empêche le bon fonctionnement. Brancher et débrancher le cordon d’alimentation avec les mains sèches et en le tenant fermement.
  • Seite 36 murs autours pour que le fonctionnement ne puisse pas provoquer de dommages accidentels. Il NE faut PAS utiliser le dispositif à proximité de fourneaux à gaz ou de flammes nues en général. Il NE faut PAS utiliser le dispositif à proximité de rideaux ou tissus. Il NE faut PAS accrocher le ventilateur à...
  • Seite 37 16. Ranger les piles non utilisées dans leur emballage d’origine, à l’écart des objets métalliques. Si elles ont été déjà retirées de l’emballage, ne pas mélanger les piles. 17. Si l’on ne souhaite utiliser l’appareil pendant une longue période, retirer les piles. 18.
  • Seite 38 Kit pour l’installation murale : 11. Plaque de fixation au mur 12. Vis et chevilles Instructions d’utilisation Dévisser la bague de fixation de la grille postérieure (5) de l’arbre moteur (7) en la tournant dans le sens inverse des aiguilles d’une montre. Insérer la grille postérieure (6) sur l’arbre moteur (7) et la fixer avec la bague de fixation prévue à...
  • Seite 39 Après l’installation, brancher la fiche à une prise de courant adéquate. Le ventilateur peut être commandé par le panneau de commande placé sur le corps principal et par la télécommande fournie. Panneau de commande Télécommande Boutons A.Off B.On/Speed C.Mode (uniquement sur la télécommande) D.Minuteur E.Swing Piles...
  • Seite 40 Touche MODE (C) seulement sur la télécommande : Appuyer sur cette touche quand le ventilateur est allumé pour sélectionner le mode de fonctionnement souhaité parmi ceux disponibles : normal (voyant « NOR »), naturel (voyant « NAT ») ou nocturne (voyant « SLP »). Touche MINUTEUR (D) : Appuyer sur cette touche quand le ventilateur est allumé...
  • Seite 41 Élimination PILES - Retirer les piles de l’appareil avant de l’éliminer. Ne pas jeter les piles avec les ordures ménagères. Les piles doivent être éliminées dans des conteneurs spéciaux ou dans des points de collecte spécifiques. Une collecte séparée adéquate permet d’éviter d’éventuels effets négatifs sur l’environnement et la santé.
  • Seite 42 GARANTIE Conditions La garantie a une durée de 24 mois à compter de la date d’achat. Cette garantie est valable seulement si correctement compilée et accompagnée du ticket de caisse qui confirme la date d’achat. L’appareil doit être remis exclusivement à notre SAV agréé. La garantie couvre la substitution ou la réparation des composants de l’appareil défectueux à...
  • Seite 43 Dieses Gerät kann sowohl von Kindern ab 8 Jahren alsauch von körperlich, sensorisch oder geistig eingeschränkten Personen bzw. Von Personen ohne Erfahrung oder ohne Wissen genutzt werden, wenn sie von einer geschulten Person beaufsichtigt werden oder wenn sie Anweisungen zum sicheren Einsatz des Geräts erhalten haben und wenn sie die entsprechenden gefahren verstanden haben.
  • Seite 44 ermächtigten Service-Centern bzw. Service-Werkstätten ausgetauscht werden. Gerät Entfernen oder Anbringen des Schutzgitters durch Herausziehen des Netzsteckers vom Netz trennen. Anmerkunge Garantiebescheinigung, fiskalische Quittung und Bedienungsanleitung für jede spätere Konsultation bitte aufbewahren. Nach Entfernen der Verpackung vergewissere man sich der Integrität des Gerätes und sollte man bei dieser Überprüfung sichtbare Beschädigungen festestellen, das Gerät nicht benutzen und sich direkt an qualifiziertes Fachpersonal wenden.
  • Seite 45 Der Gebrauch irgendeines Elektrogerätes erfordert immer die Beachtung einiger grundlegenden Regeln und zwar insbesondere: - Man darf niemals das Gerät mit nassen oder feuchten Händen berühren. - Das Gerät niemals barfuß benutzen. - Das Gerät nicht den Witterungseinflüssen ausgesetzt lassen (Regen, Sonnenstrahlung).
  • Seite 46 HINWEISE FÜR DIE BATTERIEN: 1. BATTERIEN AUSSER REICHWEITE KINDERN AUFBEWAHREN. Bei Verschlucken können diese zu chemischen Verbrennungen führen, Weichteile durchstechen oder zum Tode führen. Es können innerhalb von 2 Stunden nach dem Verschlucken schwere Verbrennungen auftreten. Sofort einen Arzt aufsuchen. 2.
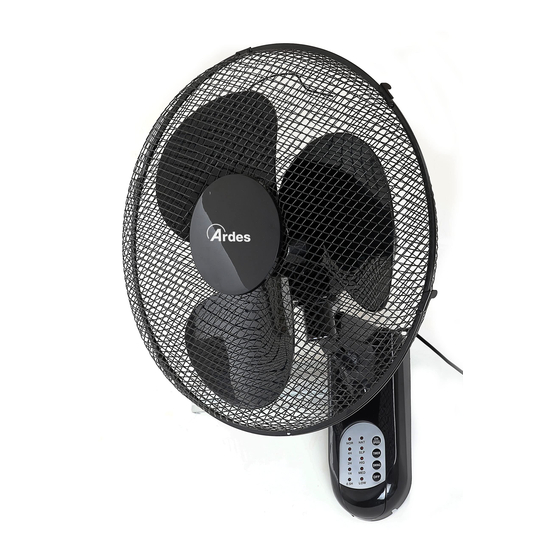
  • Seite 47 Technische informationen 1. Sicherheitsschraube des Gitters 6. Hinteres Gitter 2. Vorderes Gitter 7. Motorwelle 3. Anziehring des Ventilators 8. Motorkörper 4. Ventilator 9. Befestigungsplatte 5. Anziehring hinteres Gitter 10. Steuertafel Wandinstallations-Kit: 11. Wand-Befestigungsplatte 12. Schrauben und Dübel...
  • Seite 48 GERÄT MOTNAGE 1. Liegen Sie die Hinterseite der Gitter (6), an die Motor. 2. Dann schrauben Sie die Gitterbefestigung-Mutterschraube an. (5). 3. Drücken sie die Blätter (4) fast an die Motorwelle (7), sichern Sie es mit die Nut (3). 4. Drücken Sie die Vorderseite der Gitter (2) an die Hinterseite (6), sichern Sie es erst mit die Klemmen, dann mit die Schraube (1).
  • Seite 49 Drucktasten A. Off B. On/Speed C. Mode (nur an der Fernsteuerung) D. Timer E. Swing Batterien Die Fernsteuerung wird ohne Batterien geliefert; vor der Verwendung das Batteriefach hinter der Fernsteuerung öffnen und zwei Batterien LR03 1,5V AAA einsetzen. Dabei auf die Polaritäten achten. Um die Batterien herauszunehmen, den Deckel nach außen schieben und das Batteriefach auf der Rückseite der Fernsteuerung öffnen.
  • Seite 50 TIMER-Taste (D): Diese Taste drücken, wenn der Ventilator eingeschaltet ist, um das zeitversetzte Ausschalten des Ventilators zwischen 0,5 und 7,5 Stunden ab der Programmierung einzustellen. Mit jedem Druck erhöht sich die Zeit um 0,5 Stunden und die Leuchtanzeigen des Timers (angegeben mit 0,5H - 0,5 Stunden;...
  • Seite 51: Reinigung Und Wartung

    REINIGUNG UND WARTUNG Für den optimalen Betrieb sollte das Gerät in Intervallen abhängig vom Grad der Verschmutzung, aber mindestens einmal pro Monat gereinigt werden. 1. Vor der Reinigung Gerät ausschalten und anschließend durch Herausziehen des Netzsteckers vom Netz trennen. 2. Achtung! Gittervorderteil nur in stromlosem Zustand des Ventilators entfernen! 3.
  • Seite 52 BENUTZERINFORMATIONEN BATTERIEN - Die Batterien vor der Entsorgung aus dem Gerät nehmen. Die Batterien nicht in den Hausmüll werfen. Die Batterien müssen in dafür vorgesehenen Behältern oder Sammelzentren entsorgt werden. Die richtige Entsorgung trägt dazu bei, mögliche negative Auswirkungen auf Umwelt und Gesundheit zu vermeiden.
  • Seite 53 GARANTIESCHEIN Garantiebedingungen: Die Garantie dauert 24 Monate vom Einkaufsdatum. Dieser Garantieschein hat nur Gültigkeit, wenn er ordnungsgemäß ausgefüllt und zusammen mit dem Kassenzettel vorgelegt wird. Die Garantie umfaßt den Ersatz oder die Reparatur aller Komponenten des Gerätes im Falle von Herstellungsfehlern. Das Gerät wird ausschließlich nur von einem unserer autorisierten Kundendienststellen zurückgenommen.
  • Seite 54 TENTO SPOTŘEBIČ MOHOU POUŽÍVAT DĚTI STARŠÍ 8 LET A OSOBY SE SNÍŽENÝMI FYZICKÝMI, SMYSLOVÝMI NEBO DUŠEVNÍMI SCHOPNOSTMI NEBO NEDOSTATEČNÝMI ZKUŠENOSTMI VĚDOMOSTMI TEHDY, POKUD NACHÁZEJÍ DOZOREM ODPOVĚDNÉ OSOBY NEBO POKUD BYLY SEZNÁMENY SE SPRÁVNÝM A BEZPEČNÝM POUŽÍVÁNÍM SPOTŘEBIČE ROZUMÍ PŘÍPADNÝM RIZIKŮM S TÍM SPOJENÝM.
  • Seite 55 NAPÁJECÍHO KABELU, MUSÍ HO VYMĚNIT SERVISNÍ STŘEDISKO VÝROBCE. PŘED DEMONTÁŽÍ KRYTU UJISTĚTE, ŽE VENTILÁTOR ODPOJEN OD ZÁSUVKY. UPOZORNĚNÍ POZOR: pozorně si přečtěte tento návod k obsluze, který obsahuje důležité pokyny pro bezpečnou instalaci, používání a údržbu. Důležité pokyny pro budoucí použití. Děti si se zařízením nesmí hrát. Toto zařízení...
  • Seite 56 jsou v souladu s platnými bezpečnostními předpisy a podle elektrických parametrů adaptérů. Zařízení se nesmí zapínat pomocí externích časovačů a/nebo jiných zařízení dálkového ovládání, které nejsou uvedeny v tomto návodu. Zařízení NEPOUŽÍVEJTE ani neskladujte v blízkosti zdrojů tepla (ohřívače, kamna atd.). Zařízení...
  • Seite 57 okolních předmětů. NEPOUŽÍVEJTE zařízení v blízkosti plynových sporáků nebo otevřeného ohně. NEPOUŽÍVEJTE zařízení v blízkosti záclon nebo textilu. Ventilátor nezavěšujte na stěnu nebo strop, pokud tento typ instalace není uveden a vysvětlen v tomto návodu. Zařízení během provozu nezakrývejte. Do ochranné mřížky ventilátoru nestrkejte žádné předměty ani části těla. Během provozu nenechávejte zařízení...
  • Seite 58: Technické Údaje

    Technické údaje 1. Bezpečnostní šroub 6. Zadní mřížka 2. Přední mřížka 7. Hřídel motoru 3. Uzamykací kroužek ventilátoru 8. Motor 4. Ventilátor 9. Upevňovací deska 5. Uzamykací kroužek zadní mřížky 10. Ovládací panel Souprava pro montáž na stěnu: 11. Konzola na upevnění ke zdi 12.
  • Seite 59: Pokyny K Použití

    Pokyny k použití Odšroubujte pojistný kroužek zadní mřížky (5) z hřídele motoru (7) otáčením proti směru hodinových ručiček. Zadní mřížku (6) nasaďte na hřídel motoru (7) a zašroubujte ji ve směru hodinových ručiček pojistným kroužkem zadní mřížky (5). Ventilátor (4) nasaďte na hřídel motoru (7) a zajistěte ho přišroubováním pojistného kroužku ventilátoru (3) proti směru hodinových ručiček.
  • Seite 60 Ovládací panel Dálkový ovladač Tlačítka A. Tlačítko vypnutí B. Tlačítko zapnutí / rychlosti C. Tlačítko režimu D. Tlačítko časovače E. Tlačítko otáčení Baterie Dálkový ovladač se dodává bez baterií; před použitím dálkového ovladače otevřete kryt baterií umístěný na zadní straně dálkového ovladače a vložte 2 baterie LR03 1,5V AAA.
  • Seite 61 Tlačítko TIMER (D): Když spotřebič pracuje, můžete nastavit časovač, aby se ventilátor automaticky vypnul po nastaveném čase. Opakovaným stisknutím tohoto tlačítka zvolte požadovaný čas do vypnutí v půlhodinových krocích od 0,5 hodiny do 7,5 hodiny. Na ovládacím panelu se rozsvítí příslušný indikátor (0,5 H, 1 H, 2 H, 4 H).
  • Seite 62: Informace Pro Uživatele

    INFORMACE PRO UŽIVATELE BATERIE - Před likvidací baterie vyjměte ze zařízení. Baterie nevyhazujte do domovního odpadu, odevzdejte je do příslušných nádob nebo ve sběrném středisku. Vhodná recyklace pomáhá předcházet poškození životního prostředí a lidského zdraví. Při vyjmutí baterií postupujte podle návodu k obsluze. INFORMACE PRO UŽIVATELE “Implementace směrnice 2012/19/EU o odpadních elektrických a elektronických zařízeních (OEEZ)”,...
  • Seite 63 ZÁRUKA Pravidla a podmínky Záruka je platná po dobu 24 měsíců. Záruku lze uplatnit pouze tehdy, pokud byl řádně vyplněn záruční list a předložen spolu s dokladem o koupi, na kterém je uvedeno datum nákupu. Tato záruka se vztahuje na výměnu nebo opravu součástek tvořících spotřebič, které...
  • Seite 64: Záruční Podmínky

    ZÁRUČNÍ PODMÍNKY Záruka na tento spotřebič představuje 24 měsíců od data zakoupení. Nárok na záruku je možné uplatnit pouze po předložení originálu dokladu o zakoupení výrobku (paragon, faktura) s typovým označením výrobku, datem prodeje a čitelným razítkem prodejce. Záruka zahrnuje výměnu nebo opravu částí...
  • Seite 65 Zodpovědný zástupce za servis pro ČR na značky: ARDES, Guzzanti, Scarlett, Luxell, Graef ČERTES spol. s r.o. Donínská 83 463 34 Hrádek nad Nisou Tel./fax 482771487 - příjem oprav- servis. Tel./fax 482718718 - náhradní díly Mobil: 721018073, 731521116, 608719174 Pracovní doba 8 - 16,30 www: certes.info, e-mail: certes@certes.info...
  • Seite 66 TENTO SPOTREBIČ MÔŽU POUŽÍVAŤ DETI STARŠIE AKO 8 ROKOV A OSOBY SO ZNÍŽENÝMI FYZICKÝMI, ZMYSLOVÝMI ALEBO DUŠEVNÝMI SCHOPNOSŤAMI ALEBO NEDOSTATOČNÝMI SKÚSENOSŤAMI A VEDOMOSŤAMI LEN VTEDY, AK SA NACHÁDZAJÚ POD DOZOROM ZODPOVEDNEJ OSOBY ALEBO BOLI OBOZNÁMENÉ SPRÁVNYM BEZPEČNÝM POUŽÍVANÍM SPOTREBIČA A CHÁPU PRÍPADNÝM RIZIKÁM S TÝM SPOJENÉ.
  • Seite 67 NAPÁJACIEHO KÁBLA, MUSÍ HO VYMENIŤ SERVISNÉ STREDISKO VÝROBCU. PRED DEMONTÁŽOU KRYTU SA UISTITE, ŽE JE VENTILÁTOR ODPOJENÝ OD ZÁSUVKY. UPOZORNENIA POZOR: pozorne si prečítajte tento návod na obsluhu, ktorý obsahuje dôležité pokyny pre bezpečnú inštaláciu, používanie a údržbu. Dôležité pokyny pre budúce použitie. Deti sa so zariadení...
  • Seite 68 NEPRIPÁJATE toto zariadenie do rozdvojky. Ak je to možné, nepoužívajte adaptére a / alebo predlžovacie káble; ak je ich použitie absolútne nevyhnutné, používajte len výrobky, ktoré sú v súlade s platnými bezpečnostnými predpismi a podľa elektrických parametrov adaptérov. Zariadenie sa nesmie zapínať pomocou externých časovačov a / alebo iných zariadení...
  • Seite 69 ovládacom paneli. Ventilátor nevešajte na stenu alebo strop, ak tento typ inštalácie nie je uvedený a vysvetlený v tomto návode. Zariadenie umiestnite do správnej vzdialenosti od predmetov alebo okolitých stien a uistite sa, že jeho fungovanie nespôsobí náhodné poškodenie okolitých predmetov. NEPOUŽÍVAJTE zariadenie v blízkosti plynových sporákov alebo otvoreného ohňa.
  • Seite 70 kovových predmetov. Ak už sú vybalené, nezmiešajte ich s použitými batériami. 17. Batérie vyberte zo zariadenia, ak ho nebudete dlhší čas používať. 18. Pred inštaláciou batérií vyčistite kontakty batérií a zariadenia. 19. V prípade úniku elektrolytu z batérií, zabráňte akémukoľvek kontaktu s elektrolytom;...
  • Seite 71: Pokyny Na Použitie

    Pokyny na použitie Odskrutkujte poistný krúžok zadnej mriežky (5) z hriadeľa motora (7) otáčaním proti smeru hodinových ručičiek. Zadnú mriežku (6) naložte na hriadeľ motora (7) a zaskrutkujte ju v smere hodinových ručičiek poistným krúžkom zadnej mriežky (5). Ventilátor (4) naložte na hriadeľ motora (7) a zaistite ho priskrutkovaním poistného krúžka ventilátora (3) proti smeru hodinových ručičiek.
  • Seite 72 Ovládací panel Diaľkový ovládač Tlačidlá A. Tlačidlo vypnutia B. Tlačidlo zapnutia / rýchlosti C. Tlačidlo režimu D. Tlačidlo časovača E. Tlačidlo otáčania Batérie Diaľkový ovládač sa dodáva bez batérií; pred použitím diaľkového ovládača otvorte kryt batérií umiestnený na zadnej strane diaľkového ovládača a vložte 2 batérie LR03 1,5V AAA.
  • Seite 73 Tlačidlo TIMER (D): Keď spotrebič pracuje, môžete nastaviť časovač, aby sa ventilátor automaticky vypol po nastavenom čase. Opakovaným stláčaním tohto tlačidla zvoľte požadovaný čas do vypnutia v polhodinových krokoch od 0,5 hodiny do 7,5 hodiny. Na ovládacom paneli sa rozsvieti príslušný indikátor (0,5H, 1H, 2H, 4H).
  • Seite 74 INFORMÁCIE PRE POUŽÍVATEĽOV BATÉRIE - Pred likvidáciou batérie vyberte zo zariadenia. Batérie nevyhadzujte domového odpadu, odovzdajte ich do príslušných nádob alebo v v zbernom stredisku. Vhodná recyklácia pomáha predchádzať poškodeniu životného prostredia a ľudského zdravia. Pri vybratí batérií postupujte podľa návodu na obsluhu. INFORMÁCIE PRE POUŽÍVATEĽOV „Smernica 2012/19/EU o starých elektrických a elektronických zariadeniach (OEEZ)“...
  • Seite 75 ZÁRUKA Pravidlá a podmienky Záruka je platná počas 24 mesiacov. Záručný list je platný iba vtedy, ak bol správne vyplnený a predložený spolu s potvrdením o zakúpení. Záruka sa vzťahuje na výmenu alebo opravu súčiastok spotrebiča, pri ktorých sa jedná o chybu z výroby. Po uplynutí...
  • Seite 76: Záručné Podmienky

    ZÁRUČNÉ PODMIENKY Záruka na tento spotrebič predstavuje 24 mesiacov od dátumu zakúpenia. Nárok na záruku je možné uplatniť len po predložení originálu dokladu o zakúpení výrobku (paragón, faktúra) s typovým označením výrobku, dátumom predaja a čitateľnou pečiatkou predajcu. Záruka zahŕňa výmenu alebo opravu častí...
  • Seite 77 Zodpovedný zástupca za servis pre SR ČERTES SK, s.r.o. Pažite č. 42 010 09 Žilina tel./fax: +421 41 5680 171, 5680 173 mobil: +421 905 259213 +421 907 241912 Pracovná doba Po-Pia. 9:00 - 15:00 e-mail: certes.sk@gmail.com certes@eslovakia.sk Priezvisko/meno: ....................................Dátum/miesto predaja: ...................................
  • Seite 80 Poly Pool S.p.A. Via Sottocorna, 21/B 24020 Parre (Bergamo) - Italy Tel. +39 035 4104000 r.a. - Fax +39 035 702716 http://www.ardes.it - e-mail: polypool@polypool.it MADE IN CHINA...

Inhaltsverzeichnis