Herunterladen Inhalt Inhalt Diese Seite drucken
Inhaltsverzeichnis

Werbung

Verfügbare Sprachen
  • DE

Verfügbare Sprachen

  • DEUTSCH, seite 62
All manuals and user guides at all-guides.com
LAUNCH
INSTRUCTIONS MANUAL
-1-

Werbung

Inhaltsverzeichnis
loading

Inhaltszusammenfassung für LAUNCH Value-200

  • Seite 1 All manuals and user guides at all-guides.com LAUNCH INSTRUCTIONS MANUAL...
  • Seite 2 All manuals and user guides at all-guides.com INSTRUCTIONS MANUAL...
  • Seite 3: Inhaltsverzeichnis

    All manuals and user guides at all-guides.com INSTRUCTIONS MANUAL INDEX INDEX ..........................3 INTRODUCTION ........................ 5 CARE OF THE MANUAL......................5 CONDITIONS OF WARRANTY..................5 GENERAL INFORMATION ....................6 END-OF-LIFE ........................6 BATTERY DISPOSAL ......................6 SAFETY RULES......................... 6 PRECAUTIONS FOR HANDLING AND USE OF REFRIGERANT FLUIDS ......7 PRINCIPLES OF OPERATION ..................
  • Seite 4 All manuals and user guides at all-guides.com INSTRUCTIONS MANUAL CALIBRATING THE BOTTLE SCALE ..................20 BOTTLE DATA.........................21 CALIBRATING THE OIL SCALE .....................22 SETTINGS .........................23 LANGUAGE ..........................23 UNITS OF MEASUREMENT ....................24 WEIGHT ............................. 24 PRESSURE............................25 TEMPERATURE ..........................25 DATA............................25 SERVICES ..........................26 ENABLING TRACER FLUID INJECTION ................26 COUNTERS........................27 OPERATOR CODE:......................28...
  • Seite 5: Introduction

    All manuals and user guides at all-guides.com INSTRUCTIONS MANUAL INTRODUCTION This manual was drafted in accordance with the EEC Guidelines contained in Directive No. 392/89 as amended. This manual contains important information pertinent to operator safety. Read this manual through before beginning operation of the machine. The manufacturer reserves the right to modify this manual and the machine itself with no prior notice.
  • Seite 6: General Information

    All manuals and user guides at all-guides.com INSTRUCTIONS MANUAL GENERAL INFORMATION Machine identification information is printed on the data plate on the rear of the machine (see Figures 1 and 2). Overall machine dimensions: Height: 1060 mm Width: 500 mm Depth: 520 mm Weight:...
  • Seite 7: Precautions For Handling And Use Of Refrigerant Fluids

    All manuals and user guides at all-guides.com INSTRUCTIONS MANUAL recommended by the manufacturer. Take care never to use the vacuum pump oil in the A/C system, or vice-versa. Failure to observe any of the above safety precautions will invalidate all forms of warranty on the MACHINE.
  • Seite 8: The Machine

    ↓: Press to move downward from one procedure or operation to another within a menu. ↑: Press to move upward from one procedure or operation to another within a menu. START: Press to launch the procedure or operation shown on the display. ALARMS HIGH PRESSURE ALARM: Beeper and led advise when the pressure of the fluid in the circuit reaches 17.5 bar.
  • Seite 9: Preliminary Operations

    All manuals and user guides at all-guides.com INSTRUCTIONS MANUAL PRELIMINARY OPERATIONS Check that the main switch (i) is set to O. Check that all the MACHINE taps are closed. Connect the MACHINE to the electrical supply and switch on. Check that the vacuum pump oil level indicator shows at least one-half full.
  • Seite 10 All manuals and user guides at all-guides.com INSTRUCTIONS MANUAL < VACUUM xx min AUTOMATIC PROCEDURE > AUTOMATIC OIL ASSISTED PROCEDURE xx CC NEXT MENU FILLING xxxx g Gas avail xxxxx g ENTER Type in the vacuum time or confirm the previous value. To simply confirm, press ENTER. To type in, use keys 0 to 9.
  • Seite 11: Manual Operation

    All manuals and user guides at all-guides.com INSTRUCTIONS MANUAL 1. MANUAL OPERATION: set the quantity of refrigerant in grams for the A/C system to be charged. For example, for 850g press key 8, key 5 and key 0, “Charging 850 g”. After setting the quantity, confirm by pressing the ENTER key.
  • Seite 12 All manuals and user guides at all-guides.com INSTRUCTIONS MANUAL VACUUM 20 min 30 CC <FILLING wxyz g > where “wxyz” refers to the grams of refrigerant for the vehicle selected. The machine will be ready to enter the correct quantity of refrigerant. Confirm by pressing the ENTER key. Please contact your retailer if you wish to install the DATABASE ADVANCED (DBA.
  • Seite 13: Assisted Procedure

    All manuals and user guides at all-guides.com INSTRUCTIONS MANUAL N.B. – The automatic procedure may be run even if the A/C system is empty. In this case the machine will begin with the vacuum phase. When working with A/C systems with a single high-pressure coupling, set the charging quantity at about 100g in excess of the required quantity, since in this case it will be impossible to recover the residual refrigerant from the hoses.
  • Seite 14: Vacuum

    All manuals and user guides at all-guides.com INSTRUCTIONS MANUAL Upon completion of recovery, the machine will stop and discharge while automatically displaying the used oil extracted from the A/C system during the recovery phase. The oil discharge operation lasts 4 minutes. If any residual refrigerant in the A/C system should increase in pressure during this phase, the machine will automatically begin recovering the refrigerant.
  • Seite 15: Tracer Reintegration (If Installed)

    All manuals and user guides at all-guides.com INSTRUCTIONS MANUAL ATTENTION USING PAG OIL OR TRACER IN HYBRID VEHICLES MAY DAMAGE THE COMPRESSOR. USE ONLY SUITABLE OIL WITH A SEPARATE DEVICE. Press ENTER to continue. Set the volume of new oil to be reintegrated, in cc. Press ENTER to confirm. Open the high- and low-pressure taps (if the A/C system is equipped with a single quick-connect coupling for high or low pressure, open only the relative tap) of the machine and press START.
  • Seite 16 All manuals and user guides at all-guides.com INSTRUCTIONS MANUAL VACUUM 20 min 30 CC <FILLING wxyz g > where “wxyz” refers to the grams of refrigerant for the vehicle selected. The machine will be ready to enter the correct quantity of refrigerant. Confirm by pressing the ENTER key.
  • Seite 17: Routine Maintenance

    All manuals and user guides at all-guides.com INSTRUCTIONS MANUAL high-pressure coupling, set the charging quantity ate about 100g in excess of the required quantity, since in this case it will be impossible to recover the residual refrigerant from the hoses. ROUTINE MAINTENANCE FILLING THE MACHINE BOTTLE This operation must be performed whenever the available refrigerant fluid in the bottle is less...
  • Seite 18: Vacuum Pump

    All manuals and user guides at all-guides.com INSTRUCTIONS MANUAL FILLING BOTTLE The machine will now fill the machine bottle with the preset quantity ± 500g. When the quantity minus 500 grams is reached, the machine will stop and display: FILLING BOTTLE Close external bottle tap Press Start...
  • Seite 19: Filling The New Oil Container

    All manuals and user guides at all-guides.com INSTRUCTIONS MANUAL the circuit (inner circle yellow). Before performing any operation, check that the replacement filters are the same types as those installed on the machine. Then proceed as described below (refer to Fig. 11): 1) Disconnect the machine from the electrical supply 2) Wear protective gloves and glasses 3) Remove the rear plastic cover from the machine.
  • Seite 20: Emptying The Used Oil Container

    All manuals and user guides at all-guides.com INSTRUCTIONS MANUAL Refer to collapsible tracer cartridge precautions [MANU008.ATS]. EMPTYING THE USED OIL CONTAINER This operation must be performed whenever the oil level exceeds 200 cc. Procedure: remove the container from its lodging very carefully and without exerting pressure on the scale. Unscrew the container while holding the cap in place;...
  • Seite 21: Bottle Data

    All manuals and user guides at all-guides.com INSTRUCTIONS MANUAL <BOTTLE SCALE > OIL SCALE BOTTLE TEMPERATURE With BOTTLE SCALE flashing, press ENTER. The following screen will be displayed: CALIBRATION BOTTLE DATA PREVIOUS MENU Press the ENTER key. ZERO LEVEL Raise the bottle levels xxxxx press START...
  • Seite 22: Calibrating The Oil Scale

    All manuals and user guides at all-guides.com INSTRUCTIONS MANUAL xxxxx g xxxxx g Tare xxxxx g PREVIOUS MENU Use the arrow keys and the number pad to change the Max, Min, and Tare values. Then select PREVIOUS MENU and press ENTER. SAVE DATA: Press START.
  • Seite 23: Settings

    All manuals and user guides at all-guides.com INSTRUCTIONS MANUAL <BOTTLE SCALE > OIL SCALE BOTTLE TEMPERATURE Select BOTTLE TEMPERATURE and press the ENTER key to confirm: BOTTLE TEMPERATURE XX.X °C START to change STOP to exit Check that the temperature shown on the display is that also read on the external thermometer.
  • Seite 24: Units Of Measurement

    All manuals and user guides at all-guides.com INSTRUCTIONS MANUAL ENGLISH ITALIANO FRANCAIS <- ESPANOL NOTE : the current language is indicated by the symbol “<-“ . Use the arrow keys to scroll the available languages. Confirm a language by pressing ENTER. The machine will reset and a few seconds later the MAIN MENU will appear in the chosen language.
  • Seite 25: Pressure

    All manuals and user guides at all-guides.com INSTRUCTIONS MANUAL WEIGHT g(kg) PRESSURE TEMPERATURE °C <BACK> Select BACK and press ENTER to exit. PRESSURE Select PRESSURE: WEIGHT g(kg) <PRESSURE> TEMPERATURE °C BACK Press ENTER to change from bar to psi or from psi to bar. WEIGHT g(kg) PRESSURE...
  • Seite 26: Services

    All manuals and user guides at all-guides.com INSTRUCTIONS MANUAL CALIBRATION DATA AND CONFIGURAT. SERVICE ALARM BOTTLE FILLING Select DATA AND CONFIGURAT.: DATA CONFIGURATION SERVICES PREVIOUS MENU Select DATA. The following screen will be displayed: Gas avail. xxxx g xxx cc Temperature xxx °C - Gas avail.: quantity of refrigerant available in the storage bottle.
  • Seite 27: Counters

    All manuals and user guides at all-guides.com INSTRUCTIONS MANUAL Select OPTION. The following screen will be displayed: ..Call the technical service for the code. Type in the code and press ENTER: ENABLE TRACER <Press 1 enabled> Press 0 not enabled Start to continue Press key 1 to enable tracer injection or 0 to disenable and press START to continue.
  • Seite 28: Operator Code

    All manuals and user guides at all-guides.com INSTRUCTIONS MANUAL OPERATOR CODE: Switch the machine on. The MAIN MENU will appear after a few seconds: AUTOMATIC PROCEDURE ASSISTED PROCEDURE NEXT MENU GAS AVAIL XXXX G Select NEXT MENU: CALIBRATION DATA AND CONFIGURAT. SERVICE ALARM BOTTLE FILLING Select DATA AND CONFIGURAT.:...
  • Seite 29: Vehicle Plate

    All manuals and user guides at all-guides.com INSTRUCTIONS MANUAL VEHICLE PLATE Every time a procedure is run, the machine will ask for the vehicle license plate number, which will be reported in the printout. If the operator presses ENTER without typing the plate number, the vehicle plate field will be empty in the printout.
  • Seite 30: Use

    All manuals and user guides at all-guides.com INSTRUCTIONS MANUAL MODEL NAME: ... . . MODEL QUANTITY: xxxx Type in the vehicle model on the keyboard; press ENTER to confirm. Type in the corresponding refrigerant quantity; press ENTER to confirm. To use the customized data, scroll with the (↓↑) arrow keys to the desired vehicle model;...
  • Seite 31: System Cleaning (Optional)

    All manuals and user guides at all-guides.com INSTRUCTIONS MANUAL From the installation window, check the button “Install from a list or specific location (Advanced)” and click “Next”. At this point the computer will ask for the driver location. Click “Browse” and select the iarvircomport.inf file, previously copied to the desktop.
  • Seite 32: Index Index

    All manuals and user guides at all-guides.com MANUEL D’INSTRUCTIONS INDEX INDEX ..........................32 INTRODUCTION .......................33 CONSERVATION DU MANUEL ....................33 CONDITIONS DE GARANTIE ...................34 INFORMATIONS GENERALES..................34 FIN DU CYCLE DE VIE .....................35 ÉLIMINATION BATTERIE.......................35 REGLES ET NORMES DE SECURITE ................35 REGLES DE COMPORTEMENT AVEC LES FLUIDES REFRIGERANTS......36 PRINCIPES DE FONCTIONNEMENT ................36 MISE EN SERVICE ......................36 LA MACHINE ........................37...
  • Seite 33: Introduction

    All manuals and user guides at all-guides.com MANUEL D’INSTRUCTIONS ETALONNAGE BALANCE HUILE ................... 52 TEMPERATURE BOUTEILLE ....................52 ENTREES.......................... 53 LANGUE ..........................53 UNITES DE MESURE ......................54 POIDS ..............................54 PRESSION............................55 TEMPERATURE ..........................55 VALEURS ..........................55 SERVICES..........................56 AUTORISATION TRACEUR....................56 COMPTEURS........................
  • Seite 34: Conditions De Garantie

    All manuals and user guides at all-guides.com MANUEL D’INSTRUCTIONS CONDITIONS DE GARANTIE Le produit est garanti contre tous vices et défauts de matériaux et/ou de fabrication pour la durée de 1 (un) an à partir de la date de livraison. La garantie consiste en le remplacement, l’échange ou la réparation gratuite des pièces composant le produit qui sont défectueuses et qui sont considérées comme telles par le fabricant.
  • Seite 35: Fin Du Cycle De Vie

    All manuals and user guides at all-guides.com MANUEL D’INSTRUCTIONS La machine, comme tous les dispositifs en mouvement, est source de pollution acoustique. Le système de construction, les panneaux et les moyens adoptés par le Constructeur sont tels que ce niveau de bruit, même en phase de travail, ne dépasse pas la valeur moyenne de: 70 dB (A).
  • Seite 36: Regles De Comportement Avec Les Fluides Refrigerants

    All manuals and user guides at all-guides.com MANUEL D’INSTRUCTIONS échanger l’huile pour la pompe à vide avec l’huile pour installations de climatisation. Le défaut de respect de chacune des règles de sécurité illustrées ci-dessus, comporte la déchéance de n’importe quelle forme de garantie couvrant la machine. REGLES DE COMPORTEMENT AVEC LES FLUIDES REFRIGERANTS Les fluides réfrigérants dans les conditions ambiantes sont gazeux.
  • Seite 37: La Machine

    All manuals and user guides at all-guides.com MANUEL D’INSTRUCTIONS contrôler que la vis [1] est effectivement bloquée; si nécessaire, recommencer l’opération de blocage à partir du début. LA MACHINE ELEMENTS FONDAMENTAUX Voir Figures 5, 6, 7 et 8: z) Récipient traceur (en option) a) Consoles de commande b) Robinets h) Roues...
  • Seite 38: Operations Preliminaires

    All manuals and user guides at all-guides.com MANUEL D’INSTRUCTIONS ALARME SERVICE: est affichée et émet un signal acoustique lorsque l’on récupère 150 kg de réfrigérant. Pour la désactiver, il faut remplacer les filtres et l’huile de la pompe à vide. Le code d’élimination de l’alarme sera fourni avec les filtres.
  • Seite 39 All manuals and user guides at all-guides.com MANUEL D’INSTRUCTIONS Contrôler que les robinets de haute et basse pression sont fermés. Mettre le moteur du véhicule en marche et le climatiseur pendant environ 5-10 minutes, en maintenant le ventilateur électrique dans l’habitacle à la vitesse maximale. Eteindre le moteur du véhicule. L’instrument a un affichage à...
  • Seite 40 All manuals and user guides at all-guides.com MANUEL D’INSTRUCTIONS VIDE 20 MIN VIDE 20 MIN <HUILE AUTOMATIQUE> HUILE AUTOMATIQUE HUILE xx CC <HUILE xx CC> REMPLISSAGE xxxx g REMPLISSAGE xxxx g ↓ VIDE 20 MIN VIDE 20 MIN HUILE AUTOMATIQUE <HUILE 30 CC>...
  • Seite 41 All manuals and user guides at all-guides.com MANUEL D’INSTRUCTIONS sélectionné. La machine sera prête à rajouter la quantité exacte de réfrigérant. Confirmer avec la touche ENTER. Si l’on désire installer le DATABASE BASIC (DBB), s’adresser au revendeur de la machine. 3.
  • Seite 42 All manuals and user guides at all-guides.com MANUEL D’INSTRUCTIONS volume d’huile évacué ou selon le volume entré par l’opérateur. Dans le cas où il est installé, la quantité de traceur entrée par l’opérateur sera rajoutée automatiquement A la fin, le système passe automatiquement au remplissage de la quantité...
  • Seite 43: Operations En Procedure Assistee

    All manuals and user guides at all-guides.com MANUEL D’INSTRUCTIONS En pressant START, on redémarre la procédure; en pressant STOP ou RESET, on retourne au MENU PRINCIPAL. OPERATIONS EN PROCEDURE ASSISTEE Avec la procédure assistée, chaque opération peut être effectuée séparément à l’exception de la phase de récupération - recyclage qui est automatiquement suivie par la vidange de l’huile usée.
  • Seite 44: Vide

    All manuals and user guides at all-guides.com MANUEL D’INSTRUCTIONS ATTENTION ARRETER LA RECUPERATION AVANT LA VIDANGE DE L’HUILE PEUT ENDOMMAGER LE COMPRESSEUR START POUR CONTINUER En pressant START, on redémarre la procédure; en pressant STOP ou RESET, on retourne au MENU PRINCIPAL. VIDE Brancher les tuyaux flexibles à...
  • Seite 45: Remplissage Installation A/C

    All manuals and user guides at all-guides.com MANUEL D’INSTRUCTIONS ATTENTION L’EMPLOI D’HUILE PAG OU DE TRACEUR DANS DES AUTOS HYBRIDES PEUT ENDOMMAGER LE COMPRESSEUR. UTILISER L’HUILE APPROPRIEE AVEC UN DISPOSITIF SEPARE. Presser ENTER pour continuer. Ouvrir les robinets de haute et basse pression (dans le cas d’une installation A/C avec un seul raccord de basse pression ou un seul raccord de haute pression, ouvrir uniquement le robinet relatif) de la machine et presser START.
  • Seite 46: Entretien Ordinaire

    All manuals and user guides at all-guides.com MANUEL D’INSTRUCTIONS <COUGAR> ESCORT ESCORT D FIESTA utiliser les flèches (↓↑) pour se déplacer sur le modèle désiré, presser ENTER pour confirmer. A ce stade, la page vidéo suivante apparaît: VIDE 20 MIN HUILE 30 CC <REMPLISSAGE wxyz g>...
  • Seite 47: Pompe A Vide

    All manuals and user guides at all-guides.com MANUEL D’INSTRUCTIONS PROCEDURE AUTOMAT. PROCEDURE ASSISTEE <MENU SUIVANT> Disponible xxxx g choisir MENU SUIVANT: ETALONNAGES VALEURS ET CONFIGUR ALARME SERVICE <REMPLISSAGE BOUTEILLE> A ce stade, choisir REMPLISSAGE BOUTEILLE: REMPLISSAGE BOUTEILLE Quantité xx kg Min: x Max: xx kg Presser START...
  • Seite 48: M.1) Rajout Huile

    All manuals and user guides at all-guides.com MANUEL D’INSTRUCTIONS M1) Rajout huile M2) Vidange huile Pour le rajout et/ou la vidange de l’huile de la pompe, utiliser exclusivement l’huile recommandée par le fabricant (Pour le type exact d’huile, s’adresser au revendeur). M.1) Rajout huile Cette opération doit être effectuée lorsque le niveau d’huile descend en dessous de la moitié...
  • Seite 49: Remplissage Du Reservoir Huile Neuve

    All manuals and user guides at all-guides.com MANUEL D’INSTRUCTIONS 11) Débrancher le raccord rapide de basse pression du raccord (2) du filtre (4) 12) Démonter les filtres usés et monter les nouveaux en faisant attention aux sens des flèches. ATTENTION: remplacer le filtre usé le plus rapidement possible avec le nouveau filtre pour éviter tout risque éventuel de contamination par l’humidité...
  • Seite 50: Entretien Extraordinaire / Etalonnage

    All manuals and user guides at all-guides.com MANUEL D’INSTRUCTIONS Diamètre max. du rouleau papier: 40 mm. ENTRETIEN EXTRAORDINAIRE / ETALONNAGE Cette opération doit être effectuée quand le LCD n’affiche plus des valeurs cohérentes avec la réalité. ATTENTION: les opérations indiquées ci-dessous doivent être effectuées avec la plus grande attention et en prenant toutes les précautions.
  • Seite 51: Valeurs Bouteille

    All manuals and user guides at all-guides.com MANUEL D’INSTRUCTIONS ETALONNAGE VALEURS BOUTEILLE MENU PRECEDENT Presser la touche ENTER NIVEAU DE ZERO Soulever la bouteille niveaux xxxx Presser START Avec la bouteille soulevée du plateau, presser la touche START. A ce stade, la page vidéo suivante apparaît : VALEUR DE REFERENCE xxxx g...
  • Seite 52: Etalonnage Balance Huile

    All manuals and user guides at all-guides.com MANUEL D’INSTRUCTIONS Modifier les valeurs de Max, Min et Tare en utilisant les flèches et le clavier numérique; sélectionner ensuite MENU PRECEDENT et presser ENTER: SAUVEGARDE VALEURS: presser START. Pour sortir presser STOP Presser START pour confirmer la sauvegarde des valeurs ou STOP pour ne pas les sauvegarder.
  • Seite 53: Entrees

    All manuals and user guides at all-guides.com MANUEL D’INSTRUCTIONS TEMPERATURE BOUTEILLE XX.X °C START pour modifier STOP pour sortir Vérifier la température affichée sur l’affichage avec celle du thermomètre digital externe. Le cas échéant, la modifier en pressant START TEMPERATURE BOUTEILLE XX.X °C XXX.X...
  • Seite 54: Unites De Mesure

    All manuals and user guides at all-guides.com MANUEL D’INSTRUCTIONS A l’aide des touches FLECHE, faire défiler les langues disponibles; confirmer le choix en pressant la touche ENTER ; la machine retournera au début et après quelques secondes, le MENU PRINCIPAL dans la nouvelle langue apparaîtra. UNITES DE MESURE Mettre la machine en marche;...
  • Seite 55: Pression

    All manuals and user guides at all-guides.com MANUEL D’INSTRUCTIONS PRESSION Sélectionner PRESSION: POIDS g(Kg) <PRESSION> TEMPERATURE °C EN ARRIERE presser ENTER pour passer de bar à psi ou de psi à bar. POIDS g(Kg) PRESSION TEMPERATURE °C <EN ARRIERE> Sélectionner EN ARRIERE et presser ENTER pour sortir. TEMPERATURE Sélectionner TEMPERATURE: POIDS...
  • Seite 56: Services

    All manuals and user guides at all-guides.com MANUEL D’INSTRUCTIONS A ce stade, la page vidéo suivante apparaît: Gaz disp. xxxx g Huile xxx cc Température xxx °C - Gaz disp.: quantité de réfrigérant présente dans la bouteille de stockage; - Huile: quantité totale d’huile présente dans tous les réservoirs d’huile; - Température: température de la bouteille de stockage du réfrigérant;...
  • Seite 57: Compteurs

    All manuals and user guides at all-guides.com MANUEL D’INSTRUCTIONS Presser la touche 1 autoriser ou 0 pour désactiver et presser Start pour continuer. Après avoir autorisé le traceur, recommencer l’étalonnage de la balance huile. COMPTEURS Mettre la machine en marche et après quelques secondes, le MENU PRINCIPAL s’affiche: PROCEDURE AUTOMAT.
  • Seite 58: Autorisation Traceur

    All manuals and user guides at all-guides.com MANUEL D’INSTRUCTIONS Sélectionner VALEURS ET CONFIGURATION: VALEURS CONFIGURATION SERVICES MENU PRECEDENT Sélectionner CONFIGURATION: LANGUE UNITES DE MESURE OPTION DATE ET HEURE N. D’AGREMENT Sélectionner ENTRER N UTILISATEUR Il est possible d’entrer un code alphanumérique à 10 caractères qui indique le numéro d’habilitation de l’utilisateur.
  • Seite 59: Plaque D'immatriculation Du Véhicule

    All manuals and user guides at all-guides.com MANUEL D’INSTRUCTIONS PLAQUE D’IMMATRICULATION DU VÉHICULE Chaque fois que l’on effectue une procédure sur un véhicule, la machine demande d’entrer la plaque d’immatriculation qui est ensuite reportée sur l’imprimé. En absence d’une plaque d’immatriculation, le champ “plaque d’immatriculation”...
  • Seite 60: Personnalisation Du Database Advanced (Dba)

    All manuals and user guides at all-guides.com MANUEL D’INSTRUCTIONS PERSONNALISATION DU DATABASE ADVANCED (DBA) Sélectionner PROCÉDURE ASSISTÉE. Faire défiler avec la touche flèche en bas (↓) jusqu’à ce que les marques du véhicule dans le DBA apparaissent: <ALFA ROMEO> AUDI CHRYSLER/JEEP Presser la touche flèche en haut (↑): TOYOTA...
  • Seite 61: Contraste

    All manuals and user guides at all-guides.com MANUEL D’INSTRUCTIONS CONTRASTE En utilisant les touches 4 et 5 le contraste de l’affichage de la machine peut être réglé: la touche 4 diminue le contraste et la touche 5 augmente le contraste. Pour régler le contraste la machine doit être en menu principal avec la “PROCÉDURE AUTOMATIQUE”...
  • Seite 62: Inhaltsverzeichnis

    All manuals and user guides at all-guides.com GEBRAUCHSANLEITUNG INHALTSVERZEICHNIS INHALTSVERZEICHNIS....................62 EINFÜHRUNG ........................63 AUFBEWAHRUNG DER GEBRAUCHSANLEITUNG .............63 GARANTIEBEDINGUNGEN ....................64 ALLGEMEINE INFORMATIONEN ..................64 ENDE DER LEBENSDAUER DER MASCHINE ..............65 ENTSORGUNG DER BATTERIE ....................65 SICHERHEITSBESTIMMUNGEN..................65 VERHALTENSREGELN BEIM UMGANG MIT KÜHLMITTELN ..........66 BETRIEBSWEISE......................
  • Seite 63: Einführung

    All manuals and user guides at all-guides.com GEBRAUCHSANLEITUNG DATEN DER FLASCHE......................82 KALIBRIERUNG DER ÖLWAAGE ..................83 TEMPERATUR DER FLASCHE ....................83 EINSTELLUNGEN......................84 SPRACHE..........................84 MASSEINHEIT......................... 85 GEWICHT ............................85 DRUCK..............................86 TEMPERATUR............................86 DATEN............................. 86 SERVICE ..........................87 EINSATZ VON KONTRASTMITTEL..................87 ZÄHLER ..........................
  • Seite 64: Garantiebedingungen

    All manuals and user guides at all-guides.com GEBRAUCHSANLEITUNG GARANTIEBEDINGUNGEN Bei Material- und/oder Fabrikationsfehlern besteht eine Garantie von 1 (einem) Jahr ab dem Lieferdatum. Die Garantie besteht aus dem Auswechseln und der kostenlosen Reparatur von Teilen, wenn diese, nach Gutachtung des Herstellers, nicht einwandfrei funktionieren. Die Seriennummer des Geräts, für das der Austausch bzw.
  • Seite 65: Ende Der Lebensdauer Der Maschine

    All manuals and user guides at all-guides.com GEBRAUCHSANLEITUNG Die Maschine erzeugt wie alle in Bewegung befindlichen Vorrichtungen eine gewisse Lärmbelastung. Die Bauart, die Verkleidungen und die vom Hersteller ergriffenen Maßnahmen tragen dazu bei, dass dieser Geräuschpegel auch während der Arbeitsphase den durchschnittlichen Wert von 70 dB (A) nicht überschreitet.
  • Seite 66: Verhaltensregeln Beim Umgang Mit Kühlmitteln

    All manuals and user guides at all-guides.com GEBRAUCHSANLEITUNG zu den vorgesehenen Intervallen auswechseln und stets nur die von Hersteller empfohlenen Filter verwenden. Stets nur die von Hersteller empfohlenen Öle verwenden. Das Öl für die Vakuumpumpe darf unter keinen Umständen mit dem Öl für die Klimaanlage vertauscht werden.
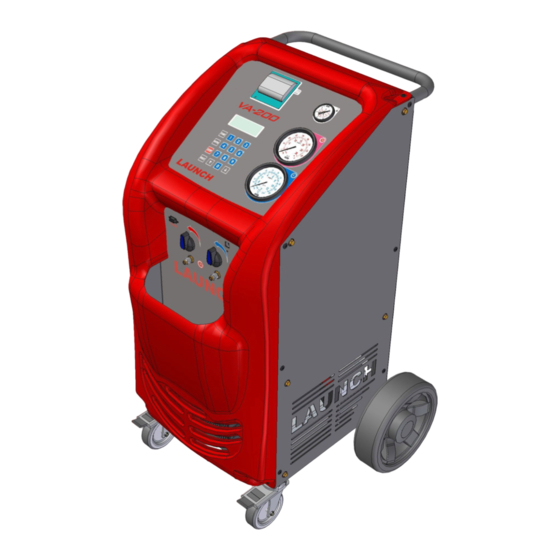
  • Seite 67: Die Maschine

    All manuals and user guides at all-guides.com GEBRAUCHSANLEITUNG die gerändelte Scheibe [4] auf die Schraube [1] stecken die Schraube [1] um wenige Umdrehungen an die Gewindebuchse [6] schrauben die Maschine einschalten die Schraube [1] solange anschrauben, bis das Display eine Füllung gleich NULL anzeigt die Mutter [2] kräftig anziehen (Halten Sie dabei die Schraube [1] mit dem anderen Engländer fest)
  • Seite 68: Alarme

    All manuals and user guides at all-guides.com GEBRAUCHSANLEITUNG ALARME ALARM HOCHDRUCK: wird angezeigt und gibt einen Signalton aus, wenn der Druck der Flüssigkeit im Kreislauf 17.5 bar übersteigt. Der Rückgewinnungsvorgang wird automatisch unterbrochen. ALARM FLASCHE VOLL: wird angezeigt und gibt einen Signalton aus, wenn im Inneren der Flasche mehr als 80% des maximalen Fassungsvermögens, d.h.
  • Seite 69: Vorgänge Bei Der Automatischen Prozedur

    All manuals and user guides at all-guides.com GEBRAUCHSANLEITUNG VORGÄNGE BEI DER AUTOMATISCHEN PROZEDUR Bei der automatischen Prozedur werden alle Vorgänge automatisch durchgeführt: Rückgewinnung und Aufbereitung, Ölablass, Vakuum, Nachfüllen mit Frischöl und Auffüllen . Der Ausdruck der Menge des rückgewonnenen Gases, des rückgewonnenen Öls, der Vakuumzeit, des nachgefüllten Öls und eingespritzten Gases erfolgt automatisch am Ende jedes einzelnen Vorgangs.
  • Seite 70 All manuals and user guides at all-guides.com GEBRAUCHSANLEITUNG VAKUUM 20 min VAKUUM 20 min <AUTOMATISCH OEL> AUTOMATISCH OEL Oel.-Waage XX cc FUELLUNG XXXX g <FUELLUNG XXXX g> ENTER Falls man eine andere als die entnommene Ölmenge nachfüllen muss, so gibt man diese nach der Rückgewinnung folgendermaßen ein: nach Bestätigung der Vakuumzeit beginnt die Schrift "Automatisch Öl“...
  • Seite 71 All manuals and user guides at all-guides.com GEBRAUCHSANLEITUNG CODE EINGEBEN CAR MODEL ENTER druecken Lesen Sie in der speziellen “Tabelle” den Code des jeweiligen Kraftfahrzeugs nach. Benutzen Sie die Nummerntastatur für die Eingabe des Codes. Am Ende der Eingabe die Taste ENTER für die Bestätigung drücken. Das Display zeigt nun an: VAKUUM 20 min Oel.-Waage...
  • Seite 72 All manuals and user guides at all-guides.com GEBRAUCHSANLEITUNG Wenn KONTRASTMITTEL NEIN blinkt, ENTER drücken, falls man kein Kontrastmittel zuführen möchte; oder PFEIL NACH UNTEN drücken und wenn KONTRASTMITTEL blinkt, die gewünschte Menge eingeben und anschließend zur Bestätigung der Kontrastmittelzufuhr ENTER drücken. Hoch- und Niederdruck der Maschine öffnen und auf die START-Taste drücken.
  • Seite 73: Vorgänge Bei Der Manuellen Prozedur

    All manuals and user guides at all-guides.com GEBRAUCHSANLEITUNG Prozedur in Pause START um fortzufahren STOP für Abbrechen der Prozedur Wenn man START drückt, setzt sich die Prozedur wieder in Gang, wenn man dagegen STOP oder RESET drückt, erscheint die folgende Meldung: ACHTUNG DAS STOPPEN DER RÜCKGEWINNUNG VOR DEM...
  • Seite 74: Vakuum

    All manuals and user guides at all-guides.com GEBRAUCHSANLEITUNG Am Ende der Rückgewinnung kommt die Maschine zum Stehen, wobei automatisch das während der Rückgewinnung aus der Klimaanlage gewonnene Altöl abgelassen und angezeigt wird. Der Ölablassvorgang dauert 4 Minuten. Falls während dieser Phase einige noch in der Klimaanlage vorhandene Kühlmittelrückstände den Druck ansteigen lassen sollten, so beginnt die Maschine automatisch erneut mit der Rückgewinnung von Kühlmittel.
  • Seite 75: Nachfüllen Mit Frischöl

    All manuals and user guides at all-guides.com GEBRAUCHSANLEITUNG NACHFÜLLEN MIT FRISCHÖL Dieser Vorgang darf ausschließlich nur nach einer Vakuumphase und vor dem Füllvorgang vorgenommen werden. Die manuelle Prozedur wählen: auf ENTER drücken, wenn die Meldung "MANUELLE PROZEDUR" auf der LCD-Anzeige blinkt. ÖL wählen: wenn die Schrift "ÖL XX ccm“...
  • Seite 76: Falls Sie Das Database

    All manuals and user guides at all-guides.com GEBRAUCHSANLEITUNG angegeben, das sich im Motorraum des Fahrzeugs befindet. Falls diese Flüssigkeitsmenge nicht bekannt ist, muss speziellen Gebrauchsanleitungen suchen. 2. Falls es installiert ist, kann man das DATABASE BASIC (DBB) benutzen: Die Taste ↓ drücken, nun zeigt das Display an: CODE EINGEBEN CAR MODEL...
  • Seite 77: Planmässige Wartung

    All manuals and user guides at all-guides.com GEBRAUCHSANLEITUNG Hahn öffnen). HINWEIS: In seltenen Fällen könnte der Nachfüllvorgang nicht zu Ende geführt werden aufgrund des Gleichgewichts der Druckwerte; in diesem Fall muss man den Hochdruck schließen (Niederdruck geöffnet lassen) und die Klimaanlage einschalten. Am Ende des Nachfüllvorgangs zeigt die Maschine folgende Meldung an: FUELLUNG Ende der Fuel...
  • Seite 78: Vakuumpumpe

    All manuals and user guides at all-guides.com GEBRAUCHSANLEITUNG FLASCHE AUFFUELLEN Menge XX kg Min: X Max: XX kg auf START druecken Die Kühlmittelmenge eingeben, die in die innere Flasche gefüllt werden soll (die Menge muss innerhalb der von der Maschine empfohlenen Grenzwerte liegen), durch Drücken von START bestätigen: Mitteles HD-Schlauch an 1 externe Flasche...
  • Seite 79: M.2) Ölwechsel

    All manuals and user guides at all-guides.com GEBRAUCHSANLEITUNG angegebenen Reihenfolge durchführen: Die Stromzufuhr der MASCHINE unterbrechen. Den Öldeckel (2) ermitteln und ganz abschrauben. Das Öl muss in jene Öffnung gefüllt werden, in der sich der Öldeckel (2) befand. Das Öl in kleinen Mengen langsam zugeben und stets warten, bis der Pegel gestiegen ist.
  • Seite 80: Füllen Des Frischölbehälters

    All manuals and user guides at all-guides.com GEBRAUCHSANLEITUNG 18) Den Code der Filter eingeben, um den Alarm auszuschalten; falls der Code der Filter nicht verfügbar ist, setzen Sie sich bitte mit dem Kundendienst in Verbindung. 19) Eine Menge in Höhe von etwa 500 g Gas absaugen, um den Kreislauf des Geräts aufzuladen.
  • Seite 81: Kalibrierung Der Flaschenwaage

    All manuals and user guides at all-guides.com GEBRAUCHSANLEITUNG folgenden Situationen sollte besondere Aufmerksamkeit gewidmet werden: Die Gewichte stets in die Mitte der Waagschalen legen. Auf die Ölwaage darf auf keinen Fall Druck ausgeübt werden. Das in den Hoch- und Niederdruckleitungen zurückgebliebene Gas stets absaugen, bevor man mit der Kalibrierung der Druckgeber beginnt.
  • Seite 82: Daten Der Flasche

    All manuals and user guides at all-guides.com GEBRAUCHSANLEITUNG NULL KALIBRIERUNG Flasche hochheben XXXX auf START drueken Bei von der Waagschale angehobener Flasche auf die Taste START drücken, nun erscheint folgender Bildschirminhalt: GEWICHT XXXX g KAL. XXXX auf START drueken Das (16 bis 18 kg schwere) Bezugsgewicht in die Mitte der Waagschale legen, dasselbe unter Verwendung der Tasten 0-1-….- 9 eingeben und auf die Taste START drücken.
  • Seite 83: Kalibrierung Der Ölwaage

    All manuals and user guides at all-guides.com GEBRAUCHSANLEITUNG DATEN SPEICHERN: auf START druecken. Zum Ausgang: auf STOP druecken Drücken Sie START, um die Speicherung der Daten zu bestätigen, drücken Sie STOP, um die Daten nicht zu speichern. KALIBRIERUNG DER ÖLWAAGE Gehen Sie in das Menü...
  • Seite 84: Einstellungen

    All manuals and user guides at all-guides.com GEBRAUCHSANLEITUNG TEMPERATUR DER FLASCHE XX.X °C Drücken Sie START um Temp. zu ändern STOP um Menü zu verlassen Vergleichen Sie die auf dem Display angezeigte Temperatur mit der auf dem externen Thermometer abgelesenen Temperatur. Falls eine Änderung notwendig ist, START drücken. TEMPERATUR DER FLASCHE XX.X °C...
  • Seite 85: Masseinheit

    All manuals and user guides at all-guides.com GEBRAUCHSANLEITUNG HINWEIS: Die aktuelle Sprache ist mit dem Symbol “<-“ angezeigt. Benutzen Sie die PFEILTASTEN um die verfügbaren Sprachen zu durchlaufen und bestätigen Sie Ihre Wahl durch Drücken der Taste ENTER. Die Maschine führt ein Reset durch und nach ein paar Sekunden erscheint das HAUPTMENÜ...
  • Seite 86: Druck

    All manuals and user guides at all-guides.com GEBRAUCHSANLEITUNG Wählen Sie ZURÜCK und drücken Sie ENTER um dieses Menü zu verlassen. DRUCK Wählen Sie DRUCK: Gewicht g(kg) <Druck bar> Temperatur °C ZURUECK Drücken Sie ENTER, um von bar zu psi bzw. von psi zu bar zu wechseln. Gewicht g(kg) Druck...
  • Seite 87: Service

    All manuals and user guides at all-guides.com GEBRAUCHSANLEITUNG <DATEN> EINSTELLUNG SERVICES ZURUECK Wählen Sie DATEN. Nun erscheint der folgende Bildschirminhalt: Fl.-Waage xxxx g Oel.-Waage xxx cc Flaschen Te xxx °C - Bestand Gas: Kühlmittelmenge, die in der Flasche des Geräts vorhanden ist; - Öl: Gesamtölmenge, die in allen Ölbehältern vorhanden ist;...
  • Seite 88: Zähler

    All manuals and user guides at all-guides.com GEBRAUCHSANLEITUNG Rufen Sie für den Code den Kundendienst. Nach Eingabe des Codes die Taste ENTER drücken: OPTION KONTRASTMITTEL 1-> aktiv 0-> nicht aktiv START=speichern Taste 1 zum Aktivieren oder Taste 0 zum Deaktivieren und anschließend die Taste START drücken, um fortzufahren.
  • Seite 89: Einsatz Von Kontrastmittel

    All manuals and user guides at all-guides.com GEBRAUCHSANLEITUNG AUTOMAT. PROZEDUR MANUELLE PROZEDUR NAECHSTE SEITE BESTAND XXXX g NAECHSTE SEITE wählen: KALIBRIERUNG DATEN U. EINSTELLUN. WARTUNG FLASCHE AUFFUELLEN Nun DATEN U. EINSTELLUNGEN wählen: DATEN EINSTELLUNGEN SERVICE ZURÜCK Wählen Sie EINSTELLUNGEN: SPRACHEN MASSEINHEITEN OPTIONEN DATUM UND UHRZEIT...
  • Seite 90: Kennzeichen Des Fahrzeugs

    All manuals and user guides at all-guides.com GEBRAUCHSANLEITUNG Kennzeichen des Fahrzeugs Jedes Mal, wenn eine Prozedur an einem Auto durchgeführt wird, fordert die Maschine Sie dazu auf, das Kennzeichen einzugeben. Dieses wird dann im Ausdruck aufgeführt. Wenn Sie ENTER drücken, ohne das Kennzeichen einzugeben, bleibt das Feld des Kennzeichens im Ausdruck leer.
  • Seite 91: Benutzung

    All manuals and user guides at all-guides.com GEBRAUCHSANLEITUNG NAME FZG.MODELL: ... . . MENGE DES FZG.MOD.: ... . . Benutzen Sie die Tastatur für die Eingabe des Fahrzeugmodells und bestätigen Sie mit ENTER.
  • Seite 92: Reinigung Der Anlage (Optional)

    All manuals and user guides at all-guides.com GEBRAUCHSANLEITUNG Auf die Frage „Zugriff auf Windows Update für die Suche nach Software erlauben?“, die Option „NEIN, NICHT JETZT“ wählen und die Taste „WEITER“ drücken. Im folgenden Bildschirminhalt die Option „Aus einem spezifischen Verzeichnis oder Pfad installieren (für erfahrene Benutzer)“...
  • Seite 93: Indice Indice

    All manuals and user guides at all-guides.com MANUALE D’USO INDICE INDICE ..........................93 INTRODUZIONE ....................... 94 CONSERVAZIONE DEL MANUALE ..................94 CONDIZIONI DI GARANZIA....................94 INFORMAZIONI GENERALI ..................... 95 FINE VITA ......................... 96 SMALTIMENTO BATTERIA ....................96 NORME DI SICUREZZA ....................96 NORME DI COMPORTAMENTO CON I FLUIDI REFRIGERANTI .........
  • Seite 94: Introduzione

    All manuals and user guides at all-guides.com MANUALE D’USO DATI BOMBOLA ........................112 CALIBRAZIONE BILANCIA OLIO ..................113 TEMPERATURA BOMBOLA ....................113 IMPOSTAZIONI .......................114 LINGUA..........................114 UNITA’ DI MISURA ........................115 PESO..............................115 PRESSIONE............................. 116 TEMPERATURA ..........................116 DATI ............................116 SERVIZI ..........................117 ABILITAZIONE FLUIDO TRACCIANTE.................117 CONTATORI........................118 CODICE DI ABILITAZIONE OPERATORE..............118 ABILITAZIONE FLUIDO TRACCIANTE................119...
  • Seite 95: Informazioni Generali

    All manuals and user guides at all-guides.com MANUALE D’USO riparazione gratuita delle parti componenti il prodotto che risultino difettose e siano considerate tali a giudizio del fabbricante. E’ necessaria l’indicazione del nr. di serie della macchina alla quale si riferisce il ricambio richiesto. Se il nr. di serie non è disponibile, è necessario fare pervenire al più...
  • Seite 96: Fine Vita

    All manuals and user guides at all-guides.com MANUALE D’USO FINE VITA Il simbolo a fianco indica che, in base In base alla direttiva 2002/96/CE, la macchina non può essere smaltita tramite i rifiuti urbani, ma è fatto obbligo di consegnarla ad un centro specializzato per la raccolta separata e lo smaltimento dei rifiuti RAEE (Rifiuti Ambientali Elettrici ed Elettronici), oppure può...
  • Seite 97: Principi Di Funzionamento

    All manuals and user guides at all-guides.com MANUALE D’USO seguenti situazioni: L’inalazione di vapori in concentrazioni molto elevate, anche per brevi periodi di tempo va evitata in quanto può provocare perdita di conoscenza o morte subitanea. L’R134a non è infiammabile ma se il vapore viene esposto a fiamme nude o a superfici al calor rosso può...
  • Seite 98: La Macchina

    All manuals and user guides at all-guides.com MANUALE D’USO LA MACCHINA ELEMENTI FONDAMENTALI Vedere fig. 5,6, 7 e 8: a) Consolle di comando b) Rubinetti h) Ruote l) Raccordi filettati Alta/Bassa Press. m) Contenitore olio esausto n) Contenitore olio nuovo bi) bilancia olio d) Bombola e) Filtri disidratatori...
  • Seite 99: Operazioni Preliminari

    All manuals and user guides at all-guides.com MANUALE D’USO ALLARME GAS INSUFFICIENTE: viene visualizzato ed emette un segnale acustico quando la quantità impostata per il riempimento è superiore alla differenze tra la disponibilità e il minimo bombola. OPERAZIONI PRELIMINARI Controllare che l’interruttore (i) sia in posizione 0. Controllare che tutti i rubinetti della MACCHINA siano chiusi.
  • Seite 100: Operazioni Nella Procedura Automatica

    All manuals and user guides at all-guides.com MANUALE D’USO OPERAZIONI NELLA PROCEDURA AUTOMATICA Nella procedura automatica tutte le operazioni sono eseguite in modo automatico: recupero e riciclo, scarico olio, vuoto, reintegro olio nuovo e riempimento. La stampa della quantità di gas recuperato, olio recuperato, tempo di vuoto, olio reintegrato e quantità...
  • Seite 101 All manuals and user guides at all-guides.com MANUALE D’USO VUOTO 20 min VUOTO 20 min <OLIO AUTOMATICO> OLIO AUTOMATICO OLIO xx CC RIEMPIMENTO XXXX G <RIEMPIMENTO XXXX G> ENTER Se abbiamo la necessità di reintegrare una quantità d’olio che potrebbe essere diversa da quella scaricata dopo il recupero bisogna impostarla come segue: una volta confermato il tempo di vuoto inizia a lampeggiare la scritta “Olio automatico”, premere il tasto ↓...
  • Seite 102 All manuals and user guides at all-guides.com MANUALE D’USO INSERIRE CODICE MODELLO AUTO Premi ENTER ed esci Leggere sull’apposita “tabella” il codice relativo all’autovettura. Utilizzare il tastierino numerico per inserire il codice. Alla fine dell’impostazione premere il tasto ENTER per confermare.
  • Seite 103 All manuals and user guides at all-guides.com MANUALE D’USO Aprire alta e bassa pressione della macchina e premere il tasto START. A questo punto inizia la fase di recupero/riciclo del refrigerante segnalata dalla scritta “Recupero riciclo”. Durante questa fase il sistema visualizza i grammi di refrigerante recuperati. Al termine del recupero la macchina si arresta scaricando e visualizzando automaticamente l’olio esausto estratto dall’impianto A/C durante il recupero.
  • Seite 104: Operazioni Nella Procedura Assistita

    All manuals and user guides at all-guides.com MANUALE D’USO ATTENZIONE FERMARE IL RECUPERO PRIMA DELLO SCARICO OLIO PUO’ DANNEGGIARE IL COMPRESSORE START PER CONTINUARE Premendo START si riprende la procedura, mentre premendo STOP o RESET si tornerà al MENU PRINCIPALE. Se durante il recupero si preme RESET, appare direttamente il seguente messaggio: ATTENZIONE FERMARE IL RECUPERO...
  • Seite 105: Vuoto

    All manuals and user guides at all-guides.com MANUALE D’USO ATTENZIONE FERMARE IL RECUPERO PRIMA DELLO SCARICO OLIO PUO’ DANNEGGIARE IL COMPRESSORE START PER CONTINUARE Premendo START si riprende la procedura, mentre premendo STOP o RESET si tornerà al MENU PRINCIPALE. Se durante il recupero si preme RESET, appare direttamente il seguente messaggio: ATTENZIONE FERMARE IL RECUPERO...
  • Seite 106: Reintegro Tracciante (Se Installato)

    All manuals and user guides at all-guides.com MANUALE D’USO REINTEGRO TRACCIANTE (se installato) Questa operazione può essere eseguita solo ed esclusivamente dopo un’operazione di vuoto e prima del riempimento. Scegliere procedura assistita: quando la scritta “procedura assistita” lampeggia sul LCD premere ENTER. Scegliere OLIO E TRACCINATE, la scritta “Olio xx cc” lampeggia sul LCD, selezionare TRACCIANTE xx CC e impostare il volume in cc di tracciante da reintegrare.
  • Seite 107: Manutenzione Ordinaria

    All manuals and user guides at all-guides.com MANUALE D’USO <ALFA ROMEO> AUDI CHRYSLER/JEEP utilizzare i tasti freccia (↓↑) per spostarsi sulla marca di autovettura sulla quale si sta facendo il servizio, premere ENTER per confermare, il display mostrerà adesso i modelli relativi alla marca (ad esempio se avessimo scelto FORD): <COUGAR>...
  • Seite 108 All manuals and user guides at all-guides.com MANUALE D’USO raccordo parte liquida della bombola esterna al tubo di alta pressione (se la bombola esterna non è dotata di raccordo parte liquida, capovolgerla in modo da recuperare refrigerante liquido). Aprire il rubinetto della bombola esterna ed il rubinetto di alta pressione della macchina.
  • Seite 109: Pompa Del Vuoto

    All manuals and user guides at all-guides.com MANUALE D’USO Chiudere il rubinetto della bombola e premere START, la macchina si fermerà automaticamente dopo aver recuperato il refrigerante presente nei tubi. Chiudere il rubinetto di alta pressione. Sconnettere la bombola esterna. Spengere la macchina POMPA DEL VUOTO Per un buon funzionamento della pompa del vuoto è...
  • Seite 110: Riempimento Contenitore Olio Nuovo

    All manuals and user guides at all-guides.com MANUALE D’USO 8) Procedere con un’operazione di recupero (nota: il rubinetto di bassa pressione deve essere aperto) 9) Una volta raggiunto zero bar chiudere subito il rubinetto (3) del il filtro (5) e premere Stop o Reset 10) Scollegare la macchina dalla rete elettrica 11) Sconnettere l’attacco rapido di bassa pressione dal raccordo (2) del filtro (4)
  • Seite 111: Cambio Rotolo Carta Stampante

    All manuals and user guides at all-guides.com MANUALE D’USO CAMBIO ROTOLO CARTA STAMPANTE Usare carta termica con le seguente specifiche: Ampiezza della carta 58 mm Diametro massimo del rotolo di carta 40mm MANUTENZIONE STRAORDINARIA / CALIBRAZIONE Questa operazione deve essere eseguita quando LCD non visualizza più valori coerenti con la realtà.
  • Seite 112: Dati Bombola

    All manuals and user guides at all-guides.com MANUALE D’USO Con la scritta BILANCIA BOMBOLA lampeggiante premere il tasto ENTER. A questo punto appare la seguente schermata CALIBRAZIONE DATI BOMBOLA MENU PRECEDENTE Premere il tasto ENTER LIVELLO DI ZERO Sollevare la bombola Livelli xxxx Premere START...
  • Seite 113: Calibrazione Bilancia Olio

    All manuals and user guides at all-guides.com MANUALE D’USO xxxxx g xxxxx g Tara xxxxx g MENU PRECEDENTE Modificare i valori di Max, Min e Tara utilizzando le frecce ed il tastierino numerico, poi selezionare MENU PRECEDENTE e premere ENTER: SALVATAGGIO DATI: premere START.
  • Seite 114: Impostazioni

    All manuals and user guides at all-guides.com MANUALE D’USO <BILANCIA BOMBOLA> BILANCIA OLIO TEMPERATURA BOMBOLA Selezionare TEMPERATURA BOMBOLA e confermare con ENTER: TEMPERATURA BOMBOLA XX.X °C START per modificare STOP per uscire Verificare la temperatura visualizzata sul display con quella letta sul termometro esterno. Se necessario modificarla premere START TEMPERATURA BOMBOLA XX.X...
  • Seite 115: Unita' Di Misura

    All manuals and user guides at all-guides.com MANUALE D’USO ENGLISGH ITALIANO FRANCAIS <- ESPANOL NOTA : la lingua corrente è indicata dal simbolo “<-“ Utilizzare le i tasti FRECCIA per scorrere le lingue disponibili, confermare la scelta utilizzando il tasto ENTER, la macchina si resetterà ed dopo alcuni secondi apparirà il MENU PRINCIPALE nella nuova lingua.
  • Seite 116: Pressione

    All manuals and user guides at all-guides.com MANUALE D’USO PESO g(Kg) PRESSIONE TEMPERATURA °C <INDIETRO> Selezionare INDIETRO e premere ENTER per uscire. PRESSIONE Selezionare PRESSIONE: PESO g(Kg) <PRESSIONE> TEMPERATURA °C INDIETRO premere ENTER per cambiare da bar a psi o da psi a bar. PESO g(Kg) PRESSIONE...
  • Seite 117: Servizi

    All manuals and user guides at all-guides.com MANUALE D’USO DATI CONFIGURAZIONE SERVIZI MENU PRECEDENTE Selezionare DATI Apparirà la seguente schermata: Gas disp. xxxx g Olio xxx cc Temperatura xxx °C - Gas disp: quantità di refrigerante presente dentro la bombola di stoccaggio; - Olio: quantità...
  • Seite 118: Contatori

    All manuals and user guides at all-guides.com MANUALE D’USO Premere il tasto 1 abilitare o 0 per disabilitare e premere START per continuare. Dopo l’abilitazione del tracciante rifare la calibrazione della bilancia olio. CONTATORI Accendere la macchina , dopo alcuni secondi appare il MENU PRINCIPALE: PROCEDURA AUTOMATICA PROCEDURA ASSISTITA MENU SUCCESSIVO...
  • Seite 119: Abilitazione Fluido Tracciante

    All manuals and user guides at all-guides.com MANUALE D’USO Selezionare DATI E CONFIGURAZIONE: DATI CONFIGURAZIONE SERVIZI MENU PRECEDENTE Selezionare CONFIGURAZIONE: LINGUA UNITA’ DI MISURA OPZIONE SET DATA & ORA INSERIRE N OPERATORE Selezionare INSERIRE N OPERATORE E’ possibile inserire un codice alfanumerico a 10 caratteri che indica il numero di abilitazione dell’operatore.
  • Seite 120: Personalizzazione Database Advanced (Dba)

    All manuals and user guides at all-guides.com MANUALE D’USO INSERT NOME OFFICINA ... . . Usare la tastiera per inserire il nome dell’officina, confermare con ENTER, appare la seguente schermata: INSERT TELEFONO .
  • Seite 121: Cancellazione

    All manuals and user guides at all-guides.com MANUALE D’USO CANCELLAZIONE Per eliminare campi di dati personalizzati, utilizzare i tasti freccia (↓↑) per spostarsi sull’autovettura desiderata, premere il tasto “0” (ZERO), un segnale di allarme viene emesso, ed appare la seguente schermata: NOME MACCHINA xxxx g CANCELLARE?
  • Seite 122: Diagnosi Statica (Opzionale)

    All manuals and user guides at all-guides.com MANUALE D’USO DIAGNOSI STATICA (OPZIONALE) Vedere istruzioni [MANUSTA001.0] fornite in allegato al kit diagnosi statica DIAGNOSI INTEGRATA (OPZIONALE) Vedere istruzioni [MANUSBB005] -122-...
  • Seite 123: Sumario

    All manuals and user guides at all-guides.com MANUAL DE INSTRUCCIONES SUMARIO SUMARIO........................123 INTRODUCCIÓN......................124 CONSERVACIÓN DEL MANUAL..................124 CONDICIONES DE GARANTÍA ..................124 INFORMACIONES GENERALES ................... 125 FIN DE LA VIDA ÚTIL ..................... 125 ELIMINACIÓN DE LA BATERÍA.................... 126 NORMAS DE SEGURIDAD.....................
  • Seite 124: Introducción

    All manuals and user guides at all-guides.com MANUAL DE INSTRUCCIONES TEMPERATURA BOMBONA....................143 CONFIGURACIÓN ......................144 IDIOMA ..........................144 UNIDADES DE MEDIDA......................145 PESO..............................145 PRESIÓN ............................146 TEMPERATURA ..........................146 DATOS...........................146 SERVICIOS..........................147 ACTIVACIÓN LÍQUIDO TRAZADOR..................147 CONTADORES........................148 CÓDIGO DE HABILITACIÓN OPERADOR ..............148 ACTIVACIÓN LÍQUIDO TRAZADOR................149 FECHA Y HORA ......................149 MATRÍCULA DEL VEHÍCULO ..................150 IMPOSTACION ENCABEZAMIENTO E IMPRESIÓN .............150...
  • Seite 125: Informaciones Generales

    All manuals and user guides at all-guides.com MANUAL DE INSTRUCCIONES hace referencia el repuesto pedido. Si no se dispone del número de serie, hay que enviar cuanto antes a la empresa fabricante un comprobante válido de compra (factura u otros documentos fiscales válidos).
  • Seite 126: Eliminación De La Batería

    All manuals and user guides at all-guides.com MANUAL DE INSTRUCCIONES electrónicos no útiles o mismo volver a el revendedor en caso de compra de equipos nuevos. La legislación actual proporciona sanciones severas en caso de disposiciones de componentes eléctricos de forma no adecuada en el ambiente. Si es utilizado incorrectamente o dispuesto en el ambiente los equipos y componentes eléctricos y electrónicos pueden lanzar substancias peligrosas para el ambiente y para la salud humana.
  • Seite 127: Funcionamiento

    All manuals and user guides at all-guides.com MANUAL DE INSTRUCCIONES ácidos. El olor acre y penetrante de estos productos de descomposición basta para indicar su presencia. Es menester, pues, evitar las condiciones apenas mencionadas. - No existen pruebas de riesgos derivados de la absorción de r134a a través de la piel; no obstante, y por su bajo punto de ebullición, se aconseja llevar adecuadas ropas de protección para evitar que posibles salpicaduras de líquido o vapor toquen la piel y, en especial, los ojos, pues podrían provocar el congelamiento de los fluidos oculares.
  • Seite 128: La Máquina

    All manuals and user guides at all-guides.com MANUAL DE INSTRUCCIONES LA MÁQUINA ELEMENTOS FUNDAMENTALES Ver figuras 5, 6, 7 y 8: z) Recipiente del trazador (optativo) a) Tablero de mandos b) Llaves h) Ruedas l) Racores roscados de alta y baja presión m) Tanque aceite usado n) Tanque aceite nuevo bi) Balanza aceite...
  • Seite 129: Operaciones Preliminares

    All manuals and user guides at all-guides.com MANUAL DE INSTRUCCIONES OPERACIONES PRELIMINARES Controlar que el interruptor (i) esté en posición 0. Controlar que todas las llaves de la máquina estén cerradas. Enchufar la máquina y encenderla. Controlar que el indicador de nivel del aceite de la bomba de vacío esté...
  • Seite 130: Operaciones En Procedimiento Automático

    All manuals and user guides at all-guides.com MANUAL DE INSTRUCCIONES OPERACIONES EN PROCEDIMIENTO AUTOMÁTICO En el procedimiento automático, todas las operaciones se realizan automáticamente: recuperación y reciclaje, descarga de aceite, vacío, reposición aceite nuevo y llenado. Automáticamente, al concluirse cada operación se imprime la cantidad de gas y de aceite recuperados, el tiempo de vacío, el aceite repuesto y la cantidad de gas inyectado.
  • Seite 131 All manuals and user guides at all-guides.com MANUAL DE INSTRUCCIONES VACIADO 20 min VACIADO 20 min <ACEITE AUTOMATICO> ACEITE AUTOMATICO ACEITE XX cc RELLENADO XXXX g <RELLENADO XXXX g> ENTER Si es necesario reponer una cantidad de aceite diferente de la descargada durante la recuperación, se la introduce de este modo: una vez confirmado el tiempo de vacío, destella la leyenda "Aceite automático";...
  • Seite 132 All manuals and user guides at all-guides.com MANUAL DE INSTRUCCIONES INTRODUCIR CODIGO MODELLO COCHE ENTER para salir Leer en la tabla correspondiente el código del vehículo. Mediante el teclado numérico introducir el código. Al terminar la programación, apretar ENTER para confirmar. En la pantalla aparece: VACIADO 20 min...
  • Seite 133 All manuals and user guides at all-guides.com MANUAL DE INSTRUCCIONES Abrir la presión alta y baja de la máquina y apretar START. Empieza ahora la fase de recuperación y reciclado del refrigerante, indicada por la leyenda “Recuperación-reciclado”. Durante esta etapa, el sistema visualiza los gramos de refrigerante recuperados. Al concluir la recuperación, la máquina se detiene, descargando y visualizando automáticamente el aceite usado extraído de la instalación de A/C durante la recuperación.
  • Seite 134: Operaciones En Procedimiento Asistido

    All manuals and user guides at all-guides.com MANUAL DE INSTRUCCIONES ATENCIÓN PARAR LA RECUPERACIÓN ANTES DE DESCARGAR EL ACEITE PUEDE PERJUDICAR EL COMPRESOR. START PARA PROSEGUIR Pulsando START se reanuda el procedimiento; pulsando STOP o RESETEAR se vuelve al MENÚ PRINCIPAL. Si se pulsa RESET durante la recuperación, en pantalla aparece directamente el siguiente mensaje: ATENCIÓN...
  • Seite 135: Vacío

    All manuals and user guides at all-guides.com MANUAL DE INSTRUCCIONES Pulsando START se reanuda el procedimiento; pulsando STOP o RESETEAR, en pantalla aparece el siguiente mensaje: ATENCIÓN PARAR LA RECUPERACIÓN ANTES DE DESCARGAR EL ACEITE PUEDE PERJUDICAR EL COMPRESOR. START PARA PROSEGUIR Pulsando START se reanuda el procedimiento;...
  • Seite 136: Reposición De Trazador (Optativo)

    All manuals and user guides at all-guides.com MANUAL DE INSTRUCCIONES Programar la cantidad de aceite nuevo que se debe reponer, expresada en cc. Confirmar con ENTER. Abrir las llaves de alta y baja presión (si se trata de instalación de A/C con un úncio racor de alta o baja presión, abrir únicamente la llave correspondiente) de la máquina y apretar START.
  • Seite 137 All manuals and user guides at all-guides.com MANUAL DE INSTRUCCIONES 3. Si está instalada, se puede utilizar la BASE AVANZADA DE DATOS (DBA): apretar la tecla ↓; en la pantalla aparece: <ALFA ROMEO> AUDI CHRYSLER/JEEP Mediante las teclas (↓↑) ir a la marca de vehículo en la que se está efectuando el servicio y confirmar con ENTER;...
  • Seite 138: Mantenimiento Ordinario

    All manuals and user guides at all-guides.com MANUAL DE INSTRUCCIONES MANTENIMIENTO ORDINARIO LLENAR LA BOMBONA INTERNA DE LA MÁQUINA Esta operación se efectúa cuando en la bombona hay menos de 3 kg de refrigerante a disposición; es indispensable efectuarla cuando la pantalla pone "Alarma bombona vacía". Proveerse de una bombona de gas R134a y conectar el racor de parte líquida de la bombona externa al tubo de alta presión (si la bombona externa no dispone de racor para parte líquida, ponerla boca abajo para recuperar refrigerante líquido).
  • Seite 139: Bomba De Vacío

    All manuals and user guides at all-guides.com MANUAL DE INSTRUCCIONES Ahora, la máquina llena la bombona interna con la cantidad programada más ± 500g. Cuando faltan 500 gramos para llegar a la cantidad total, la máquina se detiene y pone el siguiente mensaje: LLENAR BOMBONA CERRAR llave bombona...
  • Seite 140: Llenar Tanque Con Aceite Nuevo

    All manuals and user guides at all-guides.com MANUAL DE INSTRUCCIONES 2) Ponerse guantes y gafas de protección; 3) Quitar el plástico trasero de la máquina; 4) Cerrar las llaves de la bombona; 5) Cerrar la llave (1) del filtro (4); 6) Conectar el empalme rápido de baja presión al racor macho (2) del filtro (4) 7) Enchufar la máquina a la red eléctrica;...
  • Seite 141: Cambiar El Rollo De Papel De La Impresora

    All manuals and user guides at all-guides.com MANUAL DE INSTRUCCIONES manteniendo la tapa fija y girando el tanque. Vaciar el contenido del tanque en un recipiente para aceite usado. Enroscar nuevamente el tanque, manteniendo siempre la tapa fija y ponerlo nuevamente en su sitio con mucho cuidado y sin hacer presión sobre la balanza.
  • Seite 142: Datos De La Bombona

    All manuals and user guides at all-guides.com MANUAL DE INSTRUCCIONES En la pantalla aparece lo siguiente: <BALANZA BOTELLA> BALANZA ACEITE PRESION BOTELLA PRESION A/C Cuando destella la leyenda BALANZA BOTELLA, apretar ENTER. La pantalla pone: CALIBRADO DATOS BOTELLA MENU ANTERIOR Apretar ENTER NIVEL DE CERO Levantar BOTELLA...
  • Seite 143: Regulación Balanza De Aceite

    All manuals and user guides at all-guides.com MANUAL DE INSTRUCCIONES xxxxx g xxxxx g Vicia xxxxx g MENU ANTERIOR Modificar los valores máx, mín y tara mediante las flechas y las teclas numéricas; a continuación, seleccionar MENÚ PRECEDENTE y apretar ENTER: MEMORIZACION DATOS: pressionar START.
  • Seite 144: Configuración

    All manuals and user guides at all-guides.com MANUAL DE INSTRUCCIONES <BALANZA BOTELLA> BALANZA ACEITE TEMPERATURA BOTELLA Seleccionar TEMPERATURA BOMBONA y confirmar con ENTER: TEMPERATURA BOMBOLA XX.X °C START per modificare STOP per uscire Verificar la temperatura visualizada en pantalla con la que indica el termómetro externo. Si es necesario modificarla, pulsar START TEMPERATURA BOMBOLA XX.X...
  • Seite 145: Unidades De Medida

    All manuals and user guides at all-guides.com MANUAL DE INSTRUCCIONES ENGLISH ITALIANO FRANÇAIS <- ESPAÑOL NOTA : el idioma corriente está indicado por el símbolo “<-“ Mediante las flechas, pasar los idiomas disponibles y confirmar la selección con ENTER. La máquina se resetea y unos segundos después vuelve al menú...
  • Seite 146: Presión

    All manuals and user guides at all-guides.com MANUAL DE INSTRUCCIONES PESO g(Kg) PRESIÓN TEMPERATURA °C SALIR Seleccionar SALIR y apretar ENTER para salir. PRESIÓN Seleccionar PRESIÓN: PESO g(Kg) <PRESION> TEMPERATURA °C <SALIR> Apretar ENTER para cambiar de bar a psi o de psi a bar. PESO g(Kg) PRESION...
  • Seite 147: Servicios

    All manuals and user guides at all-guides.com MANUAL DE INSTRUCCIONES Luego seleccionar DATOS Y CONFIGURACIONES. <DATOS> IMPOSTACION SERVICIOS MENU ANTERIOR Seleccionar DATOS. En la pantalla aparece lo siguiente: Gas disp. xxxx g Aceite xxx cc Temperatura xxx °C - Gas disp: cantidad de refrigerante que hay dentro de la bombona de almacenamiento; - Aceite: cantidad total de aceite que hay en todos los recipientes de aceite: - Temperatura: temperatura de la bombona de almacenamiento del refrigerante;...
  • Seite 148: Contadores

    All manuals and user guides at all-guides.com MANUAL DE INSTRUCCIONES Contactar con el servicio técnico para obtener el código. Una vez introducido el código, apretar ENTER: HABIL. LIQ. DETECTOR pres. 1 habilitado pres. 0 no habilit Start para continuar Con la tecla 1 se activa, con la tecla 0 se desactiva; apretar Start. Una vez activado el trazador, regular nuevamente la balanza del aceite.
  • Seite 149: Activación Líquido Trazador

    All manuals and user guides at all-guides.com MANUAL DE INSTRUCCIONES USO AUTOMÁTICO PROCEDIMIENTO MANUAL MENÚ SUCESIVO GAS DISP. XXXX G Seleccione MENÚ SUCESIVO: CALIBRADO DATOS Y IMPOSTACION ALARMA SERVICIO LLENAR BOTELLA Seleccione DATOS Y IMPOSTACION: DATOS IMPOSTACION SERVICIOS MENÚ ANTERIOR Seleccione IMPOSTACION: IDIOMA UNIDADE DE MEDIDA...
  • Seite 150: Matrícula Del Vehículo

    All manuals and user guides at all-guides.com MANUAL DE INSTRUCCIONES MATRÍCULA DEL VEHÍCULO Cada vez que se trabaja en un vehículo, la máquina pide que se introduzca el número de matrícula que luego imprime junto con los datos. Si pulsa ENTER sin entrar ningún dato, el campo de la matrícula queda en blanco.
  • Seite 151: Utilización

    All manuals and user guides at all-guides.com MANUAL DE INSTRUCCIONES NOMBRE MODELO: ... . . CANTIDAD MODELO: ... . . A través del teclado, escriba el nombre del modelo de vehículo y confirme con ENTER.
  • Seite 152: Lavado Instalación (Optativo)

    All manuals and user guides at all-guides.com MANUAL DE INSTRUCCIONES El sistema operativo pone en marcha la secuencia de procedimiento guiado del nuevo hardware. Ante la pregunta: “¿Autorizar conexión a Windows update para búsqueda del software?”, seleccione “NO, NO AHORA” y pulse “SEGUIR”. En la siguiente pantalla, seleccione “Instalar de una lista o ruta específica (para usuarios expertos)”, pulse “SEGUIR”.
  • Seite 153: Índice Índice

    All manuals and user guides at all-guides.com MANUAL DE INSTRUÇÕES ÍNDICE ÍNDICE ..........................153 INTRODUÇÃO ........................ 154 CONSERVAÇÃO DO MANUAL ..................154 CONDIÇÕES DE GARANTIA..................155 INFORMAÇÕES GERAIS ....................155 FINAL DE VIDA DO EQUIPAMENTO ................156 ELIMINAÇÃO DA BATERIA ....................156 NORMAS DE SEGURANÇA ...................
  • Seite 154: Introdução

    All manuals and user guides at all-guides.com MANUAL DE INSTRUÇÕES DADOS GARRAFA ........................172 CALIBRAGEM BALANÇA ÓLEO ...................173 TEMPERATURA GARRAFA....................173 PROGRAMAÇÕES ......................174 LÍNGUA..........................174 UNIDADE DE MEDIDA ......................175 PESO..............................175 PRESSÃO ............................176 TEMPERATURA ..........................176 DATA............................176 SERVIÇOS..........................177 HABILITAÇÃO FLUIDO TRAÇADOR ..................177 CONTADORES........................178 CÓDIGO DE HABILITAÇÃO OPERADOR ..............179 HABILITAÇÃO DO FLUIDO TRAÇADOR................179...
  • Seite 155: Condições De Garantia

    All manuals and user guides at all-guides.com MANUAL DE INSTRUÇÕES CONDIÇÕES DE GARANTIA A garantia cobre os defeitos devidos a materiais e/ou de fabrico durante um período de 1 (um) ano a partir da data de entrega. A garantia consiste na substituição ou na reparação gratuita das peças que compõem o produto que se apresentem defeituosas e que sejam consideradas defeituosas pelo fabricante.
  • Seite 156: Final De Vida Do Equipamento

    All manuals and user guides at all-guides.com MANUAL DE INSTRUÇÕES FINAL DE VIDA DO EQUIPAMENTO O símbolo à direita indica que, de acordo com a norma 2002/96/EC, o equipamento não pode ser descartado normalmente como lixo e deve ser entregue a um órgão especializado em coleta de componentes elétricos descartados ou mesmo deve ser retornado ao vendedor quando na aquisição de um novo equipamento.
  • Seite 157: Princípios De Funcionamento

    All manuals and user guides at all-guides.com MANUAL DE INSTRUÇÕES provocar perda de consciência ou até morte. O R134a não é inflamável; contudo, se o vapor for exposto a uma chama, ou a superfícies de calor vermelho, pode sofrer uma decomposição térmica com formação de produtos ácidos.
  • Seite 158: O Equipamento

    All manuals and user guides at all-guides.com MANUAL DE INSTRUÇÕES O EQUIPAMENTO ELEMENTOS FUNDAMENTAIS Ver figs. 5, 6, 7 e 8: z) Recipiente traçador (OPCIONAL) a) Console dos comandos b) Torneiras h) Rodas l) Conexões roscadas Alta/Baixa Pressão. m) Recipiente óleo usado n) Recipiente óleo novo bi) Balança óleo d) Garrafa...
  • Seite 159: Operações Preliminares

    All manuals and user guides at all-guides.com MANUAL DE INSTRUÇÕES substituir os filtros e o óleo da bomba de vácuo. Junto com os filtros será enviado um código que permite a interrupção do alarme. ALARME GÁS INSUFICIENTE: este alarme é visualizado, e emite um sinal acústico, quando a quantidade programada para o preenchimento for superior à...
  • Seite 160 All manuals and user guides at all-guides.com MANUAL DE INSTRUÇÕES O equipamento tem um display de quatro linhas, com um máximo di 20 dígitos por linha. Nos menus de selecção, o item seleccionado está a piscar, no presente manual será representado entre <>.
  • Seite 161 All manuals and user guides at all-guides.com MANUAL DE INSTRUÇÕES VACUO 20 MIN VACUO 20 MIN <OLEO AUTOMATICO> OLEO AUTOMATICO OLEO XX CC <OLEO XX CC> PREENCHIM. XXXX G PREENCHIM. XXXX G ↓ VACUO 20 MIN VACUO 20 MIN OLEO AUTOMATICO <OLEO 30 CC>...
  • Seite 162 All manuals and user guides at all-guides.com MANUAL DE INSTRUÇÕES com a tecla ENTER. Querendo instalar o DATABASE BASIC (DBB) contactar o revendedor do equipamento. 3. Se instalado, pode ser utilizado o DATABASE ADVANCED (DBA): Carregar na tecla ↓, será visualizado: <ALFA ROMEO>...
  • Seite 163 All manuals and user guides at all-guides.com MANUAL DE INSTRUÇÕES vácuo. Depois de terminar a fase de vácuo, continua-se com a adição automática de óleo novo conforme o volume de óleo descarregado ou conforme o volume programado pelo operador. Se estiver instalado, o traçador será adicionado automaticamente conforme a quantidade programada pelo operador.
  • Seite 164: Operações No Modo Assistido

    All manuals and user guides at all-guides.com MANUAL DE INSTRUÇÕES ATENÇAO PARAR A RECUPERACAO ANTES DA DESCARGA OLEO PODE DANIFICAR O COMPRESSOR START PARA CONTINUAR START PER CONTINUARE Carregando START recomeça a operação, enquanto que carregando STOP ou RESET volta- se ao MENU PRINCIPAL.
  • Seite 165: Vácuo

    All manuals and user guides at all-guides.com MANUAL DE INSTRUÇÕES Carregando START recomeça a operação, enquanto que carregando STOP ou RESET volta- se ao MENU PRINCIPAL. Se durante a recuperação for carregada a tecla RESET, será visualizada directamente a seguinte mensagem: ATENÇAO PARAR A RECUPERACAO ANTES DA DESCARGA...
  • Seite 166: Preenchimento Sistema A/C

    All manuals and user guides at all-guides.com MANUAL DE INSTRUÇÕES cc” estiver a piscar no LCD, seleccionar TRAÇADOR xx CC e programar o volume em cc de traçador a ser adicionado. Carregar na tecla ENTER para confirmar. No ecrã é visualizada a seguinte mensagem: ATENÇAO O USO DE OLEO PAG OU TRAC.
  • Seite 167: Manutenção Ordinária

    All manuals and user guides at all-guides.com MANUAL DE INSTRUÇÕES utilizar as teclas seta (↓↑) para seleccionar a marca do veículo no qual se quer fazer o serviço, carregar na tecla ENTER para confirmar a escolha, o display visualizará os modelos relativos à...
  • Seite 168 All manuals and user guides at all-guides.com MANUAL DE INSTRUÇÕES máquina. Se a garrafa externa não estiver equipada com tubo aspirador, colocá-la de cabeça para baixo para que haja um fluxo maior. Ligar a máquina, depois de alguns segundos será visualizado o MENU PRINCIPAL: <MODO AUTOMATICO>...
  • Seite 169: Bomba De Vácuo

    All manuals and user guides at all-guides.com MANUAL DE INSTRUÇÕES Fechar a torneira da garrafa e carregar na tecla START, a máquina pára automaticamente depois de ter recuperado o refrigerante presente nos tubos. Fechar a torneira de alta pressão. Desconectar a garrafa externa. Desligar a máquina. BOMBA DE VÁCUO Para um bom funcionamento da bomba de vácuo é...
  • Seite 170: Preenchimento Reservatório Óleo Novo

    All manuals and user guides at all-guides.com MANUAL DE INSTRUÇÕES 5) Fechar a torneira (1) do filtro (4) 6) Conectar o engate rápido de baixa pressão à conexão macho (2) do filtro (4) 7) Ligar a máquina à rede eléctrica. 8) Proceder com uma operação de recuperação (observação: a torneira de baixa pressão deve estar aberta) 9) Uma vez alcançado o valor zero bar fechar imediatamente a torneira (3) do filtro (5) e...
  • Seite 171: Troca Rolo Papel Impressora

    All manuals and user guides at all-guides.com MANUAL DE INSTRUÇÕES exercer pressão na balança. Abrir o recipiente mantendo a tampa fixa e esvaziá-lo num recipiente para óleos usados. Fechar de novo o reservatório, sem girar a tampa, e sim o próprio reservatório, e voltar a inseri-lo em sua sede prestando grande cuidado para não exercer pressão na balança.
  • Seite 172: Dados Garrafa

    All manuals and user guides at all-guides.com MANUAL DE INSTRUÇÕES <CELULA GARRAGA> CELULA OLEO TEMPERATURA GARRAFA Quando CELULA GARRAFA estiver a piscar, carregar na tecla ENTER. Será visualizada a seguinte mensagem: CALIBRAGEM DADOS GARRAFA MENU PRECEDENTE Carregar na tecla ENTER NIVEL DE ZERO Levantar a garrafa Níveis...
  • Seite 173: Calibragem Balança Óleo

    All manuals and user guides at all-guides.com MANUAL DE INSTRUÇÕES xxxxx g xxxxx g Tare xxxxx g MENU PRECEDENTE Modificar os valores e Max, Min e Tara utilizando as setas e o teclado numérico, seleccionar MENU PRECEDENTE e carregar na tecla ENTER para confirmar: SALVAR DADOS: carregar START.
  • Seite 174: Programações

    All manuals and user guides at all-guides.com MANUAL DE INSTRUÇÕES <CELULA GARRAGA> CELULA OLEO TEMPERATURA GARRAFA Seleccionar TEMPERATURA GARRAFA e confirmar carregando na tecla ENTER: TEMPERATURA GARRAFA XX.X °C START para modificar STOP para sair Comparar a temperatura visualizada no display com a temperatura detectada pelo termómetro externo.
  • Seite 175: Unidade De Medida

    All manuals and user guides at all-guides.com MANUAL DE INSTRUÇÕES ENGLISGH ITALIANO FRANCAIS ESPANOL <- ESPANOL OBS. : a língua actualmente seleccionada está indicada com a seta “<-“ Utilizar as teclas SETA para visualizar as línguas disponíveis, confirmar a escolha carregando na tecla ENTER, a máquina fará...
  • Seite 176: Pressão

    All manuals and user guides at all-guides.com MANUAL DE INSTRUÇÕES carregar na tecla ENTER para trocar de g(kg) a oz(lb) ou de oz(lb) a g(kg). PESO g(Kg) PRESSAO TEMPERATURA °C <SAIR> Seleccionar SAIR e carregar na tecla ENTER para sair. PRESSÃO Seleccionar PRESSÃO: PESO...
  • Seite 177: Serviços

    All manuals and user guides at all-guides.com MANUAL DE INSTRUÇÕES CALIBRAGENS <VALORES E CONFIGUR.> ALARME SERVICO PREENCH GARRAFA seleccionar agora VALORES E CONFIGUR. <VALORES> CONFIGURACAO SERVICOS MENU PRECEDENTE Seleccionar VALORES Será visualizado o seguinte ecrã: Gas disp. xxxx g Oleo xxx cc Temperatura xxx °C...
  • Seite 178: Contadores

    All manuals and user guides at all-guides.com MANUAL DE INSTRUÇÕES Seleccionar OPCAO, será visualizado o seguinte ecrã: ..Chamar o serviço de assistência técnica para o código. Depois de introduzir o código, carregar na tecla ENTER: ESTADO TRACANTE <Carr. 1 tracante sim> Carr.
  • Seite 179: Código De Habilitação Operador

    All manuals and user guides at all-guides.com MANUAL DE INSTRUÇÕES CÓDIGO DE HABILITAÇÃO OPERADOR Ligar o equipamento, depois de alguns segundos será visualizado o MENU PRINCIPAL: MODO AUTOMATICO MODO ASSISTIDO MENU SUCESSIVO DISPONIB. XXXX G Seleccionar MENU SUCESSIVO: CALIBRAGENS VALORES E CONFIGUR. ALARME SERVICO PREENCH GARRAFA Seleccionar VALORES E CONFIGURAÇÃO:...
  • Seite 180: Placa Do Veículo

    All manuals and user guides at all-guides.com MANUAL DE INSTRUÇÕES PLACA DO VEÍCULO Toda vez que se realiza uma operação com um automóvel, o equipamento solicita a placa do mesmo, e o número será indicado no documento impresso. Carregando na tecla ENTER sem introduzir nenhum dado, o campo destinado à...
  • Seite 181: Uso

    All manuals and user guides at all-guides.com MANUAL DE INSTRUÇÕES NOMBRE MODELO: ... . . CANTITAD MODELO: ... . . Utilizar o teclado para introduzir o nome do modelo do veículo, confirmar carregando em ENTER.
  • Seite 182: Lavagem Equipamento (Opcional)

    All manuals and user guides at all-guides.com MANUAL DE INSTRUÇÕES O computador irá agora pedir o percurso para encontrar o Driver, escolher “FOLHEAR” e seleccionar o ficheiro iarvircomport.inf anteriormente posicionado no desktop, confirmar seleccionando a tecla “ABRIR”. Depois de ter pressionado a tecla “PRÓXIMO” será visualizada a última página que avisa que a instalação assistida foi concluída.
  • Seite 183 All manuals and user guides at all-guides.com LABEL Fig.1 Fig.2 Fig.3...
  • Seite 184 All manuals and user guides at all-guides.com Fig.4...
  • Seite 185 All manuals and user guides at all-guides.com Fig.5...
  • Seite 186 All manuals and user guides at all-guides.com Fig.6...
  • Seite 187 All manuals and user guides at all-guides.com Fig.7...
  • Seite 188 All manuals and user guides at all-guides.com Fig.8...
  • Seite 189 All manuals and user guides at all-guides.com Fig.9...
  • Seite 190 All manuals and user guides at all-guides.com Fig.10...
  • Seite 191 All manuals and user guides at all-guides.com Fig.11...
  • Seite 192 All manuals and user guides at all-guides.com Fig.12...
  • Seite 193 All manuals and user guides at all-guides.com...
  • Seite 194 All manuals and user guides at all-guides.com...

Inhaltsverzeichnis