Herunterladen Inhalt Inhalt Diese Seite drucken
cherubini Windtec Serie Einstellanleitungen

cherubini Windtec Serie Einstellanleitungen

Wetterstation windwächter & sonnensensor
Inhaltsverzeichnis

Werbung

Verfügbare Sprachen
  • DE

Verfügbare Sprachen

  • DEUTSCH, seite 22
SENSORE vENTO E vENTO/LUCE
WIND SENSOR & SUN SENSOR
WETTERSTATION WINDWäChTER
CAPTEUR DE vENT ET DE
ANEMÓMETRO CON SENSOR LUZ
PARA EL CONTROL DEL TOLDO
Serie - Series - Baureihe - Série - Serie
ISTRUZIONI - INSTRUCTIONS - EINSTELLANLEITUNGEN
& SONNENSENSOR
vENT-LUMIÈRE
INSTRUCTIONS - INSTRUCCIONES
I
GB
D
F
E
windtec
windtec lux

Werbung

Inhaltsverzeichnis
loading

Inhaltszusammenfassung für cherubini Windtec Serie

  • Seite 1 SENSORE vENTO E vENTO/LUCE WIND SENSOR & SUN SENSOR WETTERSTATION WINDWäChTER & SONNENSENSOR CAPTEUR DE vENT ET DE vENT-LUMIÈRE ANEMÓMETRO CON SENSOR LUZ PARA EL CONTROL DEL TOLDO windtec Serie - Series - Baureihe - Série - Serie windtec lux ISTRUZIONI - INSTRUCTIONS - EINSTELLANLEITUNGEN INSTRUCTIONS - INSTRUCCIONES...
  • Seite 2: Collegamenti Elettrici

    collegamenti elettrici Il sensore Windtec è costruito in due versioni: - Windtec: sensore vento - Windtec Lux: sensore vento e luce Entrambi i modelli sono alimentati a 230V AC e comunicano con i motori via radio (433,92MHz). I sensori Windtec e Windtec Lux sono compatibili con la serie di motori Blue Wave RX. WINDTEC azzurro WINDTEC LUx...
  • Seite 3 sensore vento e sensore luce attivati solo sensore vento attivato attivazione / disattivazione sensore luce skipper LuX skipper P-LuX IMPoRtAntE! Per utilizzare le funzioni luce nel mod. “Windtec Lux” è necessario acquistare un telecomando mod. “skipper Lux” o “skipper P-Lux”. REgoLAzIonE gRAdo dI dIMEnsIonI...
  • Seite 4: Telecomandi Compatibili

    telecomanDi comPatiBili display selezione del canale attivazione/disattivazione del sensore luce - Skipper Skipper Skipper Skipper (per Windtec Lux) *fare riferimento alle istruzioni specifiche del telecomando LEd - Skipper display - Skipper salita attivazione/disattivazione del stop sensore luce - Skipper discesa Skipper Skipper Skipper...
  • Seite 5: Posizione Del Sensore

    Posizione Del sensore imPortante! È indispensabile collocare il sensore Windtec lateralmente, il più vicino possibile alla tenda associata, evitando di posizionarla nella zona superiore o inferiore, coperta dalla tenda. CoRREtto sBAgLIAto sBAgLIAto associazione Di PiU’ motori al sensore una singolo sensore Windtec può essere utilizzato per automatizzare un gruppo di tende motorizzate.
  • Seite 6: Fissaggio Del Sensore

    fissaggio Del sensore Il sensore Windtec dispone di un meccanismo di posizionamento che ne permette il montaggio su qualsiasi superficie. Per regolare l’angolazione del supporto è necessario premere il pulsante posto in corrispondenza del perno di rotazione (vedi disegno). PREMERE...
  • Seite 7 inserimento Delle seQUenze Di comanDo La maggior parte delle sequenze di comando è composta da tre passi ben distinti, al termine dei quali il motore segnala, con diversi tipi di rotazione, se il passo si è concluso in modo positivo o negativo. Lo scopo di questo paragrafo è quello di riconoscere le segnalazioni del motore.
  • Seite 8: Memorizzazione Del Sensore

    memorizzazione Del sensore Per realizzare l’associazione del sensore al motore, è necessario aver già memorizzato un telecomando nel motore. La sequenza di memorizzazione è la seguente: tn: telecomando memorizzato 2 sec tasto set cancellazione Del sensore Per cancellare l’associazione del sensore ad un motore, è necessario usare un telecomando memorizzato nel motore.
  • Seite 9: Regolazione Della Funzione Vento

    regolazione Della fUnzione vento La regolazione della soglia del vento si effettua con l’apposita manopola, situata nella parte inferiore del sensore Windtec, identificata con il simbolo della manica a vento. La regolazione può essere impostata da una velocità minima di 7,5 km/h, fino a una velocità massima di 45 km/h.
  • Seite 10: Disattivazione Della Riapertura Automatica

    Disattivazione Della riaPertUra aUtomatica La funzione di riapertura può essere disattivata con la seguente sequenza di comando. tn: telecomando memorizzato tn (2 sec) regolazione Della fUnzione lUce (WinDtec lUX) La regolazione della soglia della luce si effettua con l’apposita manopola, situata nella parte inferiore del sensore Windtec Lux, identificata con REgoLAzIonE LuCE il simbolo del sole.
  • Seite 11: Modalità Test

    moDalità test questa funzione è utile per verificare la corretta comunicazione via radio, e per effettuare la prova delle funzioni vento e luce. Per attivare la funzione di tEst, tenere premuto il pulsante sEt (circa 2 sec.), finché il motore confermerà...
  • Seite 12: Electrical Connections

    ELECTRICAL CONNECTIONS There are two versions of the Windtec sensor: - Windtec: Wind sensor - Windtec Lux: Wind & Sun sensor Both models are supplied with 230V AC and communicate with the motors by radio frequency (433.92 MHz). The Windtec and Windtec Lux sensors are compatible with the Blue Wave RX range motors.
  • Seite 13 Wind & Sun sensor activate. only Wind sensor activate. enable/disable sun sensor Skipper LuX Skipper P-LuX ATTenTion! To use the light function in mod. “Windtec Lux” must employ a remote control “Skipper Lux” or “Skipper P-Lux”. SeTTing Sun deg.HuM. diMenSionS WeigHT ReF.
  • Seite 14: Compatible Remote Controls

    COMPATIBLE REMOTE CONTROLS display channel selector enable/disable sun sensor - Skipper Skipper Skipper Skipper (for WindTec Lux) *check the specific instruction book Led - Skipper display - Skipper enable/disable sun stop sensor - Skipper down Skipper Skipper Skipper (for WindTec Lux) KEY TO SYMBOLS - short motor rotation in one direction...
  • Seite 15: Where To Place The Wind & Sun Sensor

    WHERE TO PLACE THE WIND & SUN SENSOR ATTENTION! The Windtec sensor must be positioned to the side, as close as possible to its awning, and not above or below the awning coverage area. RigHT WRong WRong SETTING OF SEVERAL MOTORS TO ONE SENSOR one single Windtec sensor can be used to automate a group of motorised awnings.
  • Seite 16: Fitting The Wind & Sun Sensor

    FITTING THE WIND & SUN SENSOR The Windtec sensor has a positioning mechanism for fitting to any surface. To adjust fitting-angle, press the button to rotate the support (see drawing). PReSS...
  • Seite 17 COMMAND SEQUENCES Most of the command sequences have three distinct steps, at the end of which the motor indicates if the step has been concluded positively or not, by turning in different ways. This paragraph is provided to recognise the motor indications. The buttons must be pressed as shown in the sequence, without taking more then 4 seconds between one step and the next.
  • Seite 18: Setting The Wind & Sun Sensor

    SETTING THE WIND & SUN SENSOR To associate Windtec sensor to a motor, a remote control must be already memorised on the motor. The setting sequence is the following: Tn: already programmed remote control 2 sec Button set DELETING THE WIND & SUN SENSOR To delete the Windtec sensor from the motor, must be used a already programmed remote control.
  • Seite 19: Setting The Wind Sensor

    SETTING THE WIND SENSOR The wind level point can be set using the button provided in the lower part of the WindTec sensor, identified by the windsock symbol. The speed can be set from a minimum of 7,5 Km/h to a maximum of 45 Km/h. it’s prudent not to set the wind speed over the fourth level, which corresponds to 35 Km/h.
  • Seite 20: Deactivating Automatic Reopening

    DEACTIVATING AUTOMATIC REOPENING The automatic reopening function can be deactivated at any moment with the following command sequence: Tn: already programmed remote control Tn (2 sec) SETTING THE SUN SENSOR (Windtec Lux) The light level point can be set using the button provided in the lower part of the Windtec Lux sensor, identified by the sun symbol.
  • Seite 21: Test Mode

    TEST MODE This function is useful to check the correct communication via radio, and to perform the wind and sun function test. To activate the TeST function, hold the SeT button down for around 2 seconds, until the motor confirms the command by bringing the awning to half opening distance. The test function lasts for 3 minutes, during which the wind and light level settings can be checked, without waiting for the activation times.
  • Seite 22: Elektrische Anschlüsse

    ELEKTRISCHE ANSCHLÜSSE Diese Wetterstation wird in zwei Varianten angeboten: - Windtec: Windwächter - Windtec Lux: Windwächter und Sonnensensor Beide Modelle benötigen eine 230 AC Stromversorgung und Kommunizieren mit einer Frequenz von (433,92MHz) mit den Motoren. Die Wetterstationen Windtec und Windtec Lux sind mit den Rohrmotoren der Serie Blue Wave RX kompatibel.
  • Seite 23 Windwächter und Sonnsensor aktiv. nur Windwächter aktiv. EIN/AUS Sonnensensor SKippeR LuX SKippeR p-LuX AuFpASSen! zur Funktion der Wetterstation “Windtec Lux” muss ein Handsender “Skipper Lux” oder “Skipper p-Lux” verwendet werden. einSteLLung SCHutzgRAD DiMenSionen geWiCHt ARt.nR SonnenSenSoR (mm) (klux) IP33 300X140XH95 A520007 2,5 - 100 IP33...
  • Seite 24 COMPATIBLE REMOTE CONTROLS display Auswahl des Kanals ein/AuS Sonnensensor - Skipper Skipper Skipper Skipper (für Windtec Lux) *siehe die entsprechende Bedienungsanleitung LeD - Skipper display - Skipper ein/AuS Sonnensensor - Stop Skipper Skipper Skipper Skipper (für Windtec Lux) SYMBOLERKLÄRUNG - einzelne “kurze” Drehung in eine Richtung Windgeschwindigket einstellung...
  • Seite 25: Positionierung Der Wetterstation

    POSITIONIERUNG DER WETTERSTATION VORSICHT! Die Wetterstation Windtec Lux ist seitlich, so nahe wie möglich an der entsprechenden Markise zu montieren. Diese darf weder unterhalb oder oberhal, noch von der Markise verdeckt montiert werden. RiCHtig FALSCH FALSCH ANSCHLUSS MEHRERER MOTOREN AN DIE WETTERSTATION Mit einer einzelnen Wetterstation Windtec können bis zu 5 Markisen, die mit Rohrmotoren Blue Wave RX bestückt sind, gesteuert werden.
  • Seite 26: Befestigung Der Wetterstation

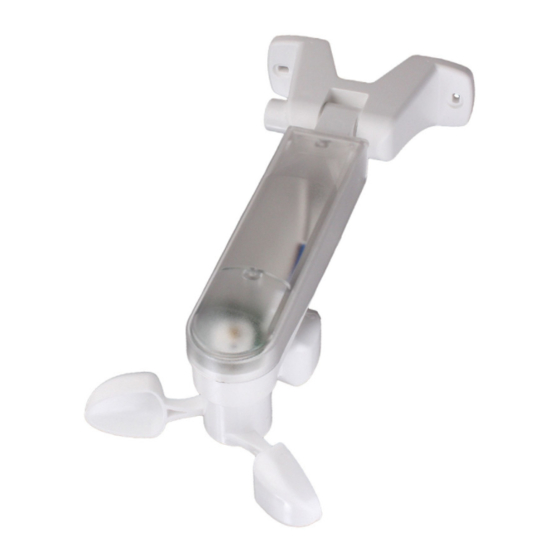
    BEFESTIGUNG DER WETTERSTATION Die Wetterstation Windtec beinhaltet einen Verstellmechanismus der die Montage in diversen positionen erlaubt. Die Verstellung der neigung des Halters kann durch drücken des “Knopfes” ausgeführt werden. Bei Druck löst sich die einrastung und ermöglicht die Verstellung. DRÜCKen...
  • Seite 27: Eingabe Der Befehlsfolgen

    EINGABE DER BEFEHLSFOLGEN Die meisten Befehlsfolgen entsprechen drei klar unterschiedlichen Schritten, bei deren ende der Motor, mit unterschiedlichen Drehungen, anzeigt ob die eingabe erfolgreich war oder misslungen ist. Hier werden die vom Motor gegebenen Signale erläutert. Die tasten müssen wie unten beschrieben gedrückt werden und es dürfen nicht mehr als 4 Sekunden von einem Schritt zum anderen verstreichen.
  • Seite 28: Einprogrammierung Der Wetterstation

    EINPROGRAMMIERUNG DER WETTERSTATION um die Wetterstation mit dem Motor in Verbindung zu bringen, muss ein bereits eingestellter Handsender benutzt werden. zur einstellung geht man wie folgt vor: tn: eingestellter Handsender 2 Sek taste set LÖSCHUNG DER WETTERSTATION zur Löschung der Verbindung der Wetterstation zum Motor, muss ein bereits eingestellter Handsender benutzt werden.
  • Seite 29: Einstellung Des Windwächters

    EINSTELLUNG DES WINDWÄCHTERS Die einstellung der Wind-Alarmauslösung erfolgt über das unten am gehäuse befindliche, mit dem Symbol der Windhose versehene, einstellrad der Wetterstation Windtec. Der “Windalarm” kann auf drei verschiedene niveaus, von minimal 7,5 Km/h bis maximal 45 km/h, eingestellt werden. es ist ratsam den Windalarm nicht über das vierte niveau, von 35 Km/h, einzustellen.
  • Seite 30: Deaktivierung Der Automatischen Öffnung Nach Einem Windalarm

    DEAKTIVIERUNG DER AUTOMATISCHEN ÖFFNUNG NACH EINEM WINDALARM nach einer Aktivierung kann die automatische Öffnung nach einem Windalarm mit den folgend beschrieben Befehlsfolgen erneut deaktiviert werden: tn: eingestellter Handsender tn (2 Sek) EINSTELLUNG DES SONNENSENSORS (Windtec Lux) einstellung niveaus Sonnen- Alarmauslösung erfolgt über das unten am gehäuse befindliche, mit dem Symbol der Sonne versehene, einSteLLung einstellrad der Wetterstation Windtec Lux.
  • Seite 31 TEST MODUS Mit diesem test Modus kann die Funkverbindung geprüft werden, und zugleich die Windwächter und Sonnensensor Funktion getestet werden. zur Aktivierung der testfunktion die taste Set ca. 2 lang drücken bis der Motor den Befehl bestätigt und die Markise auf ca. die Hälfte des “AB” Laufes bringt. Die testfunktion bleibt für 3 Minuten aktiv, während dessen es möglich sein wird die Wind+Sonne niveau einstellungen zu prüfen.
  • Seite 32: Connexions Électriques

    CONNEXIONS ÉLECTRIQUES Le capteur Windtec existe en deux versions: - Windtec: capteur de vent - Windtec Lux: capteur de vent et lumière Les deux modèles sont alimentés à 230V AC et communiquent avec les moteurs par radio (433,92 MHz). Les capteurs Windtec et Windtec Lux sont compatibles avec la série de moteurs Blue Wave RX.
  • Seite 33 active le capteur de vent et de lumière active le capteur de vent seulement activation / désactivation du capteur lumière skiPPeR LuX skiPPeR P-LuX tRÈs iMPoRtAnt! Pour utiliser les fonctions lumière du mod. “Windtec Lux”, il est nécessaire de se doter d’un émetteur mod.
  • Seite 34: Légende Des Symboles

    TÉLÉCOMMANDES COMPATIBLES display sélection du canal activation / désactivation du capteur lumière- Skipper Skipper Skipper (pour Windtec Lux) Skipper * voir les instructions specifiques Led - Skipper display - Skipper montée activation / désactivation du arrêt capteur lumière - Skipper descente Skipper Skipper...
  • Seite 35: Association De Plusieurs Moteurs Au Capteur

    MISE EN PLACE DU CAPTEUR TRÈS IMPORTANT! il est impératif de placer le capteur Windtec latéralement, le plus près possible du store auquel il est associé, et éviter de le placer dans la zone supérieure ou inférieure couverte par le store. CoRReCt inCoRReCt inCoRReCt...
  • Seite 36: Fixation Du Capteur

    FIXATION DU CAPTEUR Le capteur Windtec dispose d’un mécanisme de positionnement qui permet de le monter sur n’importe quelle surface. Pour régler l’angle de support, appuyer sur le bouton qui se trouve en correspondance avec l’axe de rotation (voir dessin). APPuYeR...
  • Seite 37 ACTIVATION DES SÉQUENCES DE COMMANDE Les séquences se composent pour la plupart de trois étapes bien distinctes à l’issue desquelles le moteur indique par différents types de rotation si l’étape s’est achevée de façon positive ou négative. Cette section a pour objet d’expliquer les signalisations du moteur.
  • Seite 38: Mémorisation Du Capteur

    MÉMORISATION DU CAPTEUR Pour effectuer l’association du capteur au moteur, il faut avoir mémorisé précédemment une télécommande sur le moteur. La séquence de mémorisation est la suivante: tn: télécommande mémorisée 2 sec touche set ANNULATION DU CAPTEUR Pour annuler l’association du capteur au moteur, il faut utiliser une télécommande mémorisée sur le moteur.
  • Seite 39: Réglage De La Fonction Du Vent

    RÉGLAGE DE LA FONCTION DU VENT Le réglage de la valeur de seuil du vent s’accomplit à travers le potentiomètre correspondant qui se trouve dans la partie inférieure du capteur Windtec, identifiée par le symbole d’une manche à vent. Le réglage peut être programmé d’une vitesse minimum de 7,5 km/h à...
  • Seite 40: Désactivation De La Réouverture Automatique

    DÉSACTIVATION DE LA RÉOUVERTURE AUTOMATIQUE Pour désactiver la fonction de réouverture automatique, accomplir à n’importe quel moment la séquence de commande suivante: tn: télécommande mémorisée tn (2 sec) RÉGLAGE DE LA FONCTION LUMIÈRE (Windtec Lux) Le réglage de la valeur de seuil de lumière s’accomplit à...
  • Seite 41: Mode De Test

    MODE DE TEST Cette fonction est utile pour vérifier la communication correcte par radio et pour faire l’essai des fonctions vent et lumière. Pour activer la fonction test, maintenir le bouton seL pressé (2 s environ) jusqu’à ce que le moteur valide la commande et porte le store à la moitié de la course d’ouverture. La fonction test reste active 3 minutes pendant lesquelles il sera possible de vérifier la configuration des seuils de vent et lumière sans qu’il soit nécessaire d’attendre les temps d’activation.
  • Seite 42: Conexiones Eléctricas

    CONEXIONES ELéCTRICAS El sensor Windtec ha sido fabricado en dos versiones: - Windtec: sensor viento - Windtec Lux: sensor viento y luz Ambos modelos son alimentados a 230V AC y la comunicación con el motor es vía radio (433.92 MHz). Los sensores Windtec y Windtec Lux son compatibles con la serie de motores Blue Wave RX.
  • Seite 43 sensor viento y luz activados sólo sensor viento activado Habilitar / deshabilitar functión luz skiPPER LuX skiPPER P-LuX ¡¡¡ MuY iMPoRtAntE !!! Para utilizar la función luz en el modelo “Windtec Lux” es necesario utilizar un emisor modelo “skipper Lux” o “skipper P-Lux”.
  • Seite 44: Emisores Compatibles

    EMISORES COMPATIBLES display selección del canal Habilitar / deshabilitar functión luz - Skipper Skipper Skipper Skipper (para Windtec Lux) *ver el libro de instrucciones del emisor LEd - Skipper display - Skipper suBidA Habilitar / deshabilitar stoP functión luz - Skipper BAJAdA Skipper...
  • Seite 45 POSICIONAMIENTO DE LA CENTRAL ¡¡¡ MUY IMPORTANTE !!! Es indispensable colocar el captor Windtec lo más próximo posible al toldo asociado, evitando posicionarlo en la parte superior o inferior del toldo. CoRRECto inCoRRECto inCoRRECto AGRUPACIÓN DE VARIOS MOTORES CON UNA CENTRAL un sólo captor Windtec nos permite controlar un grupo de toldos automatizados.
  • Seite 46 FIJACIÓN DE LA CENTRAL La central Windtec dispone de un mecanismo de posicionamiento que nos permitirá situar la central sobre cualquier superficie. Para regular el ángulo del soporte es necesario pulsar el botón situado junto a la articulación (véase dibujo). PuLsAR...
  • Seite 47 INSERCIÓN DE LA SECUENCIAS DE MANDO La mayor parte de las secuencias de mando están compuestas por tres pasos bien diferenciados, al término de los mismos el motor realiza una señal, con diversos tipos de rotación, según el paso haya concluido en modo positivo o negativo. El objetivo de este apartado es reconocer las indicaciones del motor.
  • Seite 48 MEMORIZACIÓN DE LA CENTRAL Para memorizar la central en el motor, es necesario haber memorizado con anterioridad un emisor en el motor. La secuencia de memorización es la siguiente: tn: Emisor ya memorizado 2 sec tECLA sEt BORRADO DE LA CENTRAL WINDTEC EN UN MOTOR Para proceder a la cancelación de una central en un motor, es necesaria la utilización de un emisor ya memorizado en el motor.
  • Seite 49: Regulación De La Función Viento

    REGULACIÓN DE LA FUNCIÓN VIENTO La regulación del umbral de viento se realiza por medio de un potenciómetro, situado en la parte inferior de la central Windtec e identificado con el símbolo del viento. El intervalo de funcionamiento del automatismo va desde una velocidad mínima de 7,5 km/H, hasta una velocidad máxima de 45 km/H.
  • Seite 50: Desactivación De La Reapertura Automática

    DESACTIVACIÓN DE LA REAPERTURA AUTOMÁTICA La función de reapertura automática puede ser desactivada con la siguiente secuencia de mando: tn: Emisor ya memorizado tn (2 sec) REGULACIÓN DE LA FUNCIÓN SOL (Windtec Lux) La regulación del umbral de sol se realiza por medio de un potenciómetro, situado en la parte inferior de la central Wintec Lux, identificado con el símbolo PotEnCióMEtRo...
  • Seite 51: Tecla Set

    MODO TEST Esta operación nos contrasta que la comunicación vía radio del motor con la central es totalmente correcta, y para efectuar la prueba de las funciones viento y luz. Para activar la función test, mantendremos pulsada la tecla sEt (2 seg), hasta que el motor nos confirme, que ha entrado en modo test, llevando el toldo hasta una posición intermedia del recorrido del mismo.
  • Seite 52 ANTRIEBSSYSTEME FÜR DEN SONNENSCHUTZ SISTEMAS DE ACCIONAMIENTO PARA PROTECCIÓN SOLAR cherubini s.p.a. 25081 Bedizzole (Bs) - Italy - Via Adige, 55 tel +39 030 6872039 - fax +39 030 6872040 - info@cherubini.it - www.cherubini.it cherubini iberia cherubini France 03630 sAX Alicante - spain 30600 Vauvert - france Avida.

Diese Anleitung auch für:

Windtec lux serie

Inhaltsverzeichnis