
Inhaltszusammenfassung für Bresser Junior Astro Planetarium
- Seite 1 Astro Planetarium Art. No. 8847100 Bedienungsanleitung Operating Instructions Mode d’emploi Handleiding Istruzioni per l’uso Instrucciones de uso Instrukcja obsługi...
- Seite 2 DOWNLOAD: STELLARIUM SKY CHART SOFTWARE DOWNLOAD 1. www.bresser.de/download/Stellarium 2. QR-Code Bedienungsanleitung ......... 4 Operating Instructions ......12 Mode d’emploi ........20 Handleiding ........... 28 Istruzioni per l’uso ........36 Instrucciones de uso ....... 44 Instrukcja obsługi ........52...
- Seite 3 Fig. 2 1* 1& 1& Fig. 1 Fig. 3...
- Seite 4 GEFAHR von Körperschäden! Setzen Sie das Gerät keinen Temperaturen über trennt gesammelt und einer umweltgerechten Dieses Gerät beinhaltet Elektronikteile, 60° C aus! Wiederverwertung zugeführt werden. die über eine Stromquelle (Netzteil und/ oder Batterien) betrieben werden. Lassen Sie GEFAHR von Sachschäden! Batterien und Akkus dürfen nicht im Hausmüll Kinder beim Umgang mit dem Gerät nie unbe- Bauen Sie das Gerät nicht auseinander!
- Seite 5 Garantie & Service EG-Konformitätserklärung Eine „Konformitätserklärung“ in Über- Die reguläre Garantiezeit beträgt 5 Jahre und be- einstimmung mit den anwendbaren ginnt am Tag des Kaufs. Die vollständigen Garan- Richtlinien und entsprechenden Normen ist von tiebedingungen und Serviceleistungen können der Bresser GmbH erstellt worden. Der vollstän- Sie unter www.bresser.de/garantiebedingungen dige Text der EG-Konformitätserklärung ist unter einsehen.
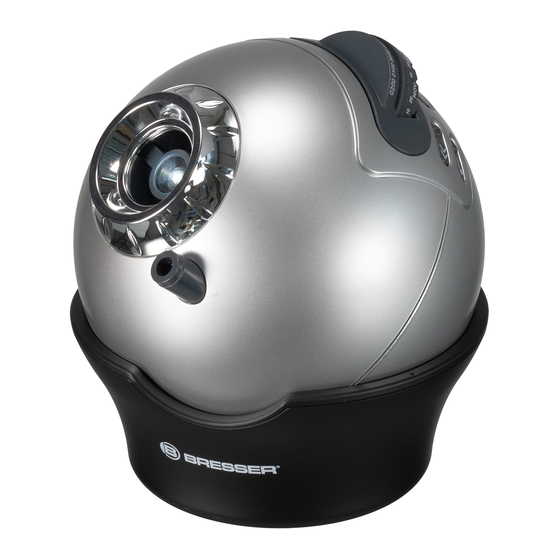
- Seite 6 Teile-Übersicht (Abb. 1-3) Stellen Sie jetzt den Standfuß für die Planetari- umskugel (9) auf einen ebenen und stabilen Un- 1. Planetariumskugel tergrund (z.B. Tisch) und setzen Sie die Planeta- 2. Ein/Aus/Stopp-Taste riumskugel (1) hinein. Dabei muss das Objektiv 3. Knopf zum Öffnen des Dia-Fachs (7) parallel zur Projektionsfläche (Wand oder 4.
- Seite 7 Himmelsprojektion mit dem HINWEIS: Aufgrund der Erdrotation ist die An- Rad für die Einstellung des Datums (5) Astro-Planetarium ordnung der Himmelsobjekte innerhalb eines Mit der Datumsskala des Rads können die 365 Drücken Sie den Knopf zum Öffnen des Dia-Fachs Jahres immer unterschiedlich. Daher sind nicht Tage eines Jahres nach Monaten geordnet einge- (3).
- Seite 8 Beispiel 2: Drücken Sie die Taste für die Einstellung des Sie möchten den Nachthimmel für den 30. De- Schlafmodus (4), um die gewünschte Zeit für die zember, 22:30 Uhr, mit dem Astro-Planetarium Abschaltautomatik (30 oder 60 Minuten) zu ak- anzeigen lassen (Projektion). Drehen Sie dazu tivieren.
- Seite 9 Technische Daten die südliche Halbkugel aktivieren und anpassen. HINWEISE zur Reinigung Drücken Sie dann bitte die Taste für die rechtssei- Trennen Sie das Gerät vor der Reinigung • Projektionsmethode: Optisch tige Rotation (16). Alle übrigen Funktionen sind von der Stromquelle (Netzstecker ziehen •...
- Seite 10 Problembehebung Es kann vorkommen, dass dein Astro-Planetarium nicht richtig funktioniert. Das muss nicht daran liegen, dass es defekt ist! Oft ist es so, dass eine Klei- nigkeit beim Aufbau nicht beachtet wurde. Deshalb haben wir dir hier die häufigsten Fehler aufgeschrieben, damit du versuchen kannst, ein Problem selbst zu beheben.
-
Seite 11: Problembehebung
Problem Möglicher Fehler Problembehebung Eventuell ist nicht die richtige Diaschei- Lege die Diascheibe (10) mit dem Simulation des Himmels in die Halterung be eingelegt. (11) ein. Das Planetarium projeziert nicht den gewünschten Him- Vermutlich hast du Datum und Uhrzeit melsausschnitt. Stelle das Datum des Beobachtungszeitraums in Verbindung mit der richtigen für den Beobachtungszeitraum nicht Uhrzeit wie in der Anleitung beschrieben ein. - Seite 12 RISK of physical injury! Do not subject the device to temperatures ex- In accordance with the regulations concerning This device contains electronic components ceeding 60 C. batteries and rechargeable batteries, disposing that are powered by either a mains connec- of them in the normal household waste is explic- tion or batteries.
- Seite 13 Warranty & Service UKCA Declaration of Conformity The regular guarantee period is 5 years and Bresser GmbH has issued a „Declara- begins on the day of purchase. You can consult tion of Conformity“ in accordance with the full guarantee terms and details of our applicable guidelines and correspond- services at www.bresser.de/warranty_terms.
- Seite 14 Finally, turn the planetarium sphere (1) in such right. a way so that the side directly across from the Setting up the astro planetarium After you’ve installed the batteries (15), put the slide plate holder (7) is pointing north (Fig. 4).
- Seite 15 Sky projection with the astro 30 Apr 2 days planetarium 26 28 Press the button for opening the slide drawer (3). The tray will open by itself (Fig. 2). Fig. 8 Set one of the two slide plates (10) into the slide Explanation of the knob for setting the date (5) plate holder (11).
- Seite 16 In order to save energy, the projection January (JAN (Fig. 9). automatically shuts down after 2 hours. When the astro planetarium is not in use, the de- Fig. 10 vice should be turned off simply by pressing the Fig.
- Seite 17 Using the shooting stars function TIPS on cleaning Technical information Remove the device from it’s energy source • Projection method: optical After activating the image rotation, you can also before cleaning (remove plug from socket • Observation position: 35° North* switch on the shooting stars function.
-
Seite 18: Troubleshooting
Troubleshooting It can happen that your Astro-Planetarium doesn’t work properly. That does not mean that there is something wrong with the machine! It is often the case that a small detail was forgotten while you were setting up. For that reason, we have compiled the most common mistakes here so that you can try to fix the problem yourself. - Seite 19 Problem Possible Mistake Solution Perhaps the wrong slide plate is in the Lay the slide plate (10) with the simulation of the sky into the holder (11). machine. The planetarium is not projecting the desired portion of the sky You have probably adjusted the date Adjust the date of the observation time span along with the correct time, as and time incorrectly.
- Seite 20 RISQUE de blessures corporelles! N’exposez jamais l’appareil à des températures niveau du droit national, les équipements élec- Cet appareil contient des pièces électro- de plus de 60° C ! triques doivent être triés et déposés à un endroit niques fonctionnant à l‘aide d’une source où...
- Seite 21 Déclaration de conformité CE Garantie et Service Bresser GmbH a émis une « déclaration La durée normale de la garantie est de 5 ans à de conformité » conformément aux lig- compter du jour de l’achat. Vous pouvez consul- nes directrices applicables et aux normes corres- ter l’intégralité...
- Seite 22 Aperçu-télé (Ilustr. 1-3) Montage de l’Astro-Planétarium petite impression (+/-) dans le compartiment à piles pour connaître la direction de la polarité. 1. Sphère Planétarium Ouvrez le couvercle du compartiment à piles (12) Si tu as introduit les piles (15), replacez le sup- 2.
- Seite 23 Tournez la Sphère Planétarium (1) de sorte que 30 Apr 2 days la partie en face du support pour les disques de diapositives (7) soit orientée vers le nord 26 28 (Illustr. 4). Fig. 8 Projection du ciel avec l’Astro Planétarium Explication de la roue pour le réglage de la date Appuyez sur le bouton pour ouvrir de fente pour Fig.
- Seite 24 Tournez la roue de réglage de date (5) jusqu’à 11, vous voyez les possibilités pour une projection Appuyez sur la touche pour le réglage du mode ce que le trait pour ’00:00’ soit au dessus sur sur le plafond (a) ou le mur (b). sommeil (4) pour activer l’heure souhaitée pour l’échelle de temps (6) entre les deux petits traits le dispositif automatique de déconnexion (30...
- Seite 25 Données techniques Appuyez sur la touche Marche/Arrêt/Stop (2) REMARQUES concernant le nettoyage pour arrêter la rotation. Avant de procéder au nettoyage de l’appa- • Méthode de projection : Optique De la même manière, vous pouvez activer et reil, séparez-le de la source de courant •...
- Seite 26 Dépannage Il peut arriver que ton Astro-Planétarium ne fonctionne pas correctement. Cela ne veut pas nécessairement dire qu’il est défectueux ! Souvent, il s’agit seulement d’un détail de montage qui n’a pas été respecté. C’est pourquoi nous avons décrit ci-dessous les erreurs les plus courantes pour que tu puisses essayer de régler le problème toi-même.
- Seite 27 Problème Erreur possible Dépannage Peut-être n’as-tu pas introduit la bonne Introduis la diapositive (10) avec la simulation su ciel dans le support (11). diapositive. Le Planétarium ne projette pas les extraits de ciel Peut-être n’as-tu pas correctement souhaités. Règle la date de la période d’observation par rapport à la bonne heure comme réglé...
-
Seite 28: Elektrische Schok
GEVAAR voor lichamelijk letsel! Stel het apparaat niet bloot aan temperaturen ten gescheiden worden ingezameld en volgens Dit apparaat bevat elektronische onderde- boven de 60ºC! de milieurichtlijnen worden gerecycled. len die via een stroombron (stroomvoor- ziening of batterijen) worden aangedreven. Zorg GEVAAR voor materiële schade! Batterijen en accu's mogen niet worden wegge- dat kinderen tijdens de bediening altijd onder... - Seite 29 Garantie & Service EG-conformiteitsverklaring “conformiteitsverklaring” De reguliere garantieperiode bedraagt 5 jaar en overeenstemming met de van toepas- begint op de dag van aankoop. De volledige ga- sing zijnde richtlijnen en overeenkomstige nor- rantievoorwaarden en servicediensten kunt u be- men is door Bresser GmbH afgegeven. De volle- kijken op www.bresser.de/warranty_terms.
- Seite 30 Overzicht van de onderdelen (afb. 1-3) Gebruiksklaar maken van het Als je de batterijen (15) er goed om in hebt astro-planetarium gelegd, zet je de batterijhouder (13) terug en 1. Planetariumbol schroeft hem weer vast. 2. Aan-/uit-/stop-toets Open het deksel van het batterijvak (12) aan de Tenslotte moet je het deksel van het batterijvak 3.
- Seite 31 Draai de planetariumbol (1) vervolgens zo om, dat de 2 days 30 Apr kant die zich tegenover de houder voor de diaschij- ven (11) bevindt, naar het noorden wijst (afb. 4). 26 28 Hemelprojectie met het astro-planetarium afb. 8 Druk op de knop om het diavak (3) te openen. De Uitleg bij het wiel om de datum mee in te stel- la gaat open (afb.
- Seite 32 Draai daarvoor het wiel om de datum mee in te licht op. Na de ingestelde tijd schakelt het appa- stellen (5) zo ver door, tot de streep voor ‚00:00‘ raat over naar de slaapmodus (ook energie-spaar- bovenop de tijdschaal (6) tussen de twee korte modus).
- Seite 33 Technische gegevens Gebruik van de vallende-ster-functie TIPS voor het schoonmaken Als u de beeldrotatie geactiveerd heeft (zie punt Ontkoppel het apparaat vóór het schoon- • Projectiemethode: Optisch 4), kunt u ook de vallende-ster-functie gebruiken. maken van de stroombron (stekker uit het •...
- Seite 34 Het oplossen van problemen Het kan gebeuren dat je astro-planetarium niet goed werkt. Het hoeft daarom niet kapot te zijn! Vaak is het zo, dat er een kleinigheid bij de opbouw mis is gegaan. Daarom hebben we hier de meest voorkomende problemen opgesomd, zodat je je probleem zelf kunt proberen op te lossen. Probleem Mogelijke fout Oplossing...
- Seite 35 Probleem Mogelijke fout Oplossing Waarschijnlijk heb je niet de juiste Leg de juiste diaschijf (10) met de nachthemel die je wilt bekijken in de diaschijf in het apparaat. houder (11). Het planetarium laat een andere nachthemel zien, dan Het kan ook zijn dat je de datum en tijd Stel het datum van de observatieperiode met de juiste tijd in zoals in de ik heb ingesteld.
- Seite 36 PERICOLO di lesioni! Non cortocircuitare l’apparecchio e/o le batterie Non gettare apparecchi elettrici nei comuni Il presente apparecchio contiene parti e non metterli a contatto con fiamme! L’esposi- rifiuti domestici! elettroniche che funzionano con l’apporto zione a temperature eccessive o un uso impro- Secondo la direttiva europea 2002/96/CE di energia da sorgenti elettriche (alimentatore prio dell'apparecchio può...
- Seite 37 Dichiarazione di conformità CE Garanzia e assistenza Bresser GmbH ha redatto una La durata regolare della garanzia è di 5 anni e de- "dichiarazione di conformità" in linea corre dalla data dell‘acquisto. Le condizioni com- con le disposizioni applicabili e le rispettive plete di garanzia e i servizi di assistenza sono norme.
- Seite 38 Panoramica dei componenti (Fig. 1-3) Montaggio del planetario astronomico Dopo aver messo le pile (15), inserisci nuovamen- te il supporto della batteria (13) e riavvitalo. 1. Sfera planetaria Apri il coperchio del vano batteria (12) situato Infine, rimetti al suo posto il coperchio del vano 2.
- Seite 39 Proiezione della volta celeste con il planetario 30 Apr 2 days astronomico 26 28 Premi il tasto per aprire il vano diapositive (3). Il vano si apre (fig. 2). afb. 8 Inserisci uno dei due dischi (10) nel supporto (11). Informazioni sulla ruota per l’impostazione del- la data (5) afb.
- Seite 40 Gira la ruota per l’impostazione della data (5) fin- Premere il tasto per l'impostazione della modalità ché il trattino che corrisponde a “00:00” in alto di sospensione (4) per attivare il tempo di spegni- sulla scala del tempo (6) non si troverà tra i due mento automatico desiderato (30 o 60 minuti).
- Seite 41 Dati tecnici le. A tal proposito, premere il tasto per la rotazio- AVVERTENZE per la pulizia ne a destra (16). Tutte le altre funzioni sono iden- Per pulire l’apparecchio, scollegarlo dalla • Sistema di proiezione: ottico tiche alla rotazione a sinistra (vedi punto 4.1). sorgente di energia elettrica (scollegare •...
- Seite 42 Soluzione dei problemi Può succedere che il tuo planetario astronomico non funzioni bene. Questo però non vuol dire necessariamente che sia guasto! Spesso è solo così che non si sono osservate delle piccolezze durante il montaggio. Quindi abbiamo raccolto qui gli errori più frequenti in modo tale che tu possa provare a risolvere il problema da solo.
- Seite 43 Problema Possibile errore Soluzione del problema Forse non hai inserito il disco delle Inserisci il disco (10) con la simulazione del cielo nel supporto (11). diapositive giusto. Il planetario non proietta il settore del cielo che vorrei Probabilmente non hai impostato cor- Regola correttamente la data e l’ora del periodo di osservazione, secondo le vedere.
- Seite 44 ¡PELIGRO de lesiones corporales! pueden producir cortocircuitos, incendios o in- ¡No deposite aparatos eléctricos en la basu- Este aparato incluye componentes elec- cluso explosiones! ra doméstica! Con arreglo a la Directiva Euro- trónicos operados a través de una fuente pea 2002/96/CE sobre aparatos eléctricos y de electricidad (equipo de alimentación y/o pi- ¡No exponga el aparato a temperaturas superio- electrónicos usados y a su aplicación en las res-...
- Seite 45 Garantía y servicio Declaración de conformidad de la Unión Europea (CE) El período regular de garantía es 5 anos inicián- Bresser GmbH ha emitido una "Declara- dose en el día de la compra. Las condiciones ción de conformidad" de acuerdo con de garantía completas y los servicios pueden las directrices y normas correspondientes.
- Seite 46 Tele-resumen (Fig. 1-3): Estructura del planetario las pequeñas inscripciones (+/-) que hay en el astronómico compartimento de las pilas. 1. Esfera del planetario 2. Tecla de encendido/apagado/parada Abra la tapa del compartimento de las pilas (12) Una vez que haya introducido las pilas (15) vuel- 3.
- Seite 47 tar la distancia de proyección necesaria. estación del año. Cada muesca de la escala se A continuación, gire la esfera del planetario (1) de corresponde con 30 minutos (Fig. 7). modo que la parte opuesta al soporte de los discos de diapositivas (7) señale hacia el Norte (Fig.
- Seite 48 Para ello, gire la rueda de ajuste de la fecha (5) (1) en la peana (9). En la Fig. 11 puede ver las seleccionado la distancia correcta. hasta que la muesca correspondiente a «00:00» posibilidades de una proyección en el techo (a) se encuentre arriba en la escala temporal (6) entre o en la pared (b).
- Seite 49 Presione la tecla de encendido/apagado/parada INDICACIONES sobre la limpieza Datos técnicos (2) a fin de detener la rotación. Antes de limpiarlo, retire el aparato de la • Método de proyección: óptico Del mismo modo, puede activar y adaptar la ro- fuente de alimentación eléctrica (extraer el •...
- Seite 50 Resolución de problemas Puede ocurrir que tu planetario astronómico no funcione correctamente. ¡Eso no significa que esté estropeado! Lo que suele pasar es que no se ha tenido en cuenta algún detalle durante el montaje. Por eso vamos a describirte aquí los errores más frecuentes, para que puedas intentar solucionar el problema por ti mismo.
- Seite 51 Problema Posible error Resolución del problema El planetario sólo proyecta un Seguro que no has introducido ningún Introduce en el soporte (11) uno de los discos de diapositivas (10) suminis- círculo de luz claro. disco de diapositivas. trados. A pesar de que el aparato Apaga el aparato por medio del interruptor de encendido/apagado (2) y está...
- Seite 52 NIEBEZPIECZEŃSTWO odniesienia obrażeń! ka temperatura i niezgodne z przeznaczeniem Nie wyrzucać urządzeń elektrycznych ra- To urządzenie zawiera części elektro- użytkowanie mogą spowodować zwarcia, poża- zem z odpadami z gospodarstwa domowe- niczne, które są zasilane prądem (zasi- ry, a nawet wybuchy! go! Zgodnie z Dyrektywą...
- Seite 53 Gwarancja i serwis Deklaracja zgodności WE „Deklaracja zgodności” zgodna ze sto- Standardowy okres gwarancji wynosi 5 lata i roz- sowanymi dyrektywami i odpowiednimi poczyna się z dniem dokonania zakupu. Wszel- normami została sporządzona przez Bresser kie informacje dotyczące gwarancji i świad- GmbH.
- Seite 54 Przegląd części (rys. 1-3) Ustawić podstawę na kulę planetarium (9) na równym i stabilnym podłożu (np. na stole), a 1. Kula planetarium następnie umieścić w niej kulę planetarium (1). 2. Przycisk WŁ./WYŁ./Stop Obiektyw (7) musi być ustawiony równolegle do 3. Przycisk do otwierania kieszeni na przeźrocze powierzchni wyświetlania (ściany lub sufitu) (rys.
- Seite 55 Projekcja nieba za pomocą WSKAZÓWKA: Na skutek ruchu obrotowego Koło do ustawiania daty (5) Astro-Planetarium kuli ziemskiej układ obiektów na niebie obser- Za pomocą podziałki daty na kole można ustawić Nacisnąć przycisk do otwierania kieszeni na wowany w okresie jednego roku zmienia się. 365 dni w roku uporządkowanych według przeźrocze (3).
- Seite 56 Przykład 2: Nacisnąć przycisk do ustawiania trybu czuwa- Jeśli chcą Państwo wyświetlić za pomocą Astro- nia (4), aby aktywować wybrany czas automaty- Planetarium nocne niebo dla dnia 30 grudnia, cznego wyłączania (30 lub 60 minut). Zaświeci godz. 22.30. Należy przesuwać koło do ustawia- odpowiednia dioda LED.
- Seite 57 Dane techniczne cania obrazu w prawo (16). Wszystkie pozostałe WSKAZÓWKI dotyczące czyszczenia funkcje są takie same jak w przypadku obracania Przed rozpoczęciem czyszczenia należy • Sposób wyświetlania: optyczny w lewo (patrz punkt 4.1). odłączyć urządzenie od źródła prądu • Pozycja obserwacji: 35° północ* (odłączyć...
- Seite 58 Rozwiązywanie problemów Może się zdarzyć, że Twoje Astro-Planetarium nie działa prawidłowo. Niekoniecznie oznacza to, że jest zepsute! Często okazuje się, że został przeoczony jakiś drobiazg przy montażu urządzenia. Dlatego wypisaliśmy poniżej najczęściej pojawiające się błędy, abyś sam/a spróbował/a je rozwiązać. Problem Możliwy błąd Rozwiązanie problemu...
- Seite 59 Problem Możliwy błąd Rozwiązanie problemu Być może włożone jest niewłaściwe Włóż przeźrocze (10) z symulacją nieba do kieszeni urządzenia (11). przeźrocze. Planetarium nie wyświetla wybranego fragmentu nieba. Prawdopodobnie nieprawidłowo usta- Ustaw datę obserwacji w połączeniu z właściwą godziną tak, jak opisano w wiłeś/aś...
- Seite 60 Contact Bresser GmbH Bresser UK Ltd. Gutenbergstraße 2 Suite 3G, Eden House 46414 Rhede · Germany Enterprise Way, Edenbridge, Kent TN8 6Hf, Great Britain www.bresser.de @BresserEurope �� ...