SecuFirst ALM314S Schnellstartanleitung
Quicklinks
ALC Electronics B.V.
Dr. Paul Janssenweg 151
5026 RH Tilburg | The Netherlands
www.secufirst.eu | www.alcelectronics.eu
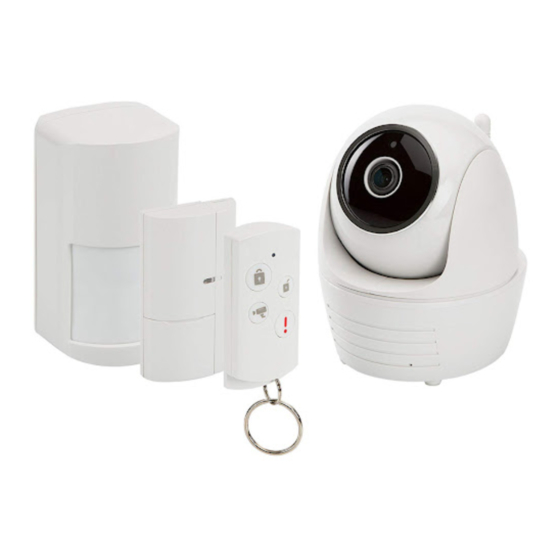
1. Box Content
Pan/Tilt Wireless
Power Adaptor
Camera Antenna
Appcam
x 1
x 1
Ethernet cable
Quick Start Guide
Note:
Please use maximum 128 GB of
Micro SD card XC class 10 or
Micro SD card XC class 10 UHS1
Micro SD Card is excluded in the
x 1
x 1
packaging
2.
Wi-Fi antenna
Power Adaptor
3.
SecuFirst HD Professional
Edition
omguardec2
INSTALL
4.
5.
Wi-Fi
Wi-Fi Direct
MORE
On
ALC Electronics 2.4 Ghz
Connected
HD-000026
6.
7.
Camera Name
Please plug in the power cable.
HD-000004
DID
DGAE-000004-LHHNE
Enter a new security password
Enter your new password
Wired Setup
lf your camera do not have a network
port, please use the wireless option.
Enter a new admin password
Enter your new password
Wireless Setup
Existing Camera
8.
9.
SecuFirst HD
System Name(Live Video)
Playing
ALC Electronics 2.4Ghz
System Arm/ Disarm
9.
Tip
1
Home position not set yet,
save current position to HOME
position?
Snapshot
Muted
Cancel
Save
A
B C
10.
Play
1
A
B
C
D
11.
Door Window Magnet
Motion Sensor
12.
2
1
EN
1. Box content
2. Screw on the Wi-Fi antenna to the IP camera.
Connect the power adaptor to the IP camera and a 230V
socket.
x 1
DO NOT connect an Ethernet cable during installation.
3. Download the Secufirst HD Professional Edition app from
the Google Play Store (Android) or Apple Store (iOS).
4. Go to the Wi-Fi settings of your smartphone or tablet.
Connect to a Wi-Fi signal called "HD-0........".
128
GB
The password of this Wi-Fi network is 12345678 (Note, this
connection has no internet available, this is correct).
Note, if this Wi-Fi signal is not being showed, remove the
ethernet cable and adaptor and plugin the adaptor again,
or reset the camera (See additional information below).
5. Open the app Secufirst HD Professional Edition and tap
"Press to add new system".
6. Tap "Wireless setup" and wait for 10 seconds.
7. Insert 2 new passwords.
1. Security password (To have live view).
2. Admin password (To change settings of the camera).
Tab "OK" and insert the 2 passwords which contain:
A) Minimum of 12 characters.
B) At least one capital letter (Example: A).
C) At least one small letter (Example: a).
D) At least one digit (Example: 1).
E) At least one reading sign (Example: ! ).
The new difficult passwords is for your own protection so
other unwanted people cannot have access to your camera.
Tab "Save" button.
8. Select your own Wi-Fi network.
There will be displayed 1 network but you can view all
networks close to the camera by tab the small arrow on the
right side of the displayed network.
After you have selected your Wi-Fi network insert your own
Wi-Fi password (Note, this is your own Wi-Fi pasword, not
the password you have entered in step 7 above).
Tab "Save" button.
Note, The Wi-Fi network "HD-0......" will not be visable again.
It's only during the installation of the camera.
9. The IP camera will restart. Tab "live view" and wait about
100 seconds.
The screenshot will show "Connected" after 100 seconds
and you can tab on "Play" to have the live view. In the live
video you can swipe the image to move the camera.
A) Make a snapshot of the image you have on your phone.
B) Audio unmute / mute
C) Record the live video manually
D) Pre set options for the angle of the camera.
E) Talk back to the camera from the smartdevice.
Save
You can speak while holding this button (Push to talk).
F) Armed / Disarmed.
Armed => Recordings and push notifications.
Disarmed => No recordings and push notifications.
G) Return to main menu.
When you leave the live view the first time, the app will ask
G
you to save the home position. Press "Save".
10. Settings in the main menu.
A) Add a new device. Only needed when you buy another
SecuFirst branded item.
We have an all-in 1 app for the categories: IP camera,
Door Entry, Alarm, Home automation and Lighting.
Armed
B) Edit settings. When you tab on this button then 3 buttons
will appear in the screenshot.
F
1) Settings
2) Errase current camera from this app.
3) Events to look back at recordings
(only if you have insert a micro SD card into the camera).
Tab the "Edit setting" button below to remove the 3 buttons
Record
PTZ
Talk
in the screenshot.
D
E
C) Reconnect button. If the camera doesn't show "Connected",
tab this button.
D) Info button.
11. Remove the plastic foil to activate the motion sensor,
remote control and door window magnet.
If you want to expand the set with more motion sensors,
please check our big manual because they need to set up
first.
12. To go to the advanced setting tab "Edit settings" and then
the "Settings" button in the screenshot.Please enter your
Camera name, example : Garden camera, then tab "Save".
2
3
To go to the advanced setting tab "Edit setting" and then
the "Setting" button in the screenshot.
Below in the next screen tab on the button "Advanced".
Insert the second password of step 7 (Admin password).
All the Advanced settings are explained in our big manual.
13. Downloads available on our website www.secufirst.eu
* Big manual
* How to install movies
Additional information
Video recording.
Insert a Mirco SD card, maximum 128GB, XC Class 10 /
XC Class 10 UHS1 (Not included).
Please disconnect the power adaptor before you install the
Remote Control
micro SD card. Put the Micro SD card in the Micro SD card slot
and connect the power adaptor again.
Finally you need to format the SD card in the advanced settings
of the app (FAT32).
Installation 2nd Smart device.
Download and install the "Secufirst HD Professional Edition"
app on your smart device. Open the app and tap "Press to add
new system".Tap "Excisting System". Enter camera name (Your
own choice), DID code and password. Tab "Save" Button, then
"Yes" to save the system.
Reset the camera to default.
The camera can be reset to default settings by holding a
paperclip on the reset button for 15 seconds. The reset hole
you can find on the back of the camera.
You notice the camera is reset when the LED starts flashing
quickly.The camera will reboot and after 20 seconds the
camera will turn.
The reset is completed.
Reset the device is needed in case of:
3
A) Installation cannot be completed
B) Forgot your password
C) Change to a new Wi-Fi network in another location.
Model: ALM314S Alarm System
NL
1. Doos inhoud.
2. Draai de antenne op de IP camera. Sluit de adapter aan op
de IP camera en plaats de stekker in het stopcontact.
Let op, GEEN internet kabel aansluiten tijdens de installatie.
3. Download de app "Secufirst HD Professional Edition" van de
Google Play Store (Android) of Apple Store (iOS).
4. Ga naar de wifi instellingen van uw smartphone of tablet.
Verbind met het wifi signaal "HD-0........". Het wachtwoord
voor dit wifi netwerk is 12345678 (De melding "dit netwerk
heeft geen internet" is correct).Let op, als het wifi netwerk
niet zichtbaar is dan de internetkabel verwijderen dan
adapter uit het stopcontact en weer terug plaatsen, of
camera resetten (Zie onderin bij Additionele informatie).
5. Open de app "Secufirst HD Professional Edition" en tik op
"Press to add new system".
6. Tik op "Wireless setup" en wacht 10 seconden.
7. Maak 2 nieuwe wachtwoorden aan.
1. Security password (Voor live beeld). 2. Admin password
(Voor instellingen in de camera te wijzigen).Tik op "OK" en
voeg 2 nieuwe wachtwoorden toe welke moet bestaan uit:
A) Minimaal 12 karakters.
B) Minimaal één hoofdletter (Voorbeeld: A)
C) Minimaal één kleine letter (Voorbeeld: a).
D) Minimaal één cijfer (Voorbeeld: 1).
E) Minimaal één leesteken (Voorbeeld: !).
De nieuwe wachtwoorden zijn moeilijk gemaakt voor uw
eigen veiligheid om te voorkomen dat ongewenste
personen toegang kunnen krijgen tot uw camera.
Tik op "Save".
8. Selecteer uw eigen wifi netwerk. Er is 1 netwerk zichtbaar.
Tik op het kleine pijltje rechts van het netwerk om alle
netwerken in de buurt van de camera te zien. Selecteer uw
eigen netwerk en vul vervolgens uw eigen wifi netwerk
wachtwoord in. (Let op, dit is uw eigen wifi wachtwoord,
niet te verwarren met het wachtwoord welke u bij stap 7
heeft ingevuld).Tik op "Save".Opmerking: Het wifi netwerk
"HD-0......" zal hierna niet meer zichtbaar zijn. Dit netwerk is
alleen bedoeld voor de installatie.
9. De IP camera zal opnieuw gaan opstarten. Tik op "Live view"
en wacht vervolgens 100 seconden.In het beginscherm zal
"Connected" zichtbaar zijn. Tik op "Play" om live beeld te
zien. Swipe met uw vinger over het live beeld om de camera
te laten draaien.
A) Maak een snapshot van de huidige schermafbeelding.
B) Audio aan of uit.
C) Maak handmatig een opname van het huidige live beeld.
D) Pre set instellingen voor de positie van de draaibare
camera.
E) Microfoon. Praat terug via de camera door tijdens het
spreken de microfoon ingedrukt te houden (Push to talk).
F) Armed / disarmed.
Armed => Opnames en push berichten actief (indien
ingesteld) Disarmed => Opnames en push berichten uit.
G) Keer terug naar het hoofdscherm.Bij de eerste keer live
beeld sluiten zal het systeem met een melding komen om de
"Home position" op te slaan. Tik op "Save".
10. Instellingen in het hoofdscherm.
A) Nieuw apparaat toevoegen. Alle producten onder het
merk SecuFirst kunnen worden toegevoegd in deze app
zoals: IP camera's, Wifi deurbel met camera, Alarm
systeem, Home automation en een verlichtingscamera.
B) Instellingen wijzigen. Tik op dit icoon en er zullen
vervolgens 3 iconen verschijnen op het screenshot.
1) Instellingen
2) Prullenbak om deze camera uit de app te verwijderen
3) Events om opgenomen beelden terug te kijken (indien u
een micro SD kaart heeft toegevoegd).Om de iconen weer
weg te krijgen uit het screenshot tikt u nogmaals onderaan
op instellingen.
C) Reconnect. Tik erop om de app opnieuw met de camera
te verbinden.
D) Informatie.
11. Om de bewegingssensor, afstandsbediening en deur/raam
magneet te activeren, dient u het plastic lipje te verwij-
deren. Wilt u de set uitbreiden met meerdere sensoren,
dan dienen deze ingeleerd te worden.
Uitleg hierover vindt u in onze uitgebreide handleiding.
12. Geavanceerde instellingen. Tik op "Edit settings" en
vervolgens op "Settings" in het camera screenshot. Bij
"Camera name" kan er een eigen naam worden gegeven
aan de camera bijvoorbeeld Camera tuin. Na het invullen
tikt u op "Save". Tik wederom op "Edit settings" en vervol-
gens op "Settings" in het screenshot. Tik op "Advanced"
onderin het scherm.Vul uw wachtwoord in welke is
ingegeven als admin wachtwoord bij stap 7. In onze
uitgebreide handleiding geven we verdere uitleg over de
geavanceerde instellingen.
13. Meer informatie kunt u vinden op onze website
www.secufirst.eu
* Uitgebreide handleiding.
* Installatie video's.
Additionele informatie
Video opnames
Gebruik een Micro SD kaart, XC Klasse 10 / XC Klasse 10 UHS1
van maximaal 128GB (Niet inbegrepen).Voordat u de Micro SD
kaart installeert, dient u de stroom van het product te halen
door de stekker uit het stopcontact te halen. Plaats de SD kaart
in het SD kaart slot en steek de stekker weer in het stopcon-
tact. Tot slot dient u de SD kaart te formatteren in de geavan-
ceerde instellingen van de app (FAT32).
Een 2de smartphone/tablet instellen voor deze
camera.
Download en installeer de app "Secufirst HD Professional
Edition".Open de app en tik op "Press to add new system" en
vervolgens op "Excisting system". Vul een eigen camera naam,
de DID code en het wachtwoord in. Tik op "Save" en vervolgens
op "Yes" om het systeem op te slaan.
Reset de camera naar standaard instellingen.
Druk met een paperclip op de reset knop achter op het
product. Houd deze voor 15 seconden ingedrukt. Het groene
lampje achterop de camera zal snel gaan knipperen. Dit
betekent dat de camera goed gereset is. De camera zal
opnieuw opstarten. Let op, tijdens het opstarten zal de camera
na ongeveer 20 sec. gaan draaien. Het apparaat moet gereset
worden indien:
A) De installatie niet gelukt is met de bovenstaande stappen.
B) U het wachtwoord vergeten bent.
C) U de camera op een ander wifi netwerk wilt aansluiten.

Verwandte Anleitungen für SecuFirst ALM314S

Inhaltszusammenfassung für SecuFirst ALM314S
- Seite 1 A) Nieuw apparaat toevoegen. Alle producten onder het 10. Settings in the main menu. ALC Electronics 2.4Ghz merk SecuFirst kunnen worden toegevoegd in deze app A) Add a new device. Only needed when you buy another zoals: IP camera's, Wifi deurbel met camera, Alarm SecuFirst branded item.
- Seite 2 A) Neues Gerät hinzufügen. Alle Produkte unter der Marke A) Ajouter un nouvel appareil. Tous les produits de la marque SecuFirst können hinzugefügt werden in dieser App, wie: SecuFirst peuvent être ajoutés dans l'app, comme : IP-Kameras, Wifi-Türklingel mit Kamera, Alarmanlage, Heimauto- caméras IP, sonnerie WIFI avec caméra, système d’alarme,...
- Seite 3 A) Agregar un nuevo dispositivo. Todos los productos de la marca Cliccate su "Save". Playing SecuFirst pueden ser añadidos en esta aplicación, como por 10. Impostazioni nella schermata principale. ALC Electronics 2.4Ghz ejemplo: cámaras IP, timbres wifi con cámara, el sistema de A) Aggiungere nuovo dispositivo.
- Seite 4 Klicka på "Save". 10. Indstillinger i hovedskærmen. 10. Inställningar i huvudskärmen. A) Tilføjelse af nyt apparat. Alle produkter af mærket SecuFirst kan A) Lägga till en ny apparat. Samtliga produkter under märket tilføjes i denne app, såsom: IP-kameraer, wi-fi-dørklokke med SecuFirst kan läggas till i denna app, till exempel: IP-kameror,...