Inhaltsverzeichnis
Werbung
Verfügbare Sprachen
Verfügbare Sprachen
Quicklinks
All manuals and user guides at all-guides.com
5x42 Night Vision
Nachtsichtgerät mit Aufnahmefunktion
Night Vision with record funtion
Appareil de vision nocturne avec fonction d'enregistrement
Dispositivo de visión nocturna con función de grabación
Visore notturno con funzione ripresa di immagini
BEDIENUNGSANLEITUNG
DE
INSTRUCTION MANUAL
GB
MODE D'EMPLOI
FR
INSTRUCCIONES DE USO
ES
РУКОВОДСТВО ПО ЭКСПЛУАТАЦИИ.
RU
ISTRUZIONI PER L'USO
IT
Art. No. 18-77450
Werbung
Inhaltsverzeichnis

Verwandte Anleitungen für Bresser 5x42 Night Vision


Inhaltszusammenfassung für Bresser 5x42 Night Vision
- Seite 1 All manuals and user guides at all-guides.com 5x42 Night Vision Nachtsichtgerät mit Aufnahmefunktion Night Vision with record funtion Appareil de vision nocturne avec fonction d’enregistrement Dispositivo de visión nocturna con función de grabación Visore notturno con funzione ripresa di immagini Art.
- Seite 2 All manuals and user guides at all-guides.com...
- Seite 3 All manuals and user guides at all-guides.com 6x AA Batterien erforderlich Batteries required...
-
Seite 4: Allgemeine Informationen
All manuals and user guides at all-guides.com Allgemeine Informationen ACHTUNG! Dieses Zeichen steht vor jedem Textabschnitt, der auf Sach- oder Um- Zu dieser Anleitung weltschäden bei unsachgemäßer Anwendung hinweist. Diese Bedienungsanleitung ist als Teil des Gerätes zu betrachten. Verwendungszweck Lesen Sie vor der Benutzung des Geräts aufmerksam die Sicherheitshin- Dieses Produkt dient ausschließlich der privaten Nutzung. - Seite 5 All manuals and user guides at all-guides.com BRAND-/EXPLOSIONSGEFAHR! VERÄTZUNGSGEFAHR! Setzen Sie das Gerät keinen hohen Temperaturen aus. Benutzen Sie nur Ausgelaufene Batteriesäure kann zu Verätzungen führen! Vermeiden die empfohlenen Batterien. Gerät und Batterien nicht kurzschließen oder Sie den Kontakt von Batteriesäure mit Haut, Augen und Schleimhäuten. ins Feuer werfen! Durch übermäßige Hitze und unsachgemäße Handha- Spülen Sie bei Kontakt mit der Säure die betroffenen Stellen sofort mit bung können Kurzschlüsse, Brände und sogar Explosionen ausgelöst...
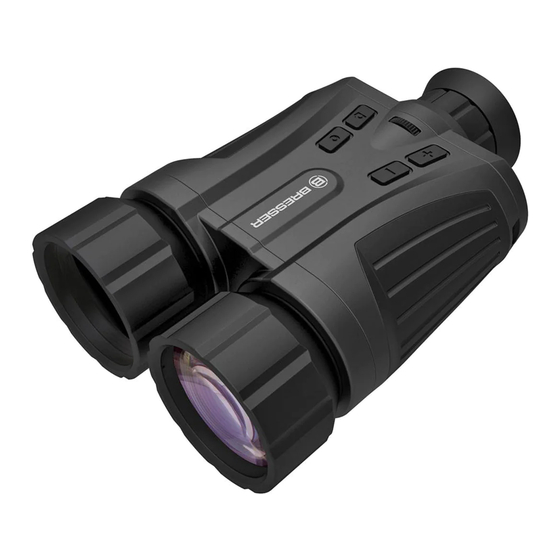
- Seite 6 All manuals and user guides at all-guides.com Teileübersicht Benutzen Sie nur die empfohlenen Batterien. Ersetzen Sie schwache oder verbrauchte Batterien immer durch einen komplett neuen Satz Bat- 1. Infrarotaufheller terien mit voller Kapazität. Verwenden Sie keine Batterien unterschiedli- 2. Objektiv cher Marken, Typen oder unterschiedlich hoher Kapazität.
-
Seite 7: Bedienung
All manuals and user guides at all-guides.com Bedienung Funktionen Richten Sie das Gerät auf ein Objekt das 20-30 m entfernt ist. 1. Bei diesem Nachtsichtgerät mit integriertem Infrarotaufheller ist es Schauen Sie ins Okular (3) und drehen Sie dieses, bis der Bild- möglich die Helligkeit der Infrarotbeleuchtung über die Tasten (4, 5) an- schirm klar zu erkennen ist. - Seite 8 All manuals and user guides at all-guides.com Multifunktionstaste (2 Funktionen): Bei eingeschaltetem Infrarotaufheller wird die Leuchtkraft je Tastendruck • Anschalten gesteigert bis 100% der Leuchtkraft erreicht ist. Ist die maximale Leis- • Abschalten tung erreicht, hat ein weiteres Drücken keine Auswirkung. Anschalten: Wenn das Gerät abgeschaltet ist, kann es durch kurzes ge- Multifunktionstaste (2 Funktionen): drückt halten der Taste eingeschaltet werden.
- Seite 9 All manuals and user guides at all-guides.com Fotoaufnahme Filmaufnahme Durch Drücken der Fotoaufnahme -Taste machen Sie eine Fotoaufnahme Die Filmaufnahme starten Sie durch Drücken des Aufnahmeknopfs; durch des Live-Bildes, die abgespeichert wird. erneutes Drücken dieses Knopfes beenden Sie die Filmaufnahme. Wäh- Die Auflösung der Fotobilder beträgt 768 x 582 Pixel.
-
Seite 10: Hinweise Zur Reinigung
All manuals and user guides at all-guides.com Hinweise zur Reinigung Verbindung mit einem Computer ACHTUNG! Unterbrechen Sie niemals eine bestehende Datenverbin- Trennen Sie das Gerät vor der Reinigung von der Stromquelle (Batterien dung zum Computer bevor Sie alle Daten übertragen haben. Durch eine entfernen)! Reinigen Sie das Gerät nur äußerlich mit einem trockenen Unterbrechung kann es zu Datenverlusten kommen. -
Seite 11: Garantie & Service
Geräte oder Batterien, die nach dem 01.06.2006 produziert wurden, erfahren Sie beim kommunalen Entsorgungsdienstleister oder Umweltamt. EG-Konformitätserklärung Eine „Konformitätserklärung“ in Übereinstimmung mit den anwendbaren Richtlinien und entsprechenden Normen ist von der Bresser GmbH erstellt worden. Diese kann auf Anfrage jederzeit eingesehen werden. -
Seite 12: General Information
All manuals and user guides at all-guides.com General Information NOTE! You will find this symbol in front of every section of text which deals with About this Instruction Manual the risk of damage to property or the environment. These operating instructions are to be considered a component of Intended Use the device. - Seite 13 All manuals and user guides at all-guides.com RISK OF FIRE/EXPLOSION! RISK OF CHEMICAL BURN! Do not expose the device to high temperatures. Use only the Leaking battery acid can lead to chemical burns. Avoid contact of recommended batteries. Do not short-circuit the device or batteries, or battery acid with skin, eyes and mucous membranes.
-
Seite 14: Scope Of Delivery
All manuals and user guides at all-guides.com Privacy PROTECTION! 8. Battery compartment The device is intended only for private use. Please heed the privacy of 9. LED status other people. Do not use it to look into apartments, for example. 10. - Seite 15 All manuals and user guides at all-guides.com Once the illuminator is switched on, viewing in complete darkness is To save images or videos, you need an SD memory card up to 32GB*. possible. Slide the micro SD memory card into the micro SD card slot (13) until it 4.
- Seite 16 All manuals and user guides at all-guides.com Multifunction button (2 functions): Taking photos • Switch on the infrared illuminator By pressing the photoshot button, you will take a picture of the live image, • Increase the light intensity of the illuminator which is then stored.
- Seite 17 All manuals and user guides at all-guides.com Taking a film Connection to a computer The film recording is started by pressing the recording knob; pressing ATTENTION! Never disconnect an existing data connection to the this same button again to stop the recording. During film recording, the computer before you transfer all the data.
-
Seite 18: Notes On Cleaning
All manuals and user guides at all-guides.com NOTES on Cleaning Before cleaning the device, disconnect it from the power supply (remove Do not dispose of electronic devices in the household garbage! batteries)! Only use a dry cloth to clean the exterior of the device. To As per Directive 2002/96/EC of the European Parliament on waste avoid damaging the electronics, do not use any cleaning fluid. -
Seite 19: Ec Declaration Of Conformity
All manuals and user guides at all-guides.com EC Declaration of Conformity Bresser GmbH has issued a „Declaration of Conformity“ in accordance with applicable guidelines and corresponding standards. This can be viewed any time upon request. Warranty & Service The regular guarantee period is 2 years and begins on the day of purchase. -
Seite 20: Informations Générales
All manuals and user guides at all-guides.com Informations générales REMARQUE! Ce symbole précède un passage destiné à mettre l’utilisateur en garde A propos de ce manuel face à un danger susceptible de résulter d’un usage inapproprié et pou- vant entraîner des dommages matériels ou de l‘environnement. Le présent mode d‘emploi doit être considéré... - Seite 21 All manuals and user guides at all-guides.com RISQUE de dommages corporels! RISQUE D’ELECTROCUTION! Les enfants ne doivent utiliser cet appareil que sous surveillance. Main- Cet appareil contient des pièces électroniques raccordées à une tenez les enfants éloignés des matériaux d’emballage (sacs plastiques, source d’alimentation électrique (batteries).
- Seite 22 All manuals and user guides at all-guides.com Périmètre de la livraison RISQUE de dommages matériels! Ne pas démonter l’appareil! En cas de défaut, veuillez vous adresser au Appareil de vision nocturne (A), sac en nylon (B), chiffon (C), service client de votre pays (figurant sur le bon de garantie). mode d’emploi Liste des pièces N‘utilisez que les batteries conseillées.
- Seite 23 All manuals and user guides at all-guides.com 13. Fente permettant d’insérer une carte micro SD 5. Dans l’obscurité totale, lorsque l’illuminateur infrarouge est allumé, sa (pour cartes SD* d’une capacité maximale de 32 Go) portée est d’environ 200 m. 14. Port Mini-USB Utilisation *non fournie Dirigez l’appareil sur un objet situé...
- Seite 24 All manuals and user guides at all-guides.com en émettant un petit bruit de clic et peut ensuite être retirée. Augmentation de l’intensité lumineuse de l’illuminateur infrarouge: Lorsque l’illuminateur infrarouge est à l’arrêt, celui-ci peut être mis en *non fournie marche en appuyant une fois sur ce bouton. Lorsque l’illuminateur infra- Touche multifonction (2 fonctions): rouge est en marche, une impulsion sur ce bouton permet d’augmenter •...
- Seite 25 All manuals and user guides at all-guides.com Enregistrement de photo Enregistrement vidéo En appuyant sur la touche Enregistrement photo, vous avez la pos- L’enregistrement vidéo peut être lancé en appuyant sur le bouton sibilité de capturer l’image qui s’affiche actuellement et de l’enre- d’enregistrement ;...
- Seite 26 All manuals and user guides at all-guides.com REMARQUE concernant le nettoyage Connexion à un ordinateur ATTENTION! Ne jamais couper une liaison de données existante avec Avant de nettoyer l’appareil, veuillez le couper de son alimentation l‘ordinateur avant d’avoir transféré toutes les données. Une interruption électrique (enlevez les batteries)! Ne nettoyez l’appareil que de l’extérieur de la connexion peut entraîner des pertes de données.
-
Seite 27: Garantie Et Service
Déclaration de conformité CE Bresser GmbH a émis une « déclaration de conformité » conformément aux lignes directrices applicables et aux normes correspondantes. Celle-ci peut être consultée à tout moment sur demande. -
Seite 28: Informaciones De Carácter General
All manuals and user guides at all-guides.com Informaciones de carácter general ¡NOTA! Este signo se encuentra delante de cualquier sección de texto que indica Sobre este manual daños materiales o medioambientales provocados por el uso indebido. El presente manual de instrucciones se debe considerar parte inte- Uso previsto grante del aparato. - Seite 29 All manuals and user guides at all-guides.com ¡PELIGRO DE INCENDIO/EXPLOSIÓN! ¡PELIGRO DE ABRASIÓN! No exponga el aparato a altas temperaturas. Utilice exclusivamente las Si se derrama el ácido de las pilas, este puede provocar abrasiones pilas recomendadas. ¡No cortocircuitar ni arrojar al fuego el aparato o Evite el contacto del ácido de las baterías con la piel, los ojos y las las pilas! El calor excesivo y el manejo inadecuado pueden provocar mucosas.
-
Seite 30: Contenido De La Entrega
All manuals and user guides at all-guides.com ¡PROTECCIÓN de la privacidad! 7. Encendido/Apagado El dispositivo están concebidos para el uso privado. Respete la privaci- 8. Compartimento de las pilas dad de las personas de su entorno – por ejemplo, no utilice este aparato 9. - Seite 31 All manuals and user guides at all-guides.com 2. Cuando el blanqueador de infrarrojos se encuentra apagado, la re- imagen de alta calidad. No es necesario girar más el ocular (3). Su dis- producción de imágenes se realiza mediante un refuerzo de la luz de positivo se encuentra configurado para sus necesidades.
- Seite 32 All manuals and user guides at all-guides.com Cuando el blanqueador de infrarrojos esté encendido se puede au- Botón multifunción (2 funciones): mentar la intensidad cada vez que pulse el botón hasta que se haya • Encendido alcanzado el 100% de intensidad. En este caso seguir pulsando el •...
- Seite 33 All manuals and user guides at all-guides.com Toma de instantáneas Grabación de películas Pulsando el botón de toma de instantáneas realizará una instantánea de Si pulsa el botón de grabación empezará un vídeo. Si vuelve a pulsar la imagen actual, que será guardada. dicho botón terminará...
-
Seite 34: Instrucciones De Limpieza
All manuals and user guides at all-guides.com INSTRUCCIONES de limpieza Conexión con el ordenador ATENCIÓN! Nunca interrumpa una conexión de datos establecida con el Antes de limpiar el aparato, desconéctelo de la fuente de electricidad ordenador hasta que todos los datos hayan sido copiados. La interrup- (quite las pilas). - Seite 35 Conforme a la directiva europea 2002/96/UE sobre aparatos eléctricos y electrónicos usados y a su aplicación en la legislación nacional, los Bresser GmbH ha emitido una „Declaración de conformidad“ aparatos eléctricos usados se deben recoger por separado y conducir a de acuerdo con las directrices y normas correspondientes.
-
Seite 36: Общая Информация
All manuals and user guides at all-guides.com Общая информация ВНИМАНИЕ! Этот символ располагается перед каждым фрагментом текста, в О данном руководстве котором имеется указание на риски материального ущерба или на- несения ущерба окружающей среде вследствие ненадлежащего ис- Данное руководство по эксплуатации является частью устрой- пользования. -
Seite 37: Опасность Пожара
All manuals and user guides at all-guides.com ОПАСНОСТЬ травмирования! ОПАСНОСТЬ ПОРАЖЕНИЯ ЭЛЕКТРОТОКОМ! Дети могут пользоваться устройством только под присмотром взрос- Данное устройство содержит электронные компоненты, приво- лых. Храните упаковку (пластиковые пакеты, резиновые ленты и пр.) димые в действие от источника тока (батарейки). Не оставляйте в... -
Seite 38: Комплект Поставки
All manuals and user guides at all-guides.com Детали прибора Используйте только рекомендованные батарейки. Заменяйте весь комплект разряженных или использованных батареек целиком. Не 1. ИК-осветитель устанавливайте батарейки разных марок, типов или емкостей. Если 2. Объектив устройство не будет использоваться в течение длительного времени, 3. -
Seite 39: Возможности Прибора
All manuals and user guides at all-guides.com Эксплуатация прибора Возможности прибора Наведите прибор на объект, расположенный на расстоянии 1. Яркость ИК-осветителя данного прибора ночного видения можно 25 м от вас. Посмотрите в окуляр (3) на дисплей и поворачи- отрегулировать при помощи соответствующих кнопок (4, 5). 2. - Seite 40 All manuals and user guides at all-guides.com Кнопка включения и выключения: При включенном ИК-осветителе нажатие этой кнопки увеличивает • Включение прибора яркость освещения до максимального значения. По достижении мак- • Выключение прибора симального значения яркость увеличиваться не будет. Включение прибора: для включения прибора нажмите и удержи- Кнопка...
- Seite 41 All manuals and user guides at all-guides.com Как сделать снимок Как записать видеоролик Нажмите спусковую кнопку затвора, чтобы сделать снимок, который Чтобы записать видеоролик, нажмите кнопку начала видеозапи- будет сохранен на установленную карту памяти. си. Повторное нажатие остановит запись. Во время записи рядом Разрешение...
-
Seite 42: Советы По Уходу
All manuals and user guides at all-guides.com Подключение к компьютеру поверхности устройства сухой салфеткой. Не используйте чистящую Не разрывайте подключение к компьютеру во время передачи ин- жидкость, она может повредить электронные компоненты. Линзы формации, так как это может привести к необратимой потере данных. (окуляры... - Seite 43 у местных властей. тии и о наших сервисных центрах можно получить на нашем сайте www.bresser.de/warranty_terms. Сертификат соответствия ЕС Сертификат соответствия был составлен с учетом действую- щих правил и соответствующих норм компанией Bresser GmbH. Его можно просмотреть по запросу в любое время.
-
Seite 44: Informazioni Generali
All manuals and user guides at all-guides.com Informazioni generali NOTA! Questo simbolo precede sempre le porzioni di testo che avvisano di Informazioni sul presente manuale eventuali pericoli legati a un utilizzo non conforme che può comportare danni materiali o ambientali. Questo manuale d’uso va considerato parte integrante dell’apparec- chio. - Seite 45 All manuals and user guides at all-guides.com PERICOLO di danni alla persona! RISCHIO DI FOLGORAZIONE! I bambini possono utilizzare l’apparecchio soltanto sotto la vigilanza di Questo apparecchio contiene componenti elettronici azionati da una un adulto. Tenere i materiali di imballaggio (sacchetti di plastica, elastici, sorgente di corrente (batterie).
-
Seite 46: Accessori In Dotazione
All manuals and user guides at all-guides.com Elenco delle parti componenti Utilizzare esclusivamente le batterie consigliate. Sostituire le batterie scariche o usate sempre con una serie di batterie nuove completamente 1. Illuminatore a infrarossi cariche. Non utilizzare batterie di marche, tipi o livelli di carica diversi. 2. - Seite 47 All manuals and user guides at all-guides.com Funzioni Puntare l’apparecchio su un oggetto posto a una distanza di 20-30 1. In questo visore notturno con illuminatore a infrarossi integrato è pos- m. Guardare attraverso l’oculare (3) e girarlo finché il riquadro dello sibile adattare la luminosità...
- Seite 48 All manuals and user guides at all-guides.com Tasto multifunzione (2 funzioni) Se l’illuminatore a infrarossi è acceso, ogni volta che si preme il tasto, • Accensione la luminosità aumenta fino a raggiungere il 100%. Una volta raggiunta la • Spegnimento potenza massima, premendo ulteriormente il tasto non si produce alcun effetto.
- Seite 49 All manuals and user guides at all-guides.com Ripresa fotografica Ripresa video Premendo il tasto della ripresa fotografica, si scatta un immagine dal vivo Per avviare la registrazione di un filmato, premere l’apposito tasto; se che viene memorizzata. lo si preme ancora una volta, la ripresa video si interrompe. Durante la La risoluzione delle foto è...
- Seite 50 All manuals and user guides at all-guides.com NOTE per la pulizia Collegamento con un computer ATTENZIONE! Prima di procedere con la pulizia, staccare l’apparecchio dalla sorgente Non interrompere mai un collegamento dati in corso con il computer, di corrente (rimuovere le batterie)! Pulire l’apparecchio soltanto con prima che il trasferimento dei dati sia stato completato.
-
Seite 51: Dichiarazione Di Conformità Ce
Dichiarazione di conformità CE Bresser GmbH ha redatto una „dichiarazione di conformità“ in linea con le disposizioni applicabili e le rispettive norme. Su richiesta, è visionabile in qualsiasi momento. - Seite 52 All manuals and user guides at all-guides.com Bresser GmbH Gutenbergstr. 2 · DE-46414 Rhede Besuchen Sie uns auf • Find us on: Germany www.bresser.de · service@bresser.de...