Phoenix SS1180 Bedienungsanleitung
Inhaltsverzeichnis
Verfügbare Sprachen
Verfügbare Sprachen
Quicklinks
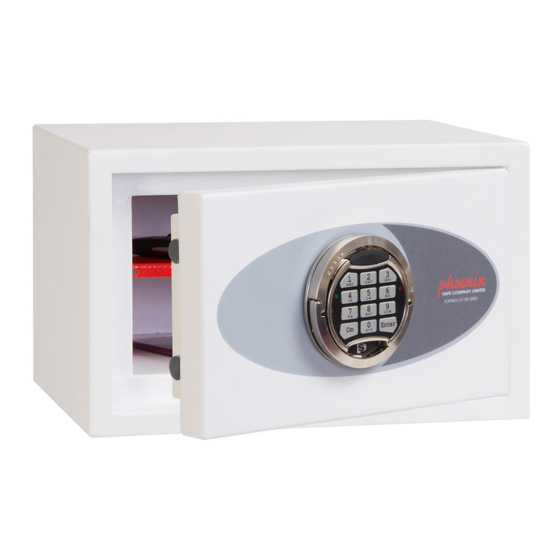
1. MAIN COMPONENTS
2. DEFINITIONS
2.1 Master Code
A set of numbers (6 to 8 digits) which opens the lock and is used for the
set up of all lock features.
Before using the safe, please change the factory Master code
(see par.4.1). It is strongly recommended to keep the master
code safe from unauthorized people. Do not use easily guessed
sequences (birthdays, house and phone numbers, etc.)
Factory Master Code:
1–2–3–4–5–6
2.2 User Codes
A set of numbers (6 to 8 digits) which opens the lock and has limited
functions to change the settings.
A maximum of 9 user codes can be set up.
The lock does not have a Factory User Code set up. Please see
par.4.2 to set the User codes.
2.3 Signals
Short single acoustic signal with single green LED flash (3)
[G]1
– confirmation of the button pressing on the keypad.
Short double acoustic signal with double green LED flash
[G]2
(3) – confirmation of successfully finished operation.
Long single acoustic signal with single red LED flash (4) –
[R]--
error message on the user's actions.
Short acoustic signal sounds 5 times with 5 red LED flashes
[R]5
(4) – low battery message. Please see par.5.1 how to
change the battery.
3. MAIN FUNCTIONS
3.1 Opening the Lock
3.1.1 Opening with the Factory Master code
[ON] [1] [2] [3] [4] [5] [6] [Enter]
3.1.2 Opening with the Master or User Code
[ON] [Master or User Code] [Enter]
If the code is correct, the green LED will flash twice and the door can be
opened within 5 seconds by turning the handle (2) clockwise.
If you enter a wrong code three times in a row, the keypad will be
locked for 5 minutes. This will be indicated with intermittent red
LED flashes.
OPERATING INSTRUCTION FOR SS1180, SS1190,
SS1440 & HS0670 & GUARANTEE REGISTRATION
Fig. 1.1
1. Keypad
2. Folding handle
3. Green LED [G]
4. Red LED [R]
5. Plastic cover for emergency
power
Phoenix Safe Company
where peace mind is guaranteed
3.2 Closing the Lock
Close the door and turn the handle (2) anti- clockwise until it stops.
4. SERVICE FUNCTIONS
It is strongly recommended to change the settings of the lock with
the door in the open position.
After changing the code, the lock should be tested several times
with the door in the open position.
The service functions will be unavailable in the case of low power
supply which is indicated by the signals, please refer to par.2.3,
[R]5.
4.1 Changing the Master Code
[ON] [Enter] [1] [Enter] [Current Master Code] [Enter] [new Master Code]
[Enter]
[repeat new Master Code] [Enter]
Checking the new Master code:
[ON] [new Master Code] [Enter]
4.2 Setting and changing the User Code–with the Master Code
Before setting or changing a User Code, the default Master Code
must to be changed (see par.4.1). Up to 9 user codes can be set
up.
[ON][Enter][2][Enter]
[1-9 (user code position)] [Enter] [Master Code] [Enter] [new User Code]
[Enter]
[repeat new User Code] [Enter]
Checking the new User Code:
[ON] [New User Code] [Enter]
4.3 Changing the User Code without the Master Code
[ON] [Enter] [3] [Enter]
[1-9 (user code positon)] [Enter] [Current User Code] [Enter]
[new User Code] [Enter]
[repeat new User Code] [Enter]
Checking the new User Code:
[ON] [new User Code] [Enter]
4.4 Deleting the User Code
[ON] [Enter] [0] [Enter] [1-9 (user code position)] [Enter] [Master Code]
[Enter]
4.5 Switching off/switching on the sound
[ON] [Enter] [5] [Enter] [Master Code] [Enter]
5. TIME DELAY FUNCTION
5.1 Switching on the Time Delay function
[ON] [Enter] [6] [Enter] [Master Code] [Enter] [01-99 – opening delay] [1-9
– opening window] [Enter]
E.g.: 092 = 9 minute delay time, and a 2 minute opening window
5.2 Opening the Lock with the Time Delay
[ON] [Master or User code] [Enter] (Wait for opening delay time to finish.
Acoustic signal will indicate the end.) [Master or User Code] [Enter]
Pressing [Enter] during the Time Delay will interrupt this feature,
and the process will have to start again.
5.3 Switching off the Time Delay function
[ON] [Enter] [6] [Enter] [Master Code] [Enter][000] [Enter]
V1 APR 2019
Inhaltsverzeichnis

Verwandte Anleitungen für Phoenix SS1180


Inhaltszusammenfassung für Phoenix SS1180
-
Seite 5: Servicefunktionen
OPERATING INSTRUCTION FOR SS1180, SS1190, SS1440 & HS0670 & GUARANTEE REGISTRATION 1. HAUPTKOMPONENTEN kann innerhalb der nächsten 5 Sekunden durch das Drehen des Klappg- riffes im Uhrzeigersinn geöffnet werden. Geben Sie 3mal hintereinander den falschen Code ein, ist die Codeeingabe für 5 Minuten gesperrt. Diesen Zustand erkennen Sie durch das regelmäßige Aufleuchten der roten LED. - Seite 6 OPERATING INSTRUCTION FOR SS1180, SS1190, SS1440 & HS0670 & GUARANTEE REGISTRATION 5.3 Zeitfunktionen deaktivieren Abbildung. 7.2 ON-Enter-6-Enter-Mastercode-Enter-000-Enter • drücken und halten Sie die neue Batterie an die Notbestromungskon- takte, belassen Sie bitte die Kontakte der Batterie an den Notbestro- mungskontakten 6.