Inhaltszusammenfassung für AmazonBasics B07715R57K
Seite 1
Beach Tent Tente De Plage Strandzelt Tenda da Spiaggia Refugio Para Playa ビーチテント 沙滩帐篷 B07715R57K...
Seite 2
English ........3 Français ......... 13 Deutsch ........23 Italiano ........33 Español ........43 日本語 ........53 中文 ........63...
Seite 3
Welcome Guide • English Beach Tent Contents: Before getting started, ensure the package contains the following components: Part...
Seite 4
Assembly Step 1: • Join the semi poles of both poles (A) and (D). Step 2: • Insert poles (A) into the sleeves at the back of the canvas (C).
Seite 5
Assembly Step 3: • Route the poles through the sleeves towards the front of the canvas. Step 4: • Insert one end of the poles (A) into the rings at the front of the canvas. • Insert the opposite end of the poles (A) into the rings located at the bottom of the back of the canvas.
Seite 6
Assembly Step 5: • Insert pole (D) into the sleeve that runs sideways on top of the canvas.
Seite 7
Assembly Step 6: • Insert end of pole (D) into the ring on one side of the canvas. Repeat on the other side.
Seite 8
Assembly Step 7: • Secure poles (A) and (D) at both their intersections by tying the ribbons (that are attached to the canvas) around them. Step 8: • Insert the pegs (E) through the loops around the perimeter of the canvas and stake them into the ground.
Seite 9
Assembly Step 9: • Fill the sand-bag anchors (B) with sand and place them inside the tent (at the sides or at the back) to weigh down the tent. Step 10:...
Safety and Compliance WARNING: Do not use as a camping tent! Do not have an open fire inside or in the proximity of the tent! The beach tent should not be completely shut while there are people inside! Risk of suffocation/heatstroke when the door is fully closed.
Weight: 2 kg Dimensions: 240 x 145 x 145 cm Warranty Information To obtain a copy of the warranty for this product: For US - Visit amazon.com/AmazonBasics/Warranty For UK - Visit amazon.co.uk/basics-warranty — or — Contact Customer Service at 1-866-216-1072...
Seite 12
Love it? Hate it? Let us know with a customer review. AmazonBasics is committed to delivering customer-driven products that live up to your high standards. We encourage you to write a review sharing your experiences with the product. Please visit: amazon.com/review/review-your-purchases# For further services: Visit amazon.com/gp/help/customer/contact-us...
Seite 13
Guide de Bienvenue • Français Tente De Plage Contenu : Avant de commencer, veuillez vous assurer que l’emballage contient les composants suivants : Composant Qté...
Montage Étape 1 : • Assemblez les demi-barres des deux barres (A) et (D). Étape 2 : • Insérez les barres (A) dans les manches situées à l’arrière de la toile (C).
Seite 15
Montage Étape 3 : • Faites passer les barres dans les manches vers l’avant de la toile. Étape 4 : • Insérez une extrémité des barres (A) dans les anneaux situés à l’avant de la toile. • Insérez l’extrémité opposée des barres (A) dans les anneaux situés en bas, à l’arrière de la toile.
Seite 16
Montage Étape 5 : • Insérez la barre (D) dans la manche latérale en haut de la toile.
Seite 17
Montage Étape 6 : • Insérez l’extrémité de la barre (D) dans l’anneau situé sur l’un des côtés de la toile. Répétez l'opération de l'autre côté.
Seite 18
Montage Étape 7 : • Fixez solidement les barres (A) et (D) au niveau de leurs deux intersections en nouant les rubans (fixés sur la toile) autour. Étape 8 : • Insérez les chevilles (E) dans les boucles situées le long du pourtour de la toile, puis plantez-les dans le sol.
Seite 19
Montage Étape 9 : • Remplissez les sacs de sable d’ancrage (B) avec du sable, puis placez-les à l’intérieur de la tente (sur les côtés ou à l’arrière) pour alourdir la tente. Étape 10 :...
Sécurité Et Conformité AVERTISSEMENT : Ne pas utiliser comme tente de camping ! Ne pas placer de feux ouverts à l’intérieur ou à proximité de la tente ! La tente de plage ne doit pas être complètement fermée lorsque des personnes se trouvent à l’intérieur ! Risque d’étouffement/de coups de chaleur lorsque la porte est complètement fermée.
Pliage Et Rangement • Suivez les étapes de l’installation dans l’ordre inverse pour démonter la tente, en veillant à ce que l’ensemble des composants et le manuel soient correctement rangés dans l’emballage, en vous référant à la liste des composants. •...
Seite 22
Vous l’adorez ? Vous le détestez ? Faites-le nous savoir en laissant un commentaire. AmazonBasics s’engage à vous offrir des produits axés sur les besoins de la clientèle et répondant à vos normes élevées. Nous vous encourageons à rédiger un commentaire visant à partager vos expériences sur le produit.
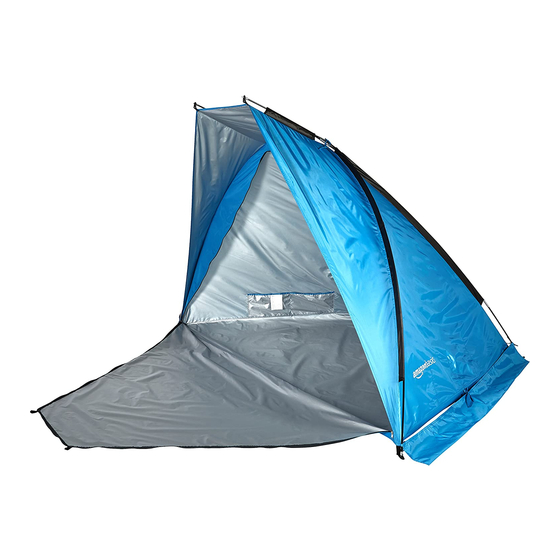
Seite 23
Bedienungsanleitung • Deutsch Strandzelt Inhalt: Bevor Sie beginnen, prüfen Sie, ob die Verpackung die folgenden Teile enthält: Teil Anzahl...
Seite 24
Montage Schritt 1: • Verbinden Sie die Teilstangen beider Stangen (A) und (D) miteinander. Schritt 2: • Stecken Sie die Stangen (A) in die Schläuche auf der Rückseite der Zeltleinwand (C).
Seite 25
Montage Schritt 3: • Führen Sie die Stangen durch die Schläuche zur Vorderseite der Zeltleinwand. Schritt 4: • Stecken Sie ein Ende der Stangen (A) in die Ringe an der Vorderseite der Zeltleinwand. • Führen Sie das gegenüberliegende Ende der Stangen (A) in die Ringe an der Unterseite der Zeltleinwand ein.
Seite 26
Montage Schritt 5: • Stecken Sie die Stange (D) in den Schlauch, der seitlich an der Zeltleinwand verläuft.
Seite 27
Montage Schritt 6: • Stecken Sie das Ende der Stange (D) in den Ring auf einer Seite der Zeltleinwand. Gehen Sie auf der anderen Seite genauso vor.
Seite 28
Montage Schritt 7: • Befestigen Sie die Stangen (A) und (D) an ihren beiden Schnittpunkten, indem Sie die Bänder (die an der Zeltleinwand befestigt sind) um sie herum binden. Schritt 8: • Stecken Sie die Stifte (E) durch die Schlaufen um den Rand der Zeltleinwand und stecken Sie sie in den Boden.
Seite 29
Montage Schritt 9: • Füllen Sie die Sandsackanker (B) mit Sand und legen Sie sie in das Zelt (an den Seiten oder auf der Rückseite), um das Zelt zu beschweren. Schritt 10:...
Sicherheit und Konformität WARNUNG: Nicht als Campingzelt verwenden! Kein offenes Feuer in oder in der Nähe des Zeltes! Das Strandzelt sollte nicht komplett geschlossen sein, solange sich Personen darin aufhalten! Erstickungs-/Hitzschlaggefahr, wenn die Tür komplett geschlossen ist. Lassen Sie Kinder niemals unbeaufsichtigt im Zelt. •...
Wartung und Pflege • Wischen Sie das Produkt nach Gebrauch mit einem feuchten Tuch ab. Technische Daten Gewicht: 2 kg Abmessungen: 240 x 145 x 145 cm Gewährleistung Eine Kopie der Gewährleistung für dieses Produkt erhalten Sie unter Besuchen Sie amazon.de/basics-garantie —...
Seite 32
Gefällt es Ihnen? Gefällt es Ihnen nicht? Dann bewerten Sie das Produkt auf unserer Webseite! AmazonBasics setzt sich für die Bereitstellung kundenorientierter Produkte ein, um Ihre hohen Qualitätsstandards zu erfüllen. Bitte schreiben Sie eine Rezension, in der Sie Ihre Erfahrungen mit dem Produkt teilen.
Seite 33
Guida di Benvenuto • Italiano Tenda da Spiaggia Contenuto: Prima di iniziare, assicurarsi che la confezione contenga i seguenti componenti: Pezzo Qtà...
Seite 34
Montaggio Passo 1: • Unire i semi-pali di entrambi i pali (A) e (D). Passo 2: • Inserire i pali (A) nei manicotti sul retro del telone (C).
Seite 35
Montaggio Passo 3: • Spingere i pali attraverso i manicotti verso la parte anteriore del telone. Passo 4: • Inserire una estremità dei pali (A) negli anelli sulla parte anteriore del telone. • Inserire l’estremità opposta dei pali (A) negli anelli situati sul fondo del retro del telone.
Seite 36
Montaggio Passo 5: • Inserire il palo (D) nel manicotto che corre lateralmente in cima al telone.
Seite 37
Montaggio Passo 6: • Inserire l’estremità del palo (D) nell’anello su un lato del telone. Ripetere per l’altro lato.
Seite 38
Montaggio Passo 7: • Fissare i pali (A) e (D) su entrambe le loro intersezioni legando i nastri (che sono attaccati al telone) intorno a questi. Passo 8: • Far passare i picchetti (E) attraverso gli occhielli intorno al perimetro del telone e fissarli a terra.
Seite 39
Montaggio Passo 9: • Riempire gli ancoraggi a sacco di sabbia (B) con sabbia e posizionarli dentro la tenda (sui lati o sul retro) per appesantire la tenda. Passo 10:...
Sicurezza e Conformità AVVERTENZA: Non usare come tenda da campeggio! Non accendere fuochi dentro o in prossimità della tenda! La tenda da spiaggia non deve essere chiusa completamente mentre ci sono persone all’interno! Rischio di soffocamento/colpo di calore in caso di porta completamente chiusa. Mai lasciare i bambini all'interno della tenda senza supervisione.
Cura e Manutenzione • Strofinare il prodotto con un panno umido dopo l’uso. Specifiche Peso: 2 kg Dimensioni: 240 x 145 x 145 cm Informazioni Di Garanzia Per ottenere una copia della garanzia del prodotto: Visita amazon.de/basics-garantie — o — Contattare il Servizio Clienti al 800 62 88 05...
Seite 42
Ti piace? Oppure no? Faccelo sapere scrivendo la tua recensione. AmazonBasics si impegna a distribuire prodotti orientati al cliente che siano all’altezza degli standard più elevati. Pertanto, invitiamo i clienti a scrivere una recensione per condividere le proprie esperienze con il prodotto.
Seite 43
Guía de Bienvenida • Español Refugio Para Playa Contenido: Antes de comenzar, compruebe que el embalaje incluye los siguientes componentes: Componente Cant.
Montaje Paso 1: • Una las mitades de ambas varillas (A) y (D). Paso 2: • Inserte las varillas (A) en las fundas de la parte posterior de la tela (C).
Seite 45
Montaje Paso 3: • Pase las varillas por las fundas hacia la parte frontal de la tela. Paso 4: • Inserte uno de los extremos de la varilla (A) en los anillos de la parte delantera de la tela. • Inserte el extremo opuesto de la varilla (A) en los anillos situados de la parte inferior trasera de la tela.
Seite 46
Montaje Paso 5: • Inserte la varilla (D) en la funda lateral de la parte superior de la tela.
Seite 47
Montaje Paso 6: • Inserte el extremo de la varilla (D) en el anillo de un lateral de la tela. Repita el proceso en el lado opuesto.
Seite 48
Montaje Paso 7: • Fije las varillas (A) y (D) en ambas intersecciones atando las cintas de la tela a su alrededor. Paso 8: • Inserte las piquetas (E) por los círculos situados alrededor del perímetro de la tela y fíjelas en el suelo.
Seite 49
Montaje Paso 9: • Llene los anclajes de arena (B) con arena y colóquelos dentro de la tienda (en los laterales y en la parte posterior) para sujetar la tienda. Paso 10:...
Seite 50
Seguridad y Cumplimiento ADVERTENCIA: ¡No utilizar como tienda de campaña! ¡No encienda fuego dentro o cerca de la tienda! ¡El refugio para playa no debe cerrarse totalmente si hay personas dentro! Riesgo de asfixia / insolación si la puerta está totalmente cerrada. Nunca deje a los niños sin vigilancia dentro de la tienda.
Cuidado y Mantenimiento • Limpie el producto con un paño húmedo después del uso. Especificaciones Peso: 2 kg Dimensiones: 240 x 145 x 145 cm Información Sobre La Garantía Para obtener una copia de la garantía de este producto: Visite amazon.de/basics-garantie —...
Seite 52
¿Le encanta? ¿No le gusta nada? Escriba una opinión como cliente. En AmazonBasics nos comprometemos a proveer productos pensados para satisfacer a nuestros clientes y que estén a la altura de sus elevados estándares de calidad. Le animamos a que escriba una opinión sobre su experiencia con el producto.