Herunterladen Inhalt Inhalt Diese Seite drucken

Werbung

Verfügbare Sprachen
  • DE

Verfügbare Sprachen

  • DEUTSCH, seite 66
Digital Binoculars
USER MANUAL
IR
MENU
IR
B1
1

Werbung

Inhaltsverzeichnis
loading

Inhaltszusammenfassung für Rexing B1

  • Seite 1 Digital Binoculars USER MANUAL MENU...
  • Seite 3 TABLE OF CONTENTS ENGLISH JAPANESE (日本語) FRENCH (FRANGAIS) ITALIAN (ITALIANA) SPANISH (ESPANOL) GERMANY (DEUTSCH)
  • Seite 4 Overview Thank you for choosing REXING! We hope you love your new product as much as we do. If you need assistance, or have any suggestions to improve it, please contact us. You can reach us via care@rexingusa.com or call us at (203) 800-4466. 日本のお客様は、...
  • Seite 5: Product Overview

    Product Overview...
  • Seite 6 Product Overview MENU Lens with Manual Focus IR LEDs USB Port/Micro SD Card Slot Cover Menu Button IR Up/Zoom in/Up Button Mode Button IR Down/Zoom Out/Down Button Shot Button Power Button Battery Cover Strap Hole...
  • Seite 7: Specification

    Specification IMAGE RESOLUTION 1M(1280x960)/VGA(640x480) 960P(1280x960@30FPS)/VGA(640x480@30FPS) VIDEO RESOLUTION APERTURE F 1.2 f=25mm LENS ANGLE FOV=10° , diameter is 24mm Inner screen 2.31 ”(960*240) TFT; DISPLAY SCREEN Outer screen 98*48mm DIGITAL ZOOM STORAGE MEDIA Micro SD card, up to 32GB VIEWING DISTANCE 200M-300M IN ALL DARK VIEWING DISTANCE...
  • Seite 8: Operating The Camera

    Operating the Camera...
  • Seite 9: Installation

    Installation Power Supply Inserting Memory Card Batteries Installation Please prepare a Micro SD card(up to 32GB) in advance. Please install batteries into the device before using. Open the card slot cover, you will see the card slot. Open the battery cover on the back of device.
  • Seite 10: Basic Operations

    Basic Operations Turn On And Turn Off Taking Still Photos Keep pressing the power button Turn on the device,the default for 3 seconds to turn on the is photo mode. If not, press device. Keep pressing the power the Mode button to switch to button for 3 seconds again can photo mode.
  • Seite 11 Basic Operations Recording Video Note Turn on the device, press the • About the manual focus: On the left Mode button to switch to lens, marked “far” and “near”. If the video mode. observation distance is far, please rotate the lens to left. If the distance Zooming: is near, rotate the lens to right.
  • Seite 12 Settings in Photo and Video Mode Press Menu button in photo or video mode, can change the settings. MENU Function Set the photo resolution. PHOTO RESOLUTION Options: [1M 1280x960]/[VGA 640x480] Set the video resolution. VIDEO SIZE Options:[960 1280x960]/[640 640x480] NIGHT VISION Choose the night vision sensitivity.
  • Seite 13 Settings in Photo and Video Mode DATE&TIME Set the date and time of device. Add the date stamp on the photo or video DATE STAMP files. Options: [Off]/[Date]/[Date&Time]. Set OSD (on-screen) language. Options:[English]/[Simplified Chinese/ LANGUAGE [Traditional Chinese]/[French]/[Dutch]/ [Spanish]/[ltalian]/[Portuguese]/[German]/ [Russian]/[Japanese]/[Korean]. Format your TF card. Format TF card will delete all files including the protected files.
  • Seite 14 Playback Playback Playback Menu List Turn on the device, press the Set the time period that the camera Mode button to switch to playback should wait before reacting to mode. subsequent activation of the main sensor after the initial recording. Press Up/Down button to view During the selected interval, the photos and video files.
  • Seite 15 Download files to PC There are two ways to download files from the device to a computer: • By inserting the memory card into a card reader. • By connecting the device to a computer using the supplied USB cable. Using a Card Reader Connecting the Device to a PC through the USB Cable...
  • Seite 17 製品の概要...
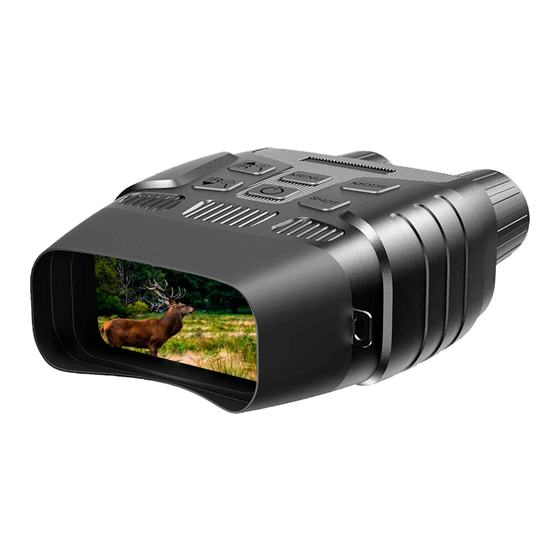
  • Seite 18 製品の概要 MENU レンズ (手動で調整可能) IR ライト USB 端子/Micro SDカードスロッ ト メニューボタン カバー モードボタン IRアップ/ズームイン/上方向ボタン シャッターボタン IRダウン/ズームアウト/下方向ボタン バッテリーカバー 電源ボタン ストラップホール...
  • Seite 19 仕様 静止画サイズ 1 M (1280x960) / VGA (640x480) 960P(1280x960@30FPS)/ ビデオサイズ VGA(640x480@30FPS) 絞り F 1.2 f=25mm レンズ FOV=10° 、 口径24mm 内部スクリーン2.31インチ ディスプレイ (960x240)TFT, 外部スクリーン 98x48mm デジタルズーム 4倍 記憶媒体 Micro SDカード、 最大32GBまで対応 夜間の撮影距離 200M-300M 弱光下での撮影距離 3m~無限 3W、 850nm、 強い赤外線スポッ トライト、 7 赤外ライ ト レベル赤外調整...
  • Seite 20 カメラの操作...
  • Seite 21 インス トール メモリーカードを挿入する 電池の取り付け Micro SDカードを用意してください。 電池の取り付け (最大32GB) 。 使用前に電池を装着してください。 スロッ トカバーを開いて、 カ ードスロッ 本機の後ろ側にあるバッテリーカバー トを確認します。 を開きます。 Micro SDカードの向きが正しいこと 6個の単三電池を取り付けくださ を確認して、スロットに挿入しま い。 バッテリーの極性が正しいこと す。無理にカードを挿入しないでく を確認してください。 ださい。 バッテリーカバーを閉じます。 使用前に、Micro SDカードをフォー マットします。フォーマットすること で、電池寿命が延び、シャッタース ピードが速くなります。 カードをスロットから取り出すに は、メモリーカードの端を静かに押 し込みます。カードが少し飛び出た 注意: ら、カードを取り出します。 • 製品に異なる種類の電池 や、新しい電池と古い電池 を同時に取りつけないでく...
  • Seite 22 基本操作 オン/オフ 写真を撮る 電源ボタンを3秒間押し続ける 本機の電源をOnにすると、既 と、本機がオンになります。 定で写真モードになっていま また、電源ボタンを3秒間押し続 す。写真モードでない場合 けると、オフになります。 は、モードボタンを押して、 写真モードに切り替えます。 MENU ズーム ボタンまたは ボタンを 押し続けて写真をズームしま す。ズーム値はスクリーンで表 示されます。 写真を撮る LCD画面で被写体を確認しま す。 シャッターボタンを押して写 真を撮ります。 モードの変更 本機には、写真モード、 ビデオ モード、 再生モ ードの3つのモード があります。 モ ードボタンを押し て、 異なるモードを切り替えます。 写真モード 静止画を撮る ビデオモード ビデオを録画する 再生モード 画像/ビデオファイルを再生する...
  • Seite 23 基本操作 注意 ビデオを録画する • 手動フォーカスについて : デバイスの 機器をオンにしてから、モード ボタンを押してビデオモードに切 レンズの左には 「Far」 と 「Near」 のマ ー り替えます。 クが付いています。 観察距離が遠い場 合は、 レンズを左に回します。 観察距離 ズーム が近い場合、 レンズを右に回します。 実 ボタンまたは ボタンを押 際の観察距離に応じて最適な焦点距離 し続けて画像をズームします。 を繰り返し調整できます。 ズーム値はスクリーンで表示さ れます。 • ビデオモードでは音がありません。 観測 距離が遠いため、 遠距離から音を送るこ 録画を開始する とはできません。 LCD画面で被写体を確認しま •...
  • Seite 24 写真モードとビデオモードの設定メニュー 写真モードとビデオモードでは、 メニューボタンを押すと設定を変更します。 メニュー 機能 画像解像度を設定する。 写真解像度 選択肢:「1M 1280x960」 / 「 VGA 640x480」 ビデオ解像度を設定する。 ビデオ解像度 選択肢:「960 1280x960」 / 「 640 640x480」 ナイトビジョンの感度を選択する。 ナイ トビジョンの 選択肢:「低」 / 「中」 / 「高」 。 感度 光源の周波数による干渉を防ぐために、お住ま いの地域に合った電力供給の周波数を設定しま 電源周波数 す。 選択肢:「50Hz」 / 「 60Hz」 。 電力を節約するために、...
  • Seite 25 写真モードとビデオモードのメニュー 日付と時間 デバイスの日時を設定する。 写真またはビデオに日時印を追加する。 日付スタンプ 選択肢:「オフ」/「日付」/「日付と時間」 スクリーンの言語を選択する。 選択肢:「英語」 / 「簡体字中国語」 / 「繁体字 中国語」 / 「フランス語」 / 「オランダ語」 / ス 言語 ペイン語」/「イタリア語」/「ポルトガル 語」/「ドイツ語」/「ロシア語」/「日本 語」/「韓国語」。 メモリカードをフォーマッ トすると、 ロック されたファイルを含むすべてのファイル が削除されます。 フォーマッ トする前に フォーマット 重要なファイルをコンピューターにコ ピーしてください。 選択肢:「はい」 / 「 いいえ」 。 本機の設定を工場出荷時の状態にリセット リセッ ト する。...
  • Seite 26 再生モード 再生 再生モードのメニュー 電源をオンにしてモードボタンを押 最初の録画の後に、メインセンサーが して再生モードに切り替えます。 反応するまでのカメラの待機時間を設 定します。 上方向/下方向ボタンを押して写真/ビ 選択した間隔のあいだ、カメラは画像 デオファイルを表示します。 や動画を記録しません。 ビデオを再生する これにより、メモリカードが同じ瞬間 シャッターボタンを押して録画したビ の録画で容量がいっぱいになるのを防 デオの再生を開始します。 ぎます。「5~60秒」または「1~60 分」を選択できます。 もう一度シャッターボタンを押すと、 一時停止します。 メニュー 機能 メニューボタンを押して現在のビデオ メモリーカード内の の再生を停止します。 現在表示している1 メニューボタンを押すと、ビデオ つのファイル、また の再生を中止します。再生モード は全てのファイルの ファイル でメニューボタンを押すと、ディ 保護をします。 保護 スプレイに再生モードのメニュー 選択肢:[1つのファイ が表示されます。上方向/下方向ボ ル保護On/1つのファ タンで保護または削除を選択して イル保護Off]/[すべて...
  • Seite 27 ファイルをコンピューターにダウンロード する デバイスのメモリカードからコンピュータにファイルをダウンロードするには、 2つの 方法があります。 • メモリーカードをカードリーダーに挿入します。 • 付属のUSBケーブルを使用して、 デバイスをコンピューターに接続しま す。 デバイスをUSBケーブルでコンピュー カードリーダーを使用する ターに接続する メモリーカードをデバイスから取り出 し、 カードリーダーに挿入してコン デバイスをオンにします。 同梱され ピュータ ーに接続します。 ているUSBケーブルでパソコンと接 続します。 [マイコンピュータ]またはWindows エクスプローラを開き、 メモリカード デバイスをパソコンと接続する を表す「リムーバブルディスク」ア と、スクリーンに「MSDC」と表 イコンをダブルクリックします。 示されます。 メモリカードからコンピューターの任 [マイ コンピュータ]または 意のディレクトリにファイルをコピ ー [Windows エクスプローラ]を開き します。 ます。 「リムーバブルディスク」アイコ...
  • Seite 29 Apparence du produit...
  • Seite 30 Apparence du produit MENU Objectif (avec focalisation manuelle) Lumière IR Port USB/Couvercle de la fente pour Touche Menu carte TF Touche Mode IR + /Zoom en avant/Touche + Touche Déclencheur IR - /Zoom en arrière/Touche - Couvercle du compar- Touche d’alimentation timent à...
  • Seite 31: Spécifications

    Spécifications TAILLE D’IMAGE FIXE 1 M (1280x960) / VGA (640x480) 960P(1280x960@30FPS)/ TAILLE DE LA VIDÉO VGA(640x480@30FPS) ANNEAU LUMINEUX F 1.2 f=25mm OBJECTIF FOV = 10 °, diamètre : 24mm Écran interne TFT 2,3T (960 * 240) HD; ÉCRAN D’AFFICHAGE Écran externe 98 * 48mm ZOOM NUMÉRIQUE SUPPORT DE Carte TF, jusqu’à...
  • Seite 32 Opération de l’appareil photo...
  • Seite 33 Installation Installation des batteries Insérer une carte mémoire Installation des batteries Préparer une carte TF (32 Go maximum) à l’avance. Veuillez installer les batteries dans l’appareil avant l’utilisation. En ouvrant le couvercle de la fente pour carte TF, vous verrez la fente Ouvrez le couvercle du compar- pour carte.
  • Seite 34: Opérations De Base

    Opérations de base Allumer et éteindre Prendre une photo Maintenez enfoncé la touche Après que l’appareil est d’alimentation pendant 3 secondes allumé, il entre en mode Photo pour allumer l’appareil de vision par défaut. Sinon, appuyez sur nocturne. Appuyez à nouveau sur la touche Mode pour passer le bouton d’alimentation pendant 3 en mode Photo.
  • Seite 35 Basic Operations Enregistrement vidéo Remarques Allumez l’appareil, appuyez sur • À propos de la focalisation manuelle: les la touche Mode pour passer mots “loin” et “proche” sont marqués sur en mode Vidéo. l’objectif gauche de l’appareil. Si la distance d’observation est relativement éloignée, Zooming tournez l’objectif vers la gauche.
  • Seite 36 Menu en mode Photo et Vidéo Appuyez sur la touche Menu en mode Photo ou Vidéo, vous pouvez modifier les paramètres comme suit. MENU Fonction RÉSOLUTION DE LA Définir la résolution de la photo PHOTO Options: [1M 1280x960] / [VGA 640x480]. RÉSOLUTION DE LA Définir la résolution de la vidéo VIDÉO...
  • Seite 37 Menu en mode Photo et Vidéo DATE ET TEMPS Définir le temps et la date de l’appareil. Ajouter l’horodatage sur les fichiers de photo HORODATAGE ou vidéo. Sélectionnez : [Arrêt] / [Date] / [Date et Temps]. Définir la langue d’affichage à l’écran. Options: [anglais] / [chinois simplifié] / [chinois LANGUE traditionnel] / [français] / [néerlandais] /...
  • Seite 38 Lecture Lecture Menu en mode Lecture Allumez l’appareil, appuyez sur la Définissez la période de temps que la touche Mode pour passer en mode caméra doit attendre avant de réagir de lecture. à l’activation ultérieure du capteur principal après l’enregistrement initial. Appuyez sur la touche +/- pour Pendant le intervalle sélectionné, parcourir des photos et des...
  • Seite 39 Télécharger des fichiers sur un ordinateur Il existe deux manières de télécharger des fichiers de l’appareil sur un ordinateur: Insérez la carte TF dans un lecteur de carte. • Connectez l’appareil de vision nocturne à l’ordinateur à l’aide du • câble USB fourni.
  • Seite 41: Panoramica Del Prodotto

    Panoramica del Prodotto...
  • Seite 42 Panoramica del Prodotto MENU Obiettivo con messa a fuoco manuale LED IR Porta USB / Slot per scheda Micro SD Pulsante Menu Pulsante IR Su / Zoom avanti / Su Pulsante modalità Pulsante IR giù / Zoom indietro / Giù Pulsante di sparo Pulsante diaccensione Battery Cove...
  • Seite 43: Specificazione

    Specificazione DIMENSIONI 1 M (1280x960) / VGA (640x480) IMMAGINE FISSA DIMENSIONE DEL 960P(1280x960@30FPS)/ VIDEO VGA(640x480@30FPS) APERTURA F 1.2 f=25mm ANGOLI FOV = 10 °, diametro è 24mm DELL’OBIETTIVO Schermo interno 2.3T (960 * 240) TFT SCHERMO Schermo esterno 98 * 48mm ZOOM DIGITALE SUPPORTI DI SD Karte, Maximum zu 32GB...
  • Seite 44 Operare il visore notturno digitale...
  • Seite 45: Installazione

    Installazione Alimentazione elettrica Inserimento della scheda di memoria Alimentazione elettrica Preparare in anticipo una scheda Installare le batterie nel dispositivo Micro SD (fino a 32 GB). prima dell’uso. Aprire il coperchio dello slot della Aprire il coperchio della batteria scheda, vedrai lo slot della scheda. sul retro del dispositivo.
  • Seite 46: Operazioni Di Base

    Operazioni di base Attiva e disattiva Scatto di foto Tenere premuto il pulsante di Accendi il dispositivo, accensione per 3 secondi per l’impostazione predefinita accendere il dispositivo. Tenere è la modalità foto. In caso premuto di nuovo il pulsante di contrario, premere il pulsante accensione per 3 secondi per Modalità...
  • Seite 47 Operazioni di base fotoRegistrazione di video Avviso Accendere il dispositivo, • Informazioni sulla messa a fuoco manuale: premere il pulsante Modalità sull’obiettivo sinistro, contrassegnato “lontano” per passareAlla modalità video e “vicino”. Se l’osservazione la distanza è lontana, ruotare l’obiettivo verso sinistra. Lo zoom Se la distanza è...
  • Seite 48 Impostazioni in modalità Foto e Video Premere il pulsante Menu in modalità foto o video, è possibile modificare le impostazion. MENU Funzione Imposta la risoluzione della foto. FOTO RISOLUZIONE Opzioni: [1M 1280x960] / [VGA 640x480]. DIMENSIONE DEL Imposta la risoluzione video. VIDEO Opzioni: [960 1280x960] / [640 640x480].
  • Seite 49 Impostazioni in modalità Foto e Video APPUNTAMENTO Imposta la data e l’ora del dispositivo Aggiungi il timbro della data sui file di foto o TIMBRO DELLA DATA video. Opzioni: [Di] / [data] / [DateTime] Imposta la lingua OSD (sullo chermo) Opzioni: [inglese] / [cinese semplificato / LINGUAGGIO [Cinese tradizionale] / [francese] / [olandese]...
  • Seite 50 Riproduzione Riproduzione Elenco dei menu di riproduzione Accendi il dispositivo, premi il Imposta il periodo di tempo che pulsante Modalità per passare alla la fotocamera deve attendere modalità di riproduzione. prima di reagire alla successiva attivazione di sensore principale Premere il pulsante Su / Giù per dopo la registrazione iniziale.
  • Seite 51 Scarica i file sul PC Esistono due modi per scaricare i file dal dispositivo su un computer: Inserendo la scheda di memoria in un lettore di schede. • Collegando il dispositivo a un computer utilizzando il cavo USB in • dotazione.
  • Seite 53: Descripción Del Producto

    Descripción del producto...
  • Seite 54 Descripción del producto MENU Lente con enfoque manual LED IR Puerto USB / Ranura para tarjeta Menü-Taste Micro SD Botón de modo Botón IR Arriba / Acercar / Arriba Botón de disparo Cambio descendente IR / reducción / Ensenada de la batería flecha hacia abajo Botón de encendido Orificio de correa...
  • Seite 55 Specificazione TAMAÑO DE IMAGEN 1 M (1280x960) / VGA (640x480) FIJA 960P(1280x960@30FPS)/ TAMAÑO DE VÍDEO VGA(640x480@30FPS) APERTURA F 1.2 f=25mm LENSANGLE FOV = 10 °, el diámetro es de 24 mm PANTALLA DE Pantalla interna 2.3T (960 * 240) TFT; VISUALIZACIÓN Pantalla exterior 98 * 48 mm ZOOM DIGITAL...
  • Seite 56 Operando la cámara...
  • Seite 57: Instalación

    Instalación Suministro de energía Insertar tarjeta de memoria Suministro de energía Prepare una tarjeta Micro SD (hasta 32 GB) de antemano. Instale baterías en el dispositivo antes de usar. Abra la tapa de la ranura de la tarjeta, verá la ranura de la tarjeta. Abra la tapa de la batería en la parte posterior del dispositivo.
  • Seite 58: Operación Básica

    Operación básica Encender y apagar Tomar fotos fijas Mantenga presionado el botón de Encienda el dispositivo, el encendido durante 3 segundos para valor predeterminado es el encender el dispositivo. Mantener modo de foto. De lo contrario, presionado el botón de encendido presione el botón Modo para durante 3 segundos nuevamente cambiar al modo foto.
  • Seite 59 Operazioni di base Grabación de video Aviso Encienda el dispositivo, • Acerca del enfoque manual: en la lente presione el botón Modo para izquierda, marcada “lejos” y “cerca”. Si la cambiar el modo de video. observación la distancia es lejana, gire la lente hacia la izquierda.
  • Seite 60 Impostazioni in modalità Foto e Video Presione el botón Menú en modo foto o video, puede cambiar la configuración. MENÚ Función Establece la resolución de la foto. FOTO RESOLUCIÓN Opciones: [1M 1280x960] / [VGA 640x480]. Establece la resolución del video. TAMAÑO DE VÍDEO Opciones: [960 1280x960] / [640 640x480].
  • Seite 61 Impostazioni in modalità Foto e Video FECHA Y HORA Establezca la fecha y hora del dispositivo. Agregue el sello de fecha en los archivos de foto o video. SELLO DE LA FECHA Opciones: [Desactivado] / [Fecha] / [Fecha y hora]. Establecer el idioma OSD (en pantalla).
  • Seite 62 Reproducción Reproducción Lista del menú de reproducción Encienda el dispositivo, presione el Establezca el período de tiempo que botón Modo para cambiar al modo la cámara debe esperar. Antes de de reproducción. reaccionar a la activación posterior de la sensor principal después de la Presione el botón Arriba / Abajo grabación inicial.
  • Seite 63 Descargar archivos a la PC Hay dos formas de descargar archivos del dispositivo a una computa- dora: Al insertar la tarjeta de memoria en un lector de tarjetas. • Al conectar el dispositivo a una computadora con el cable USB •...
  • Seite 65 Überblick für das Produkt...
  • Seite 66 Überblick für das Produkt MENU Das Objektiv IR LEDs (Fokussierung mit Handbetrieb) Menü-Taste Schnittstelle von USB/ Modell-Taste Steckplatz von SD Karten Auslöser IR das Zoom ansteigen/vergrößen/ nach oben Batteriehalter IR das Zoom absteigen/ verkleinern/ nach unterPower Button Schalter Gurtloch...
  • Seite 67: Spezifikation

    Spezifikation STILL-BILD GRÖSSE 1M(1280x960)/VGA(640x480) 960P(1280x960@30FPS)/ VIDEO-GRÖSSE VGA(640x480@30FPS) DIE BLENDE F 1.2 f=25mm DAS OBJEKTIV FOV=10°, der Durchmess ist 24mm Innenbildschirm 2.3T( 960*240 )HD TFT DER BILDSCHIRM Größe von Außenbildschirm 98*48mm DIGITAL-ZOOM DAS SPEICHERMEDIEN SD Karte, Maximum zu 32GB BEOBACHTUNGSANSTAND 200M-300M BEI DUNKELHEIT BEOBACHTUNGSABSTAND 3M~grenzenlos...
  • Seite 68 Die Kamera bedienen...
  • Seite 69 Installation Power Supply Insertar tarjeta de memoria Power Supply Prepare una tarjeta Micro SD (hasta 32 GB) de antemano. Bitte installasieren Sie die Battrie vor Anwendung. Abra la tapa de la ranura de la tarjeta, verá la ranura de la tarjeta. Öffnen Sie den Deckel von Batterie Inserte la tarjeta Micro SD en la...
  • Seite 70: Basic-Anwendung

    Basic-Anwendung An-/Abschaltung Aufnahme Drücken Sie den Schalter 3 Sekunden Nach der Anschaltung gibt lang, um das Nachtsichtgerät es Fotomodus. Wenn nicht, einzuschalten. Halten Sie wieder den drücken Sie die Taste, um den Schalter 3 Sekunden lang gedrückt, zu wechseln. um die abzuschalten. Zoomen Drücken Sie die oder...
  • Seite 71 Basic-Anwendung Video-Aufnahme Achtung Schalten Sie das Gerät an und • Über die Fokussierung mit Handbetrieb: Auf drücken Sie die Modustaste, dem linken Objektiv mit “Fern” und “Nah” um in den Videomodus zu markiert. Wenn der Beobachtungsabstand weit wechseln. ist, bitte drehen Sie das Objektiv nach links. Wenn der Beobachtungsabstand nahe ist, Zoomen drehen Sie das Objektiv nach rechts.
  • Seite 72 Menü unter Foto-/Videomodus Unter Foto- und Videomodus können Sie die Menütaste im Foto- oder Videomodus drücken, um die Einstellungen zu ändern. MENÜ Leistungen Stellen Sie die Fotoauflösung ein BILD-AUFLÖSUNG Optionen:[1M 1280x960]/[VGA 640x480] Stellen Sie die Videoauflösung ein VIDEOAUFLÖSUNG Optionen:[960 1280x960]/[640 640x480] NACHTSICHTEMPFIN Wählen Sie die Nachtsichtempfindlichkeit.
  • Seite 73 Menü unter Foto-/Videomodus Stellen Sie die Uhrzeit und das Datum des DATUM UND UHRZEIT Geräts ein. Fügen Sie Ihrem Foto oder Ihrer Videodatei ein DATUMSSTEMPEL Zeitwasserzeichen hinzu Optionen: [Aus] / [Datum] / [Datum & Uhrzeit]. Bildschirmanzeigesprache auswählen [Englisch] / [Vereinfachtes Chinesisch] / [Traditionelles Chinesisch] / [Sprache] / SPRACHE [Niederländisch] / [Spanisch] / [Italienisch]...
  • Seite 74 Review Review Menü von Review-Modus Schalten Sie das Gerät an und Stellen Sie den Zeitraum ein, in drücken Sie die Modustaste, dem die Kamera warten soll vor um in den Reviewmodus zu der Reaktion auf nachfolgende wechseln. Aktivierung der Hauptsensor nach der ersten Aufnahme.
  • Seite 75: Datei Auf Computer Herunterladen

    Datei auf Computer herunterladen Es gibt zwei Methoden, um Bilder von der Speicherkarte eines Nacht- sichtgeräts auf Ihren Computer herunterzuladen: Setzen Sie die SD-Karte in den Flash-Kartenleser ein • Schließen Sie das Nachtsichtgerät mit dem mitgelieferten USB-Kabel • an Ihren Computer an. Anwendung eines Kartenlesers Schließen Sie Ihren Camcorder über das USB-Kabel an Ihren...
  • Seite 76 Customer Protection...
  • Seite 77: Customer Service

    Customer Service FCC Statement This equipment has been tested and found to comply with the limits for a Class B digital device, pursuant to part 15 of the FCC Rules. These limits are designed to provide reasonable protection against harmful interference in a residential installation.
  • Seite 78: Warranty And Disclaimers

    Register your B1 without obligation or advance notice. at RexingUSA.com to extend the Warranty does not extend to any warranty. In the event warranty accessories used with the camera.
  • Seite 80 www.rexingusa.com...

Inhaltsverzeichnis