
Verwandte Anleitungen für U.N.O. Fitness CT 1500

Inhaltszusammenfassung für U.N.O. Fitness CT 1500
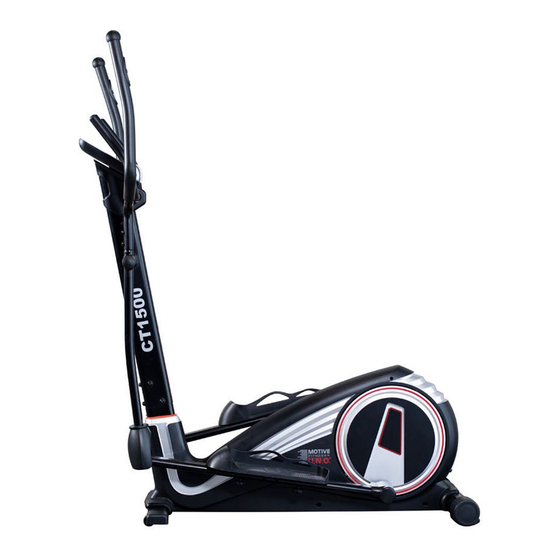
- Seite 1 CT 1500 Assembly & User Manual Aufbau- & Benutzerhandbuch Assemblage & Manuel Montaje y Manual...
-
Seite 3: Inhaltsverzeichnis
Inhalt / Content / Contenido / Contenu Kapitel Seite Section Page Allgemeines ... . . 4 General Information ..4 Sicherheit ....8 Safety . -
Seite 4: Allgemeines
Allgemeines / General Information Qualität Quality Ihr Trainingsgerät wurde gemäß der aktuellen This exercise product has been designed and Europäischen Sicherheitsstandards (EN 957) manufactured to comply with the latest (BS EN 957) entworfen und hergestellt. British and European Safety Standards. Fragen Questions Sollten Sie Schwierigkeiten mit dem Aufbau oder... - Seite 5 General / Généralités Calidad Qualité Este producto de ejercicio ha sido diseñado y Cet appareil d’entraînement a été conçu et fabriqué fabricado para cumplir con las últimas (BS EN 957) conformément aux normes de sécurité européennes Normas de seguridad británicas y europeas. actuelles (BS EN 957).
-
Seite 6: General Information
Allgemeines / General Information Garantie Guarantee Beny Sports Germany GmbH gewährt Beny Sports Co. UK Ltd. guarantee's its product Garantieleistungen nur im Rahmen der range for DOMESTIC USE ONLY for a period of HEIMBENUTZUNG für die Dauer von 2 Jahren ab 1 YEAR from the original certified date of purchase. -
Seite 7: Service Clientèle
General / Généralités Garantía Garantie Beny Sports Germany GmbH garantiza su Beny Sports Germany GmbH accorde des producto rango para USO DOMÉSTICO services de garantie uniquement pour un USAGE ÚNICAMENTE por un período de 2 AÑOS desde DOMESTIQUE, pour une période de 2 ans à la fecha de compra certificada original. -
Seite 8: Maximal-Gewicht
Sicherheit / Safety Verstauung und Benutzung Storage and Use Ihr Gerät ist dafür konstruiert, in einer sauberen, Your product is intended for use in clean dry trockenen Umgebung benutzt zu werden. conditions. You should avoid storage in excessively Vermeiden sie die Verstauung an zu kalten oder cold or damp places as this may lead to corrosion klammen Orten, da dies zu Korrosion und ähnlichen and other related problems that are outside our... - Seite 9 Seguridad / Sécurité Almacenamiento y uso Stockage et utilisation Su producto está diseñado para usarse en Votre produit est destiné à être utilisé dans des ambientes limpios y secos. condiciones. Debe conditions. Vous devez éviter un stockage evitar el almacenamiento en exceso lugares fríos excessif endroits froids ou humides car cela peut o húmedos, ya que esto puede provocar corrosión entraîner de la corrosion et d'autres problèmes...
-
Seite 10: Sicherheitshinweise
Sicherheit / Safety Sicherheitshinweise Safety Information 1. Bitte lesen Sie die gesamte Anleitung, bevor Sie 1. Please read the entire instruction before starting dieses Gerät verwenden. using this machine. 2. Der Besitzers dieser Maschine muss alle Benutzer 2. It is the responsibility of the owner of this machine über alle vorbeugenden Maßnahmen informieren. -
Seite 11: Información De Seguridad
Seguridad / Sécurité Información de seguridad Informations de sécurité 1. Lea todas las instrucciones antes de comenzar a 1. Veuillez lire toutes les instructions avant de usar esta máquina. commencer à utiliser cette machine. 2. Es responsabilidad del propietario de esta máquina 2. -
Seite 12: Exercising Lnformation
Trainingsinformation / Exercising lnformation Zu Beginn Beginning Wie Sie mit dem Training beginnen, unterscheidet How you begin to exercise will vary from person sich von Mensch zu Mensch. Haben Sie lange to person. If you have not exercised for a long nicht trainiert, waren Sie für eine Weile inaktiv, period of time, have been inactive for a while, or oder sind Sie extrem übergewichtig, MÜSSEN Sie... -
Seite 13: Exercice
Ejercicio / Exercice Comenzando Début La forma en que empiece a hacer ejercicio variará La façon dont vous commencez à faire de l'exercice de una persona a otra a la persona. Si no ha hecho varie d'une personne à l'autre à la personne. Si vous ejercicio durante mucho tiempo período de tiempo, n'avez pas exercé... -
Seite 14: Aufwärmen
Trainingsinformation / Exercising lnformation Aufwärmen Warm Up Ein erfolgreiches Trainingsprogramm besteht aus A successful exercise programme consists of drei Teilen: Aufwärmen, Aerobic, und Cool Down. three parts, Warm Up, Aerobic Exercise and Cool Beginnen Sie das Training niemals ohne Aufwärmen. Down. - Seite 15 Ejercicio / Exercice Calentar Réchauffer Un programa de ejercicio exitoso consiste en Un programme d'exercices réussi consiste en tres partes, calentamiento, ejercicio aeróbico trois parties, échauffement, exercice aérobie et y enfriamiento Abajo. Nunca inicie una sesión cool Vers le bas. Ne commencez jamais une de entrenamiento sin calentando.
- Seite 16 Trainingsinformation / Exercising lnformation Untrainiert Trainiert USERS UNCONDITIONED CONDITIONED Alter Zielzone A Zielzone B TARGET ZONE - A TARGET ZONE - B (Years) (Beats per Minute) (Beats per Minute) (Jahre) (Schläge pro Minute) (Schläge pro Minute) 20-24 145 - 165 155 - 175 20-24 145 - 165...
- Seite 17 Ejercicio / Exercice INCONDICIONAL ACONDICIONADO INCONDITIONNÉ CONDITIONNÉ años ÂGE ZONA OBJETIVO - A ZONA OBJETIVO - B ZONE CIBLE - A ZONE CIBLE - B (Années) (Battements par minute) (Battements par minute) (Años) (Latidos por minuto) (Latidos por minuto) 20-24 145 - 165 155 - 175 20-24...
- Seite 18 Trainingsinformation / Exercising lnformation Schulter Heben Shoulder Lift Rotieren und heben Sie die rechte Schulter in Rotate and lift your right shoulder up towards Richtung Ohr, dann entspannen. Dasselbe tun Sie your ear for one count. Relax then repeat for the mit der linken Schulter.
- Seite 19 Ejercicio / Exercice Levantamiento de hombros Lifting des épaules Gire y levante su hombro derecho hacia Faites pivoter et soulevez votre épaule droite tu oído para una cuenta. Relájese y luego vers votre oreille pour un compte. Détendez-vous repita para hombro izquierdo. puis répétez pour le épaule gauche.
- Seite 20 Trainingsinformation / Exercising lnformation Grundlegendes Aerobic Basic Aerobic Training Trainingsprogramm Programme Wir schlagen die folgenden Aerobic For your basic Aerobic Exercise routine we Trainingsprogramme vor. Denken Sie daran, richtig suggest that you try the following. Remember, zu atmen, die Übungen in Ihrem eigenen Tempo zu breathe correctly, exercise at your own pace and absolvieren und es nicht zu übertreiben, um do not over-train as injury may result.
- Seite 21 Ejercicio / Exercice Entrenamiento aeróbico Entraînement aérobie de básico Programa base Programme Para su rutina básica de ejercicios aeróbicos, Pour votre routine d'exercice aérobie de sugiero que intente lo siguiente. Recuerda, base, nous suggère que vous essayez ce Respire correctamente, haga ejercicio a su qui suit.
-
Seite 22: Aufbau
Aufbau / Assembly / Montaje / Montage Komponentenstückli Components - Parts Bitte überprüfen Sie, ob alle unten aufgeführten Please check you have all parts listing below Teile vorhanden sind Componentes Composants Por favor, compruebe que tiene todas las piezas Vérifiez que l'emballage contient toutes les pièces que figuran a continuación de la liste ci-dessous. -
Seite 23: Montaje
Aufbau / Assembly / Montaje / Montage Montageanleitungen Assembly Instructions Nehmen Sie alle Einzelteile aus der Verpackung, Remove all the separate parts from the packaging, legen Sie sie auf den Boden und prüfen Sie anhand lay them on the floor and check that all are there der Montageschritte, ob alle vorhanden sind. - Seite 24 Aufbau / Assembly / Montaje / Montage...
- Seite 25 Aufbau / Assembly / Montaje / Montage Montage des oberen Monitorkabels (14) an das untere Assembling of the Upper Monitor Cable (14) to the Lower Monitorkabel (94) und Installation der Halterung (97) Monitor Cable (94) and installation of the Support (97) at am Hauptrahmen (52).
- Seite 26 Aufbau / Assembly / Montaje / Montage...
- Seite 27 Aufbau / Assembly / Montaje / Montage Installation des oberen zweifach wirkenden Lenkers (8) und Installation of Upper Dual Action Handlebar (8) and Footplate der Fußplattenstützstangen (28) am unteren zweifach Support Bars (28) at Lower Dual Action Handlebar (21L+21R) wirkenden Lenker (21L + 21R) 1.
- Seite 28 Aufbau / Assembly / Montaje / Montage Instalación del manillar superior de doble acción (8) y de las Installation du guidon supérieur à double action (8) et des barras de soporte del reposapiés (28) en el manillar inferior barres de support des repose-pieds (28) au guidon inférieur de doble acción (21L+21R) à...
- Seite 29 Aufbau / Assembly / Montaje / Montage...
- Seite 30 Aufbau / Assembly / Montaje / Montage Installation des Pedals (35) an der Fußplatten- Installation of the Pedal (35) at Footplate Support Bar Stützstangen (28). (28). 1. Drücken Sie das rechte Pedal (35R) auf die 1. Push the Right Pedal (35R) onto the Footplate Fußplatten-Stützstange (28R).
- Seite 31 Aufbau / Assembly / Montaje / Montage...
- Seite 32 Aufbau / Assembly / Montaje / Montage Bringen Sie den Monitor (1) an der Stütze (97) an. Attach the Monitor (1) at Support (97) 1. Stecken Sie den Stecker des Verbindungskabels (14) 1. Put the plug of Connection Cable (14) into the plug in den Stecker auf der Rückseite des Monitors (1).
- Seite 33 Aufbau / Assembly / Montaje / Montage...
- Seite 34 Aufbau / Assembly / Montaje / Montage Befestigen Sie die Computerhalterung an der Stütze (97). Attach the computer bracket at the support (97) Befestigen Sie die hintere Lenkerstangenabdeckung (99B) Attach the Back Handlebar Post Cover (99B) and Front und die vordere Lenkerstangenabdeckung (99F) mit einer Handlebar Post Cover (99F) to the Support (97) by using M4 x 15 Flachkopfschraube (100) an der Halterung (97) M4 x 15 Flat Head Screw (100) and tighten firmly.
- Seite 35 Aufbau / Assembly / Montaje / Montage Schließen Sie die Stromversorgung an. Attach the Power. 1. Bitte stecken Sie den Stecker des Adapters in den 1. Please insert the Plug of Adaptor to the power plug at Netzstecker am Ende des Kettenschutzes. the end of chain guard.
- Seite 36 Aufbau / Assembly / Montaje / Montage Kontrollen Checks 1. Überprüfen Sie die korrekte Installation und Funktion 1. Check the correct installation and function of all aller Schraub- und Steckverbindungen. Die Installation ist screwed and plug connections. Installation is thereby damit abgeschlossen.
- Seite 37 Aufbau / Assembly / Montaje / Montage...
- Seite 38 Aufbau / Assembly Liste der Einzelteile Parts List Key No. Description Schlüsselnr. Beschreibung Monitor ..... . 1 Monitor ..... . 1 M5 x 10 Schraube .
- Seite 39 Aufbau / Assembly Liste der Einzelteile Parts List Key No. Description Schlüsselnr. Beschreibung Lager ..... . . 2 Bearing ..... . 2 ø20 x ø25 x 1T Unterlegscheibe .
- Seite 40 Montaje / Montage Liste der Einzelteile Parts List Code Description QTÉ Nº. clave Descripción ANZCANT Monitor ..... . 1 Moniteur ..... 1 M5 x 10 Tornillo .
- Seite 41 Montaje / Montage Liste der Einzelteile Parts List Code Description QTÉ Nº. clave Descripción ANZCANT Rodamiento ....2 Roulement ....2 ø20 x ø25 x 1T Arandela .
-
Seite 42: Tastenfunktion
Bedienungsanleitung / Exercise Monitor Instruction TASTENFUNKTION BUTTON FUNCTION 1. Manuell und Programm auswählen. 1. To select manual and program. 2. Manuelle Last einstellen. 2. Adjust the manual load. 3. Funktionswert nach oben/unten einstellen. 3. Adjust function value up/down. 4. Drücken Sie im STOP-Modus die Taste, um 4. -
Seite 43: Ordinateur
Ordenador / Ordinateur FUNCIÓN DE BOTÓN FONCTION DES BOUTONS 1. Para seleccionar el manual y el programa. 1. Pour sélectionner Manuel et Programme. 2. Ajustar la carga manual. 2. Régler la charge manuelle. 3. Ajustar el valor de la función arriba/abajo. 3. -
Seite 44: Operation Procedure
Bedienungsanleitung / Exercise Monitor Instruction BEDIENVORGANG OPERATION PROCEDURE 1.MANUELL 1.MANUAL A. Schließen Sie das Netzteil an und der Computer schaltet A. Connect power supply and computer will power on with a sich mit einem langen Piepton ein. Das LCD-Display zeigt 2 long beep sound, LCD display all segments for 2 seconds. -
Seite 45: Procédure D'utilisation
Ordenador / Ordinateur PROCEDIMIENTO DE USO PROCÉDURE D'UTILISATION 1. MANUAL 1. MANUEL A. Conecte la fuente de alimentación y el ordenador se A. Connectez l'alimentation et l'ordinateur s'allumera avec un encenderá emitiendo un largo pitido, la pantalla LCD mostrará long bip sonore et affichera tous les segments LCD pendant todos los segmentos durante 2 segundos. - Seite 46 Bedienungsanleitung / Exercise Monitor Instruction B. Drücken Sie START/STOP, um das Training schnell zu B. Press START/STOP to start workout quickly, all exercise starten. Alle Trainingswerte werden von Null hochgezählt, oder value will count up from zero, or user can press F key to switch der Benutzer kann die Taste F drücken, um den Countdown- and select the countdown mode of TIME-DIST.-CAL.
-
Seite 47: Ordenador
Ordenador / Ordinateur B. Pulse START/STOP para comenzar el entrenamiento B. Appuyez sur START/STOP pour démarrer rapidement rápidamente, el valor del ejercicio contará desde cero, l'entraînement, toutes les valeurs de l'exercice progresseront o bien el usuario puede pulsar la tecla F para cambiar y à... - Seite 48 Bedienungsanleitung / Exercise Monitor Instruction 5. P11~P15, PROGRAMM 5. P11~P15,PROGRAM A. Nach dem Einschalten des Computers kann der Benutzer A. After the computer power on, user can press +/- to select +/- drücken, um das Programm P11~P15 auszuwählen. the program P11~P15. B.
- Seite 49 Ordenador / Ordinateur 5. PROGRAMAS P11~P15 5. PROGRAMME P11~P15 A. Después de encender el ordenador, el usuario puede A. Après la mise sous tension de l'ordinateur, l'utilisateur peut pulsar +/- para seleccionar el programa P11~P15. appuyer sur +/- pour sélectionner le programme P11~P15. B.
- Seite 50 Bedienungsanleitung / Exercise Monitor Instruction B. Drücken Sie START/STOP, um das Training schnell zu B. Press START/STOP to start work quickly, all exercise value starten. Alle Trainingswerte werden von Null hochgezählt, will count up from zero, or user can press F key to switch and oder der Benutzer kann die Taste F drücken, um den select the countdown mode of TIME-DIST.-PULSE-set WATT Countdown-Modus von TIME-DIST.-PULSE-Set WATT-Wert...
- Seite 51 Ordenador / Ordinateur B. Pulse START/STOP para comenzar el entrenamiento B. Appuyez sur START/STOP pour démarrer rapidement rápidamente, el valor del ejercicio contará desde cero, o bien l'entraînement, toutes les valeurs de l'exercice progresseront el usuario puede pulsar la tecla F para cambiar y seleccionar à...
- Seite 52 Bedienungsanleitung / Exercise Monitor Instruction C. Ziel-Herzschlagwert = (220-AGE)* voreingestellter C. Target heartbeat value=(220-AGE)* heartbeat preset value. Herzschlagwert. D. Once exercise, the initial value of level is 1, user can press D. Nach dem Training beträgt der Anfangswert der Stufe 1, +/- button to adjust.
- Seite 53 Ordenador / Ordinateur C. Valor objetivo del latido del corazón=(220-EDAD)* valor C. Valeur cible du pouls = (220-ÂGE)*valeur prédéfinie du predefinido del latido del corazón. nombre de battements. D. Una vez que comience el ejercicio, el valor inicial del nivel D.
- Seite 54 Bedienungsanleitung / Exercise Monitor Instruction 9. PULSE (PULS) 9. PULSE A. Wenn das Pulssignal 6 bis 8 Sekunden lang empfangen A. If pulse signal input for 6~8 seconds, the computer shows wird, zeigt der Computer an, dass der Wert des Pulssignal the pulse signal value is 72.
- Seite 55 Ordenador / Ordinateur 9. PULSE 9. POULS A. Si hay una entrada de señal de pulso durante 6~8 segundos, A. Si l'entrée de signal de pulsations dure 6~8 secondes, el ordenador mostrará que el valor de la señal de pulso es 72. l'ordinateur indique une valeur de pouls de 72.
-
Seite 56: Kundendienst
Beny Sports Germany GmbH Beny Sports Co. UK Ltd. Unit 8, Riparian Way, Klingenhofstr. 51 The Crossings, Cross Hills, D-90411 Nürnberg West Yorkshire BD20 7BW KUNDENDIENST CUSTOMER SUPPORT Erreichbar Montag bis Freitag von 8:00 bis 17:00 Uhr is open from 9.00am to 5.00pm from Monday to Friday Tel: 0911 / 975978 –...