Seite 1
Bedienungsanleitung Digital Manometer Seite Operating instructions Digital Manometer Page Mode d’emploi Manomètre numérique Page Istruzioni per l’uso Manometro digitale Pagina HM35 (Ex)
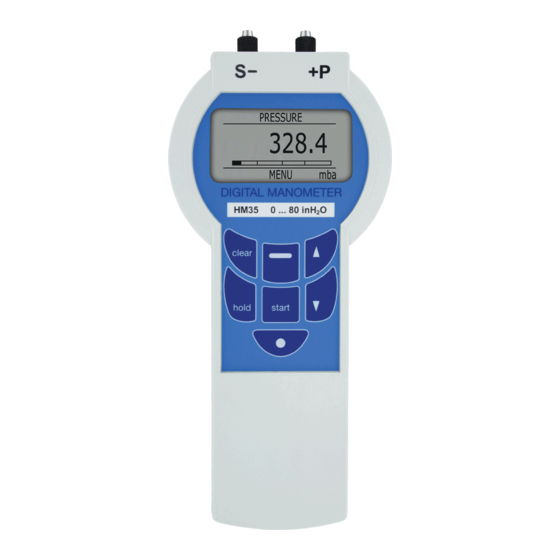
Bedienungsanleitung Inhaltsverzeichnis Beschreibung ..................6 Sicherheitsangaben ................6 Bedienung ................... 7 Ein- und Ausschalten ................7 Beleuchtung ..................8 Pneumatische Anschlüsse ..............8 Funktionen und Betriebsarten ............. 9 Menüauswahl und Einstellungen ............10 Datalogging ..................13 3.6.1 Daten aufzeichnen ................13 3.6.2 Daten auf PC übertragen ..............
Seite 5
Bedienungselemente Infrarot-Schnittstelle IR Anschlüsse Pneumatikschläuche Grafik-Anzeige Nullstellung / Menü verlassen Funktionstaste Betriebsart wählen Anschluss Steckernetzgerät 6 VDC (nicht bei Ex-Ausführung) Anzeige einfrieren Start-Funktion Ein-/Ausschalten (> 1 s : Beleuchtung ein) Beachten Sie die Hinweissymbole in der Bedienungsanleitung! CE Konformitätserklärung Wir erklären in alleiniger Verantwortung, dass dieses Produkt mit der folgenden Norm übereinstimmt: •...
Funktionsausstattung und seiner hohen Präzision, eignet es sich für einen breiten Anwendungsbereich. Infrarot-Schnittstelle (IR) SCPI-Befehlen (Standard Commands for Programmable Instruments) kommuniziert das HM35 mit einem PC. Die Bedienung ist sehr einfach und unterstützt den Anwender in seinen Messaufgaben. Betriebsarten • Druckmessung / Differenzdruck •...
Beim Anlegen der Speisespannung schaltet das HM35 automatisch ein. • Bei Unterbruch der Speisespannung arbeitet das HM35 im Batteriebetrieb weiter • Bei Temperaturwechsel muss das HM35, um die beste Genauigkeit zu erreichen, in ausgeschaltetem Zustand min. 30 Minuten der neuen Umgebungstemperatur angepasst werden. •...
• Nach dem Einschalten wechselt das HM35 in die zuletzt verwendete Betriebsart, z.B. • Bei aktiviertem Displayfilter Einschwingvorgang (ca. 5 s) abwarten. Beleuchtung Einschalten Ein/Aus-Taste lang (> 1 s) drücken Im Menü die Funktion Configuration → Lighting wählen und eine Helligkeitsregelung Einstellung Off, Level 1, Level 2 oder Level 3 wählen.
Beim Aufschrauben eines Kupplungsstückes unbedingt mit einem Gabelschlüssel dagegenhalten! Keinesfalls nur am Gehäuse halten! Funktionen und Betriebsarten Taste clear hold start Funktionen PRESSURE Zero: setzt Messwert auf Null DIFFERENCE Zur Menüauswahl Friert alle aktuellen MIN/MAX Setzt Max/Min auf Messwertan- aktuellen Messwert zeigen ein AVERAGE Setzt Messwert auf...
Menüauswahl und Einstellungen Navigation innerhalb Menüauswahl Kurz (< 1 s) 1 Ebene zurück clear Lang (> 1 s) Zurück zur Funktionsebene/Betriebarten Auswählen Einstellungen/Funktionen Die auf der Anzeige invertiert dargestellte Funktion wird beim Drücken der Funktions-Taste )ausgeführt. Die momentan selektierte Einstellung bei Werten ist mit 'ü' gekennzeichnet. In der folgenden Tabelle sind die Default-Werte entsprechend markiert (Werkseinstellung).
Seite 11
Taste Hinweis Datalogging Interval Intervallzeit manual 25 M./s 10 M./s ü 10 s 30 s 1 min 2 min 5 min 10 min 30 min 12 h 24 h Mit s/t/ EDIT/OK einstellen user Print Datalogging Press 'start' Drucken/Senden via IR Clear Memory Press 'clear' Löscht Datenspeicher...
Seite 12
Taste Hinweis Display-Filter Filtert Anzeigewerte 1) ü Auto-Off Autom. Abschalten 3 min ü 10 min 60 min Auto-Zero Sensor autom. Nullen beim Einschalten, wenn Messwert < 1%FS ü Beep Piepser für Warnhinweise ü Lighting Level 1 Bei Ex-Ausführung nur Level 1 möglich Level 2 ü...
Datalogging 3.6.1 Daten aufzeichnen Bei jedem Start der Datenaufzeichnung wird zuerst ein Informationskopf ("Header") gespeichert. Anschliessend werden fortlaufend die Messwerte gespeichert. Nach jedem Unterbruch der Aufzeichnung oder bei manueller Speicherung wird "Stop" gespeichert. Am Ende aller Aufzeichnungen wird "End" gespeichert. Messwerte sind mit dem Header eindeutig identifizierbar.
Legende der Daten-Typen siehe Tabelle auf Seite 22. user-interval-Zeit wird z.B. wie folgt dargestellt, „user 01:15:00“ 3.6.2 Daten auf PC übertragen (mit Kommunikationssoftware „HM35 Communication“) IR (IrDA)- Adapter gemäss Anleitung des Herstellers installieren. Kommunikationssoftware gemäss Anleitung auf PC installieren und einrichten. Kommunikationssoftware starten.
Seite 15
Befehl von PC an Druckmessgerät senden <SCPI Command> [SP <Parameter 1>] [ , <Parameter 2> ] [ , <Parameter 3> ] [ , ... ] HT [ * <CS> ] CR Beispiele: Uhrzeit auf 07:08:09 setzen: S Y S T : T i m e SP 0 7 , 0 8 , 0 9 HT * 2 5 5 CR (mit Checksumme) S Y S T : T i m e SP 0 7 , 0 8 , 0 9 HT CR (ohne Checksumme)
Return Value Befehl verarbeitet: Return Value = o k Beispiel: Ausgabe: o k HT * 1 3 CR Error Return Value Meaning er-001 RS232 Protocol Checksum Error er-110 Header Error; Too short Header Error; Too many subnodes Header Error; Qery not at leaf node Header Error;...
Seite 17
Initialisierung Hinweise ACT-220L/220L+ werden durch umschalten Steuerleitungen programmiert. Diese Leitungen dürfen im Betrieb nie zusammen low sein. In diesem Zustand wird der ACT-220L/220L+ in den Power Down Modus versetzt. Falls DTR und RTS zur gleichen Zeit low sind, oder in einem undefinierten Zustand sind, müssen diese min.
Seite 21
Rückgabe-Daten Beschreibung Bemerkung Parameter Rückgabe- Grenzen Daten-Typ 3min, 10min, 60min --- Auto Off Zeit setzen Gerät ausschalten ON, OFF Auto Zero enable/disable 25M./s, 10M./s, Setzen Intervallzeit für analog Menü 1s ... 24h Datalogging 10s, 30s ... 24h Setzen Zeitperiode für analog Menü...
Seite 22
Legende Daten-Typ Bezeichnung Beschreibung Beispiel INTEGER Dezimale Zahl, ganzzahlig FLOAT Floating point Zahl 123.45 I-FLOAT Floating point Zahl, als INTEGER übertragen. 3242721280 Das heisst, es wird nicht im floating point Format übertragen, (entspricht -12.5) sondern der nach dem IEEE-754 Standard codierte INTEGER – Wert.
Alte Batterien sach- und umweltgerecht entsorgen Kalibration Eine Nachkalibration darf nur von Fachpersonal und mit den entsprechenden Druck- normalen durchgeführt werden. Wir empfehlen, das HM35 mindestens 1 mal jährlich neu kalibrieren zu lassen, bei höchsten Genauigkeitsanforderungen mehrmals jährlich. Manuelle Nachkalibration •...
Endwert Den angegebenen Druckwert (Endwert) am Drucknormal einstellen. Funktions-Taste ( ) drücken è der Endwert wird kalibriert und das HM35 kehrt in den Normalbetrieb zurück. Hinweise • Die Kalibration wird immer in mbar durchgeführt. • Die Kalibration muss bei stabiler Raumtemperatur von 22 °C ± 2 °C erfolgen.
Seite 25
Stromversorgung • 3 x 1,5 V Mignon-Zelle AA, IEC LR6 oder Akkus (Ex-Geräte: nur zugelassene Typen gemäss Anhang) • geregeltes Steckernetzgerät 6 VDC (min. 6, max. 9 VDC, nicht bei Ex-Ausführung) Stromaufnahme < 25 mA bzw. < 40 mA (Ex-Ausführung) ohne Beleuchtung, IR und Piepser Betriebsdauer ca.
Messbereiche und Genauigkeiten Die Messwertanzeige arbeitet im Bereich von -10 % bis 110 % des Messbereiches. 4.2.1 Ausführung Europa Mess- Einheit Druckart Auflösung Max. Max. bereich Belastbarkeit statischer Druck 0 ... 25 mbar 0.001 125 mbar 17 bar 0 ... 70 mbar 0.001 350 mbar...
Ausgang 6 VDC ± 10 %, 1,5 W Wartung und Lagerung Das HM35 ist wartungsfrei. Es kann mit einem feuchten Lappen gereinigt werden. Keine lösungsmittelhaltigen Reinigungsmittel verwenden! Batteriewechsel und Nachkalibration gemäss den entsprechenden Kapiteln. Bei längerer Lagerung sind die Batterien aus dem Instrument zu entfernen.
Anhang Zugelassene Batterien für Geräte mit Ex-Schutz für Temperaturklasse 4 (T4). Hersteller Typ / Bezeichnung Leclanché SA, Switzerland LONG LIFE Art.-Nr. 804.0 (Kohle/Zink-Batterie, R6) Zugelassene Batterien für Geräte mit Ex-Schutz für Temperaturklasse 3 (T3). Hersteller Typ / Bezeichnung GP Batteries GP Super Alkaline Battery (Gold Peak Group) GP15A-S2...
Seite 34
Operating Instructions Contents Description ..................36 Safety information ................36 Operation ................... 37 Switching on and off ................37 Lighting....................38 Pneumatic connection ................ 38 Functions and operating modes ............39 Menu selection and set-up ..............40 Data logging ..................43 3.6.1 Data recording..................
Seite 35
Operating Elements Infra-red interface IR Connection for pneumatic tube Graphic display Zero position / Exit menu Function key Select operating mode Connection for 6 VDC power supply (not present in Ex-models) Hold display Start function Switch On/Off (> 1 s: Light on) Please note this warning symbol in these operating instructions! EC Declaration of Conformity We declare on our own responsibility that this product conforms to the following...
Description The HM35 digital pressure gauge is a pressure-measuring instrument with an integrated pressure sensor for the measurement of differential, relative or absolute pressures and vacuum. Its versatile range of functions and high precision render it suitable for a wide range of applications.
The HM35 continues to work in battery mode following an interruption of the supply voltage • In case of a change in temperature, the HM35 must be allowed to adapt to the new ambient temperature for a least 30 minutes while switched off in order to attain the best measurement accuracy.
• After switch-on, the HM35 switches to the last operational mode used, e.g.: • With the display filter activated, wait until the transient effect finishes (approx. 5 s). Lighting Switching on Press the On/Off-key for > 1 s In the Menu, select the Configuration → Lighting function and Brightness control select an adjustment of Off, Level 1, Level 2 or Level 3.
When screwing onto a coupling, it is important to hold the coupling steady with a wrench to prevent any turning! Never secure by holding the casing itself! Functions and operating modes clear hold Start Functions PRESSURE Zero: sets measured value to DIFFERENCE zero To Menu selection...
Menu selection and set-up Navigation within the Menu selection Brief (< 1 s) 1 level back clear Long (> 1 s) Back to the function level/operating modes Selection of Set-up/Functions The functions shown inverted on the display will be carried out if the Function key ) is pressed.
Seite 41
Notes Data logging Interval Interval period manual 25 M./s 10 M./s ü 10 s 30 s 1 min 2 min 5 min 10 min 30 min 12 h 24 h Set with s/t/ EDIT/OK user Print Data Logging Press 'Start' Print/send via IR Clear Memory Press 'Clear'...
Seite 42
Notes Display Filter Filters the display values 1) ü Auto-Off Auto. switch-off 3 min ü 10 min 60 min Auto-Zero Sensor auto-zeros at switch-on if measured value < 1% FS ü Beep Warning beeper ü Lighting Level 1 Only Level 1 possible for Ex-models Level 2 ü...
Data logging 3.6.1 Data recording Every time that the Data Logging is started, an information header ("Header") will first be saved: The measured values will then be saved sequentially. "Stop" will be saved after every interruption of the logging or if manual storage is carried out. At the end of all the data loggings, "End"...
(with HM35 Communication Software) Install the IR (IrDA) -adapter according the instructions of the manufacturer. Install the HM35 Communication Software. Start the HM35 Communication Software. Place the instrument max. 20 cm from the IR (IrDA)-Adapter and switch it on. Ensure...
Seite 45
Sending a command from PC to the instrument <SCPI Command> [SP <Parameter 1>] [ , <Parameter 2> ] [ , <Parameter 3> ] [ , ... ] HT [ * <CS> ] CR Examples: Setting the time to 07:08:09: S Y S T : T i m e SP 0 7 , 0 8 , 0 9 HT * 2 5 5 CR (with checksum) S Y S T : T i m e SP 0 7 , 0 8 , 0 9 HT CR (without checksum)
Return Value Command processed: Return Value = o k Example for response: o k HT * 1 3 CR Error Return Value Meaning er-001 RS232 Protocol checksum Error er-110 Header Error; Too short Header Error; Too many subnodes Header Error; Query not at leaf node Header Error;...
Seite 47
Initialisation Remarks ACT-220L/220L+ are programmed by toggling the control lines RTS and DTR. These lines may not be low at the same time during operation. this condition ACT- 220L/220L+ goes in power down mode. If DTR and RTS are low at the same time or in an undefined condition, both lines must be set high for at least 50 ms to leave the power min.
Seite 48
Command Sub-node 1 Sub-node 2 Transfer Parameters Parameter Data Type MEASure :PRESsure <interval> INTEGER :PRESsure? :TEMPerature? UNITs :PRESsure <unit> DISCRETE :PRESsure? SYSTem :DATE <yyyy>,<mm>,<dd> INTEGER :DATE? :TIME <hh>,<mm>,<ss> INTEGER :TIME? :ERRor [:NEXT]? :VERSion? :BEEPer :STATe <state> BOOLEAN :BATTery? :RANGe? :TOLerance? :IDENt? :SET :FILTer...
Seite 49
Parameter Feedback data Feedback data Description Remarks limits type 0, 10, 25 <value> FLOAT Continuous transfer of Continuous measurement measured values with 10 or 25 M/s. Stops with Interval=0 <value> FLOAT Query measured Individual value pressure value <value> FLOAT Query sensor °C, individual value temperature mbar, bar,..
Seite 50
Command Sub-node 1 Sub-node 2 Transfer parameter Parameter data type SYSTem :SET :AOFF <time> DISCRETE :OFF :AZERo <state> BOOLEAN :INTerval <interval> DISCRETE :AVERage <interval> DISCRETE :CONFig :IRDA <status> BOOLEAN DIAGnostic :ERRors? DISPlay :BRIGhtness <level> DISCRETE MEMory :COPY :DLOG? :DELete :ALL *CLS *IDN? *STB?
Seite 51
Feedback data Description Remarks Parameter Feedback data limits type 3min, 10min, 60min --- Set auto Off time Switch off instrument ON, OFF Enable/disable auto zero 25M./s, 10M./s, Set interval time for Data Similar to Menu 1s ... 24h Logging 10s, 30s ... 24h Set time period for Similar to Menu Average...
Seite 52
Data Type Key Designation Description Example INTEGER Decimal number, whole numbers only FLOAT Floating-point number 123.45 I-FLOAT Floating-point number, transferred as an INTEGER. 3242721280 This means that it will not be transferred in the floating-point (corresponds to -12.5) format, but as an INTEGER – value coded according to the IEEE- 754 standard.
Re-calibration may only be carried out by specialist staff and with the corresponding pressure standards. We recommend that you have the HM35 re-calibrated at least once a year, and, in case of highest demands for precision, several times a year.
Full-scale value Set the given pressure value to the normal pressure. Press the Function key ( è the full-scale value will be calibrated and the HM35 returns to normal operation. Notes • The calibration is always carried out in mbar.
Seite 55
Power supply • 3 x 1,5 V Mignon-cell AA, IEC LR6 or accumulator (Ex-instruments: only accepted types according to appendix) • regulated 6 VDC plug-in mains supply unit (min. 6, max. 9 VDC, not for Ex-version) Current consumption < 25 mA resp. < 40 mA (Ex-version) without display light, IR and beeper Battery life approx.
Measuring Range and Precision The measured values display works in the range from -10 % to 110 % of the measurement range. 4.2.1 European Model Measurement Unit Pressure Resolution Max. Max. range type loading static pressure 0 ... 25 mbar 0.001 125 mbar 17 bar...
Measurement units The following units of measurement can be selected depending on the measuring range: Measurement ranges mbar bar hPa kPa MPa kg/ Europa 1) 2) 1) 2) 1) 2) 0 ... 25 mbar 0 ... 10 • • • •...
Output 6 VDC ± 10 %, 1,5 W Maintenance and storage The HM35 requires no maintenance. It can be cleaned with a damp cloth. Do not use cleaning agents containing solvents! See the relevant chapters for battery replacement und re-calibration.
Appendix Admissible batteries for instruments with Ex-certification for temperature class 4 (T4). Manufacturer Type / Designation Leclanché SA, Switzerland LONG LIFE Art.-Nr. 804.0 (carbon/zinc-batterie, R6) Admissible batteries for instruments with Ex-certification for temperature class 3 (T3). Manufacturer Type / Designation GP Batteries GP Super Alkaline Battery (Gold Peak Group)
Seite 64
Mode d'emploi Table des matières Description ..................64 Informations de la sécurité ..............64 Utilisation.................... 65 Mise sous tension................65 Eclairage .................... 66 Raccords pneumatiques..............66 Fonctions et modes de fonctionnement..........67 Sélection du menu et réglages............68 Data logging ..................71 3.6.1 Enregistrement des mesures .............
Seite 65
Eléments de commande Interface infrarouge IR Raccords des tuyaux pneumatiques Affichage graphique Position zéro / Quitter le menu Touche de fonction Sélection du mode de fonctionnement Raccord d'alimentation 6 VDC (pas sur la version Ex) Geler l'affichage Démarrage de la fonction Marche / arrêt (>...
Description Le manomètre numérique HM35 est un instrument de mesure de pression avec capteur de pression intégré pour la mesure de pression différentielle, relative, absolue ou de vide. Grâce à ses multiples fonctions et à sa grande précision, il convient à un vaste domaine d'applications.
Lors de l'interruption de la tension d'alimentation, le HM35 continue sur batterie • Lors de variation de température, le HM35 doit pour atteindre la meilleure précision, être stabilisé pendant 30 minutes au moins sous tension à la nouvelle température ambiante.
Réglage de luminosité Sélectionner dans le menu la fonction Configuration → Lighting et choisir un réglage Off, Level 1, Level 2 ou Level 3. Le HM35 en version Ex n'a plus que les niveaux Off et Level 1. Eteindre Presser brièvement (< 1 s) sur la touche Marche/arrêt (arrêter l'instrument),...
Veiller au raccordement correct des tuyaux pneumatiques! haute pression basse pression (pas disponible pour version avec pression absolue et relative) En vissant un raccord, il faut absolument retenir du côté opposé avec une clé! Ne tenir en aucun cas par le boîtier! Fonctions et modes de fonctionnement Touche clear...
Mesure du taux de fuite (capteur Diff/Gauge) ou de la tendance (capteur Abs.). Le HM35 indique la variation de pression (CHANGE RATE) du point initial au moment actuel. Le premier affichage a lieu 10 s après le démarrage. Sélection du menu et réglages Navigation à...
Seite 71
Touche Remarque Datalogging Interval Intervalle manual 25 M./s 10 M./s ü 10 s 30 s 1 min 2 min 5 min 10 min 30 min 12 h 24 h Régler avec s/t/ EDIT/OK user Print Datalogging Press 'start' Imprimer/envoyer via IR Clear Memory Press 'clear' Efface la mémoire de données...
Seite 72
Touche Remarque ü Auto-Off Déclenchement autom. 3 min ü 10 min 60 min Auto-Zero Mise à zéro autom. du capteur à l'enclenchement, si la valeur mesurée < 1%FS ü Beep Signal sonore d'avertissement ü Lighting Level 1 Sur l'exécution Ex, seul Level 1 possible Level 2 ü...
Data logging 3.6.1 Enregistrement des mesures A chaque démarrage de l'enregistrement des mesures, un en-tête d'information ("Header") est d'abord mémorisé. Ensuite les valeurs mesurées sont enregistrées à la suite. Après chaque interruption de l'enregistrement ou en cas d'enregistrement manuel, "Stop" est enregistré. A la fin de tous les enregistrements, "End" est enregistré. Les valeurs mesurées sont identifiable par l'en-tête.
Le temps user-interval est représenté par ex. de la manière suivante: user 01:15:00 3.6.2 Transfert des données sur PC (avec logiciel de communication „HM35 Communication“) Installer l'adaptateur IR (IrDA) selon l'instruction du fabricant. Installer et régler le logiciel de communication selon l'instruction sur PC.
Seite 75
Envoyer l'ordre du PC au manomètre <SCPI Command> [SP <Parameter 1>] [ , <Parameter 2> ] [ , <Parameter 3> ] [ , ... ] HT [ * <CS> ] CR Exemples: Régler l'heure à 07:08:09: S Y S T : T i m e SP 0 7 , 0 8 , 0 9 HT * 2 5 5 CR (avec somme de contrôle) S Y S T : T i m e SP 0 7 , 0 8 , 0 9 HT CR (sans somme de contrôle)
Return Value Ordre traité: Return Value = o k Exemple: Affichage: o k HT * 1 3 CR Error Return Value Meaning er-001 RS232 Protocol Checksum Error er-110 Header Error; Too short Header Error; Too many subnodes Header Error; Qery not at leaf node Header Error;...
Seite 77
Initialisation Remarque ACT-220L/220L+ sont programmés commutation des lignes de commande RTS et DTR. Ces lignes ne doivent jamais être low en fonctionnement. Dans cet état, ACT- 220L/220L+ est déplacé dans le mode Power Down. Si DTR et RTS sont low en même temps, ou se trouvent dans un état indéfini, ces lignes doivent être couplées sur high min.
Seite 78
Ordre Subnode 1 Subnode 2 Paramètre de transfert Paramètre Type de données MEASure :PRESsure <interval> INTEGER :PRESsure? :TEMPerature? UNITs :PRESsure <unit> DISCRETE :PRESsure? SYSTem :DATE <yyyy>,<mm>,<dd> INTEGER :DATE? :TIME <hh>,<mm>,<ss> INTEGER :TIME? :ERRor [:NEXT]? :VERSion? :BEEPer :STATe <state> BOOLEAN :BATTery? :RANGe? :TOLerance? :IDENt?
Seite 79
Paramètre Données de retour Type de Description Remarque Limites données de retour 0, 10, 25 <value> FLOAT Transmission Mesure permanente avec permanente des valeurs 10 ou 25 mes./s. mesurées Arrêt avec intervalle = 0 <value> FLOAT Interrogation des Valeur unique pressions mesurées <value>...
Seite 80
Ordre Subnode 1 Subnode 2 Paramètre de transfert- Paramètre Type de données SYSTem :SET :AOFF <time> DISCRETE :OFF :AZERo <state> BOOLEAN :INTerval <interval> DISCRETE :AVERage <interval> DISCRETE :CONFig :IRDA <status> BOOLEAN DIAGnostic :ERRors? DISPlay :BRIGhtness <level> DISCRETE MEMory :COPY :DLOG? :DELete :ALL *CLS...
Seite 81
Description Remarque Paramètre Données de retour Type de Limites données de retour 3min, 10min, 60min --- Activer le temps Auto Off Arrêter l'appareil ON, OFF Auto Zero actif / inactif Activer le temps 25 mes./s, 10 analogue au menu d'intervalle pour le data mes./s, logging 1s ...
Seite 82
Légende des types de données Désignation Description Exemple INTEGER nombre décimal, entier FLOAT nombre à virgule flottante 123.45 I-FLOAT nombre à virgule flottante, transmis comme INTEGER. 3242721280 Cela signifie que la transmission ne se fait pas au format de (correspond -12.5) nombre à...
Un ré-étalonnage ne doit être exécuté que par le personnel qualifié aux pressions normales correspondantes. Nous recommandons de ré-étalonner le HM35 au moins 1 fois par an, et pour les plus hautes exigences de précision plusieurs fois par année. Ré-étalonnage manuel •...
Étendue de mesure Régler la pression indiquée (étendue de mesure) à la pression normale. Presser sur la touche Fonction ( è l'étendue de mesure est étalonnée et le HM35 retourne en fonctionnement normal. Remarques • L'étalonnage s'exécute toujours en mbar.
Seite 85
Alimentation électrique • 3 x 1,5 V piles Mignon AA, IEC LR6 ou accus (instruments Ex: seulement les types homologués selon annexe) • fiche d'alimentation réglée 6 VDC (min. 6, max. 9 VDC, pas pour exécution Ex) Courant consommé < 25 mA resp. < 40 mA (version Ex) sans éclairage, IR ni signal sonore Durée de fonctionnement env.
Plages de mesure et précision Seul les valeurs mesurées dans le domaine de –10 % à 110 % de la plage de mesure sont affichies. 4.2.1 Exécution Europe Plage de Unité Genre de Résolution Capacité de Pression statique mesure pression charge max.
Unités de mesure Les unités de mesure suivantes peuvent être choisies selon la plage de mesure de pression: Plages de mesure mbar bar hPa kPa MPa kg/ Europe 1) 2) 1) 2) 1) 2) 0 ... 25 mbar 0 ... 10 •...
6 VDC ± 10 %, 1,5 W Entretien et stockage Le HM35 est exempt d'entretien. Il peut être nettoyé avec un chiffon humide. N'utiliser aucun produit de nettoyage contenant un solvant! Remplacement des batteries et ré-étalonnage selon les chapitres correspondants.
Pompe à main Adaptateur sériel infrarouge RS232 Adaptateur NPT 1/8" Adaptateur Rectus type 20 Logiciel de communication pour MS-Windows (95/98, 2000, XP) Résumé des caractéristiques techniques du produit Caractéristiques HM35 HM35Ex Remarques Fonctions de base • • 1 capteur de pression intégré...
Seite 91
Caractéristiques HM35 HM35Ex Remarques • • Affichage de la précision au démarrage • • Affichage de batteries épuisées • • Signal acoustique En cas de dépassement/ fausse manœuvre • • Test interne Boîtier • • Handheld • • Etanche aux projections d'eau IP54 Raccords •...
Annexe Batteries homologuées pour instruments version Ex pour classe de temperature 4 (T4). Fabricant Type / Désignation Leclanché SA, Switzerland LONG LIFE Art.-Nr. 804.0 (batterie charbon/zinc, R6) Batteries homologuées pour instruments version Ex pour classe de temperature 3 (T3). Fabricant Type / Désignation GP Batteries GP Super Alkaline Battery...
Seite 94
Istruzioni per l’uso Indice Descrizione ..................94 Dati riguardanti la sicurezza ............... 94 Uso..................... 95 Accensione e spegnimento ..............95 Illuminazione ..................96 Allacciamenti pneumatici..............96 Funzioni e tipi di funzionamento ............97 Scelta del menu e regolazioni ............98 Datalogging ..................
Seite 95
Elementi di comando Interfaccia infrarossa IR Allacciamento per tubi pneumatici Visualizzazione Azzeramento / Uscita dal menu Tasto per le funzioni Scelta del tipo di funzionamento Allacciamento con presa e cavo 6 VDC (non per esecuzione a sicurezza intrinseca) Blocco dell'indicazione Funzione- Start Accensione/spegnimento (>...
Grazie alla sua costruzione versatile ed alla sua alta precisione, esso si adatta ad un vasto campo applicativo. Tramite un'interfaccia a raggi infrarossi (IR), ed ordini SCPI- (Standard Commands for Programmable Instruments) l'HM35 può comunicare con un PC. Il suo uso è molto semplice e lo strumento supporta adeguatamente l'utente nel suo compito di misurazione.
• L'HM35 si accende automaticamente quando è alimentato dalla rete. • In caso di interruzione della corrente di rete, l'HM35 funziona ulteriormente in quanto alimentato dalle batterie • In caso di cambiamento della temperatura ambiente, l'HM 35 va tenuto spento per almeno 30 minuti alla nuova temperatura per adattarlo alla nuova condizione.
Scegliere nel menu la Configuration → Lighting ed una Regolazione luce messa a punto Off, Level 1, Level 2 o Level 3. L'HM35 a sicurezza intrinseca ha solo la fase Off ed il Level 1. Spegnimento Premere brevemente (< 1 sec) il tasto acceso/spento (spegnere lo strumento), oppure spegnimento automatico dopo 20 secondi.
Prestare attenzione al corretto allacciamento dei tubi! pressione più alta pressione più bassa (esecuzione per pressione assoluta e relativa non disponibile) Avvitando un pezzo del giunto, servirsi assolutamente di una controchiave di contrasto! Non fare forza in nessun caso sulla carcassa! Funzioni e tipi di funzionamento Tasto clear...
Misura del valore di perdita (Diff/Gauge-Sensor) o della tendenza (Abs.-Sensor). Viene indicata la variazione di pressione (CHANGE RATE) dal punto di partenza a quello attuale. La prima indicazione appare 10 secondi dopo la partenza. Scelta del menu e regolazioni Navigazione nell'ambito dei menu Breve (<...
Seite 101
Tasto Istruzione Datalogging Interval Tempo d'intervallo manual 25 M./s 10 M./s ü 10 s 30 s 1 min 2 min 5 min 10 min 30 min 12 h 24 h Regolare con s/t/ EDIT/OK User Print Datalogging Press 'start' Stampa/invio via IR Clear Memory Press 'clear' Cancella memoria dati...
Seite 102
Tasto Istruzione ü Auto-Off Spegnimento automatico 3 min ü 10 min 60 min Auto-Zero Sensore autom. Si azzera accendendosi, quando il valore è < 1%FS ü Beep Segnale acustico per avvertimenti ü Lighting Level 1 Per esecuzione a sicurezza intrinseca è possibile solo il livello 1 Level 2 ü...
Datalogging 3.6.1 Registrazione dei dati Ad ogni accensione per la registrazione dei dati, il sistema memorizza una testata informativa ("Header"). Successivamente i valori di misura vengono registrati in continuazione. Ad ogni interruzione della registrazione o in caso di memorizzazione manuale, si memorizza "Stop". Alla fine di tutte le memorizzazioni, si memorizza "End". I valori misurati sono chiaramente identificabili grazie alla testata.
Il tempo d'intervallo dell'operatore viene rappresentato ad. es., „user 01:15:00” 3.6.2 Trasmissione dei dati al PC (Con Software di comunicazione „HM35 Communication“) Installare l’adattatore per infrarossi (IrDA) secondo le istruzioni del produttore. Installare il Software di comunicazione sul PC e metterlo a punto seguendo le istruzioni.
Seite 105
Invio di comando dal PC al misuratore di pressione <SCPI Command> [SP <Parameter 1>] [ , <Parameter 2> ] [ , <Parameter 3> ] [ , ... ] HT [ * <CS> ] CR Esempi: Impostare l’ora su 07:08:09: S Y S T : T i m e SP 0 7 , 0 8 , 0 9 HT * 2 5 5 CR (con checksum) S Y S T : T i m e SP 0 7 , 0 8 , 0 9 HT CR (con checksum)
Return Value Comando elaborato: Return Value = o k Esempio: risposta: o k HT * 1 3 CR Error Return Value Significato er-001 RS232 Protocol Checksum Error er-110 Header Error; Too short Header Error; Too many subnodes Header Error; Query not at leaf node Header Error;...
Seite 107
Inizializzazione Istruzioni ACT-220L/220L+ sono programmati mediante commutazione dei conduttori di comando RTS e DTR. Tali conduttori non devono mai essere entrambi low durante il funzionamento. Verificandosi questo stato, l’ACT-220L/220L+ passa nel modo Power down. sono contemporaneamente low o in uno stato min.
Seite 108
Ordine Subnode 1 Subnode 2 Parametri da inoltrare Tipi di dati per i parametri MEASure :PRESsure <interval> INTEGER :PRESsure? :TEMPerature? UNITs :PRESsure <unit> DISCRETE :PRESsure? SYSTem :DATE <yyyy>,<mm>,<dd> INTEGER :DATE? :TIME <hh>,<mm>,<ss> INTEGER :TIME? :ERRor [:NEXT]? :VERSion? :BEEPer :STATe <state> BOOLEAN :BATTery? :RANGe?
Seite 109
Limiti dei Dati ritornati Tipo di dati Descrizione Osservazione parametri ritornati 0, 10, 25 <value> FLOAT Trasmissione continua Durata di misura di 10 o 25 dei dati di misura M/s. Arresto con intervallo = 0 <value> FLOAT Chiamata valore Valore singolo misurato <value>...
Seite 110
Ordine Subnode 1 Subnode 2 Parametri da inoltrare Tipi di dati per i parametri SYSTem :SET :AOFF <time> DISCRETE :OFF :AZERo <state> BOOLEAN :INTerval <interval> DISCRETE :AVERage <interval> DISCRETE :CONFig :IRDA <status> BOOLEAN DIAGnostic :ERRors? DISPlay :BRIGhtness <level> DISCRETE MEMory :COPY :DLOG? :DELete...
Seite 111
Limiti dei Dati ritornati Tipo di dati Descrizione Osservazione parametri ritornati 3min, 10min, 60min --- Stabilire tempo Auto Off Spegnere l'apparecchio ON, OFF Auto Zero enable/disable Stabilire tempo 25M./s, 10M./s, menu analogico d'intervallo per 1s ... 24h Datalogging 10s, 30s ... 24h Stabilire tempo per menu analogico Average...
Seite 112
Legenda tipo di dati Denominazione Descrizione Esempio INTEGER numero decimale, intero FLOAT numero del floating point 123.45 I-FLOAT numero del floating point, trasmesso come INTEGER. 3242721280 Ossia esso non è trasmesso in formato floating point, bensì (corrisponde -12.5) secondo il valore codificato INTEGER standard secondo IEEE- 754.
Eliminare le vecchie batterie in modo corretto ed ecologico Taratura Una eventuale ritaratura va effettuata unicamente da personale specializzato e con le corrispondenti pressioni. Raccomandiamo di fare tarare l'HM35 almeno una volta all'anno e più frequentemente in caso di particolari necessità di precisione. Ritaratura manuale •...
La taratura va effettuata a temperatura ambiente stabile di 22 °C ± 2 °C. • Il valore di taratura è accettato solo se rientra nel ± 5 % del fondo scala dell'HM35. • Con i collegamenti pneumatici disconnessi è possibile ritarare il solo punto di zero.
Seite 115
Alimentazione elettrica • 3 x 1,5 V Mignon- cella AA, IEC LR6 o accumulatori (versione Ex.: solo tipi omologati. v. allegato) • Spina d'alimentazione regolata con cavo 6 VDC (min. 6, max. 9 VDC, non per esec. a sicurezza intrinseca) Assorbimento corrente <...
Campi di misura e precisione L'indicazione della misura è compresa tra -10 % e 110 % del campo di misura. 4.2.1 Esecuzione Europa Campo di Unità Tipo di Risoluz. Carico max. Pressione statica misura pressione max. 0 ... 25 mbar 0.001 125 mbar 17 bar...
Unità di misura In funzione del campo di pressione da misurare, si possono scegliere le seguenti unità di misura: Campo di misura mbar bar hPa kPa MPa kg/ Europa 1) 2) 1) 2) 1) 2) 0 ... 25 mbar 0 ... 10 •...
Uscita 6 VDC ± 10 %, 1,5 W Manutenzione ed immagazzinaggio L'HM35 non richiede manutenzione. Esso può essere pulito con un panno umido. Non usare detersivi contenenti solventi! Cambio delle batterie e ritaratura secondo i rispettivi capitoli. Per immagazzinaggi prolungati è necessario togliere le batterie dallo strumento.
Pompa a mano Adattatore seriale infrarosso RS232 Adattatore NPT 1/8" Adattatore a retto tipo 20 Software di comunicazione per MS Windows (95/98, 2000, XP) Panoramica caratteristiche tecniche Caratteristiche HM35 HM35Ex Osservazioni Funzioni di base • • 1 sensore di pressione montato •...
Seite 121
Caratteristiche HM35 HM35Ex Osservazioni • • Precisione d'indicazione in partenza • • Indicazione Low Battery • • Segnale acustico Uscendo dai limiti/ errore d'immissione • • Auto test Corpo strumento • • Portatile • • A prova di spruzzi d'acqua IP54 Allacciamenti •...
Appendice Batterie ammesse per funzionamento in ambiente con pericolo di esplosione per classe di temperatura 4 (T4). Produttore Tipo / contrassegno Leclanché SA, Switzerland LONG LIFE Art.-Nr. 804.0 (carbone/zinco-batterie, R6) Batterie ammesse per funzionamento in ambiente con pericolo di esplosione per classe di temperatura 3 (T3).
Seite 124
REVUE THOMMEN AG 4437 Waldenburg Switzerland Phone +41 61 965 22 22 +41 61 961 81 71 www.thommenag.ch...