Herunterladen Inhalt Inhalt Diese Seite drucken
Inhaltsverzeichnis

Werbung

Verfügbare Sprachen
  • DE

Verfügbare Sprachen

  • DEUTSCH, seite 1
DVS 4232
Wichtige Hinweise zur Installation / Garantieurkunde
Important notes for installation / warranty card
Mode d'emploi / certificat de garantie
Avvertenze importanti per l'installazione / certifcato di garanzia
Notas importantes sobre la instalación y certificado de garantía
Важная информация по инсталляции / гарантия
VOL
+
VOL
INPUT
Surround Sound System

Werbung

Inhaltsverzeichnis
loading

Inhaltszusammenfassung für Magnat DVS 4232

  • Seite 1 DVS 4232 Wichtige Hinweise zur Installation / Garantieurkunde Important notes for installation / warranty card Mode d’emploi / certificat de garantie Avvertenze importanti per l’installazione / certifcato di garanzia Notas importantes sobre la instalación y certificado de garantía Важная информация по инсталляции / гарантия...
  • Seite 2 ------- 3 ------- 15 ------- 27 ------- 39 ------- 51 ------- 63 - 2 -...
  • Seite 3: Inhaltsverzeichnis

    Sehr geehrter Kunde, vielen Dank, dass Sie sich für den Magnat DVS 4232 entschieden haben. Bitte lesen Sie unsere folgenden Hinweise vor Inbetriebnahme des DVS 4232 genau durch. INHALT Wichtige Sicherheitshinweise ------------------------------------------------------------ 4 Entsorgungshinweise ---------------------------------------------------------------------- 4 Bedienelemente am Gerät ---------------------------------------------------------------- 5 Die Fernbedienung ------------------------------------------------------------------------- 6 Anschlüsse ---------------------------------------------------------------------------------- 7...
  • Seite 4: Wichtige Sicherheitshinweise

    WICHTIGE SICHERHEITSHINWEISE Das Dreieck mit Blitzsymbol warnt den Benutzer, dass innerhalb des Gerätes hohe Spannungen verwendet werden, die gefährliche Stromschläge verursachen können. Das Dreieck mit Ausrufezeichen macht den Benutzer darauf aufmerksam, dass in der beigefügten Bedienungsanleitung wichtige Hinweise enthalten sind, die unbedingt beachtet werden müssen.
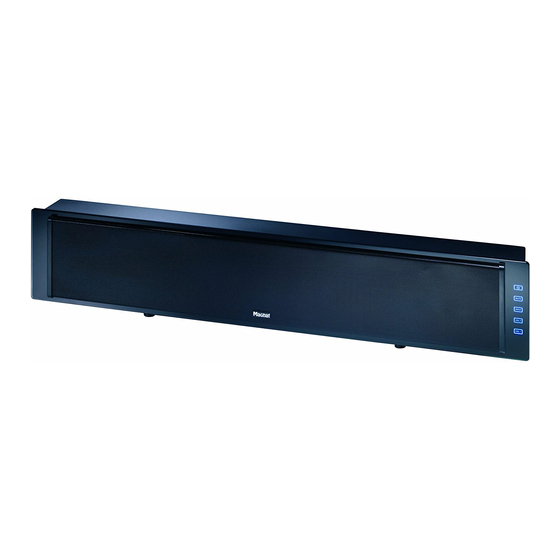
  • Seite 5: Bedienelemente Am Gerät

    BEDIENELEMENTE AM GERÄT VORDERSEITE: Sensortastenfeld V O L V O L IN P Achtung! Um ein sicheres Schalten des Sensortastenfeldes zu gewährleisten, benutzen Sie zur Betätigung der Tasten bitte Ihren Daumen. RÜCKSEITE: 17 19 POWER COAX 1 OPT 1 OPT 2 AC IN FUSE SUB.
  • Seite 6: Die Fernbedienung

    DIE FERNBEDIENUNG 1. STANDBY/POWER: Schaltet das Gerät ein oder aus. 2. INPUT: Wiederholtes Drücken wählt zwischen --DISK --OPTICAL 1 --OPTICAL 2 --COAXIAL 1 --COAXIAL 2 --AUX --TV als Eingang. INPUT 3. 0 bis +10 Zifferntasten. Eingabe von Ziffern. 4. SETUP: Zeigt Ihnen das Setup-Menü...
  • Seite 7: Anschlüsse

    ANSCHLÜSSE Subwooferausgang POWER COAX 1 OPT 1 OPT 2 AC IN FUSE SUB. OUTPUT SUB. SWITCH VIDEO COAX 2 OUTPUT Verbindung zu einer beliebigen Stereo- Signaleingangsquelle (z.B. TV, DVD, CD player, xBox, Ps2, Computer usw.) (Optisches Kabel, nicht im Lieferumfang enthalten) oder V O L V O L...
  • Seite 8: Hauptfunktionen Des Geräts

    HAUPTFUNKTIONEN DES GERÄTES 1. ON/OFF Schalten Sie den Netzschalter auf der Rückseite des Geräts auf "ON". Das Grät ist jetzt im Standby- betrieb, auf der LED-Anzeige leuchtet "HELLO". Drücken Sie die Standby-Taste am Gerät oder auf der Fernbedienung um das Gerät einzuschalten. Das System erkennt jedes anliegende "...
  • Seite 9: System Setup

    SYSTEM SETUP Sie können Ihr TV-Gerät an dem Videoausgang auf der Rückseite des Geräts anschließen. Bedienung der Menüs für die Systemeinstellungen: 1. Ein Druck auf die SETUP-Taste der Fernbedienung führt zu folgenden Menü: 2. Menüs können Sie mit den Navigationstasten .
  • Seite 10: Spracheinstellungen

    SYSTEM SETUP System Setup Diese Option stellt die Werkseinstellungen wieder her. Spracheinstellungen Wählen Sie hier die Sprache aus, die für die Bildschirmanzeige der Menüs und Statusinformationen verwendet werden sollen. Video Setup Hier können Sie die verschiedenen Parameter der Bilddarstellung regeln. Wählen Sie die gewünschte Funktion aus, dann drücken Sie die Enter - Taste und passen den Wert mit den [ ]-Tasten nach Ihrem Wunsch an.
  • Seite 11: Lautsprecher Einstellung

    SYSTEM SETUP Lautsprecher Einstellung: Downmix DOWNMIX bedeutet die Reduzierung des Tonsignals auf die 2-Kanal-Wiedergabe. Wenn Sie LT/RT auswählen, aktivieren Sie für die beiden Frontkanäle einen lebendigen, theaterähnlichen Effekt. Vor- aussetzung dafür ist aber, dass das Tonmaterial über PRO LOGIC Dolby Stereo Effekte verfügt. Wählen Sie STEREO für normale Stereowiedergabe.
  • Seite 12: Speicherkarten

    SPEICHERKARTEN Abspielen von Audio-, Bild- und Videodateien auf Speicherkarten: Starten Sie das System wie üblich. Platzieren Sie die Speicherkarten (USB/SD/MMC/MS) mit den entsprechenden Dateien im Karteneinschub. Achten Sie dabei auf die richtige Lage (Beschriftung nach vorn). Die Wiedergabe beginnt automatisch. Auf dem Bildschirm eines angeschlossenen TV- Geräts erhalten Sie folgende Übersicht über den Inhalt des Speichermediums: MP3 Audiodatei abspielen JPEG Bilddatei anzeigen...
  • Seite 13: Problembehandlung

    PROBLEMBEHANDLUNG PROBLEM URSACHE LÖSUNG 1. System ist nicht mit dem System spielt nicht 1. Überprüfen Sie das Stromnetz verbunden. Netzkabel. 2. Das Gerät lässt sich nicht 2. Stellen Sie sicher, das einschalten. der Netzschalter eingeschaltet ist. Kein Sound-Effekt im Stellen Sie sicher, dass sich Stellen Sie am DVD- DVD/5.1 Ausgangsmodus der DVD-Player im 5.1-Modus...
  • Seite 14: Technische Daten

    Technische Daten AUSGANGSLEISTUNG: Subwoofer (RMS) ------------------------------------------------------ 40 W Front-/ Center-Lautsprecher (RMS) ------------------------------- 3x 15 W Maximale Ausgangsleistung (Impuls) ----------------------------- 200 W Abmessungen (B x H x T) -------------------------------------------- 970 x 200 x 130 mm MITGELIEFERTES ZUBEHÖR: Fernbedienung ---------------------------------------------------------- 1 Stk. Batterie / Knopfzelle --------------------------------------------------- 1 Stk.
  • Seite 15 Dear customer, thank you for choosing the Magnat DVS 4232. Please read the following information carefully before starting to use your DVS 4232. CONTENT Safetey precaution ------------------------------------------------------------------------- 16 Instructions for disposal ------------------------------------------------------------------- 16 Description of the unit --------------------------------------------------------------------- 17 Description of the remote ----------------------------------------------------------------- 18...
  • Seite 16: Safetey Precaution

    SAFETY PRECAUTION This symbol warns the user that high voltage is used within the device which can result in electric shock. This symbol makes the user aware that there are important notes in the enclosed instruction manual which must be observed. Warning: Do not open! Risk of electric shock! To reduce the risk CAUTION of fire or electric shock, do not expose this unit to...
  • Seite 17: Description Of The Unit

    DESCRIPTION OF THE UNIT FRONT VIEW Touch panel control V O L V O L IN P Note: The touch screen panel requires large area of sensible contact, we recommend user to use thumb to operate the panel for better control. BOTTOM VIEW 17 19 POWER...
  • Seite 18: Description Of The Remote

    DESCRIPTION OF THE REMOTE 1. Standby/Power: Turn the unit on or off. 2. Input: Recycle select DISK --OPTICAL 1 --OPTICAL 2 --COAXIAL 1--COAXIAL 2 --AUX--TV input mode INPUT 3. 0~+10 Number key Press to enter numbers, such as DVD part number, etc.
  • Seite 19: Connections

    CONNECTIONS Subwoofer signal output POWER COAX 1 OPT 1 OPT 2 AC IN FUSE SUB. OUTPUT SUB. SWITCH VIDEO COAX 2 OUTPUT Connect to any two channel (Right/Left) sound source/device. (E.g. TV, DVD, CD player, xBox, Ps2, Computer etc.) (Optical cable ---Not include) V O L V O L IN P...
  • Seite 20: System Basic Operation

    SYSTEM BASIC OPERATION 1. ON/OFF Plug in the power cord to the outlet, switch the MAIN POWER to ON position at the back of the unit, the unit goes into standby mode, the LED displays "HELLO". Press STANDBY button on the front panel or on the remote control to start the operation of the system.
  • Seite 21: System Setup

    SYSTEM SETUP The system can connect your TV use video output connector on the rear panel. Using the system setup menus: 1. Press the SETUP button on the remote control to display the SETUP menu as shown below. 2. Use the buttons to select one of the SETUP options, highlight your desired selection with in each SETUP menu and press ENTER/PLAY button to confirm.
  • Seite 22: Language Setup

    SYSTEM SETUP System Setup DEFAULT: All functions resume initial statuses if you choose this option. Language Setup Select the language here, which is to be used for the screen display of the menus and the status information. Video Setup Here you can regulate the different parameters of the image representation. Please select the desired function, then press ENTER and adapt the value with the [ ]-keys according to your desire.
  • Seite 23: Speaker Setup

    SYSTEM SETUP Speaker Setup: Downmix a) LT/RT: you can select this option to decrypt the signal so as to present a vivid theater effect, provided that your DISC contains PRO LOGIC Dolby stereo effect. b) STEREO: at 5.1 sound channel output, the audio outputs to 5 speakers and a sub-woofer. At 2 sound channel output, the audio outputs to left and right speakers.
  • Seite 24: Memory Cards

    MEMORY CARDS Playing audio, picture and video files stored on memory cards: Turn the system On as usual. Insert your flash memory card containing MP3 audio/JPEG files into the memory card slot. Note: The card only be inserted one way, push it in as far as, it will go until it locks in place. The system will read the information on the card.
  • Seite 25: Maintenance & Troubleshooting

    MAINTENANCE & TROUBLESHOOTING MAINTENANCE & TROUBLESHOOTING ISSUE CAUSED BY SOLUTION 1. System does not No sound from system 1. Check with the power connected with power. plug. 2. The power does not 2. Make sure the power switch on. switch at the back pane is on.
  • Seite 26: Specifications

    SPECIFICATIONS OUTPUT POWER: Subwoofer (RMS) ------------------------------------------------------ 40 W Front-/ Center-Speaker (RMS) ------------------------------------- 3x 15 Maximal Output Power (peak) -------------------------------------- 200 W Dimension (W x H x D) ----------------------------------------------- 970 x 200 x 130 mm SCOPE OF DELIVERY: Remote control ---------------------------------------------------------- 1 Stk. Button-type battery ----------------------------------------------------- 1 Stk.
  • Seite 27 Chère cliente, cher client, Merci d'avoir choisi le DVS 4232 de Magnat. Avant d'utiliser votre DVS 4232, veuillez lire attentivement les informations qui suivent. SOMMAIRE Consignes de sécurité importantes ------------------------------------------------------- 28 Instructions pour la mise au rebut----------------------------------------------------------- 28 Eléments de commande --------------------------------------------------------------------- 29 La télécommande ----------------------------------------------------------------------------- 30...
  • Seite 28: Consignes De Sécurité Importantes

    CONSIGNES DE SECURITE IMPORTANTES Ce symbole avertit l'utilisateur que l'appareil est traversé par des tensions élevées pouvant entraîner des décharges électriques dangereuses. Ce symbole indique à l'utilisateur de l'appareil que la notice d'utilisation jointe avec l'appareil contient des consignes importantes devant impérativement être respectées. Attention! Ne pas ouvrir, risque d'électrocution! CAUTION Afin de reduire les risques d’incendie ou de décharge électricque,...
  • Seite 29: Eléments De Commande

    ELEMENTS DE COMMANDE FACE AVANT Clavier à effleurement V O L V O L IN P Attention! Afin de garantir un bon fonctionnement du clavier à effleurement, servez-vous de votre pouce pour appuyer sur les touches. FACE ARRIERE 17 19 POWER COAX 1 OPT 1 OPT 2...
  • Seite 30: La Télécommande

    LA TELECOMMANDE 1. STANDBY/POWER : Marche/arrêt de l'appareil. 2. INPUT : Une pression répétée permet de choisir entre --DISK --OPTICAL 1 --OPTICAL 2 --COAXIAL 1 --COAXIAL 2 --AUX --TV comme entrée. INPUT 3. Touches numériques de 0 à +10. Saisie de chiffres. 4.
  • Seite 31: Connexions

    CONNEXIONS Sortie subwoofer POWER COAX 1 OPT 1 OPT 2 AC IN FUSE SUB. OUTPUT SUB. SWITCH VIDEO COAX 2 OUTPUT Branchement d'une source stéréo de votre choix (par ex. TV, DVD, lecteur CD, xBox, Ps2, ordinateur, etc.) (câble optique, non compris dans la livraison) V O L V O L IN P...
  • Seite 32: Fonctions Principales

    FONCTIONS PRINCIPALES 1. ON/OFF Mettez l'interrupteur d'alimentation au dos de l'appareil sur « ON ». L'appareil est maintenant en mode de veille. Le message « HELLO » apparaît sur l'affichage à LED. Appuyez sur la touche Standby de l'appareil ou de la télécommande pour mettre en marche l'appareil. Le système détecte chaque signal d'entrée présent.
  • Seite 33: Configuration Du Système

    CONFIGURATION DU SYSTEME Il vous est possible de brancher votre téléviseur à la sortie vidéo située au dos de l'appareil. Commande des menus pour les réglages du système: 1. Une pression sur la touche SETUP de la télécommande permet d'accéder au menu suivant: Les menus peuvent être consultés de manière intuitive à...
  • Seite 34: Réglages De La Langue

    CONFIGURATION DU SYSTEME Configuration du système Cette option permet de rétablir les réglages par défaut. Réglages de la langue Sélectionnez la langue que vous souhaitez utiliser pour afficher à l'écran les menus et les informations d'état. Configuration vidéo Ce menu vous permet de régler les différents paramètres d'affichage à l'écran. Sélectionnez la fonction souhaitée puis appuyez sur la touche ENTER et ajustez la valeur selon vos préférences à...
  • Seite 35: Réglage Des Haut-Parleurs

    CONFIGURATION DU SYSTEME Réglage des haut-parleurs: Downmix DOWNMIX sert à réduire le signal sonore sur 2 canaux. Si vous sélectionnez LT/RT, activez un effet vivant et imitant une salle de théâtre pour les deux canaux frontaux. La condition requise est que le matériel sonore dispose des effets Dolby Stereo PRO LOGIC.
  • Seite 36: Cartes Mémoires

    CARTES MEMOIRES Lecture de fichiers audio, vidéo et d'image enregistrés sur des cartes mémoires: Démarrez le système comme d'habitude. Insérez dans le lecteur de cartes les cartes mémoires (USB/SD/MMC/MS) contenant les fichiers. Veillez à insérer les cartes correctement (face imprimée vers le haut). La lecture démarre automatiquement.
  • Seite 37: Aide En Cas De Dysfonctionnement

    AIDE EN CAS DE DYSFONCTIONNEMENT PROBLEME RAISON SOLUTION 1. Le système n'est pas Le système ne fonctionne 1. Vérifiez le cordon branché au réseau pas. d'alimentation. électrique. 2. Vérifiez que 2. Impossible de mettre en l'interrupteur marche l'appareil. d'alimentation est allumé.
  • Seite 38: Caracteristiques Techniques

    CARACTERISTIQUES TECHNIQUES PUISSANCE DE SORTIE: Subwoofer (RMS) ------------------------------------------------------------- 40 W Haut-parleurs frontaux/centraux (RMS) --------------------------------- 3x 15 W Puissance maximale de sortie (impulsion) ----------------------------- 200 W Dimensions (largeur x hauteur x profondeur) -------------------------- 970 x 200 x 130 mm ACCESSOIRES FOURNIS: Télécommande ---------------------------------------------------------------- Pile / pile ronde ---------------------------------------------------------------- Câble vidéo cinch (jaune) ---------------------------------------------------...
  • Seite 39 Gentile cliente, La ringraziamo per aver deciso di acquistare i Magnat DVS 4232. La preghiamo di leggere accuratamente le seguenti avvertenze prima di mettere in funzione il DVS 4232. INDICE Informazioni sulla sicurezza ----------------------------------------------------------------- 40 Istruzioni per lo smaltimento ---------------------------------------------------------------- 40...
  • Seite 40: Informazioni Sulla Sicurezza

    INFORMAZIONI SULLA SICUREZZA Questo simbolo indica all'utente l'utilizzo di alta tensione all'interno del dispositivo con conseguente pericolo di shock elettrico: Questo simbolo indica all'utente la presenza all'interno di questo manuale d'istruzioni di informazioni importanti da osservare con cura. Pericolo: non aprire! Rischio di shock elettrico! Per evitare rischi CAUTION di incendio o shock elettrico non esporre l'unità...
  • Seite 41: Descrizione Dell'apparecchio

    DESCRIZIONE DELL'APPARECCHIO VISTA FRONTALE: Pannello comandi touch panel V O L V O L IN P Importante! Il pannello comandi touch panel richiede ampiezza di contatto; raccomandiamo perciò agli utenti di utilizzare le dita per controllare al meglio le funzioni. VISTA POSTERIORE 17 19 POWER...
  • Seite 42: Descrizione Del Telecomando

    DESCRIZIONE DEL TELECOMANDO 1. STANDBY/ACCENSIONE: Accende e spegne l'unità. 2. INPUT: Permette di scegliere il modo di input fra DISK --OPTICAL 1 --OPTICAL 2 --COAXIAL 1--COAXIAL 2--AUX--TV INPUT 3. TASTI NUMERICI DA 0 A +10 Premere per inserire numeri corrispondenti, ad esempio, alle sezioni numerate di un DVD.
  • Seite 43: Collegamenti

    COLLEGAMENTI Uscita segnale subwoofer POWER COAX 1 OPT 1 OPT 2 AC IN FUSE SUB. OUTPUT SUB. SWITCH VIDEO COAX 2 OUTPUT Collegare a qualsiasi dispositivo/sorgente con due canali (sinistro/destro), come TV, DVD, lettore CD,xBox, Ps2, Computer ecc.) (Cavo ottico non incluso) V O L V O L IN P...
  • Seite 44: Funzioni Base Del Sistema

    FUNZIONI BASE DEL SISTEMA 1. ON/OFF Inserire il cavo di alimentazione nella presa, posizionare l'interruttore principale (situato sul retro dell'apparecchio) su ON: l'unità entra nel modo standby e il LED mostra la scritta “HELLO”. Premere il pulsante STANDBY dal pannello frontale o dal telecomando per avviare il sistema. L'unità rileverà automaticamente qualsiasi segnale di input.
  • Seite 45: Impostazione Del Sistema

    IMPOSTAZIONE DEL SISTEMA Il sistema è collegabile al vostro apparecchio TV mediante il connettore video posto sul pannello posteriore. Utilizzo dei menu impostazioni: 1. Premere il pulsante SETUP sul telecomando per visualizzare il relativo menu illustrato Usare i pulsanti per selezionare una delle opzioni di SETUP, evidenziare la selezione desiderata in ciascun menu SETUP e premere il pulsante ENTER/PLAY per confermare.
  • Seite 46: Scelta Della Lingua

    IMPOSTAZIONE DEL SISTEMA Impostazione del sistema DEFAULT: scegliendo quest'opzione, tutte le funzioni tornano alle impostazioni iniziali. Impostazione lingua Selezionare la lingua da utilizzare per visualizzare a schermo i menu e le informazioni sullo stato. Impostazione video Da qui è possibile regolare i diversi parametri per la rappresentazione delle immagini. Scegliere la funzione desiderata, premere ENTER e adattare il valore premendo i pulsanti secondo le preferenze personali.
  • Seite 47: Impostazioni Altoparlanti

    IMPOSTAZIONE DEL SISTEMA Impostazione altoparlanti: Downmix LT/RT: selezionare questa opzione per decriptare il segnale in modo da ottenere un esaltante effetto teatro. È necessario che il vostro disco contenga gli effetti stereo Dolby PRO LOGIC. STEREO: con la modalità uscita audio a 5.1 canali, il sistema emette il suono attraverso 5 altoparlanti e un subwoofer.
  • Seite 48: Schede Di Memoria

    SCHEDE DI MEMORIA Riproduzione di file contenenti audio, immagini e video salvati su schede di memoria: Accendere il sistema come di consueto con il pulsante ON. Inserire la scheda flash memory contenente i file audio MP3 o i file JPEG nell'apposito alloggiamento per le schede di memoria.
  • Seite 49: Manutenzione E Risoluzione Die Problemi

    MANUTENZIONE E RISOLUZIONE DIE PROBLEMI PROBLEMA CAUSA SOLUZIONE 1. Il sistema non è collegato Il sistema non emette alcun 1. Verificare il cavo e la alla presa di alimentazione. suono presa di alimentazione. 2. L'interruttore di 2. Accertarsi che alimentazione non è l'interruttore posto sul acceso.
  • Seite 50: Specifiche Tecniche

    SPECIFICHE TECNICHE POTENZA D'USCITA: Subwoofer (RMS) ---------------------------------------------------------------------- 40 W Altoparlante Frontale/Centrale (RMS) -------------------------------------------- 3x 15 Potenza d'uscita massima (picco) ------------------------------------------------- 200 W Dimensioni (L x A x P) --------------------------------------------- 970 x 200 x 130 mm CONTENUTO DELLA CONFEZIONE: Telecomando ---------------------------------------------------------------------------- 1 pz Batteria a bottone ---------------------------------------------------------------------- 1 pz Cavo video RCA (giallo) -------------------------------------------------------------- 1 pz Cavo coassiale RCA (arancione) -------------------------------------------------- 1 pz...
  • Seite 51 Estimado cliente, gracias por haber seleccionado il Magnat DVS 4232. Lea la siguiente información detenidamente antes de comenzar a utilizar su DVS 4232. CONTENIDO Instrucciones de seguridad-------------------------------------------------------------------52 Eliminación de residuos-----------------------------------------------------------------------52 Controles del equipo--------------------------------------------------------------------------- 53 Control remoto-----------------------------------------------------------------------------------54 Conexiones --------------------------------------------------------------------------------------55 Principales funciones del equipo------------------------------------------------------------56 Instalación del sistema------------------------------------------------------------------------ 57...
  • Seite 52: Precauciones Importantes De Seguridad

    PRECAUCIONES IMPORTANTES DE SEGURIDAD Este símbolo advierte al usuario de la presencia de altos niveles de tensión utilizados en el dispositivo, que podrían provocar descargas eléctricas. Este símbolo advierte al usuario de la existencia de notas importantes en el manual de instrucciones adjunto que deben respetarse.
  • Seite 53: Controles Del Equipo

    CONTROLES DEL EQUIPO FRENTE: Teclado táctil V O L V O L IN P Atención: Para asegurar el funcionamiento seguro del teclado táctil, operarlo utilizando los pulgares. PARTE POSTERIOR: 17 19 POWER COAX 1 OPT 1 OPT 2 AC IN FUSE SUB.
  • Seite 54: Control Remoto

    CONTROL REMOTO 1. STANDBY/POWER: Permite encender o apagar el equipo. 2. INPUT: Presionar para seleccionar una de las siguientes opciones de entrada: --DISCO --OPTICAL 1 --OPTICAL 2 --COAXIAL 1 INPUT --COAXIAL 2 --AUX --TV 3. Cifras 0 a 10 Permiten ingresar cifras. 4.
  • Seite 55: Conexiones

    CONEXIONES Salida de subwoofer POWER COAX 1 OPT 1 OPT 2 AC IN FUSE SUB. OUTPUT SUB. SWITCH VIDEO COAX 2 OUTPUT Conexión con cualquier fuente de señal estéreo (p.ej. TV, DVD, reproductor de CD, xBox, Ps2, ordenador, etc.) (No incluye cable óptico.) V O L V O L IN P...
  • Seite 56: Principales Funciones Del Equipo

    PRINCIPALES FUNCIONES DEL EQUIPO 1. ENCENDIDO/APAGADO Llevar el interruptor de encendido que se encuentra en la parte posterior del equipo a la posición “ON”. El equipo pasa así al modo standby o de espera, y en la pantalla LED se lee “HELLO”. Para encender el equipo basta con presionar el botón de standby del equipo o del control remoto.
  • Seite 57: Instalacion Del Sistema

    INSTALACION DEL SISTEMA Es posible conectar el televisor a la salida de vídeo que se encuentra en la parte posterior del equipo. Instrucciones para la operación de los menús de instalación del sistema: 1. Presionar una vez el botón de SETUP del control remoto para acceder al siguiente menú: Los menús se pueden operar de manera intuitiva con los botones de navegación Con el botón ENTER/PLAY se confirma/activa la opción seleccionada.
  • Seite 58: Idioma

    INSTALACION DEL SISTEMA Instalación del sistema Esta opción recupera los ajustes definidos en fábrica: Idioma Con esta opción es posible seleccionar el idioma de los menús y los mensajes de estado del sistema: Instalación de vídeo Permite el ajuste de los diferentes parámetros de la visualización de imágenes. Seleccionar la función deseada, presionar el botón ENTER y ajustar a gusto el parámetro utilizando los botones - 58 -...
  • Seite 59: Altavoces

    INSTALACION DEL SISTEMA Ajuste de altavoces: Downmix La función DOWNMIX permite reducir la señal de audio de los dos canales de reproducción. Si se selecciona la opción LT/RT, los canales frontales producen un sonido intenso, similar al de un teatro; para ello, sin embargo, el material de sonido reproducido debe contar con efectos estereofónicos PRO LOGIC Dolby.
  • Seite 60: Tarjetas De Memoria

    TARJETAS DE MEMORIA Reproducción de archivos de audio, imagen y vídeo de tarjetas de memoria: Iniciar el sistema como de costumbre. Colocar la tarjeta de memoria (USB/SD/MMC/MS) con los archivos correspondientes en la unidad para tarjetas, prestando atención a la posición correcta (inscripción hacia arriba).
  • Seite 61: Resolución De Problemas

    RESOLUCION DE PROBLEMAS PROBLEM CAUSA SOLUCION 1. El sistema no está El sistema no funciona. 1. Controlar el cable de enchufado a la red conexión a la red eléctrica. eléctrica. 2. El equipo no se enciende. 2. Asegurarse de que el interruptor de encendido esté...
  • Seite 62: Datos Técnicos

    DATOS TECNICOS POTENCIA DE SALIDA: Subwoofer (RMS) ------------------------------------------------------ 40 W Altavoz frontal/central (RMS) ---------------------------------------- 3x 15 W Potencia máxima de salida (impulso) ----------------------------- 200 W Medidas (ancho x altura x profundidad) -------------------------- 970 x 200 x 130 ACCESORIOS INCLUIDOS: Control remoto ---------------------------------------------------------- Pila (redonda) ----------------------------------------------------------- Cable cinch de vídeo (amarillo) ------------------------------------- Cable cinch coaxial (naranja) ---------------------------------------- 1...
  • Seite 63 Уважаемый покупатель! Благодарим Вас за решение приобрести Magnat DVS 4232. Пожалуйста, внимательно прочитайте следующую информацию перед включением DVS 4232. СОДЕРЖАНИЕ Важные указания по технике безопасности------------------------------------------ 64 Указания по утилизации-------------------------------------------------------------------- 64 Элементы управления на приборе------------------------------------------------------ 65 Дистанционное управление--------------------------------------------------------------- 66 Подключения ---------------------------------------------------------------------------------- 67 Главные...
  • Seite 64: Важные Указания По Технике Безопасности

    ВАЖНЫЕ УКАЗАНИЯ ПО БЕЗОПАСНОСТИ Этот символ предупреждает пользователя о том, что внутри устройства используется высокое напряжение, которое может привести к опасным ударам тока. Этот символ указывает пользователю устройства на то, что в прилагаемом руководстве по эксплуатации имеются важные указания, которым обязательно нужно...
  • Seite 65: Элементы Управления На Приборе

    ЭЛЕМЕНТЫ УПРАВЛЕНИЯ НА ПРИБОРЕ Панель с сенсорными клавишами ПЕРЕДНЯЯ СТОРОНА: V O L V O L IN P Внимание! Для правильного пользования панелью с сенсорными клавишами, рекомендуется использовать при нажатии клавиш большой палец. ЗАДНЯЯ СТОРОНА: 17 19 POWER COAX 1 OPT 1 OPT 2 AC IN FUSE...
  • Seite 66: Дистанционное Управление

    ДИСТАНЦИОННОЕ УПРАВЛЕНИЕ 1. STANDBY/POWER: Включает и выключает прибор. 2. INPUT: При повторном нажатии можно выбрать между --DISK --OPTICAL 1 --OPTICAL 2 --COAXIAL 1 --COAXIAL 2 --AUX --TV в качестве входа. 3. Клавиши с цифрами между от 0 до +10. INPUT Ввод...
  • Seite 67: Подключения

    ПОДКЛЮЧЕНИЯ Выход на сабвуфер POWER COAX 1 OPT 1 OPT 2 AC IN FUSE SUB. OUTPUT SUB. SWITCH VIDEO COAX 2 OUTPUT Подключение к любому источнику входного стереосигнала (напр., TV, DVD, CD Player, xBox, Ps2, компьютер и т.д.) (Оптический кабель, не входит в объём поставки) или...
  • Seite 68: Главные Функции Системы

    ГЛАВНЫЕ ФУНКЦИИ СИСТЕМЫ 1. ON/OFF Установите сетевой выключатель на обратной стороне прибора в положение "ON". Прибор находится теперь в режиме ожидания (Standby), на светодиодном индикаторе высвечивается "HELLO". Нажмите Standby-клавишу на самом приборе или на пульте дистанционного управления для того, чтобы включить устройство. Система распознаёт любой поступающий входной...
  • Seite 69: Настройка Системы

    НАСТРОЙКА СИСТЕМЫ Ваш телевизор Вы можете подключить к видеовыходу на обратной стороне прибора. Управление меню настройки системы: 1. При нажатии клавиши SETUP на пульте ДУ открываются следующие меню: 2. Вы можете управлять меню интуитивно при помощи навигационных клавиш Активация отдельных выборочных пунктов производиться при помощи клавиши ENTER/PLAY. 3.
  • Seite 70: Языковые Настройки

    НАСТРОЙКА СИСТЕМЫ Настройка системы Эта опция восстанавливает заводские настройки. Языковые настройки: Здесь Вы можете выбрать язык для отображения меню на экране и информации о статусе. Видеонастройка Здесь Вы можете регулировать различные параметры воспроизведения изображения. Выберите нужную функцию, затем нажмите клавишу Enter и подберите желаемое значение при помощи клавиш...
  • Seite 71: Настройка Громкоговорителей

    НАСТРОЙКА СИСТЕМЫ Настройка: Downmix DOWNMIX означает сокращение звукового сигнала до 2-канального воспроизведения. При выборе LT/RT Вы активируете для обоих фронтальных каналов живой, напоминающий театральную атмосферу эффект. Но это возможно только при условии, если звуковой материал содержит PRO LOGIC Dolby Stereo эффекты. STEREO выбирается при нормальном стереофоническом воспризведении.
  • Seite 72: Карты Памяти

    КАРТЫ ПАМЯТИ Воспроизведение аудио-, видео- и графических файлов с карт памяти: Запустите систему обычным образом. Вставьте карту памяти (USB/SD/MMC/MS) с соответствующими файлами в устройство для считывания. Следите при этом за тем, чтобы надпись находилась сверху. Воспроизведение начинается автоматически. На экране подключенного телевизора MP3 Audiodatei abspielen JPEG Bilddatei anzeigen AVI Videodatei abspielen...
  • Seite 73: Помощь При Неисправностях

    ПОМОЩЬ ПРИ НЕИСПРАВНОСТЯХ ПРОБЛЕМА ПРИЧИНА РЕШЕНИЕ 1. Система не подключена к Отсутствует 1. Проверьте сетевой электросети. воспроизведение. кабель. 2. Прибор не включается. 2. Удостоверьтесь, что сетевой выключатель включен. Нет звукового эффекта в Убедитесь, что DVD-плеер Установите на DVD-плеере выходном режиме DVD/5.1. находится...
  • Seite 74: Технические Данные

    ТЕХНИЧЕСКИЕ ДАННЫЕ ТЕХНИЧЕСКИЕ ДАННЫЕ ВЫХОДНАЯ МОЩНОСТЬ: Сабвуфер (RMS) ----------------------------------------------------------------- 40 Вт Фронтальный/Центральный громкоговоритель (RMS) -------------- 3x 15 Вт Максимальная выходная мощность (Impuls) ----------------------------- 200 Вт Габариты (Ш x В x Г) ---------------------------------------------- 970 x 200 x 130 мм ПРИЛАГАЕМЫЕ ПРИНАДЛЕЖНОСТИ: Пульт...
  • Seite 75 Wir gratulieren Ihnen! Durch Ihre kluge Wahl sind Sie Besitzer eines Magnat Produktes geworden. Magnat -Produkte erfreuen sich aufgrund der hohen Qualität eines ausgezeichneten Rufes weltweit. Dieser hohe Qualitätsstandard ermöglicht es für Magnat -Produkte 2 Jahre Garantie zu gewähren. Die Produkte werden während des gesamten Fertigungsvorganges laufend kontrolliert und geprüft. Im Servicefall beachten Sie bitte folgendes: 1.
  • Seite 76: Garantiekarte

    ARANTIEKARTE ARRANTY Typ/ Type Serien-Nr./Serial-No. Name und Anschrift des Händlers /Stempel Name and address of the dealer/stamp Käufer/Customer Name/Name Straße/Street PLZ, Ort /City Land /Country Kaufdatum / buying date Nur gültig in Verbindung mit Ihrer Kaufquittung! No warranty without receipt!
  • Seite 78 Magnat Audio-Produkte GmbH Lise-Meitner-Str. 9  D-50259 Pulheim  Germany T el. +49 (0) 2234 / 807 - 0  Fax +49 (0) 2234 / 807 - 399 Internet: http://www.magnat.de...

Inhaltsverzeichnis