Werbung
Quicklinks
SICCE S.p.A.
Via V. Emanuele, 115
36050 Pozzoleone - Vicenza - ITALY
www.sicce.com
IMPORTANT SAFETY INSTRUCTIONS
WARNING
- To guard against injury, basic safety precautions should be observed, including the following.
READ AND FOLLOW ALL SAFETY INSTRUCTIONS
DANGER
:
To avoid possible electric shock, special care should be taken since water is employed in the use of aquarium equipment. For each
of the following situations, do not attempt repairs by yourself. Return the appliance to an authorized service facility for service or discard the
appliance.
1) If the appliance falls into the water, DON'T reach for it! First unplug I and then retrieve it. If electrical components of the appliance get wet,
unplug the appliance immediately.
2) If the appliance shows any sign of abnormal water leakage, immediately unplug it from the power source.
3) Carefully examine the appliance after installation. It should not be plugged in if there is water on parts not intended to be wet.
4) Do not operate any appliance if it has a damaged cord or plug, or if it is malfunctioning or has been dropped or damaged in any manner.
5) To avoid the possibility of the appliance plug or receptacle getting wet, position aquarium stand and tank or the fountain to one side of a
wall-mounted receptacle to prevent water from dripping onto the receptacle or plug.
A "drip-loop" (pic. 1) should be arranged by the user for each cord connecting an aquarium appliance to a receptacle. The "drip-loop" is the part
of the cord below the level of the receptacle or the connector if an extension cord is used, which prevents water travelling along the cord and
coming in contact with the receptacle.
If the plug or socket does get wet, DON'T unplug the cord. Disconnect the fuse or circuit breaker that supplies power to
appliance. Then unplug and examine for presence of water in the receptacle.
6) Close supervision is necessary when any appliance is used by near children.
7) To avoid injury, do not contact moving parts or hot parts such as heaters, reflectors, lamp bulbs and similar.
8) Always unplug an appliance from an outlet when not in use, before putting on or taking off parts and before cleaning.
Never yank cord to pull plug from outlet. Grasp the plug and pull to disconnect.
9) Do not use an appliance for other than intended use. The use of attachments, not recommended or sold by the
manufacturer of the appliance, may cause an unsafe condition.
10) Do not install or store the appliances where it will be exposed to the weather or to temperatures below freezing.
11) Make sure an appliance mounted on a tank is securely installed before operating it.
12) Read and observe all the important notices of the appliance.
13) If an extension cord is necessary, a cord with a proper rating should be used. A cord rated for less amperes or watts than the appliance
rating, may overheat. Care should be taken to arrange the cord so that it will not be tripped over or pulled.
14) This appliance has a polarized plug (one blade is wider than other). As a safety feature, this plug will fit in a polarized outlet only one way.
If the plug does not fit fully in the outlet, reverse the plug. If it still does not fit, contact a qualified electrician. Never use with an extension cord
unless plug can be fully inserted. Do no attempt to defeat this safety feature.
SAVE THIS INSTRUCTIONS
EN
SAFETY REGULATIONS
Before doing any work on the filter, always disconnect the power supply. The power cable of this pump may not be replaced;
if it is damaged, the appliance must be scrapped. The product complies with the current safety regulations. Check the voltage
marked on the pump and ensure that it corresponds to the mains voltage.
The appliance must be fed through a differential switch (life saver), the rated current of which is less than or equal to 30mA.
The pump must not operate without water and with liquids with a temperature higher than 35°C!
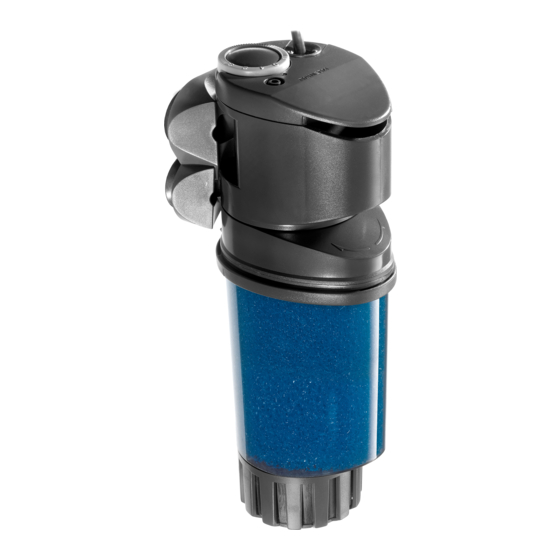
INSTALLATION
Decide where you want to position the filter, accurately clean the glass of the tank at the point where the suckers will be
positioned, rest the support on the glass and press firmly. Then insert the filter, in such a way that the flow is going in the
right direction (pict. 1). Lastly, insert the plug in the socket.
REGULATING THE SUCTION GRILLE
The filter has a regulating device (pict. 2) which allows you to vary the size of the spaces in the suction grille. This device
prevents fry or small fish from getting into the filter.
REGULATING THE AIR FLOW
SHARK ADV has an exclusive centralised system for monitoring the water flow rate and the air flow; these operations are
controlled by turning the small wheel on the top of the filter (pict. 3 - 3.1)
A - normal aeration
0 - water flow without aeration
1 - 75% water flow
2 - 50% water flow
3 - 25% water flow
In positions 1-2-3 the decrease of the water flow is compensated by a greater air flow in order to avoid a dangerous decrease
of the oxygen in the water.
MAINTENANCE
For periodic cleaning of the filter and of the pump, it is sufficient to remove the filter from the tank by releasing it from the
support, remove the filter cup from the pump body by pulling and bending them slightly so as to cancel the force of attraction
of the fixing magnets (pict. 4).
Once the filtering module has been removed from the pump body, lever on the grille cap until it is released from the cup
(pict. 5). Then extract the filtering material (picture 6) and rinse it in running water.
To clean the rotor, remove the filter cover (A pict. 7), turning the filter head anti-clockwise; gently extract the rotor (pict. 7),
and wash everything in lukewarm water, removing any deposits of scale with a soft brush.
To reassemble the filter, perform the same operations in inverse order.
The magnets in the cartridges and in the pump body of the filter have unlimited duration, however, take care not to damage
them during filter-cleaning operations.
Scratches or breakages of the holding magnets could threaten correct operation of the filter anchoring system.
INSTRUCTIONS FOR THE CORRECT DISCHARGE OF THE PRODUCT ACCORDING TO EU DIRECTIVE 2002/96/EC
When used or broken, the product does not have to be discharged with the other waste. It can be delivered to the specific
electric waste collection centres or to dealers who give this service. Discharge separately an electric tool avoid negative
consequences for the environment and for the Health and allows to regenerate the materials so to have a great saving of
energy and resources.
WARRANTY
This product is guaranteed against defects of materials and workmanship for a period of 2 years from the date of purchase,
except the rotor. The warranty certificate must be filled in by the dealer and must accompany the pump if it is returned for
reparation, along with the cash register receipt or similar document. The warranty covers the replacement of the defective
parts. In case of improper use, tampering or negligence by the buyer or user, the guarantee is void and expires immediately.
The guarantee is also void in absence of the cash register receipt or similar document. The expenses for shipping the pump
to and from the factory, or the repair station, have to be paid by the buyer.
D
SICHERHEITSNORMEN
Vor jeglichem Eingriff am Filter stets die Stromzufuhr abtrennen. Das Speisekabel dieses Produkts darf nicht ausgewechselt
werden. Falls es beschädigt wird, muss das Gerät verschrottet werden. Das Produkt entspricht den derzeit gültigen
Sicherheitsnormen. Die auf der Pumpe aufgedruckte Spannung kontrollieren und sicherstellen, dass sie mit der Netzspannung
übereinstimmt.
Das Gerät muss über einen Differentialschalter (Fehlerstromschutzschalter) gespeist werden, dessen Nennstrom niedriger
als oder gleich 30mA ist.
Der Filter darf nicht ohne Wasser und mit Flüssigkeiten, deren Temperatur 35°C überschreitet, betrieben werden!
INSTALLIERUNG
Entscheiden Sie, in welchem Bereich Sie den Filter positionieren möchten, reinigen Sie das Beckenglas an dem Punkt, an
dem die Saugköpfe positioniert werden, sorgfältig, lehnen Sie die Stütze ans Glas und drücken Sie sie fest an. Dann fügen
Sie den Filter so ein, dass der Fluss korrekt ausgerichtet ist (Bild. 1). Zum Schluss führen Sie den Netzstecker in die Steckdose
ein.
EINSTELLUNG DES ANSAUGGITTERS
Der Filter verfügt über eine Reguliervorrichtung (Bild. 2), die eine Veränderung der Öffnungen des Ansauggitters ermöglicht.
Diese Vorrichtung vermeidet das Eindringen von Setzlingen oder kleinen Fischen ins Innere des Filters.
EN
D
ANLEITUNGEN
INSTRUCTIONS
F
I
INSTRUCTIONS
ISTRUZIONI
E
NL
INSTRUCTIES
INSTRUCCIONES
DK
P
INSTRUÇÕES
BRUGSANVISNING
AQUARIUM TANK
POWER
SUPPLY CORD
APPLIANCE
DRIP LOOP
REGULIERUNG DES LUFTFLUSSES
Shark ADV verfügt über ein exklusives zentralisiertes System zur Überwachung der Fördermenge an Wasser und des
Luftflusses. Diese Vorgänge werden durch Einwirkung auf ein im oberen Teil des Filters befindliches Rädchen (Bild. 3 - 3.1)
gesteuert.
A - normale Belüftung
0 - Wasserfluss ohne Belüftung
1 - Wasserfluss zu 75%
2 - Wasserfluss zu 50%
3 - Wasserfluss zu 25%
In den Positionen 1-2-3 wird die Verminderung des Wasserflusses durch eine höhere Luftzufuhr kompensiert, um eine
gefährliche Verminderung des Sauerstoffs im Wasser zu vermeiden.
WARTUNG
Für die periodischen Reinigungen des Filters und der Pumpe ist es ausreichend, den Filter aus dem Becken zu entfernen,
indem man ihn von der Stütze loshakt. Das Filterglas vom Pumpenkörper abtrennen, indem man daran zieht und es leicht
biegt, um die Anziehungskraft der Anhakmagneten (Bild. 4) zu annullieren. Sobald der Filtrationsmodul vom Pumpenkörper
entfernt wurde, eine Hebelwirkung auf den Gitter-Stopfen ausüben, bis er vom Becher losgehakt wird (Bild. 5). Dann das
Filtriermaterial herausziehen (Bild. 6) und unter fließendem Wasser abspülen.
Zur Reinigung des Rotors den Filterdeckel (A Bild. 7) entfernen. Während der Filterkopf gegen den Uhrzeigersinn gedreht
wird, den Rotor vorsichtig herausziehen (Bild. 7) und alles in lauwarmem Wasser abspülen, wobei eventuelle Kalkablagerungen
mit einem weichen Bürstchen entfernt werden.
Zur Wiedermontage des Filters die Arbeitsvorgänge in umgekehrter Reihenfolge vornehmen.
Die in den Einsätzen und im Pumpenkörper des Filters vorhandenen Magneten haben eine unbegrenzte Dauer. Während
der Reinigungsarbeiten am Filter muss trotzdem darauf geachtet werden, sie nicht zu beschädigen.
Kratzer oder Bruch der Dichtungsmagneten könnten die korrekte Funktion des Anhaksystems des Filters beeinträchtigen.
ENTSORGUNG (nach RL2002/96/EC)
Gerät darf nicht dem normalen Hausmüll beigefügt werden, sondern muss fachgerecht entsorgt werden. Wichtig für
Deutschland: Gerät über Ihre kommunale Entsorgungsstelle entsorgen. Entsorgung von Altgeräten: Wenn dieses Symbol
eines durchgestrichenen Abfalleimers auf einem Produkt angebracht ist, unterliegt dieses Produkt der europäischen Richtlinie
2002/96/EC. Alle Elektro- und Elektronik-Altgeräte müssen getrennt vom Hausmüll über die dafür staatlich vorgesehenen
Stellen entsorgt werden. Mit der ordnungsgemäßen Entsorgung des alten Geräts vermeiden Sie Umweltschäden und eine
Gefährdung der persönlichen Gesundheit. Weitere Informationen zur Entsorgung des alten Geräts erhalten Sie bei der
Stadtverwaltung, beim Entsorgungsamt oder in dem Geschäft, wo Sie das Produkt erworben haben.
GARANTIE
Wir garantieren für 24 Monate ab Kaufdatum (ausschließlich dem Rotor) für fehlerhaftes Material und Fabrikationsfehler.
Im Garantiefall schicken Sie bitte das reklamierte Gerät mit der vom Händler ausgefüllten Garantiekarte und der datierten
Kaufquittung oder Rechnung zu dem Händler ein. Mangelnde Pflege und unsachgemäße Behandlung haben einen
Garantieverlust zur Folge. Die Garantie besteht im Austausch der schadhaften Teile. Die Kosten für Versand und die
Rücksendung gehen zu Lasten des Käufers.
F
NORMES DE SÉCURITÉ
Avant toute intervention sur le filtre, couper toujours l'alimentation électrique. Le câble d'alimentation de ce produit ne peut
pas être remplacé ; en cas de dommages, l'appareil doit être mis au rebut. Le produit est conforme aux normes actuelles
en matière de sécurité. Contrôler le voltage estampillé sur la pompe et s'assurer qu'il correspond à la tension du secteur.
L'appareil doit être alimenté à travers un interrupteur différentiel (coupe-circuit) avec un courant nominal inférieur ou égal à
30mA.
Le filtre ne doit pas fonctionner à sec et avec des liquides à une température supérieure à 35°C !
INSTALLATION
Choisir l'endroit où l'on désire positionner le filtre, nettoyer soigneusement le verre de l'aquarium au niveau du point où
seront positionnées les ventouses, appuyer le support contre le verre et appuyer avec force. Insérer ensuite le filtre de
manière à avoir une orientation correcte du flux (im 1). Pour finir, brancher la fiche dans la prise de courant.
RÉGLAGE CRÉPINE D'ASPIRATION
Le filtre dispose d'un dispositif de réglage (im. 2) qui permet de modifier la dimension des espaces de la crépine d'aspiration.
Ce dispositif évite que des alevins ou des poissons de petite taille pénètrent à l'intérieur du filtre.
RÉGLAGE FLUX AIR
SHARK ADV dispose d'un système centralisé exclusif pour contrôler le débit d'eau et le flux d'air, ces opérations sont
commandées en agissant sur la molette située sur la partie supérieure du filtre (im. 3 - 3.1)
A - aération normale
0 - flux d'eau sans aération
1 - flux d'eau à 75%
2 - flux d'eau à 50%
3 - flux d'eau à 25%
Dans les positions 1-2-3, la diminution du flux d'eau est compensée par l'augmentation du flux d'air pour éviter une réduction
dangereuse d'oxygène dans l'eau.
ENTRETIEN
Pour le nettoyage périodique du filtre et de la pompe, il suffit d'enlever le filtre de l'aquarium en le décrochant du support,
puis détacher le godet du filtre du corps de la pompe en tirant et en les pliant légèrement de manière à annuler la force
d'attraction des aimants de fixation (im. 4). Une fois que le module filtrant a été retiré du corps de la pompe, faire levier sur
le bouchon-crépine de manière à le décrocher du godet (im. 5). Enlever ensuite le matériau filtrant (im. 6) et le rincer à l'eau
courante.
Pour nettoyer le rotor, enlever le couvercle du filtre (A im. 7), en faisant tourner la tête du filtre dans le sens contraire des
aiguilles d'une montre, retirer délicatement le rotor (im. 7) et laver le tout à l'eau tiède en enlevant les éventuels dépôts
calcaires avec une brosse douce.
Pour remonter le filtre, effectuer les opérations dans l'ordre inverse.
Les aimants présents dans les cartouches et dans le corps pompe du filtre ont une durée illimitée, veiller toutefois à ne pas
les abîmer durant les opérations de nettoyage du filtre. Les rayures ou les ruptures des aimants de fixation pourraient
compromettre le fonctionnement correct du système d'accrochage du filtre.
INSTRUCTIONS POUR LA DÉCHARGE CORRECTE DU PRODUIT SELON L'EU 2002/96/EC DIRECTIF
Cet appareil ne doit pas être jeté dans les poubelles domestiques mais dans les conteneurs spécialement prévus pour ce
type de produits. Une fois utilisé ou cassé, le produit ne doit pas être déchargé avec l'autre perte. Il peut être livré aux centres
de rebut électriques spécifiques de collection ou aux distributeurs qui donnent ce service. La décharge séparément un outil
électrique évitent des conséquences négatives pour l'environnement et pour la santé et laissent régénérer les matériaux
ainsi pour avoir une grande économie d'énergie et des ressources.
GARANTIE
Ce produit, à l'exclusion du rotor, est garanti pendant une période de 2 ans à compter de la date de l'achat, contre les défauts
de matériau et de fabrication. Le certificat de garantie doit être rempli dans toutes ses parties par le revendeur et devra
accompagner l'appareil s'il est restitué pour la réparation, avec le ticket de caisse ou autre titre d'achat équivalent. La garantie
consiste dans le remplacement des pièces défectueuses. En cas d'utilisation incorrecte, de manipulation ou de négligence
de la part de l'acheteur ou de l'utilisateur, la garantie s'annule et perd son effet immédiatement. D'autre part, la garantie
s'annule également en cas d'absence du ticket de caisse ou d'un titre d'achat équivalent. Les frais d'expédition et de renvoi
sont à la charge de l'acheteur.
I
NORME DI SICUREZZA:
Prima di qualsiasi intervento sul filtro, staccare sempre il cavo di alimentazione della corrente. Il cavo di alimentazione di
questo prodotto non può essere sostituito; in caso di danneggiamento, l'apparecchio deve essere rottamato.
Il prodotto è conforme alle attuali norme in termini di sicurezza. Controllare il voltaggio stampato sulla pompa ed accertarsi
che corrisponda alla tensione di rete.
L'apparecchio deve essere alimentato attraverso un interruttore differenziale (salvavita), la cui corrente nominale sia inferiore
o uguale a 30mA.
Il filtro non deve funzionare senz'acqua e con liquidi la cui temperatura non superi i 35° C.
INSTALLAZIONE
Decidete la zona dove volete posizionare il filtro, pulite accuratamente il vetro della vasca in corrispondenza del punto dove
andranno posizionate le ventose, appoggiate il supporto al vetro e premete con forza. Inserite quindi il filtro in maniera da
avere un corretto orientamento del flusso (Fig. 1). Infine, inserite la spina nella presa della corrente.
REGOLAZIONE GRIGLIA ASPIRAZIONE
Il filtro dispone di un dispositivo di regolazione (Fig. 2) che permette di variare la dimensione degli spazi della griglia di
aspirazione. Questo dispositivo evita l'ingresso di avannotti o pesci di piccole dimensioni all'interno del filtro.
REGOLAZIONE FLUSSO ARIA
SHARK ADV dispone di un esclusivo sistema centralizzato per monitorare la portata d'acqua ed il flusso d'aria, queste
operazioni vengono comandate agendo sulla rotellina situata sulla parte superiore del filtro (Fig. 3 - 3.1).
A - aerazione normale
O - flusso d'acqua senza aerazione
1 - flusso d'acqua al 75%
2 - flusso d'acqua al 50%
3 - flusso d/acqua al 25%
Nelle posizioni 1 - 2 - 3 la diminuzione del flusso d'acqua è compensata da un maggiore afflusso d'aria, al fine di evitare una
pericolosa diminuzione di ossigeno nell'acqua.
MANUTENZIONE
Per le periodiche pulizie del filtro e della pompa, è sufficiente togliere il filtro dalla vasca sganciandolo dal supporto, staccare
il bicchiere dal corpo pompa tirando e piegandoli leggermente in modo da annullare la forza attrattiva dei magneti di aggancio
(Fig. 4). Una volta tolto il modulo della filtrazione dal corpo pompa, fate leva sul tappo-griglia fino a sganciarlo dal bicchiere
(Fig. 5). Sfilate quindi il materiale filtrante (Fig. 6) e sciacquatelo in acqua corrente. Per la pulizia del rotore, togliete il coperchio
filtro (A fig. 7), facendo ruotare la testa del filtro in senso antiorario, estraete delicatamente il rotore (Fig. 7) e lavate il tutto
in acqua tiepida, togliendo gli eventuali depositi calcarei con uno spazzolino morbido.
Per rimontare il filtro, eseguire le operazioni al contrario.
I magneti presenti nelle cartucce e nel corpo pompa del filtro hanno una durata illimitata, fate comunque attenzione durante
le operazioni di pulizia del filtro a non danneggiarli. Graffi o rotture dei magneti di tenuta potrebbero compromettere il corretto
funzionamento del sistema di aggancio del filtro.
AVVERTENZE PER IL CORRETTO SMALTIMENTO DEL PRODOTTO AI SENSI DELLA DIRETTIVA EUROPEA 2002/96/EC
Alla fine della sua vita utile, il prodotto non deve essere smaltito insieme ai rifiuti urbani. Può essere consegnato presso gli
appositi centri di raccolta differenziata predisposti dalle amministrazioni comunali, oppure presso i rivenditori che forniscono
questo servizio. Smaltire separatamente un elettrodomestico consente di evitare possibili conseguenze negative per l'ambiente
e per la Salute derivante da un suo smaltimento inadeguato e permette di recuperare i materiali di cui è composto, al fine
di ottenere un importante risparmio energetico e di risorse.
GARANZIA
Questo prodotto, escluso il rotore, è garantito per un periodo di 2 anni dalla data di acquisto, da difetti di materiale e lavorazione.
Il certificato di garanzia deve essere compilato in ogni sua parte dal rivenditore, e dovrà accompagnare l'apparecchio nel
caso in cui venga restituito per la riparazione, assieme allo scontrino fiscale o equivalente. La garanzia consiste nella
sostituzione delle parti difettose. In caso di uso improprio, manomissione o negligenza da parte dell'acquirente o utente, la
garanzia è nulla e decade immediatamente. La garanzia è inoltre nulla in caso di mancanza dello scontrino fiscale d'acquisto
o equivalente. Le spese di spedizione e rinvio sono a carico dell'acquirente.
Werbung

Verwandte Anleitungen für Sicce Shark ADV Serie


Inhaltszusammenfassung für Sicce Shark ADV Serie
- Seite 1 Abfalleimers auf einem Produkt angebracht ist, unterliegt dieses Produkt der europäischen Richtlinie 2002/96/EC. Alle Elektro- und Elektronik-Altgeräte müssen getrennt vom Hausmüll über die dafür staatlich vorgesehenen Stellen entsorgt werden. Mit der ordnungsgemäßen Entsorgung des alten Geräts vermeiden Sie Umweltschäden und eine SICCE S.p.A. INSTRUÇÕES BRUGSANVISNING Gefährdung der persönlichen Gesundheit.
- Seite 2 WARRANTY - GARANTIE NORMAS DE SEGURIDAD • SPARE PARTS • ERSATZTEILE • PIECES DE RECHANGE • RICAMBI • PIEZAS DE REPUESTOS • ЗАПАСНЫЕ ЧАСТИ GARANZIA - GARANTIA - GARANTIED Antes de llevar a cabo cualquier intervención en el filtro, hay que desconectar siempre la alimentación. No es posible sustituir el cable de alimentación de este producto, por lo que de resultar estropeado habrá...