Battery Controller BC BOOSTER K10000 PRO Benutzerhandbuch
BC BOOSTER K10000 PRO - USER MANUAL
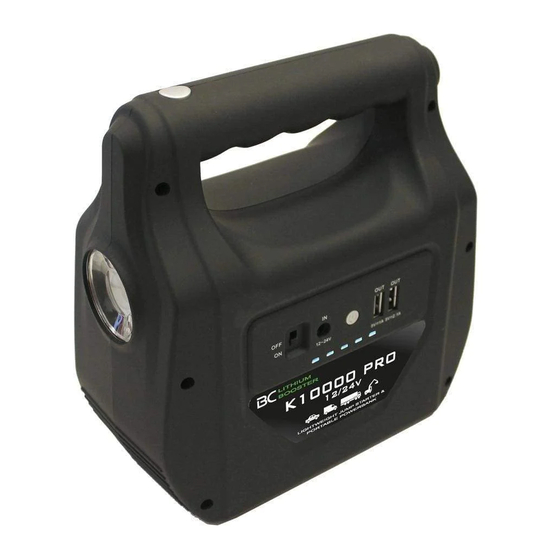
CONTENTS OF THE PACKAGE
1.12V / 24V BC BOOSTER K10000 PRO starter
2.Double connector for star�ng 12 / 24V
3.Insulated pliers for star�ng with fuse
4.Power supply for booster charging from a socket
5.Adapter for charging booster from 12V cigare�e lighter socket
6.Mul�ple USB cable for charging electronic devices
7.OBD adapter for memory saver (OPTIONAL)
8. Instruc�on manual
CHECK THE CHARGE STATUS OF BC BOOSTER K10000 PRO
To check the charge status of the starter, turn the ON / OFF switch to ON and then press the LED indicator switch. Depending on the number of lit LEDs,
the following indica�on is obtained: 1 LED: 20% / 2 LEDs: 40% / 3 LEDs: 60% / 4 LEDs: 80% / 5 LEDs: 100%.
CHARGE BC BOOSTER K10000 PRO
•CAUTION! PERFORM A FULL CHARGE IMMEDIATELY AFTER PURCHASE, AFTER EACH USE AND IN ANY CASE EVERY 3 MONTHS.
• AFTER USING THE PRODUCT TO START A VEHICLE, WAIT 30 MINUTES BEFORE CONNECTING THE BATTERY CHARGER.
1.Set the ON / OFF switch to ON.
2. Connect the supplied power supply to the 12 / 24V 2A input of the booster.
3. Insert the power supply into a power outlet. The charge status indicator LEDs flash in sequence.
4. When charging is complete, all 5 LEDs of the charge indicator are on and charging stops automa�cally. Disconnect the power supply from the power
outlet and then from the booster. Turn off the starter by se�ng the ON / OFF switch to OFF.
OR
1.Set the ON / OFF switch to ON.
2. Connect the 12V cigare�e lighter adapter to the 12 / 24V - 2A input of the booster.
3. Insert the adapter into a 12V cigare�e lighter socket. The charge status indicator LEDs flash in sequence.
4. When charging is complete, all 5 LEDs of the charge indicator are on and charging stops automa�cally.
Disconnect the power supply from the 12V socket and then from the booster. Turn off the starter by se�ng the ON / OFF switch to OFF.
START A VEHICLE WITH 12V OR 24V BATTERY
• CAUTION! DO NOT USE TO START A VEHICLE WHEN THE DEVICE IS CHARGING!
• MAKE SURE THAT THE VEHICLE IGNITION KEY IS ON "OFF" BEFORE CONNECTING THE STARTER!
• USE ONLY FOR VEHICLES WITH 12V OR 24V SYSTEM!
For the emergency star�ng of a petrol or diesel vehicle, please strictly follow the procedure described below.
1. Turn on the starter by posi�oning the ON / OFF switch to ON.
2. Press the LED indicator switch and check that at least 3 LEDs are on. Otherwise, recharge the booster to 100% before use. If the starter is very
discharged, the first LED may turn on alternately red and blue.
3.Set the ON / OFF switch to OFF.
4. Connect the RED clamp to the posi�ve (+) terminal and the BLACK clamp to the nega�ve (-) terminal of the vehicle ba�ery
5. A�er connec�ng the clamps to the ba�ery, choose the right 12V (black adapter) or 24V (red adapter) vehicle adapter and connect it to the star�ng
clamps and the 12 / 24V output of the booster.
6. Start the vehicle (turn off all electronic devices before star�ng).
7. As soon as the vehicle has started (within 15/20 seconds), disconnect the pliers from the starter and then disconnect the pliers from the ba�ery. Avoid
bringing the engine over 2500 rpm (RPM) when the starter is connected.
8. During startup, due to voltage drop, the number of lit LEDs may drop to 1 or the LED bar may go out. This is a normal situa�on, try turning on the
starter a few seconds a�er star�ng to view the charge status of the booster.
CAUTION!!! ALWAYS WAIT AT LEAST 20 SECONDS BETWEEN A START AND THE NEXT FOR USE ON MOTORCYCLES, 30 SECONDS BETWEEN A START AND
THE NEXT FOR USE ON CARS!
USE THE 5V 2.1A / 1A USB OUTPUT - CHARGING SMARTPHONE AND TABLET
1. Turn on BC BOOSTER K10000 PRO by posi�oning the ON / OFF switch to ON.
2.Connect the mul�ple USB cable to the USB 2.1A socket or the USB 1A socket of BC BOOSTER K10000 PRO.
3. Connect the other end of the cable to the device to be recharged, selec�ng the appropriate adapter. If the correct adapter is not available, you can
use the USB adapter supplied with the device to be recharged. If necessary, turn on the device to be charged.
4. Press the LED indicator bu�on twice to start charging.
5.When charging is complete, turn off the device to be charged (if necessary) and disconnect the cable from the USB port of the booster.
6. Turn off BC BOOSTER K10000 PRO by se�ng the ON / OFF switch to OFF.
7.If necessary, recharge BC BOOSTER K10000 PRO before using again.
Note. In case of temperatures <0 ° C, the starting performance of the booster can be significantly reduced. After a few starting attempts, the product
heats up and performance improves. Alternatively, place the product in a warmer place before use.
USE THE 12V 10A OUTPUT - RECHARGE AND POWER SUPPLY OF 12V DEVICES
BC BOOSTER K10000 PRO can power devices equipped with a 12V cigare�e lighter adapter.
1. Make sure the device to be powered is turned off before plugging it in.
2. Turn on BC K10000 PRO, posi�oning the ON / OFF switch to ON, and press the LED indicator switch to check the charge status.
3. Insert the 12V adapter of the device to be powered into the 12V 10A socket of BC BOOSTER K10000 PRO. If necessary, turn on the device.
4.Switch on the front LED flashlight, to make sure that the automa�c shutdown does not occur. It is important that the LED flashlight is turned on only
a�er performing step 3..
5.A�er use, turn off the device to be powered (if necessary) and disconnect the 12V adapter from the 12V socket of the booster.
6.If necessary, recharge BC BOOSTER K10000 PRO before using again.
NOTE: if the output exceeds 10A, the fuse intervenes to cut the circuit and protect the battery. The 10A fuse is replaceable
USE THE OBD ADAPTER TO SAVE MEMORIES (OPTIONAL)
BC BOOSTER K10000 PRO can be used as a memory saver when replacing a car ba�ery, through the appropriate OBD adapter.
1. Turn on BC K10000 PRO, posi�oning the ON / OFF switch to ON, and press the LED indicator switch to check the charge status.
2. Connect the OBD adapter to the 12V output of the booster. The red LED on the cigare�e lighter plug of the OBD adapter lights up.
3.Switch on the front LED flashlight, to make sure that the automa�c shutdown does not occur. It is important that the LED flashlight is turned on only a�er
performing step 2.
4. Connect the OBD adapter to the car's OBD socket for memory saving func�on.
5. Replace the car ba�ery. At the end of use, disconnect the OBD adapter from the car and from the 12V socket and turn off BC K10000 PRO.
6.If necessary, recharge BC BOOSTER K10000 PRO before using again.
NOTE: if the output exceeds 10A, the fuse intervenes to cut the circuit and protect the battery. The 10A fuse is replaceable.
USE THE LED TORCH / FRONT AND SIDE EMERGENCY LAMP
Turn the ON / OFF bu�on to ON and then press and hold the front LED flashlight switch to turn on the flashlight.
Press the switch again to change between the following modes: steady light, strobe light, SOS, off (FRONT). With steady or flashing white / red light
(LATERAL).
DATA SHEET
TROUBLESHOOTING GUIDE
DIMENSIONS
181 x 184 x 89 mm
PROBLEM
WEIGHT
1200 gr
NO RESPONSE
OUTPUT
5V – 1A + 2.1A / 12V – 10A / Avviamento 12V/24V
WHEN PRESSING
INPUT
12V-24V - 2A
THE LED INDICATOR
Time for total recharge
7 HOURS
SWITCH
STARTING CURRENT (AC)
12V / 24V 500A
PEAK CURRENT (PA)
12V / 24V 1000A
I CAN'T
TEMPERATURE OF USE
-20°C - +60°C / -4°F - +120°F
RECHARGE THE
DEVICE
STORAGE TEMPERATURE
< 70°C
F.A.Q. - QUESTIONS AND ANSWERS
1.How do I turn off BC BOOSTER K10000 PRO?
Set the ON / OFF switch to OFF to turn off the device.
2.How many times can I charge my smartphone before charging BC BOOSTER K10000 PRO?
It depends on the type and model of the smartphone. Approximately 14 �mes for an iPhone. However, it is not recommended to discharge the starter
below the 3 LEDs.
3.How many times can I start a vehicle before charging BC BOOSTER K10000 PRO?
If the device is fully charged, it can make up to 40 consecu�ve starts without requiring a recharge. It is important to wait for the �mes indicated in
one star�ng a�empt and the next, to avoid damaging the internal ba�ery.
4.How long does the BC BOOSTER K10000 PRO's internal battery hold a charge?
The internal ba�ery is lithium and can hold a charge for 3/6 months. We recommend a full charge at least every 3 months.
WARNINGS AND SAFETY
- If star�ng is not possible, always check if the clamps are correctly connected to the vehicle ba�ery terminals. Check if the ba�ery itself has
encrusta�ons, rust or dust and remove them before trying to start up again. If a�er 3 a�empts it is s�ll not possible to start the vehicle, DO NOT try
to start it again but check for other problems with the vehicle.
- DO NOT put the red pliers and the black pliers into contact, it could cause damage and dangerous situa�ons.
- DO NOT disassemble or open the device or other parts of it, it could cause damage and dangerous situa�ons.
- BC BOOSTER K10000 PRO is not intended for use by children or adults with reduced physical, sensory or mental capabili�es, without the presence of a
responsible person who can ensure safe use of the device. Do not use as a toy.
- Do not use BC BOOSTER K10000 PRO in the bathroom or in a wet place or where it may come into contact with water.
- Do not modify or disassemble the device. Always check the integrity of the cables and the device before use.
- Do not expose the device to flames or sources of heat. Do not use in the presence of flammable liquids, gases or dusts.
- Do not throw the device and avoid knocks or strong shocks.
- Recharge the internal ba�ery of the starter only at an ambient temperature between -20 ° C and 60 ° C. Store it in environments less than 70 ° C.
- During charging or storage, if the starter becomes hot or the color of the casing changes, stop using it immediately. The starter could swell or emit
smoke.
- Charge the starter only with the supplied power supply or cigare�e lighter adapter.
- Please contact your local dealer or distributor in case of anomalies or defects during use
- If the liquid inside the starter comes into contact with the skin or eyes, rinse immediately and abundantly with water and contact a doctor.
- Do not place BC BOOSTER K10000 PRO on flammable material, bed or sheets.
- At the end of the product's useful life, dispose of it in a way that respects the environment.
WARRANTY
The device is covered by a limited warranty for failures or malfunc�ons a�ributable to materials or manufacturing for a period of 12 months from the
date of purchase. The terms of the warranty are as follows: The warranty is valid if problems occur during normal opera�on. Any right to repair under
warranty expires in the event of improper use or tampering of any kind or repairs carried out by an unauthorized technician. In the event of an a�empt
to open the device or tamper with one of its components, the warranty will become inapplicable. The warranty becomes void in case of removal of the
labels of the BC BOOSTER K10000 PRO.
ENGLISH
CAUTION!!! IT IS MANDATORY TO WAIT 30
WAIT
SECONDS BEFORE MAKING ANOTHER ATTEMPT TO
START THE VEHICLE!
30"
DISCONNECT THE BOOSTER WITHIN 15/20 SECONDS FROM
STARTING, TO AVOID RISK OF FAILURE TO THE INTERNAL BATTERY.
AFTER 3 UNSUCCESSFUL START-UP ATTEMPTS, DO NOT MAKE NEW
ATTEMPTS.
IT IS ADVISABLE NOT TO RUN THE MOTOR OVER 2500 RPM BEFORE
DISCONNECTING THE BOOSTER.
ATTENZIONE/ ATTENTION / VORSICHT/ ATTENTION/ PRECAUCIÓN!!
COLLEGARE SEMPRE LE PINZE PRIMA ALLA BATTERIA (PINZA ROSSA AL POLO POSITIVO E PINZA NERA AL POLO NEGATIVO) E POI ALL' A VVIATORE!
ALWAYS CONNECT THE CLAMPS FIRST TO THE BATTERY (RED CLAMP TO THE POSITIVE POLE AND BLACK CLAMP TO THE NEGATIVE POLE) AND
THEN TO THE STARTER!
VERBINDEN SIE DIE KLEMMEN IMMER ZUERST MIT DER BATTERIE (ROTE KLAMMER MIT DEM POSITIVEN POL UND SCHWARZE KLAMMER MIT
DEM NEGATIVEN POL) UND DANN MIT DEM STARTER!
CONNECTEZ TOUJOURS LES PINCES À LA BATTERIE EN PREMIER (PINCE ROUGE AU PÔLE POSITIF ET PINCE NOIRE AU PÔLE NÉGATIF) ET PUIS AU
DÉMARREUR!
¡CONECTE SIEMPRE LAS ABRAZADERAS PRIMERO A LA BATERÍA
(ABRAZADERA ROJA AL POLO POSITIVO Y ABRAZADERA NEGRA
AL POLO NEGATIVO) Y LUEGO AL ARRANQUE!
INTERRUTTORE TORCIA
LED FRONTALE
TORCIA LED
FRONTALE
1
D����� ���������� ���
���������� 12/24V
+
P���� ������� ��� ����������
��� ��������
D����� ��������� ���
�������� 12 / 24V
+
I�������� ������ ��� ��������
���� ����
D������������ ���
�� 12 / 24V
+
I�������� Z���� ��� S������
��� S��������
D����� ���������� ����
��������� 12 / 24V
+
P���� ������ ���� ��
CAUSES
SOLUTION
��������� ���� �������
C������� ����� ����
1. UNDER DISCHARGE
CONNECT THE DEVICE
�������� 12 / 24V
PROTECTION
TO THE CHARGER AND
+
RECHARGE IT TO
A������� �������� ����
2. THE DEVICE IS IN USE
�������� ��� �������
REACTIVATE THE LED
FOR STARTING A
BAR.
VEHICLE
OPTIONAL
THE ON / OFF
SET THE ON / OFF
SWITCH IS IN THE OFF
SWITCH TO ON
POSITION
IT
Presa accendisigari 12V 10A
EN
12V 10A cigarette lighter socket
12V 10A
DE
Zigarettenanzünderbuchse
Prise allume-cigare 12V 10A
FR
Toma de mechero de 12V 10A
ES
BATTERY
CONTROLLER
BC BOOSTER K10000 PRO
FUSIBILE (10A)
PER LA PRESA 12V
PRESA 12V 10A TIPO
ACCENDISIGARI
OUTPUT 12/24V PER
AVVIAMENTO
INTERRUTTORE
TORCIA LED
LATERALE
OUTPUT USB
5V 2.1A
OUTPUT USB 5V 1A
INTERRUTTORE INDICATORE LED
INDICATORE LED
INPUT 12/24V 2A
FLASH
LED
TORCIA LED
INDICATOR
1,2
FRONTALE
USB
2.5 A
LIGHT
2
3
A��������� ��� ��������
A����������� ��� ��������
C��� USB �������� ���
������� �� �����
������� �� ����� �� ��������
�������� �����������
������������� 12V
�����������
M������� USB ����� ���
A������ ��� ��������
�������� ���������� �������
P���� ������ ��� �������
������� ���� 12V
�������� ���� � ������
��������� ������� ������
M��������� USB-K���� ���
A������ ��� L���� ���
L���� ��������������
S�������������� ���
B������� ��� ��� 12-V
G�����
B������-L���� ���� ����
Z�����������������������
S��������
P�������� ������ USB ����
A��������� ���� ���������
������� ��� ���������
A����������� ���� �� ������
�� ������� �� �����
�������������
�'������� ��� ��� �����
������-������ 12V
V����� ������ USB ����
A�������� ���� ��������
������������ ���� �����
������ ������������
�� ������������ �� ���� ��
��������� � ������ �� ��
������������
������� �� 12V
�������
A��������� OBD ��� �����-�������
FOR 12/24 V PETROL OR DIESEL
(OPTIONAL)
VEHICLES UP TO 1200 CC
OBD ������� ��� ������ ������
(OPTIONAL)
OBD-A������
���
S�������������
(OPTIONAL)
A��������� OBD ���� ������������
�� ������� (OPTIONNEL)
A�������� OBD ���� ����������� ��
������� (OPCIONAL)
Torcia di emergenza con
IT
Indicatore LED
luce SOS e stroboscopica
IT
Emergency flashlight with
EN
SOS and Strobe Modes
LED Indicator
EN
Power-LED Arbeitsleuchte -
DE
Blitzlicht mit SOS Funktion
DE
LED-Anzeige
Lampe torche avec mode
FR
FR
stroboscopique et S.O.S.
Indicateur à LED
Linterna con modo
ES
Indicador LED
ES
estroboscópico y S.O.S.
TM
Forelettronica Srl
IMPORTATO DA / IMPORTED BY:
Via Meucci, 11 - 20080 Cisliano (MI) - ITALY
info@batterycontroller.it
BC BOOSTER K10000 PRO - MANUALE D'USO
CONTENUTO DELLA CONFEZIONE
1.Avviatore 12V/24V BC BOOSTER K10000 PRO
2.Doppio conne�ore per avviamento 12/24V
3.Pinze isolate per avviamento con fusibile
4.Alimentatore per ricarica booster da presa di corrente
5.Ada�atore per ricarica booster da presa accendisigari 12V
6.Cavo USB mul�plo per ricarica disposi�vi ele�ronici
7.Ada�atore OBD per salva-memorie (OPTIONAL)
8.Manuale d'istruzioni
VERIFICARE LO STATO DI CARICA DI BC BOOSTER K10000 PRO
Per verificare lo stato di carica dell'avviatore, posizionare l'interru�ore ON/OFF su ON e quindi premere l'interru�ore dell'indicatore LED. A seconda del
numero di LED accesi, si ha la seguente indicazione: 1 LED: 20% / 2 LED: 40% / 3 LED: 60% / 4 LED: 80% / 5 LED: 100%.
CARICARE BC BOOSTER K10000 PRO
•ATTENZIONE! ESEGUIRE UNA CARICA COMPLETA SUBITO DOPO L'ACQUISTO, DOPO OGNI UTILIZZO E IN OGNI CASO OGNI 3 MESI.
•DOPO AVER UTILIZZATO IL PRODOTTO PER AVVIARE UN VEICOLO, ATTENDERE 30 MINUTI PRIMA DI COLLEGARE IL CARICABATTERIA.
1.Posizionare l'interru�ore ON/OFF su ON.
2.Collegare l'alimentatore in dotazione all'ingresso Input 12/24V 2A del booster.
3.Inserire l'alimentatore in una presa di corrente. I LED dell'indicatore stato di carica lampeggiano in sequenza.
4.Quando la carica è completa, tu� e 5 i LED dell'indicatore di carica sono accesi e la carica si interrompe automa�camente. Scollegare l'alimentatore
dalla presa di corrente e poi dal booster. Spegnere l'avviatore posizionando l'interru�ore ON/OFF su OFF.
1.Posizionare l'interru�ore ON/OFF su ON.
2.Collegare l'ada�atore per prese accendisigari 12V all'ingresso Input 12/24V - 2A del booster.
3.Inserire l'ada�atore in una presa accendisigari 12V. I LED dell'indicatore stato di carica lampeggiano in sequenza.
4.Quando la carica è completa, tu� e 5 i LED dell'indicatore di carica sono accesi e la carica si interrompe automa�camente. Scollegare l'alimentatore
dalla presa 12V e poi dal booster. Spegnere l'avviatore posizionando l'interru�ore ON/OFF su OFF.
AVVIARE UN VEICOLO CON BATTERIA 12V O 24V
•
ATTENZIONE! NON UTILIZZARE PER AVVIARE UN VEICOLO QUANDO IL DISPOSITIVO È IN CARICA!
• ASSICURARSI CHE LA CHIAVE D'ACCENSIONE DEL VEICOLO SIA SU "OFF" PRIMA DI COLLEGARE L'AVVIATORE!
• UTILIZZARE SOLO PER VEICOLI CON SISTEMA A 12V O 24V!
Per l'avviamento di emergenza di un veicolo a benzina o a gasolio, si prega di seguire stre�amente la procedura descri�a di seguito.
1.Accendere l'avviatore posizionando l'interru�ore ON/OFF su ON.
2.Premere l'interru�ore indicatore LED e verificare che almeno 3 LED siano accesi. Altrimen�, ricaricare il booster al 100% prima dell'uso. Se l'avviatore è
molto scarico, il primo LED potrebbe accendersi con luce alterna�vamente rossa e blu.
3.Posizionare l'interru�ore ON/OFF su OFF.
4.Collegare la pinza ROSSA al morse�o posi�vo (+) e la pinza NERA al morse�o nega�vo (-) della ba�eria del veicolo
TORCIA LED
5.Dopo aver collegato le pinze alla ba�eria, scegliere il giusto ada�atore per veicoli a 12V (ada�atore nero) o 24V (ada�atore rosso) e collegarlo alle
LATERALE
pinze per avviamento e all'output 12/24V del booster.
6.Avviare il veicolo (spegnere tu� i disposi�vi ele�ronici prima di eseguire l'avviamento).
7.Non appena il veicolo si è avviato (entro 15/20 secondi), scollegare le pinze dall'avviatore e quindi scollegare le pinze dalla ba�eria. Evitare di portare il
motore oltre i 2500 giri (RPM) quando l'avviatore è collegato.
8. Durante l'esecuzione dell'avviamento, a causa del calo di tensione, è possibile che il numero di LED accesi scenda fino a 1 o che la barra LED si spenga.
Si tra�a di una situazione normale, provare ad accendere l'avviarore dopo alcuni secondi dall'avviamento per visualizzare lo stato di carica del booster.
ATTENZIONE!!! ATTENDERE SEMPRE ALMENO 20 SECONDI TRA UN AVVIAMENTO ED IL SUCCESSIVO PER USO SU MOTOCICLETTE, 30 SECONDI TRA UN
AVVIAMENTO E IL SUCCESSIVO PER USO SU AUTOMOBILI!
UTILIZZARE L'OUTPUT USB 5V 2,1A / 1A - RICARICA DI SMARTPHONE E TABLET
1.Accendere BC BOOSTER K10000 PRO posizionando l'interru�ore ON/OFF su ON.
2.Collegare il cavo USB mul�plo alla presa USB 2.1A o alla presa USB 1A di BC BOOSTER K10000 PRO.
3.Collegare l'altra estremità del cavo al disposi�vo da ricaricare, selezionando l'ada�atore appropriato. Se non è disponibile l'ada�atore corre�o, è
possibile u�lizzare l'ada�atore USB in dotazione al disposi�vo da ricaricare. Se necessario, accendere il disposi�vo da ricaricare.
4.Premere due volte il pulsante dell'indicatore LED per avviare la carica.
5.Al termine della carica, spegnere il disposi�vo da ricaricare (se necessario) e scollegare il cavo dalla porta USB del booster.
6.Spegnere BC BOOSTER K10000 PRO posizionando l'interru�ore ON/OFF su OFF.
kg
POWER
7.Se necessario, ricaricare BC BOOSTER K10000 PRO prima di un nuovo u�lizzo.
1000 A
Nota. In caso di temperature < 0°C, la performance in avviamento del booster può ridursi significativamente. Dopo qualche tentativo di avviamento,
il prodotto si scalda e la performance migliora. In alternativa, posizionare il prodotto in un luogo più caldo prima dell'uso.
UTILIZZARE L'OUTPUT 12V 10A - RICARICA E ALIMENTAZIONE DI DISPOSITIVI A 12V
BC BOOSTER K10000 PRO può alimentare disposi�vi provvis� di un ada�atore accendisigari 12V.
1.Assicurarsi che il disposi�vo da alimentare sia spento prima di collegarlo.
2.Accendere BC K10000 PRO, posizionando l'interru�ore ON/OFF su ON, e premere l'interru�ore dell'indicatore LED per verificare lo stato di carica.
3.Inserire l'ada�atore 12V del disposi�vo da alimentare nella presa 12V 10A di BC BOOSTER K10000 PRO. Se necessario, accendere il disposi�vo.
4.Accendere la torcia LED frontale, per assicurarsi che non intervenga lo spegnimento automa�co. È importante che la torcia LED venga accesa solo
dopo aver eseguito il punto 3. .
5.Al termine dell'u�lizzo, spegnere il disposi�vo da alimentare (se necessario) e scollegare l'ada�atore 12V dalla presa 12V del booster.
6.Se necessario, ricaricare BC BOOSTER K10000 PRO prima di un nuovo u�lizzo.
NOTA: se l'output dovesse superare i 10A, il fusibile interviene per tagliare il circuito e proteggere la batteria. Il fusibile da 10A è sostituibile
UTILIZZARE L'ADATTATORE OBD PER SALVA-MEMORIE (OPTIONAL)
4
BC BOOSTER K10000 PRO può essere u�lizzato come salva-memorie durante la sos�tuzione della ba�eria di un'auto, a�raverso l'apposito ada�atore OBD.
1.Accendere BC K10000 PRO, posizionando l'interru�ore ON/OFF su ON, e premere l'interru�ore dell'indicatore LED per verificare lo stato di carica.
2.Collegare l'ada�atore OBD all'output 12V del booster. Il LED rosso sulla spina accendisigari dell'ada�atore OBD si accende.
3.Accendere la torcia LED frontale, per assicurarsi che non intervenga lo spegnimento automa�co. È importante che la torcia LED venga accesa solo
dopo aver eseguito il punto 2.
4.Collegare l'ada�atore OBD alla presa OBD dell'automobile per funzione salva-memorie.
5.Sos�tuire la ba�eria dell'auto. Al termine dell'u�lizzo, scollegare l'ada�atore OBD dall'auto e dalla presa 12V e spegnere BC K10000 PRO.
6.Se necessario, ricaricare BC BOOSTER K10000 PRO prima di un nuovo u�lizzo.
NOTA: se l'output dovesse superare i 10A, il fusibile interviene per tagliare il circuito e proteggere la batteria. Il fusibile da 10A è sostituibile.
UTILIZZARE LA TORCIA LED / LAMPADA D'EMERGENZA FRONTALE E LATERALE
FRONTALE / LATERALE:
Posizionare il pulsante ON/OFF su ON e quindi tenere premuto l'interru�ore della torcia LED frontale per accendere la torcia.
Premere nuovamente l'interru�ore per cambiare tra le seguen� modalità: luce fissa, luce stroboscopica, SOS, spento (FRONTALE). Con luce fissa o
lampeggiante bianca/rossa (LATERALE).
SCHEDA TECNICA
DIMENSIONI
181 x 184 x 89 mm
PESO
1200 grammi
OUTPUT
5V – 1A + 2.1A / 12V – 10A / Avviamento 12V/24V
INPUT
12V-24V - 2A
TEMPO PER RICARICA TOTALE
7 ORE
CORRENTE D'AVVIAMENTO (CA)
12V / 24V 500A
CORRENTE DI PICCO (PA)
12V / 24V 1000A
TEMPERATURA DI UTILIZZO
-20°C - +60°C / -4°F - +120°F
TEMPERATURA DI STOCCAGGIO
< 70°C
F.A.Q. - DOMANDE E RISPOSTE
1.Come faccio a spegnere BC BOOSTER K10000 PRO?
Posizionare l'interru�ore ON/OFF su OFF per spegnere il disposi�vo.
2.Quante volte posso caricare il mio smartphone prima di ricaricare BC BOOSTER K10000 PRO?
Dipende dal �po e dal modello di smartphone. Indica�vamente, 14 volte per un iPhone. Si sconsiglia comunque di scaricare l'avviatore so�o i 3 LED.
3.Quante volte posso avviare un veicolo prima di ricaricare BC BOOSTER K10000 PRO?
Se il disposi�vo è pienamente carico, può fare fino a 40 avviamen� consecu�vi senza richiedere una ricarica. È importante a�endere i tempi indica� tra
un tenta�vo di avviamento e il successivo, per evitare di danneggiare la ba�eria interna.
4.Quanto a lungo mantiene la carica la batteria interna di BC BOOSTER K10000 PRO?
La ba�eria interna è al li�o e può mantenere la carica per 3/6 mesi. Consigliamo una ricarica completa almeno ogni 3 mesi.
AVVERTENZE E SICUREZZA
- Se non è possibile eseguire l'avviamento, controllare sempre se le pinze sono corre�amente collegate ai terminali della ba�eria del veicolo.
Controllare se la ba�eria stessa presenta incrostazioni, ruggine o polvere e rimuoverle prima di riprovare ad eseguire l'avviamento. Se dopo 3
tenta�vi non è ancora possibile avviare il veicolo, NON provare ad avviarlo di nuovo ma controllare se ci sono altri problemi al veicolo.
- NON me�ere in conta�o la pinza rossa e la pinza nera, potrebbe causare danni e situazioni di pericolo.
- NON smontare o aprire il disposi�vo o altre sue par�, potrebbe causare danni e situazioni di pericolo.
- BC BOOSTER K10000 PRO non è des�nato all'uso da parte di bambini o di adul� con capacità fisiche, sensoriali o mentali rido�e, senza la presenza di
una persona responsabile che possa assicurare un uso sicuro del disposi�vo. Non u�lizzare come un gioca�olo.
- Non u�lizzare BC BOOSTER K10000 PRO in bagno o in un luogo bagnato o dove possa venire in conta�o con l'acqua.
- Non modificare o smontare il disposi�vo. Verificare sempre l'integrità dei cavi e del disposi�vo prima dell'uso.
- Non esporre il disposi�vo a fiamme o fon� di calore. Non u�lizzare in presenza di liquidi, gas o polveri infiammabili.
- Non lanciare il disposi�vo ed evitare ur� o for� shock.
- Ricaricare la ba�eria interna dell'avviatore solo a una temperatura ambiente compresa tra -20°C e 60°C. Conservarlo in ambien� a meno di 70°C.
- Durante la carica o lo stoccaggio, se l'avviatore diventa caldo o il colore dell'involucro si modifica, cessare immediatamente l'u�lizzo. L'avviatore
potrebbe gonfiarsi o eme�ere fumo.
- Caricare l'avviatore solo con l'alimentatore o l'ada�atore accendisigari in dotazione.
- Si prega di conta�are il vostro rivenditore o distributore locale in caso di anomalie o dife� durante l'u�lizzo
- Se il liquido all'interno dell'avviatore viene a conta�o con la pelle o gli occhi, sciacquare subito ed abbondantemente con acqua e rivolgersi ad un
medico.
- Non appoggiare BC BOOSTER K10000 PRO su materiale infiammabile, le�o o lenzuola.
- Alla fine della vita u�le del prodo�o, disporne in modo rispe�oso per l'ambiente.
GARANZIA
Il disposi�vo è coperto da garanzia limitata per guas� o malfunzionamen� imputabili ai materiali o alla fabbricazione per un periodo di 12 mesi dalla
data di acquisto. Le condizioni della garanzia sono le seguen�: la garanzia è valida se si verificano problemi durante il normale funzionamento. Ogni
diri�o di riparazione in garanzia decade in caso di uso improprio o di manomissioni di alcun genere o di riparazione effe�uata da un tecnico non
autorizzato. In caso di tenta�vo di apertura del disposi�vo o di manomissione di una delle sue componen�, la garanzia diventerà inapplicabile.
La garanzia decade in caso di rimozione delle e�che�e di BC BOOSTER K10000 PRO.
ITALIANO
ATTENZIONE!!! È OBBLIGATORIO ATTENDERE 30
WAIT
SECONDI PRIMA DI EFFETTUARE UN ULTERIORE
30"
TENTATIVO DI AVVIAMENTO DEL VEICOLO!
SCOLLEGARE IL BOOSTER ENTRO 15/20 SECONDI DALL'AVVIAMENTO,
PER EVITARE RISCHI DI GUASTO ALLA BATTERIA INTERNA.
DOPO 3 TENTATIVI DI AVVIAMENTO NON RIUSCITI DI SEGUITO, NON
ESEGUIRE NUOVI TENTATIVI.
È CONSIGLIABILE NON PORTARE IL MOTORE OLTRE 2500 RPM PRIMA
DI SCOLLEGARE IL BOOSTER.
Oppure
GUIDA ALLA RISOLUZIONE DEI PROBLEMI
PROBLEMA
POSSIBILI CAUSE
SOLUZIONE
NESSUNA RISPOSTA
1. PROTEZIONE DA
COLLEGARE IL
DISPOSITIVO AL
QUANDO SI PREME
SOTTOSCARICA
CARICABATTERIA E
L'INTERRUTTORE
2. IL DISPOSITIVO È IN
RICARICARLO PER
DELL'INDICATORE
USO PER L' A VVIAMENTO
RIATTIVARE LA BARRA
LED
DI UN VEICOLO
LED.
NON RIESCO A
L'INTERRUTTORE
POSIZIONARE
RICARICARE IL
ON/OFF È IN
L'INTERRUTTORE
DISPOSITIVO
POSIZIONE OFF
ON/OFF SU ON

Verwandte Anleitungen für Battery Controller BC BOOSTER K10000 PRO

Inhaltszusammenfassung für Battery Controller BC BOOSTER K10000 PRO
- Seite 1 3.Inserire l’ada�atore 12V del disposi�vo da alimentare nella presa 12V 10A di BC BOOSTER K10000 PRO. Se necessario, accendere il disposi�vo. 3. Insert the 12V adapter of the device to be powered into the 12V 10A socket of BC BOOSTER K10000 PRO. If necessary, turn on the device.
- Seite 2 - No u�lice BC BOOSTER K10000 PRO en el baño o en un lugar húmedo o donde pueda entrar en contacto con el agua. - Ne pas u�liser BC BOOSTER K10000 PRO dans la salle de bain ou dans un endroit humide ou là où il pourrait entrer en contact avec de l'eau.