Herunterladen Diese Seite drucken

Werbung

Verfügbare Sprachen
  • DE

Verfügbare Sprachen

  • DEUTSCH, seite 14
151.374 V1.0
BTS300Z ProfIle Spot

Werbung

loading

Inhaltszusammenfassung für Beamz Pro BTS300Z ProfIle Spot

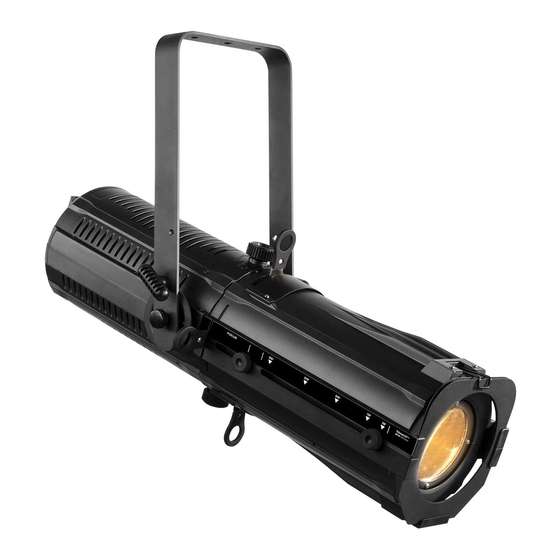
  • Seite 1 151.374 V1.0 BTS300Z ProfIle Spot...
  • Seite 2 ENGLISH SAFETY INSTRUCTIONS ........................................................3 UNPACKING INSTRUCTION ......................................................... 4 POWERSUPPLY ............................................................4 RIGGING ................................................................. 4 DMX512 CONTROL ............................................................ 5 RDM CONTROL ............................................................5 LENS TUBE ..............................................................6 MANUAL SHUTTERS ADJUSTMENT ....................................................6 COLOUR FILTERS ............................................................. 6 REPLACING THE FUSE .......................................................... 6 CLEANING ..............................................................
  • Seite 3 ESPAÑOL INSTRUCCIONES DE SEGURIDAD ....................................................18 INSTRUCCIONES DE DESEMBALAJE ..................................................19 FUENTE DE ALIMENTACIÓN ......................................................19 INSTALACIÓN ............................................................19 CONTROL DMX512 ..........................................................20 CONTROL RDM ............................................................20 TUBO DE LENTES ............................................................21 AJUSTE MANUAL OBTURADORES ....................................................21 FILTROS DE COLOR ..........................................................21 CAMBIANDO EL FUSIBLE ........................................................21 LIMPIEZA ..............................................................21 SOLUCIÓN DE PROBLEMAS ......................................................
  • Seite 4 W ARNING! Before carrying out any operations with the unit, carefully read this instruction manual and keep it with cure for future ref erence. It contains important information about the installation, usage and maintenance of the unit. • Unpack and check carefully that there is no transportation damage before using the unit •...
  • Seite 5 CAUTION! Immediately upon receiving the product, carefully unpack the carton, check the contents to ensure that all parts are present, and have been received in good condition. Notify the shipper immediately and retain packing material for inspection if any parts appear dam age from shipping or the package itself shows signs of mishandling.
  • Seite 6 If you are using a standard DMX controller, you can connect the DMX output of the controller directly to the DMX input of the first fixture in a DMX chain. Always connect the output of one unit with the input of the next fixture until all fixtures are connected. Caution: At the last fixture, you must close the DMX line with a terminating resistor.
  • Seite 7 To remove and install the BTS profile lens tubes: Step 1: Loosen (but do not remove) lens tube knobs (A) . Step2: Slide lens tube little to left or right. Step3: Lift lens tube assembly up and away from lightsource. Step4: To install perform process in reverse.
  • Seite 8 The checklist below may help you troubleshoot in the unlikely event that a problem occurs while using the product: Symptom Possible cause Suggested action No light from fixture. No power to fixture. Check that power is turned on. Check cables and connections. Shutters are all pushed in and blocking the Pull out the 4 shutter blades.
  • Seite 9 W AARSCHUW ING! Lees deze gebruiksaanwijzing zorgvuldig door voordat u met het apparaat gaat werken en bewaar deze handleiding voor toekomstig gebruik. Het bevat belangrijke informatie over de installatie, het gebruik en het onderhoud van het apparaat. • Uitpakken en zorgvuldig controleren of er geen transportschade is voordat u het apparaat gebruikt. •...
  • Seite 10 LET OP! Onmiddellijk na ontvangst, zorgvuldig uitpakken van de doos, controleer de inhoud om ervoor te zorgen dat alle onderdelen aanwezig zijn en zijn in goede staat zijn ontvangen. Bij transportschade of ontbreken van onderdelen onmiddellijk de verkopende partij inlichten. Bewaar de verpakking en het verpakkingsmateriaal.
  • Seite 11 Als u gebruik maakt van een standaard DMX-lichtstuurtafel, kunt u de DMX uitgang van de lichtstuurtafel rechtstreeks aansluiten op de DMX ingang van het eerste armatuur. Sluit altijd de DMX uitgang aan op de eerst volgende DMX ingang van het volgende armatuur totdat alle armaturen zijn aangesloten.
  • Seite 12 Voor het verwijderen en installeren van de BTS-profielbuis: Stap 1: Draai de lensbuisknoppen (A) los (maar verwijder deze niet).. Stap 2: Schuif de lensbuis iets naar links of rechts. Stap 3: Til de lensbuis omhoog en weg van de lichtbron. Stap4: Voor het monteren volg het proces in omgekeerde richting uit te voeren.
  • Seite 13 De onderstaande checklist kan u hulp bieden in het onwaarschijnlijke geval dat zich een probleem voordoet tijdens het gebruik van het product: Symptoom Mogelijke oorzaak Voorgestelde actie Geen licht uit het armatuur. Geen stroomvoorziening. Controleer of de voeding is ingeschakeld. Controleer de kabels en aansluitingen.
  • Seite 14 W ARNUNG! Lesen Sie diese Anleitung sorgfältig durch, bevor Sie das Gerät in Betrieb nehmen, und bewahren Sie sie zum späteren Gebrauch auf. Sie enthält wichtige Informationen über die Installation, den Gebrauch und die Wartung des Gerätes. • Vor der Inbetriebnahme des Gerätes auspacken und sorgfältig auf Transportschäden prüfen. •...
  • Seite 15 ACHTUNG! Packen Sie den Karton sofort nach Erhalt sorgfältig aus, überprüfen Sie seinen Inhalt, um sicherzustellen, dass alle Teile vo rhanden sind und in gutem Zustand erhalten wurden. Bei Transportschäden oder fehlenden Teilen ist der Verkäufer unverzüglich zu informieren. Lagern Sie die Verpackung und das Verpackungsmaterial.
  • Seite 16 Wenn Sie einen Standard-DMX-Controller verwenden, können Sie den DMX-Ausgang des Controller direkt mit dem DMX-Eingang des ersten Geräts verbinden. Verbinden Sie den DMX-Ausgang immer mit dem nächsten DMX-Eingang des nächsten Geräts, bis alle Geräte angeschlossen sind. Hinweis: Bei der letzten Gerät müssen Sie die DMX-Leitung mit einem Abschlusswiderstand schließen. Nehmen Sie einen XLR-Stecker und löten Sie einen 120-Ohm-Widerstand zwischen Signal (-) und Signal (+) und stecken Sie diesen in den DMX-Ausgang der letzten Gerät in der Leitung.
  • Seite 17 Zum Aus- und Einbau der BTS-Profillinsenrohre: Schritt 1: Lösen (aber nicht entfernen) Sie die Knöpfe (A) der Linsenröhre. Schritt 2: Schieben Sie das Linsenrohr wenig nach links oder rechts. Schritt 3: Heben Sie die Linsenrohranordnung nach oben und weg von der Lichtquelle. Schritt 4: Zur Installation den Prozess in umgekehrter Reihenfolge durchführen.
  • Seite 18 Die folgende Checkliste kann Ihnen im unwahrscheinlichen Fall helfen, dass während der Verwendung des Produkts ein Problem auftri tt: Symptom Mögliche Ursache Vorgeschlagene Aktion Gerät gibt kein Licht aus. Keine Stromversorgung. Vergewissern Sie sich, dass das Gerät eingeschaltet ist. Überprüfen Sie die Kabel und Anschlüsse. Alle Blendenschieber sind eingedrückt und Ziehen Sie alle 4 Blendenschieber heraus.
  • Seite 19 ATENCIÓN! Antes de realizar cualquier operación con la unidad, lea atentamente este manual de instrucciones y guárdelo con cura para futuras consultas. Contiene información importante sobre la instalación, uso y mantenimiento de la unidad. • Desembale y compruebe cuidadosamente que no haya daños de transporte antes de usar la unidad •...
  • Seite 20 PRECAUCIÓN! Inmediatamente después de recibir el producto, desembale la caja con cuidado, verifique el contenido para asegurarse de que t odas las partes estén presentes y se hayan recibido en buenas condiciones. Notifique al remitente de inmediato y guarde el material de empaque pa ra inspeccionarlo si aparecen piezas dañadas por el envío o si el propio paquete muestra signos de mal manejo.
  • Seite 21 Si está utilizando un controlador DMX estándar, puede conectar la salida DMX del controlador directamente a la entrada DMX de l primer dispositivo en una cadena DMX. Siempre conecte la salida de una unidad con la entrada del siguiente dispositivo hasta que todos los dispositivos estén conectados. Precaución: En el último aparato, debe cerrar la línea DMX con una resistencia de terminación.
  • Seite 22 Para retirar e instalar los tubos de lentes de perfil BTS: Paso 1: Afloje (pero no quite) las perillas del tubo de la lente (A). Paso 2: Deslice el tubo de la lente poco hacia la izquierda o hacia la derecha. Paso 3: Levante el conjunto del tubo de la lente hacia arriba y hacia afuera de la fuente de luz.
  • Seite 23 La siguiente lista de verificación puede ayudarle a resolver problemas en el caso de que ocurra un fallo al utilizar el producto: Síntoma Posible causa Acción sugerida Sin luz en el dispositivo. No llega alimentación Compruebe que la alimentación esté encendida. Comprobar cables y conexiones.
  • Seite 24 AVERTISSEMENT ! Avant d'effectuer toute manipulation sur l'appareil, lisez avec attention la présente notice et conservez-la pour pouvoir vous y reporter ultérieurement. Elle contient des informations importantes sur l’installation, l’utilisation et l’entretien de l’app areil. • Déballez l'appareil, vérifiez soigneusement qu'il n'y a pas de dommages dus au transport avant de l'utiliser. •...
  • Seite 25 ATTENTION ! Dès réception du produit, déballez soigneusement le carton, vérifiez son contenu pour vous assurer que toutes les pièces sont présentes et qu'elles ont été reçues en bon état. Avisez immédiatement l'expéditeur et conservez le matériel d'emballage ; contrôlez si des pièces semblent endommagées lors de l'expédition ou si le colis lui-même montre des signes de mauvaise manipulation.
  • Seite 26 Si vous utilisez un contrôleur DMX standard, vous pouvez connecter la sortie DMX du contrôleur directement à l'entrée DMX du premier appareil dans une chaîne DMX. Connectez toujours la sortie d'un appareil à l'entrée de l'appareil suivant jusqu'à ce que tous les appareils soient connectés entre eux. Attention : sur le dernier appareil, vous devez terminer la ligne DMX avec une résistance.
  • Seite 27 Pour retirer et installer les tubes de lentille profilé BTS : Etape 1 : Desserrez (mais ne retirez pas) les boutons du tube (A). Etape 2 : Faites glisser légèrement le tube vers la gauche ou la droite. Etape 3 : Soulevez le tube de la lentille et éloignez-le de la source de lumière. Etape 4 : Pour l’installer procédez comme décrit ci-dessus mais à...
  • Seite 28 La liste ci-dessous peut vous aider en cas de problèmes lors de l’utilisation du produit. Symptôme Cause possible Action suggérée Pas de réponse de l’appareil. L’appareil n’est pas alimenté. Vérifiez que l’appareil est sous tension. Aucune lumière n’est émise par l’appareil. Vérifiez les câbles et branchements.
  • Seite 29 Ń OSTRZEŻENIE! Przed przystąpieniem do jakichkolwiek czynności związanych z urządzeniem, należy uważnie przeczytać niniejszą instrukcję i zachować ją z lekarstwem na przyszłość. Zawiera ważne informacje dotyczące instalacji, użytkowania i konserwacji urządzenia. • Rozpakuj i sprawdź dokładnie, czy nie ma żadnych uszkodzeń transportowych przed użyciem urządzenia •...
  • Seite 30 UW AGA! Natychmiast po otrzymaniu produktu ostrożnie rozpakuj karton, sprawdź zawartość, aby upewnić się, że wszystkie części są obecne i zostały odebrane w dobrym stanie. Natychmiast powiadomić dostawcę i zachować materiał do pakowania w celu sprawdzenia, czy jakakolwiek część wygląda na uszkodzoną...
  • Seite 31 Jeśli używasz standardowego kontrolera DMX, możesz podłączyć wyjście DMX kontrolera bezpośrednio do wejścia DMX pierwszego urządzenia w łańcuchu DMX. Zawsze podłącz wyjście jednego urządzenia do wejścia następnego urządzenia, aż wszystkie urządzenia zostaną pod łączone. Uwaga: Na ostatnim urządzeniu musisz mieć linię DMX z rezystorem końcowym. Weź złącze XLR i przylutuj rezystor 120 Ohm między sygnałem (-) a sygnałem (+) i podłącz go do wyjścia DMX ostatniego urządzenia w linii.
  • Seite 32 Aby zmienić I zainstalować soczewkę: Krok 1: Poluzuj ale nie zdejmuj pokrętła soczewki. Krok2: Lekko wysuń soczewkę w lewo lub w prawo. Krok3: Podnieś soczewkę obiektywu do góry poza źródło światła. Krok4: Aby zainstalować wykonaj proces w odwrotnej kolejności. Obiektyw BST posiada ręczny system powiększania i ogniskowania, który pozwala na łatwe wykonywanie małych regulacji ostrości za pomocą...
  • Seite 33 Poniższa lista kontrolna może pomóc w rozwiązaniu problemu w mało prawdopodobnym przypadku wystąpienia problemu podczas korzystania z produktu: Objaw Możliwa przyczyna Sugerowane działanie Brak światła z oprawy. Brak zasilania urządzenia. Sprawdź, czy zasilanie jest włączone. Sprawdź kable i połączenia. Wszystkie żaluzje są wciśnięte Wyciągnąć...
  • Seite 34 Menu Description DMX Addr d001-d512 DMX address setting Network DHCP DHCP (Dynamic Host Configuration Protocol) mode Manual IP Address xxx.xxx.xxx.xxx IP address Net Mask 255.0.0 Net mask for class A IP address 255.255.0.0 Net mask for class B IP address 255.255.255.0 Net mask for class C IP address Mode...
  • Seite 35 1 Channel Channel Function Value Description Dimmer 000-255 Intensity 0-100% 2 Channel Channel Function Value Description Dimmer 000-255 Intensity 0-100% Strobe 000-255 Strobe, slow to fast 3 Channel Channel Function Value Description Dimmer 000-255 Intensity 0-100% Dimmer fine 000-255 Intensity 0-100% Strobe 000-255 Strobe, slow to fast...
  • Seite 36 : 100-240VAC, 50-60Hz, 2.4-1.2A Rated voltage : 300Watt Colour temperature : 3200K : 18-36° Beam angle : 93.538lx Illuminance : 1-15Hz Flash rate : 1, 2 and 3 DMX channels : DMX, Artnet, RDM and manual Function : 745 x 294 x 294mm Dimensions per unit : 9.2 kg Weight (per unit)
  • Seite 37 BeamZ Pro stands for performance, innovation and value pricing!