Monacor PSS-3000SV Anleitung
Schaltnetzgerät
Quicklinks
Schaltnetzgerät
D
A
CH
Bitte lesen Sie diese Anleitung vor dem Be trieb gründlich
durch und heben Sie sie für ein späteres Nachlesen auf.
1 Einsatzmöglichkeiten
Dieses Netzgerät dient zur Gleichstromversorgung von
elek trischen Klein span nungs ge räten und ist besonders für
Computer-An wen dun gen ge eignet (z. B. Stromversorgung
für ein Notebook oder für Peripheriegeräte wie Scanner,
externe Festplatten usw.). Für den Einsatz im Ausland ist es
mit austauschbaren Netzstecker-Adaptern ausgestattet. Die
Ausgangsspannung lässt sich über Steck widerstände in
1-V-Schritten von 5 – 24 V
einstellen.
Das Gerät ist kurzschluss fest und ge gen Überlast und
Überhitzung ge schützt. Besonderes Merkmal ist der sehr
geringe Stromverbrauch (< 0,3 W) des Netzgerätes, wenn
das angeschlossene Gerät ausgeschaltet ist.
2 Hinweise für den sicheren Gebrauch
Dieses Gerät entspricht allen erforderlichen Richtlinien der
EU und ist deshalb mit
gekennzeichnet.
WARNUNG Das Gerät wird mit lebensgefährlicher Netz-
spannung versorgt. Nehmen Sie deshalb
niemals selbst Eingriffe am Ge rät vor. Durch
un sach ge mä ßes Vor ge hen be steht die Ge -
fahr eines el ek tri schen Schlages.
G
Das Gerät ist nur zur Verwendung im Innenbereich geeig-
net. Schüt zen Sie es vor Tropf- und Spritzwasser, hoher
Luftfeuchtigkeit und Hit ze (zulässiger Einsatztemperatur-
bereich 0 – 40 °C).
G
Nehmen Sie das Netzgerät nicht in Betrieb oder ziehen
Sie es sofort aus der Steckdose, wenn:
Switch Mode Power Supply Unit
GB
Please read these operating instructions carefully prior to
operating the unit and keep them for later use.
1 Applications
This power supply unit serves for direct current supply of
electric low-voltage units and is ideally suited for computer
applications (e. g. power supply of notebooks or of periph er-
als such as scanners, external hard disks, etc.). For the use
abroad, it is equipped with exchangeable mains plug
adapters. The output voltage is adjustable via plug-in resis-
tors in steps of 1 V from 5 to 24 V .
The unit is short circuit-proof and protected against over-
load and overheating. The special feature of the power sup-
ply unit is its extra low current consumption (< 0.3 W) when
the unit connected has been switched off.
2 Safety Notes
This unit corresponds to all required directives of the EU and
is therefore marked with
.
WARNING
The unit is supplied with hazardous mains
voltage (230 V~). Never make any modifica-
tion on the unit. Inexpert handling may cause
an electric shock hazard.
G
The unit is suitable for indoor use only. Protect it against
dripping water and splash water, high air humidity, and
heat (admissible ambient temperature range 0 – 40 °C).
G
Do not operate the power supply unit or immediately dis-
connect the plug from the mains socket
1. if there is visible damage to the unit,
5 V
6 V
7 V
8 V
3000 mA
3000 mA
3000 mA
3000 mA
Pluspol an der Spitze/am Innenkontakt
G
Positive pole at the tip/at the inner contact
PSS-3000SV
1. sichtbare Schäden am Gerät vorhanden sind,
2. nach einem Sturz oder Ähnlichem der Verdacht auf
einen Defekt besteht,
3. Funktionsstörungen auftreten.
Geben Sie das Gerät in jedem Fall zur Reparatur in eine
Fachwerkstatt.
G
Verwenden Sie zum Reinigen nur ein trockenes, weiches
Tuch, niemals Wasser oder Chemi kalien.
G
Wird das Gerät zweckentfremdet, falsch an ge schlos sen,
überlastet oder nicht fachgerecht repariert, kann keine Haf-
tung für daraus resultierende Sach- oder Personenschäden
und keine Garantie für das Gerät übernommen werden.
Soll das Gerät endgültig aus dem Betrieb ge nom -
men werden, über geben Sie es zur um welt ge rech -
ten Entsorgung einem ört lichen Recyc ling be trieb.
3 Inbetriebnahme
1) Die Betriebsspannung für das zu speisende Gerät ein-
stellen: Aus den beiliegenden 20 Steck wi der ständen
den jenigen auswählen, auf dem der entsprechende
Span nungs wert aufgedruckt ist und ihn in die Buchse
„Resistor Jack", seitlich am Netzgerät, stecken.
Die Stromaufnahme des zu speisenden Geräts darf
den Ausgangsstrom des Netzgeräts für den eingestellten
Spannungswert (siehe Tabelle unten) nicht überschreiten.
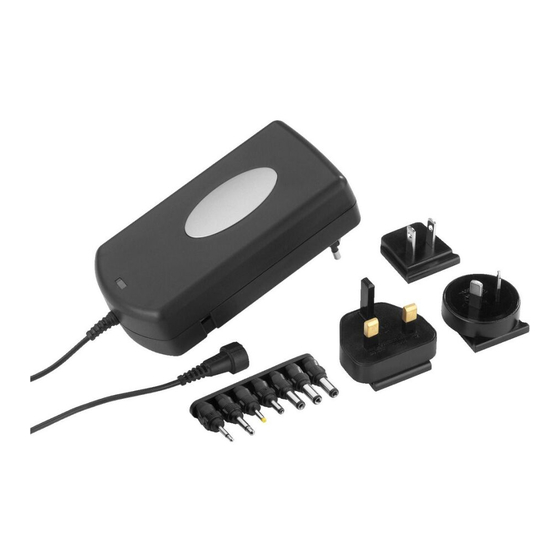
2) Aus den 7 Adaptersteckern den passenden Stecker für
das zu speisende Gerät auswäh len und in die Kupplung
des Netzge rätkabels ste cken. Dabei un be dingt die für
das Gerät erforderliche Polarität be achten! Zum Be -
stim men der Polarität die Kupplung so drehen, dass die
Pfeile von Kupplung und Ste cker aufeinander zeigen
(siehe Abbildungen unten).
2. if a defect might have occurred after the unit was
dropp ed or suffered a similar accident,
3. if malfunctions occur.
In any case the unit must be repaired by skilled personnel.
G
For cleaning only use a dry, soft cloth; never use chemi-
cals or water.
G
No guarantee claims for the unit and no liability for any
resulting personal damage or material damage will be
accepted if the unit is used for other purposes than orig i-
nally intended, if it is not correctly connected, if it is over-
loaded, or not repaired in an expert way.
If the unit is to be put out of operation definitively,
take it to a local recycling plant for a disposal which
is not harmful to the environment.
3 Operation
1) Adjust the operating voltage for the unit to be supplied
with power: Select the resistor marked with the corre-
sponding voltage value from the 20 plug-in resistors sup-
plied and insert it into the jack "Resistor Jack" on the side
of the power supply unit.
The current consumption of the unit to be supplied with
power must not exceed the output current of the power
supply unit for the voltage value adjusted (see table below).
2) Select the matching plug for the unit to be supplied with
power from the 7 adapter plugs supplied and connect it
to the inline jack of the cable of the power supply unit.
Always observe the polarity required for the unit! To
determine the polarity, turn the inline jack in such a way
that the arrows of inline jack and plug face each other
(see figures below).
Ausgangsspannungen/Ausgangsströme
9 V
10 V
11 V
12 V
3000 mA
3000 mA
3000 mA
3000 mA
®
MONACOR INTERNATIONAL GmbH & Co. KG • Zum Falsch 36 • 28307 Bremen • Germany
Copyright
by MONACOR INTERNATIONAL. All rights reserved.
©
Best.-Nr. 27.3320
Output voltages /output currents
G
13 V
14 V
15 V
16 V
2700 mA
2500 mA
2400 mA
2200 mA
3) Das Netzgerät über den Adapterstecker an die Strom ver-
sorgungsbuchse des zu speisenden Geräts an schließen.
4) Aus den 4 Netzstecker-Adaptern den passenden für das
jeweilige Land auswählen, ihn von oben in die Ausspa -
rung auf der Rückseite des Netzgeräts schieben und
kräftig nach unten ziehen, so dass er einrastet.
Um einen Adapter wieder abzunehmen und gegen
einen anderen auszutauschen, auf die darunter liegende
Entriegelungslasche (Aufschrift PRESS) drücken. Der
Adapter rastet dann aus und kann nach oben aus der
Aussparung gezogen werden.
5) Zuletzt das Netzgerät in eine Steck dose (100 – 240 V~,
50/60 Hz) stecken. Die rote Be triebsanzeige leuchtet.
Auch wenn das angeschlossene Gerät ausgeschaltet ist,
verbraucht das Netzgerät einen geringen Strom. Da rum soll-
te es aus der Steckdose gezogen werden, wenn es längere
Zeit nicht gebraucht wird.
4 Technische Daten
Stromversorgung: . . . . 100 – 240 V~, 50–60 Hz, 800 mA
Ausgangsspannungen/
Ausgangsströme: . . . . siehe Tabelle unten
Maße, Gewicht: . . . . . . 68 × 40 × 135 mm, 343 g
4 Netzstecker-Adapter: für Kontinentaleuropa, Groß bri tan-
7 Kleinspannungsstecker
2 Klinkenstecker: . . . . ∅ 2,5 mm (A) und 3,5 mm (B)
5 Hohlstecker: . . . . . . ∅ außen/innen in mm:
Änderungen vorbehalten.
3) Connect the power supply unit via the adapter plug to the
power supply jack of the unit to be supplied with power.
4) Select the matching mains plug adapter for the corre-
sponding country from the 4 mains adapter plugs sup -
plied. Slide the adapter from the top into the recess on
the rear side of the power supply unit and push it down-
wards in a powerful movement until it locks.
To remove an adapter and to exchange it for another
one, press the locking clip underneath (marking PRESS).
The adapter will unlock and can be pulled from the
recess in upward direction.
5) Finally connect the power supply unit to a mains socket
(100 – 240 V~, 50/60 Hz). The red LED will light up.
Even with the unit connected switched off, the power supply
unit has a low current consumption. Therefore, it is recom-
mended to disconnect it from the mains socket if it is not
used for a longer period.
4 Specifications
Power supply: . . . . . . . 100 – 240 V~, 50–60 Hz, 800 mA
Output voltages/
output currents: . . . . . . see table below
Dimensions, weight: . . 68 × 40 × 135 mm, 343 g
4 mains plug adapters: for Continental Europe, Great
7 low-voltage plugs
2 plugs: . . . . . . . . . . . ∅ 2.5 mm (A) and 3.5 mm (B)
5 hollow plugs: . . . . . ∅ ext./int. in mm:
Subject to technical modification.
17 V
18 V
19 V
20 V
2100 mA
2000 mA
1880 mA
1800 mA
Minuspol an der Spitze/am Innenkontakt
G
A-1194.99.02.06.2012
nien, USA /Japan, Australien
2,35/0,75 (S), 3,5/1,35 (H),
5,0/2,1 (D), 5,5/2,1 (E),
5,5/2,5 (G)
Britain, USA/Japan, Australia
2.35/0.75 (S), 3.5/1.35 (H),
5.0/2.1 (D), 5.5/2.1 (E),
5.5/2.5 (G)
21 V
22 V
23 V
24 V
1700 mA
1630 mA
1560 mA
1500 mA
Negative pole at the tip/at the inner contact

Verwandte Anleitungen für Monacor PSS-3000SV


Inhaltszusammenfassung für Monacor PSS-3000SV
- Seite 1 Positive pole at the tip/at the inner contact Minuspol an der Spitze/am Innenkontakt Negative pole at the tip/at the inner contact ® MONACOR INTERNATIONAL GmbH & Co. KG • Zum Falsch 36 • 28307 Bremen • Germany Copyright by MONACOR INTERNATIONAL. All rights reserved. A-1194.99.02.06.2012...
- Seite 2 Pôle moins à la pointe / au contact intérieur Polo negativo alla punta /al contatto interno ® MONACOR INTERNATIONAL GmbH & Co. KG • Zum Falsch 36 • 28307 Bremen • Germany Copyright by MONACOR INTERNATIONAL. All rights reserved. A-1194.99.02.06.2012...
- Seite 3 Styk dodatni na czubku/wewnętrzny Polo negativo a la punta/al contacto interior Styk ujemny na czubku /wewnętrzny ® MONACOR INTERNATIONAL GmbH & Co. KG • Zum Falsch 36 • 28307 Bremen • Germany Copyright by MONACOR INTERNATIONAL. All rights reserved. A-1194.99.02.06.2012...