Herunterladen Inhalt Inhalt Diese Seite drucken
Inhaltsverzeichnis

Werbung

Verfügbare Sprachen
  • DE

Verfügbare Sprachen

  • DEUTSCH, seite 35
WiFi projector / WiFi
Projecteur WiFi / WiFi projektor / Proiettore WiFi / WiFi-projector /
PNI VP850
проектор
Projektor WiFi / Videoproiector WiFi
User manual ..............................................
Benutzerhandbuch ...................................
Manual de usuario .....................................
Manuel utilisateur .....................................
Használati utasítás ....................................
Manuale utente .........................................
Handleiding ...............................................
Instrukcja obsługi ......................................
Manual de utilizare ...................................
/ WiFi-Projektor / Proyector wifi /
...................
3
18
35
50
65
81
96
111
127
142

Werbung

Inhaltsverzeichnis
loading

Inhaltszusammenfassung für PNI VP850

  • Seite 1: Inhaltsverzeichnis

    PNI VP850 WiFi projector / WiFi / WiFi-Projektor / Proyector wifi / проектор Projecteur WiFi / WiFi projektor / Proiettore WiFi / WiFi-projector / Projektor WiFi / Videoproiector WiFi User manual ..............Ръководство за употреба Benutzerhandbuch ........Manual de usuario ........
  • Seite 3: Package Contents

    Warnings • For a good viewing, we recommend installing the projector in a dark room. • Handle the projector with care. Do not drop it on the floor or shake it, as these actions may damage the product or may affect the normal operation of the product.
  • Seite 4: Product Description

    Product description 1. Position adjustment 2. IR receiver 3. Lens 4. Inputs 5. Main button User manual...
  • Seite 5 6. Power interface 7. Speaker 8. Fan 9. Focus adjustment 10. Keystone 11. Speaker 12. Position adjustment 13. Label Keys description 1. OK key 2. Arrow keys to navigate the menu 3. Power key 4. Select playback source: AV/HDMI/VGA 5. Menu Connections User manual...
  • Seite 6: Remote Control

    IR receiver for remote control VGA input USB drive connection port HDMI 1/2 HDMI input 3.5mm headphone input Video input Remote control 1. LED indicator 2. Turn on / off the projector 3. Select playback source 4. Arrow keys to navigate the menu 5.
  • Seite 7 Installation Standard settings (Front projection) Please refer to the table below to adjust the image size and distance (from the lens to the projection plane). Image ratio: 16: 9 Image diagonal (inch) Projection distance (meters) 5” 1.60 m 70” 2.24 m 100”...
  • Seite 8: Installation Modes

    Installation modes Projector Screen Projector Screen Rear projection Front projection Ceiling mounting Ceiling mounting Screen Projector Screen Projector Front projection Rear projection Table mounting Table mounting Warnings • If it is not correctly installed on the ceiling or table, the projector may be damaged.
  • Seite 9: Image Setting

    or on the remote control. The indicator light will turn red. The projector returns to standby mode. Image setting Focus adjustment Push the focus adjustment wheel all the way up. Then gently rotate down, observing the projected image, until it becomes clear. Focus adjustment wheel Keystone If the projected image is distorted, you can adjust it by using the keystone...
  • Seite 10 Settings In Home interface, select Setup: Options: Network, Projection, Advanced, Information 1. Network: Options: Scan (choose a network from the list and enter the password), Auto IP, Static IP, Disconnect (disconnect from the WiFi network) 2. Projection: Select the desired projection mode: Front desktop (front projection, table mounting), Rear Desktop (rear projection, table mounting), Front Ceiling (front projection, ceiling mounting), Rear Ceiling (rear projection, ceiling mounting)
  • Seite 11 3. Advanced: Language, Boot Source (display at startup), Sleeper time (sleep time scheduling), iOS Play Mode (options: screen casting HD, screen mirroring HD, screen casting SD, screen mirroring SD), Local Update (local update), Online Update (network update), Restore factory Default. Media (play multimedia files) In Home interface, select Media, then select the file you want to play: Movie, Music, Photo, Text.
  • Seite 12 Supported formats Video: MP4, MKV, WMV, RMVB, RM, AVI, FLV, TRP, VOB, 3GP, DIVW, TP, TS, MPG, M2TS, DAT Audio: MP3, AAC, FLAC, OGG, WAV, FLAC, DTS, WMA, M4A Image: BMP, JPG, PNG, JPEG Text: TXT Source (select playback source) In Home interface, select Source: Choose HDMI 1 or 2, VGA, AV Note: Make sure the selected playback source is connected.
  • Seite 13 For each playback source you have additional image and sound settings: iOS Cast Note: The projector must be connected to the Internet before using Apple Airplay for the first time. In Home interface, select iOS Cast. The iOS device and the projector must be connected to the same router or connect the iOS device to the network generated by the projector (AP mode).
  • Seite 14 Miracast In Home interface, select Miracast. Open your Android device and select the option Wireless display. Then select the name of your projector. User manual...
  • Seite 15 Note: Different versions of Android have different ways to set Wireless Display option. For details, read your Android version manual. User manual...
  • Seite 16 Troubleshooting Problem Possible cause The indicator LED does not The power cord is not connected properly light up after the projector The on / off button is faulty is turned on The on / off button is on off position The remote control is not aimed towards the projector The projector does not...
  • Seite 17: Technical Specifications

    Technical specifications Projection system LCD TFT display 5.8 inch Native resolution 1920 x 1080 Luminosity 4000 lumens Contrast ratio 4000:1 Rotate image 360° Lenses 5 glass lenses Focus Manual Language English, French, Spanish, Portuguese, Chinese etc. (23 languages in total) Lamp type LED lamp life span up to 50000 h...
  • Seite 18: Предупреждения

    Предупреждения • За добро гледане препоръчваме да инсталирате проектора в тъмна стая. • Работете внимателно с проектора. Не го изпускайте на пода или го разклащайте, тъй като тези действия могат да повредят продукта или да повлияят на нормалната работа на продукта. •...
  • Seite 19 Съдържание на пакета • Проектор • Дистанционно • Захранващ кабел • AV сигнален кабел • VGA сигнален кабел • Резервен предпазител Описание на продукта Ръководство за употреба...
  • Seite 20 1. Регулиране на позицията 2. IR приемник 3. Лещи 4. Входове 5. Основен бутон 6. Захранващ интерфейс 7. Високоговорител 8. Вентилатор 9. Регулиране на фокуса 10. Keystone 11. Високоговорител 12. Регулиране на позицията 13. Етикет Описание на ключовете 1. Бутон ОК 2.
  • Seite 21 Връзки IR приемник за дистанционно управление VGA вход Порт за свързване на USB устройство HDMI 1/2 HDMI вход 3,5 мм вход за слушалки Видео вход Ръководство за употреба...
  • Seite 22 Дистанционно 1. Лед индикатор 2. Включете / изключете проектора 3. Изберете източник на възпроизвеждане 4. Клавиши със стрелки за навигация в менюто 5. Меню 6. Назад към главната страница 7. Сила на звука + 8. Сила на звука - 9. Безшумен режим (без звук) 10.
  • Seite 23 Диагонал на Прожекционно разстояние изображението (инч) (метри) 5” 1.60 m 70” 2.24 m 100” 3.20 m 120” 3.82 m 250” 7.95 m Забележка: • За оптимално гледане препоръчваме размер на изображението от 120 инча (305 см). • Позволете марж от ± 3% спрямо размера на изображението в горната таблица.
  • Seite 24 Режими на инсталиране Предупреждения • Ако не е правилно инсталиран на тавана или масата, проекторът може да се повреди. • Проекторът трябва да се използва при температурата на околната температура между + 5° C и + 35 ° C. Превишаването на...
  • Seite 25 продукта или на дистанционното управление. Индикаторът ще светне в зелено. Видеопроекторът ще влезе в нормален режим на работа. Изключване: Когато проекторът работи, натиснете бутона за захранване на продукта или на дистанционното управление. Индикаторът ще светне в червено. Проекторът се връща в режим...
  • Seite 26 (Keystone) Ако не можете да коригирате трапецовидния камък на изображението с помощта на трапецовидната функция, опитайте се да коригирате позицията на проектора възможно най-перпендикулярно на равнината на проекция. Настройки В Home интерфейс изберете Setup: Настроики: Network, Projection, Advanced, Information 1. Network: Настроики: Scan (изберете...
  • Seite 27 2. Projection: Изберете желания режим на прожектиране: Front desktop (предна проекция, монтаж на маса), Rear Desktop (задна проекция, монтаж на маса), Front Ceiling (предна проекция, монтаж на таван), Rear Ceiling (задна проекция, монтаж на таван) 3. Advanced: Language, Boot Source (дисплей при стартиране), Sleeper time (планиране...
  • Seite 28 Media (възпроизвеждане на мултимедийни файлове) В Home интерфейс, изберете Media, след това изберете файла, който искате да възпроизведете: Movie, Music, Photo, Text. Поддържани формати Video: MP4, MKV, WMV, RMVB, RM, AVI, FLV, TRP, VOB, 3GP, DIVW, TP, TS, MPG, M2TS, DAT Audio: MP3, AAC, FLAC, OGG, WAV, FLAC, DTS, WMA, M4A Ръководство...
  • Seite 29 Картина: BMP, JPG, PNG, JPEG Текст: TXT Source (изберете източник на възпроизвеждане) В Home интерфейс, изберете Source: Избирам HDMI 1 или 2, VGA, AV Забележка: Уверете се, че избраният източник на възпроизвеждане е свързан. За всеки източник на възпроизвеждане имате допълнителни настройки...
  • Seite 30 iOS Cast Забележка: Проекторът трябва да бъде свързан с интернет, преди да използвате Apple Airplay за първи път. В Home интерфейс, изберете iOS Cast. IOS устройството и проекторът трябва да бъдат свързани към един и същ рутер или да свържат iOS устройството към мрежата, генерирана...
  • Seite 31 Miracast В Home интерфейс, изберете Miracast. Отворете устройството си с Android и изберете опцията Wireless display. След това изберете името на вашия проектор. Ръководство за употреба...
  • Seite 32 Забележка: Различните версии на Android имат различни начини за настройка Wireless Display опция. За подробности прочетете ръководството за вашата версия на Android. Ръководство за употреба...
  • Seite 33 Отстраняване на неизправности Проблем Възможна причина Захранващият кабел не е свързан Индикаторът не свети правилно след включване на Бутонът за включване / изключване проектора е повреден Бутонът за включване / изключване е в изключено положение Дистанционното управление не е Проекторът не насочено...
  • Seite 34 Технически спецификации Прожекционна система LCD TFT display 5.8 inch 1920 x 1080 Родна резолюция Яркост 4000 lumens 4000:1 Контрастно съотношение 360° Завъртете изображението Лещи 5 стъклени лещи Фокус Ръчно Език Английски, френски, испански, португалски, китайски и т.н. (общо 23 езика) Тип...
  • Seite 35: Während Der Videoprojektor Funktioniert Oder Nachdem Sie Ihn

    Achtung • Für gute qualitative Bilder empfehlen wir Ihnen den Videoprojektor in einem dunklen Raum einzubauen. • Gehen Sie vorsichtig mit dem Videoprojektor um. Lassen Sie ihn nicht fallen, setzen Sie ihn nicht unter Druck, Sie können das Produkt beschädigen oder seine Funktionen beeinträchtigen. •...
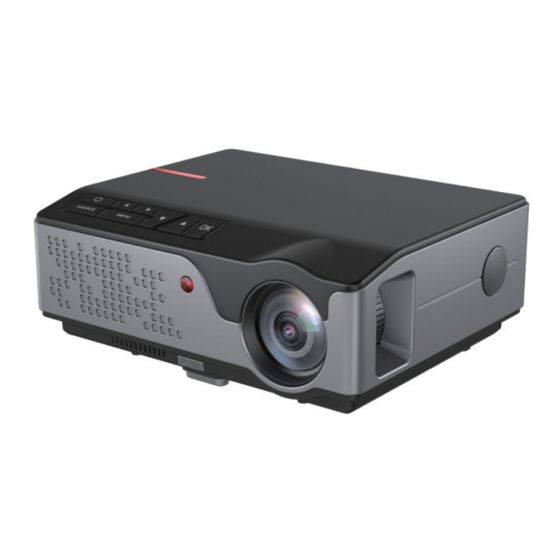
  • Seite 36: Produktbeschreibung

    Produktbeschreibung 1. Anpassung Position 2. Empfänger IR 3. Objektiv 4. Eingänge 5. Hauptschalter Benutzerhandbuch...
  • Seite 37: Beschreibung Tasten

    6. Versorgungsinterface 7. Lautsprecher 8. Ventilator 9. Anpassung Fokus 10. Keystone (Korrektur Bild Vertikalität) 11. Lautsprecher 12. Anpassung Position 13. Etikett Beschreibung Tasten 1. Taste OK 2. Pfeiltaste, um ins Menü zu surfen 3. Taste EIN/AUS 4. Auswahl Wiedergabequelle: AV/HDMI/VGA 5.
  • Seite 38: Fernbedienung

    Empfänger IR für Fernbedienung Eingang VGA Port Anschluss Stick USB HDMI 1/2 Eingang HDMI Eingang Kopfhörer 3.5mm Video Eingang Fernbedienung 1. Anzeige LED 2. Videoprojektor ein/ausschalten 3. Auswahl Wiedergabequelle 4. Pfeiltasten 5. Menü 6. Zurück zur Hauptseite 7. Lautstärke + 8.
  • Seite 39: Einbau

    Einbau Standard Einstellungen (frontale Projektion) In der Tabelle unten können Sie die Dimension und die Strecke sehen (vom Objektiv bis zum Projektionsplan) Verhältnis zum Bild : 16:9 Diagonale Bild (inch) Strecke Projektion (m) 5” 1.60 m 70” 2.24 m 100” 3.20 m 120”...
  • Seite 40: Einbaumethoden

    Einbaumethoden Projector Bildschirm Projector Bildschirm Rückprojektion Frontprojektion Deckenmontage Deckenmontage Projector Bildschirm Bildschirm Projector Frontprojektion Rückprojektion Tischmontage Tischmontage Achtung • Wenn das Gerät nicht entsprechend eingebaut ist, kann das Gerät beschädigt werden. • Der Videoprojektor kann bei einer Temperatur von +5° und +35° C verwendet werden.
  • Seite 41: Anpassung Bild

    Ausschalten: wenn der Videoprojektor nicht funktioniert, drücken Sie die Taste EIN/AUS auf dem Gerät oder auf der Fernbedienung. Die Led wird rot. Der Videoprojektor kommt in Modus Standby. Anpassung Bild Anpassung Fokus Schieben Sie nach oben das Rädchen Fokus Anpassung. Dann schieben Sie nach unten und prüfen Sie das projektierte Bild, bis es klar wird.
  • Seite 42 Bild zu korrigieren, versuchen Sie die Position des Projektors zu korrigieren, so senkrecht wir möglich zum flachen Projektionsplan. Setup (Einstellungen) In Interface Home, wählen Sie Setup: Optionen: Network, Projection, Advanced, Information 1. Network (Anschluss an WiFi): Optionen: Scan (wählen Sie ein Netzwerk aus der Liste und geben Sie das Passwort ein), Auto IP, Static IP, Disconnect (es schaltet vom WiFi Netzwerk 2.
  • Seite 43 von hinten, Einbau auf dem Tisch), Front Ceiling (frontale Projektion, Einbau auf der Decke), Rear Ceiling (Projektion von hinten, Montage auf der Decke) 3. Advanced: Language(Sprache), Boot Source (Anzeige beim Einschalten, Sleeper time (programmierung Startzeit), iOS Play Mode (mit Optionen : screen casting HD, screen mirroring HD, screen casting SD, screen mirroring SD), Local Update (update local), Online Update (update durch Netzwerk), Restore factory Default (Gerät neu Einstellung)
  • Seite 44 Format Video: MP4, MKV, WMV, RMVB, RM, AVI, FLV, TRP, VOB, 3GP, DIVW, TP, TS, MPG, M2TS, DAT Audio: MP3, AAC, FLAC, OGG, WAV, FLAC, DTS, WMA, M4A Bild: BMP, JPG, PNG, JPEG Text: TXT Source (Auswahl Wiedergabe Quelle) In Interface Home, wählen Sie Source: Benutzerhandbuch...
  • Seite 45 Wählen Sie HDMI 1 oder 2, VGA, AV Hinweis: Prüfen Sie, dass die ausgewählte Wiedergabe Quelle angeschlossen ist. Für jede Wiedergabequelle haben Sie zusätzliche Einstellungen für Bild und Laut: iOS Cast Hinweis: Der Videoprojektor muss ans Internet angeschlossen werden bevor Sie AppleAirplay zum ersten Mal verwenden.
  • Seite 46 In Interface Home, wählen Sie iOS Cast. Das iOS Gerät und der Videoprojektor müssen an demselben Router angeschlossen werden, oder verbinden Sie das iOS ans Netzwerk, das vom Videoprojektor generiert wird. Öffnen Sie iOS und wählen Sie die Option Screen Mirroring. Wählen Sie den Namen Ihres Videoprojektors aus.
  • Seite 47 Wählen Sie den Namen Ihres Videoprojektors aus. Hinweis: Verschiedene Androis Versionen haben verschiedene Arten die Option Wireless Display auszuwählen. Für weitere Details, lesen Sie die Version für Ihren Android. Benutzerhandbuch...
  • Seite 48: Probleme Und Lösungen

    Probleme und Lösungen Problem Mögliche Ursachen Die LED schaltet Das Versorgungskabel ist nicht richtig nicht ein nachdem Sie angeschlossen. den Videoprojektor Die Taste EIN/Aus ist kaputt. eingeschaltet haben. Die Taste EIN/Aus ist ausgeschaltet Die Fernbedienung ist nicht am Videoprojektor gerichtet Der Videoprojektor reagiert nicht auf die Fernbedienung Im IR Empfänger kommt starkes Licht.
  • Seite 49: Technische Spezifikationen

    Technische Spezifikationen Projektionssystem LCD TFT 5.8 inch native Auflösung 1920 x 1080 Lichtstärke 4000 lumeni Verhältnis Kontrast 4000:1 Bild Verdrehung 360° Linsen 5 Glaslinsen Focus Manuell Sprache Englisch, Französisch, Spanisch, Portugiesisch, Chinesich etc. (23 Sprachen) Typ Lampe Lebensdauer Lampe bis zu 50 000 Stunden Bildgröße 50 - 250 inch Keystone...
  • Seite 50: Contenidos Del Paquete

    Advertencias • Para una buena visualización, recomendamos instalar el proyector en una habitación oscura. • Maneje el proyector con cuidado. No lo deje caer al suelo ni lo sacuda, ya que estas acciones pueden dañar el producto o afectar el funcionamiento normal del producto.
  • Seite 51: Descripción Del Producto

    Descripción del producto 1. Ajuste de posición 2. Receptor IR 3. Lente 4. Entradas 5. Botón principal Manual de usuario...
  • Seite 52: Descripción De Las Teclas

    6. Interfaz de energía 7. Altavoz 8. Ventilador 9. Ajuste de enfoque 10. Keystone 11. Altavoz 12. Ajuste de posición 13. Etiqueta Descripción de las teclas 1. Tecla OK 2. Teclas de flecha para navegar por el menú 3. Tecla de encendido 4.
  • Seite 53: Control Remoto

    Receptor de infrarrojos para mando a distancia Entrada VGA Puerto de conexión de unidad USB HDMI 1/2 Entrada HDMI Entrada de auriculares de 3,5 mm Entrada de video Control remoto 1. Indicador LED 2. Enciende / apaga el proyector 3. Seleccionar fuente de reproducción 4.
  • Seite 54 Instalación Ajustes estándar (proyección frontal) Consulte la tabla siguiente para ajustar el tamaño y la distancia de la imagen (desde la lente hasta el plano de proyección). Relación de imagen: 16: 9 Imagen diagonal (inch) Distancia de proyección (metros) 5” 1.60 m 70”...
  • Seite 55 Modos de instalación Pantalla Proyector Proyector Pantalla Proyección trasera Proyección frontal Montaje en techo Montaje en techo Pantalla Proyector Screen Proyector Proyección frontal Proyección trasera Montaje en mesa Montaje en mesa Advertencias • Si no se instala correctamente en el techo o la mesa, el proyector puede resultar dañado.
  • Seite 56: Configuración De Imagen

    en el producto o en el control remoto. La luz indicadora se volverá roja. El proyector vuelve al modo de espera. Configuración de imagen Ajuste de enfoque Empuje la rueda de ajuste de enfoque completamente hacia arriba. Luego gire suavemente hacia abajo, observando la imagen proyectada, hasta que se aclare.
  • Seite 57: Settings (Configuraciones)

    perpendicular posible al plano de proyección. Settings (Configuraciones) En la interfaz de inicio, seleccione Setup: Opciones: Network, Projection, Advanced, Information 1. Network: Opciones: Scan (elija una red de la lista e ingrese la contraseña), Auto IP, Static IP, Disconnect (desconectarse de la red WiFi) 2.
  • Seite 58 techo), Rear Ceiling (proyección trasera, montaje en techo) 3. Advanced: Language, Boot Source (mostrar al inicio), Sleeper time (programación del tiempo de sueño), iOS Play Mode (opciones: screen casting HD, screen mirroring HD, screen casting SD, screen mirroring SD), Local Update (actualización local), Online Update (actualización de la red), Restore factory Default.
  • Seite 59 Formatos admitidos Video: MP4, MKV, WMV, RMVB, RM, AVI, FLV, TRP, VOB, 3GP, DIVW, TP, TS, MPG, M2TS, DAT Audio: MP3, AAC, FLAC, OGG, WAV, FLAC, DTS, WMA, M4A Imagen: BMP, JPG, PNG, JPEG Texto: TXT Source (seleccionar fuente de reproducción) En la interfaz de inicio, seleccione Source: Escoger HDMI 1 o 2, VGA, AV Nota: asegúrese de que la fuente de reproducción seleccionada esté...
  • Seite 60 Para cada fuente de reproducción, tiene configuraciones de imagen y sonido adicionales: iOS Cast Nota: El proyector debe estar conectado a Internet antes de usar Apple Airplay por primera vez. En la interfaz de inicio, seleccione iOS Cast. El dispositivo iOS y el proyector deben estar conectados al mismo enrutador o conectar el dispositivo iOS a la red generada por el proyector (modo AP).
  • Seite 61 Miracast En la interfaz de inicio, seleccione Miracast. Abra su dispositivo Android y seleccione la opción Wireless display. Luego seleccione el nombre de su proyector. Manual de usuario...
  • Seite 62 Nota: Las diferentes versiones de Android tienen diferentes formas de configurar la opción Wireless Display. Para obtener más detalles, lea el manual de la versión de Android. Manual de usuario...
  • Seite 63: Solución De Problemas

    Solución de problemas Problema Causa posible El cable de alimentación no está conectado El LED indicador no se correctamente enciende después de El botón de encendido / apagado está encender el proyector defectuoso El botón de encendido / apagado está en la posición de apagado El mando a distancia no está...
  • Seite 64: Especificaciones Técnicas

    Especificaciones técnicas Sistema de proyección LCD TFT display 5.8 inch Resolucion nativa 1920 x 1080 Luminosidad 4000 lumens Relación de contraste 4000:1 Rotar imagen 360° Lentes 5 lentes de vidrio Atención Manual Idioma Inglés, francés, español, portugués, chino, etc. (23 idiomas en total) Tipo de lámpara Vida útil de la lámpara LED hasta 50000 horas...
  • Seite 65: Contenu Du Colis

    Mises en garde • Pour une bonne visualisation, nous vous recommandons d’installer le projecteur dans une pièce sombre. • Manipulez le projecteur avec soin. Ne le laissez pas tomber sur le sol et ne le secouez pas, car ces actions peuvent endommager le produit ou affecter le fonctionnement normal du produit.
  • Seite 66: Description Du Produit

    • Câble de signal VGA • Fusible de rechange Description du produit Manuel utilisateur...
  • Seite 67: Description Des Touches

    1. Réglage de la position 2. Récepteur IR 3. Lentille 4. Contributions 5. Bouton principal 6. Interface d’alimentation 7. Haut-parleur 8. Ventilateur 9. Réglage de la mise au point 10. Keystone 11. Haut-parleur 12. Réglage de la position 13. Étiquette Description des touches 1.
  • Seite 68 Connexions Récepteur IR pour télécommande Entrée VGA Port de connexion de clé USB HDMI 1/2 Entrée HDMI Entrée casque 3,5 mm Entrée vidéo Manuel utilisateur...
  • Seite 69 La télécommande 1. Indicateur LED 2. Allumer / éteindre le projecteur 3. Sélectionnez la source de lecture 4. Touches fléchées pour naviguer dans le menu 5. Menu 6. Retour à la page principale 7. Volume + 8. Le volume - 9.
  • Seite 70 Diagonale de l’image (inch) Distance de projection (mètres) 5” 1.60 m 70” 2.24 m 100” 3.20 m 120” 3.82 m 250” 7.95 m Remarques: • Pour une visualisation optimale, nous recommandons une taille d’image de 120 pouces (3.82 m). • Laissez une marge de ±...
  • Seite 71: Modes D'installation

    Modes d’installation Projecteur Écran Projecteur Écran Projection arrière Projection frontale Montage au plafond Montage au plafond Écran Projecteur Écran Projecteur Projection frontale Projection arrière Montage sur table Montage sur table Mises en garde • S’il n’est pas correctement installé au plafond ou sur une table, le projecteur peut être endommagé.
  • Seite 72: Réglage De L'image

    Éteindre: lorsque le projecteur fonctionne, appuyez sur la touche d’alimentation du produit ou de la télécommande. Le voyant lumineux deviendra rouge. Le projecteur revient en mode veille. Réglage de l’image Réglage de la mise au point Poussez la molette de réglage de la mise au point à fond. Puis faites doucement pivoter vers le bas, en observant l’image projetée, jusqu’à...
  • Seite 73 Si vous ne pouvez pas corriger la distorsion trapézoïdale de l’image à l’aide de la fonction Keystone, essayez de corriger la position du projecteur aussi perpendiculairement au plan de projection que possible.. Réglages Dans l’interface d’accueil, sélectionnez Setup: Options: Network, Projection, Advanced, Information 1.
  • Seite 74 (projection frontale, montage sur table), Rear Desktop (projection arrière, montage sur table), Front Ceiling (projection frontale, montage au plafond), Rear Ceiling (projection arrière, montage au plafond) 3. Advanced: Language, Boot Source (affichage au démarrage), Sleeper time (planification du temps de sommeil), iOS Play Mode (options: screen casting HD, screen mirroring HD, screen casting SD, screen mirroring SD), Local Update (mise à...
  • Seite 75 Formats pris en charge Video: MP4, MKV, WMV, RMVB, RM, AVI, FLV, TRP, VOB, 3GP, DIVW, TP, TS, MPG, M2TS, DAT Audio: MP3, AAC, FLAC, OGG, WAV, FLAC, DTS, WMA, M4A Image: BMP, JPG, PNG, JPEG Test: TXT Source (sélectionner la source de lecture) Dans l’interface d’accueil, sélectionnez Source: Manuel utilisateur...
  • Seite 76 Choisir HDMI 1 ou 2, VGA, AV Remarque: assurez-vous que la source de lecture sélectionnée est connectée. Pour chaque source de lecture, vous disposez de paramètres d’image et de son supplémentaires: iOS Cast Remarque: le projecteur doit être connecté à Internet avant d’utiliser Apple Airplay pour la première fois.
  • Seite 77 Dans l’interface d’accueil, sélectionnez iOS Cast. L’appareil iOS et le projecteur doivent être connectés au même routeur ou connecter l’appareil iOS au réseau généré par le projecteur (mode AP). Ouvrez votre appareil iOS et sélectionnez l’option Screen Mirroring. Sélectionnez ensuite le nom de votre projecteur. Miracast Dans l’interface d’accueil, sélectionnez Miracast.
  • Seite 78 Sélectionnez ensuite le nom de votre projecteur. Remarque: différentes versions d’Android ont différentes façons de définir Wireless Display. Pour plus de détails, lisez le manuel de votre version Android. Manuel utilisateur...
  • Seite 79 Dépannage Problème Cause possible Le cordon d'alimentation n'est pas Le voyant LED ne s’allume correctement connecté pas après la mise sous tension du projecteur Le bouton marche / arrêt est défectueux Le bouton marche / arrêt est en position marche / arrêt La télécommande n'est pas dirigée vers le Le projecteur ne répond projecteur...
  • Seite 80: Spécifications Techniques

    Spécifications techniques Système de projection LCD TFT display 5.8 inch Résolution native 1920 x 1080 Luminosité 4000 lumens Rapport de contraste 4000:1 Rotation dell'image 360° Lentilles 5 lentilles en verre Focus Manuel Langue Anglais, français, espagnol, portugais, chinois etc. (23 langues au total) Type de lampe Durée de vie de la lampe jusqu’à...
  • Seite 81: Csomag Tartalma

    Figyelmeztetések • A jó megtekintés érdekében javasoljuk, hogy a kivetítőt sötét helyiségbe helyezze. • Óvatosan bánjon a projektorral. Ne ejtse le a padlóra és ne rázza meg, mert ezek a műveletek károsíthatják a terméket vagy befolyásolhatják a termék normál működését. •...
  • Seite 82: Termékleírás

    Termékleírás 1. Helyzetbeállítás 2. IR vevő 3. Lencse 4. Bemenetek 5. Fő gomb Használati utasítás...
  • Seite 83 6. Tápegység 7. Hangszóró 8. Ventilátor 9. Fókuszbeállítás 10. Keystone 11. Hangszóró 12. Helyzetbeállítás 13. Címke Kulcsok leírása 1. OK gomb 2. Nyílbillentyűk a menüben történő navigáláshoz 3. Bekapcsológomb 4. Válassza ki a lejátszási forrást: AV / HDMI / VGA 5.
  • Seite 84 IR vevő távirányítóhoz VGA bemenet USB meghajtó csatlakozó portja HDMI 1/2 HDMI bemenet 3,5 mm-es fejhallgató bemenet Videobemenet Távirányító 1. LED kijelző 2. Kapcsolja be / ki a kivetítőt 3. Válassza ki a lejátszási forrást 4. Nyílbillentyűk a menüben történő navigáláshoz 5.
  • Seite 85 Telepítés Alapbeállítások (elülső vetítés) A kép méretének és távolságának beállításához (az objektívtől a vetítési síkig) tekintse meg az alábbi táblázatot. Képarány: 16: 9 Kép átlós (inch) Vetítési távolság (méter) 5” 1.60 m 70” 2.24 m 100” 3.20 m 120” 3.82 m 250”...
  • Seite 86: Telepítési Módok

    Telepítési módok Képernyő Vetítő Vetítő Képernyő Hátsó vetület Elülső vetítés Mennyezetre szerelés Mennyezetre szerelés Képernyő Képernyő Vetítő Vetítő Elülső vetítés Hátsó vetület Asztal felszerelése Asztal felszerelése Figyelmeztetések • Ha nincs megfelelően felszerelve a mennyezetre vagy az asztalra, a projektor megsérülhet. •...
  • Seite 87 Kép beállítása Fókuszbeállítás Tolja teljesen a fókuszbeállító kereket. Ezután óvatosan forgassa lefelé, figyelemmel a kivetített képre, amíg meg nem világos. Fókuszbeállító kerék Keystone (kép függőleges beállítása) Ha a kivetített kép torz, akkor a trapézkerék segítségével állíthatja be. Ha a kivetítő nincs megfelelően elhelyezve a síkban, a kivetített kép trapéz alakú lesz, homályos élekkel.
  • Seite 88 Beállítások A Home felületen válassza a lehetőséget Setup: Lehetőségek: Network, Projection, Advanced, Information 1. Network: Lehetőségek: Scan (válasszon egy hálózatot a listából, és írja be a jelszót), Auto IP, Static IP, Disconnect (válassza le a WiFi hálózatot) 2. Projection: Válassza ki a kívánt vetítési módot: Front desktop (elülső vetület, asztalra szerelés), Rear Desktop (hátsó...
  • Seite 89 3. Advanced: Language, Boot Source (megjelenik az indításkor), Sleeper time (alvási idő ütemezése), iOS Play Mode (lehetőségek: screen casting HD, screen mirroring HD, screen casting SD, screen mirroring SD), Local Update (helyi frissítés), Online Update (hálózati frissítés), Restore factory Default. Media (multimédia fájlok lejátszása) A Home felületen válassza a lehetőséget Media, majd válassza ki a lejátszani kívánt fájlt: Movie, Music, Photo, Text.
  • Seite 90 Támogatott formátumok Videó: MP4, MKV, WMV, RMVB, RM, AVI, FLV, TRP, VOB, 3GP, DIVW, TP, TS, MPG, M2TS, DAT Hang: MP3, AAC, FLAC, OGG, WAV, FLAC, DTS, WMA, M4A Kép: BMP, JPG, PNG, JPEG Szöveg: TXT Source (válassza a lejátszási forrást) A Home felületen válassza a lehetőséget Source: Választ HDMI 1 vagy 2, VGA, AV Megjegyzés: Ellenőrizze, hogy a kiválasztott lejátszási forrás csatlakoztatva van-e.
  • Seite 91 Minden lejátszási forráshoz további kép- és hangbeállításokat ad meg: iOS Cast Megjegyzés: Az Apple Airplay első használata előtt a projektornak csatlakoznia kell az internethez. A Home felületen válassza a lehetőséget iOS Cast. Az iOS-eszközt és a kivetítőt ugyanahhoz az útválasztóhoz kell csatlakoztatni, vagy az iOS-eszközt a projektor által létrehozott hálózathoz kell csatlakoztatni (AP mód).
  • Seite 92 Miracast A Home felületen válassza a lehetőséget Miracast. Nyissa meg Android-eszközét, és válassza ki a lehetőséget Wireless display. Ezután válassza ki a kivetítő nevét. Használati utasítás...
  • Seite 93 Megjegyzés: Az Android különböző verzióiban különböző módon lehet beállítani a Wireless Display beállítást. A részletekért olvassa el az Android verziók kézikönyvét. Használati utasítás...
  • Seite 94: Hibaelhárítás

    Hibaelhárítás Probléma Lehetséges ok A tápkábel nincs megfelelően csatlakoztatva A jelző LED nem világít a kivetítő bekapcsolása után Az on / off gomb hibás A be / ki gomb ki van kapcsolva A távirányító nem a projektor felé irányul A projektor nem reagál a Az IR vevőben erős fényvisszaverődés van távvezérlő...
  • Seite 95: Műszaki Adatok

    Műszaki adatok Vetítési rendszer LCD TFT display 5.8 inch Natív felbontás 1920 x 1080 Fényesség 4000 lumens Kontraszt arány 4000:1 Kép elforgatása 360° Lencsék 5 üveglencse Fókusz Kézikönyv Nyelv Angol, francia, spanyol, portugál, kínai stb. (Összesen 23 nyelv) Lámpa típusa LED lámpa élettartama akár 50000 óra Képméret...
  • Seite 96: Contenuto Del Pacco

    Avvertenze • Per una buona visione, raccomandiamo di installare il videoproiettore in una stanza buia. • Manipolare con cura il videoproiettore. Non farlo cadere per terra e non gli causare delle scosse, in quanto potrebbe danneggiare il prodotto o potrebbe influenzare il modo di funzionamento del prodotto. •...
  • Seite 97: Descrizione Del Prodotto

    Descrizione del prodotto 1. Regolazione della posizione sul piano 2. Ricevitore IR 3. Lente 4. Ingressi 5. Pulsante principale Manuale dell’utente...
  • Seite 98: Descrizione Tasti

    6. Interfaccia di alimentazione 7. Altoparlante 8. Ventilatore 9. Regolazione del focus 10. Keystone (correzione verticalità dell’immagine) 11. Altoparlante 1. Regolazione della posizione sul piano 2. Etichetta Descrizione tasti 1. Tasto OK 2. Tasti con frecce per la navigazione nel menu 3.
  • Seite 99 Ricevitore IR per il telecomando Ingresso VGA Porta per la connessione della chiavetta USB HDMI 1/2 Ingresso HDMI Ingresso cuffie 3.5mm Ingresso video Il telecomando 1. Indicatore LED 2. Avvio/Arresto del proiettore 3. Selezione sorgente di riproduzione 4. Tasti con frecce per la navigazione nel menu 5.
  • Seite 100 Installazione Impostazioni standard (proiezione frontale) Leggere la tabella di sotto per regolare la dimensione dell’immagine e la distanza (dalla lente fino al piano di proiezione). Rapporto immagine: 16:9 Diagonale immagine (inch) Distanza di proiezione (metri) 5” 1.60 m 70” 2.24 m 100”...
  • Seite 101: Modalità Di Installazione

    Modalità di installazione Schermo Proiettore Proiettore Schermo Proiezione posteriore Proiezione frontale Montaggio a so tto Montaggio a so tto Schermo Proiettore Schermo Proiettore Proiezione frontale Proiezione posteriore Montaggio su tavolo Montaggio su tavolo Avvertenze • Se il videoproiettore non è installato correttamente sul tavolo o sul soffitto, questo potrebbe danneggiarsi.
  • Seite 102: Regolazione Dell'immagine

    funzionamento. Arresto: Quando il videoproiettore funzione, premere il tasto di avvio/arresto dal prodotto o dal telecomando. Il LED diventerà rosso. Il videoproiettore torna alla modalità standby. Regolazione dell’immagine Regolazione del focus Girare in sù, fino alla fine, la manopola per la regolazione del focus. Quindi, girare leggermente verso il basso, osservando l’immagine proiettata, fino quando questa diventa chiara e nitida.
  • Seite 103 Schermo Altezza Proiettore Proiettore Altezza Regolazione Schermo altezza Correzione immagine (Keystone) Se non si riesce a correggere la forma trapezoidale dell’immagine tramite la funzione keystone, provare a correggere la posizione del videoproiettore il più perpendicolare possibile al piano di proiezione. Setup (Impostazioni) Nell’interfaccia Home, selezionare Setup: Opzioni: Network, Projection, Advanced, Information...
  • Seite 104 2. Projection: Selezionare la modalità di proiezione desiderata: Front desktop (proiezione frontale, montaggio sul tavolo), Rear Desktop (proiezione dal retro, montaggio sul tavolo), Front Ceiling (proiezione frontale, montaggio sul soffitto), Rear Ceiling (proiezione dal retro, montaggio sul soffitto) 3. Advanced: Language (lingua), Boot Source (mostra all’avvio), Sleeper time (programazione ora di arresto), iOS Play Mode (opzioni: screen casting HD, screen mirroring HD, screen casting SD, screen mirroring SD), Local Update (update locale), Online Update (update tramite...
  • Seite 105 Media (riproduzione file multimedia) Nell’interfaccia Home, selezionare Media, quindi selezionare il file che si desidera riprodurre: Movie (video), Music (musica), Photo (foto), Text. Formati supportati Video: MP4, MKV, WMV, RMVB, RM, AVI, FLV, TRP, VOB, 3GP, DIVW, TP, TS, MPG, M2TS, DAT Audio: MP3, AAC, FLAC, OGG, WAV, FLAC, DTS, WMA, M4A Immagine: BMP, JPG, PNG, JPEG Testo: TXT...
  • Seite 106 Scegliere HDMI 1 oppure 2, VGA, AV Nota: Assicurarsi che la sorgente di riproduzione selezionata sia collegata. Per ogni sorgente di riproduzione può fare delle impostazioni di immagine e suono aggiuntivi: iOS Cast Nota: Il videoproiettore deve essere connesso a Internet prima di utilizzare Apple Airplay per la prima volta.
  • Seite 107 Nell’interfaccia Home, selezionare iOS Cast. Il dispositivo iOS ed il videoproiettore devono essere connessi allo stesso router (alla stessa rete) oppure connettere il dispositivo iOS alla rete generata dal videoproiettore. Aprire il dispositivo iOS e selezionare l’opzione Screen Mirroring. Quindi scegliere il nome del suo proiettore. Miracast Nell’interfaccia Home, selezionare Miracast.
  • Seite 108 Aprire il dispositivo Android e selezionare Wireless display. Quindi scegliere il nome del suo proiettore. Nota: Diverse versioni di Android hanno modi diversi per impostare l’opzione Wireless Display. Per i dettagli, leggere il manuale della sua versione di Android. Manuale dell’utente...
  • Seite 109: Problemi E Soluzioni

    Problemi e soluzioni Problema Possibile causa Il cavo di alimentazione non è connesso Il LED indicatore non si correttamente accende dopo l’avvio del videoproiettore Il tasto di arresto/avvio è difettoso Il tasto di arresto/avvio è sulla posizione arresto Il telecomando non è rivolto verso il Il videoproiettore non videoproiettore risponde ai comandi del...
  • Seite 110: Specifiche Tecniche

    Specifiche tecniche Sistema di proiezione Schermo LCD TFT 5.8 inch Risoluzione nativa 1920 x 1080 Luminosità 4000 lumen Rapporto contrasto 4000:1 Rotazione immagine 360° Lenti 5 lenti di vetro Focus Manuale Lingua Inglese, francese, spagnolo, portoghese, cinese ecc. (23 lingue in totale) Tipo lampada Durata di funzionamento fino a 50000 ore...
  • Seite 111: Waarschuwingen

    Waarschuwingen • Voor een goede kijkervaring raden we aan om de projector in een donkere kamer te installeren. • Ga voorzichtig om met de projector. Laat het niet op de grond vallen en schud het niet, aangezien deze handelingen het product kunnen beschadigen of de normale werking van het product kunnen beïnvloeden.
  • Seite 112: Productbeschrijving

    • Reserve zekering Product beschrijving 1. Positie aanpassing 2. IR-ontvanger Handleiding...
  • Seite 113 3. Lens 4. Ingangen 5. Hoofdknop 6. Stroominterface 7. Spreker 8. Ventilator 9. Focus aanpassing 10. Keystone 11. Spreker 12. Positie aanpassing 13. Label Sleutels beschrijving 1. OK-toets 2. Pijltjestoetsen om door het menu te navigeren 3. Power-toets 4. Selecteer afspeelbron: AV / HDMI / VGA 5.
  • Seite 114 Verbindingen IR-ontvanger voor afstandsbediening VGA-ingang USB-drive verbindingspoort HDMI 1/2 HDMI-ingang 3,5 mm koptelefooningang Video-ingang Handleiding...
  • Seite 115 Afstandsbediening 1. LED-indicator 2. Schakel de projector in / uit 3. Selecteer een afspeelbron 4. Pijltjestoetsen om door het menu te navigeren 5. Menu 6. Terug naar de hoofdpagina 7. Volume + 8. Volume - 9. Stille modus (gedempt) 10. Omdraaien 11.
  • Seite 116 Afbeelding diagonaal (inch) Projectie-afstand (meter) 5” 1.60 m 70” 2.24 m 100” 3.20 m 120” 3.82 m 250” 7.95 m Opmerkingen: • Voor een optimale weergave raden we een beeldformaat van 120 inch (3.82 m) aan. • Houd rekening met een marge van ± 3% ten opzichte van de afbeeldingsgrootte in bovenstaande tabel.
  • Seite 117: Schakel Het Apparaat In En Uit

    Installatiemodi Projector Scherm Projector Scherm Projectie van achteren Frontprojectie Plafondmontage Plafondmontage Scherm Projector Scherm Projector Frontprojectie Projectie van achteren Tafelmontage Tafelmontage Waarschuwingen • Als het niet correct aan het plafond of de tafel is geïnstalleerd, kan de projector worden beschadigd. •...
  • Seite 118 product of op de afstandsbediening. Het indicatielampje wordt rood. De projector keert terug naar de stand-bymodus. Afbeelding instelling Focus aanpassing Duw het focusinstelwiel helemaal omhoog. Draai vervolgens voorzichtig naar beneden, terwijl u het geprojecteerde beeld observeert, totdat het duidelijk wordt. Focus instelwiel Keystone (afbeelding verticale aanpassing) Als het geprojecteerde beeld vervormd is, kunt u dit aanpassen met het...
  • Seite 119 projectievlak te corrigeren. Instellingen Selecteer in de Home-interface Setup: Opties: Network, Projection, Advanced, Information 1. Network: Opties: Scan (kies een netwerk uit de lijst en voer het wachtwoord in), Auto IP, Static IP, Disconnect (verbreek de verbinding met het WiFi-netwerk) 2.
  • Seite 120 Ceiling (doorzichtprojectie, plafondmontage) 3. Advanced: Language, Boot Source (display bij het opstarten), Sleeper time (slaaptijd plannen), iOS Play Mode (opties: screen casting HD, screen mirroring HD, screen casting SD, screen mirroring SD), Local Update (lokale update), Online Update (netwerkupdate), Restore factory Default.
  • Seite 121 Ondersteunde formaten Video: MP4, MKV, WMV, RMVB, RM, AVI, FLV, TRP, VOB, 3GP, DIVW, TP, TS, MPG, M2TS, DAT Audio: MP3, AAC, FLAC, OGG, WAV, FLAC, DTS, WMA, M4A Afbeelding: BMP, JPG, PNG, JPEG Tekst: TXT Source (selecteer de weergavebron) Selecteer Source in de Home-interface: Kiezen HDMI 1 of 2, VGA, AV Opmerking: zorg ervoor dat de geselecteerde afspeelbron is aangesloten.
  • Seite 122 iOS Cast Opmerking: de projector moet met internet zijn verbonden voordat u Apple Airplay voor het eerst gebruikt. Selecteer iOS Cast in de Home-interface. Het iOS-apparaat en de projector moeten op dezelfde router zijn aangesloten of het iOS-apparaat moeten zijn verbonden met het netwerk dat door de projector is gegenereerd (AP-modus).
  • Seite 123 Miracast Selecteer Miracast in de Home-interface. Open uw Android-apparaat en selecteer de optie Wireless display. Selecteer vervolgens de naam van uw projector. Handleiding...
  • Seite 124 Opmerking: verschillende versies van Android hebben verschillende manieren om de optie Wireless Display in te stellen. Lees de handleiding van uw Android-versie voor meer informatie. Handleiding...
  • Seite 125: Probleemoplossen

    Probleemoplossen Probleem Mogelijke oorzaak De indicator-LED gaat niet Het netsnoer is niet goed aangesloten branden nadat de projector De aan / uit-knop is defect is ingeschakeld De aan / uit-knop is aan uit-positie De afstandsbediening is niet op de projector gericht De projector reageert niet op opdrachten van de...
  • Seite 126: Technische Specificaties

    Technische specificaties Projectiesysteem LCD TFT display 5.8 inch Native resolutie 1920 x 1080 Helderheid 4000 lumens Contrast ratio 4000:1 Draai de afbeelding 360° Lenzen 5 glazen lenzen Focus Handleiding Taal Engels, Frans, Spaans, Portugees, Chinees etc. (in totaal 23 talen) Soort lamp Levensduur LED-lamp tot 50000 uur...
  • Seite 127: Ostrzeżenia

    Ostrzeżenia • Aby uzyskać dobry obraz, zalecamy zainstalowanie projektora w ciemnym pomieszczeniu. • Ostrożnie obchodź się z projektorem. Nie upuszczaj go na podłogę ani nim nie potrząsaj, ponieważ może to spowodować uszkodzenie produktu lub wpłynąć na normalne działanie produktu. • Zachowaj ostrożność...
  • Seite 128: Opis Produktu

    Opis produktu 1. Regulacja pozycji 2. Odbiornik podczerwieni 3. Obiektyw 4. Wejścia 5. Główny przycisk Instrukcja obsługi...
  • Seite 129 6. Interfejs zasilania 7. Głośnik 8. Wentylator 9. Regulacja ostrości 10. Keystone 11. Głośnik 12. Regulacja pozycji 13. Etykieta Opis kluczy 1. Klawisz OK 2. Klawisze strzałek do poruszania się po menu 3. Przycisk zasilania 4. Wybierz źródło odtwarzania: AV / HDMI / VGA 5.
  • Seite 130: Zdalne Sterowanie

    Odbiornik podczerwieni do zdalnego sterowania Wejście VGA Port do podłączenia napędu USB HDMI 1/2 Wejście HDMI Wejście słuchawkowe 3,5 mm Wejście wideo Zdalne sterowanie 1. Wskaźnik ledowy 2. Włącz / wyłącz projektor 3. Wybierz źródło odtwarzania 4. Klawisze strzałek do poruszania się...
  • Seite 131 Instalacja Ustawienia standardowe (projekcja przednia) W poniższej tabeli można wyregulować rozmiar obrazu i odległość (od obiektywu do płaszczyzny projekcji). Współczynnik obrazu: 16: 9 Przekątna obrazu (inch) Odległość projekcji (metry) 5” 1.60 m 70” 2.24 m 100” 3.20 m 120” 3.82 m 250”...
  • Seite 132 Tryby instalacji Projektor Ekran Projektor Ekran Projekcja tylna Projekcja przednia Montaż na su cie Montaż na su cie Ekran Projektor Ekran Projektor Projekcja przednia Projekcja tylna Montaż na stole Montaż na stole Ostrzeżenia • Projektor może ulec uszkodzeniu, jeśli nie zostanie prawidłowo zamontowany na suficie lub stole.
  • Seite 133: Regulacja Ostrości

    na pilocie. Kontrolka zmieni kolor na czerwony. Projektor powraca do trybu gotowości. Ustawienie obrazu Regulacja ostrości Wciśnij pokrętło regulacji ostrości do końca. Następnie delikatnie obróć w dół, obserwując wyświetlany obraz, aż stanie się wyraźny. Pokrętło regulacji ostrości Keystone (regulacja pionowa obrazu) Jeśli wyświetlany obraz jest zniekształcony, można to wyregulować...
  • Seite 134 Ustawienia W interfejsie głównym wybierz Setup: Opcje: Network, Projection, Advanced, Information 1. Network: Opcje: Scan (wybierz sieć z listy i wprowadź hasło), Auto IP, Static IP, Disconnect (odłącz się od sieci Wi-Fi) 2. Projection: Wybierz żądany tryb projekcji: Front desktop (projekcja przednia, montaż...
  • Seite 135 3. Advanced: Language, Boot Source (wyświetlany podczas uruchamiania), Sleeper time (planowanie czasu snu), iOS Play Mode (opcje: screen casting HD, screen mirroring HD, screen casting SD, screen mirroring SD), Local Update (aktualizacja lokalna), Online Update (aktualizacja sieci), Restore factory Default. Media (odtwarzać...
  • Seite 136 Obsługiwane formaty Wideo: MP4, MKV, WMV, RMVB, RM, AVI, FLV, TRP, VOB, 3GP, DIVW, TP, TS, MPG, M2TS, DAT Audio: MP3, AAC, FLAC, OGG, WAV, FLAC, DTS, WMA, M4A Obrazek: BMP, JPG, PNG, JPEG Tekst: TXT Source (wybierz źródło odtwarzania) W interfejsie głównym wybierz Source: Wybierać...
  • Seite 137 Dla każdego źródła odtwarzania masz dodatkowe ustawienia obrazu i dźwięku: iOS Cast Uwaga: Projektor należy podłączyć do Internetu przed pierwszym użyciem Apple Airplay. W interfejsie głównym wybierz iOS Cast. Urządzenie iOS i projektor muszą być podłączone do tego samego routera lub podłączyć...
  • Seite 138 Miracast W interfejsie głównym wybierz Miracast. Otwórz urządzenie z systemem Android i wybierz opcję Wireless display. Następnie wybierz nazwę swojego projektora. Instrukcja obsługi...
  • Seite 139 Uwaga: różne wersje Androida mają różne sposoby ustawiania opcji Wireless Display. Aby uzyskać szczegółowe informacje, przeczytaj instrukcję obsługi wersji Androida. Instrukcja obsługi...
  • Seite 140: Rozwiązywanie Problemów

    Rozwiązywanie problemów Problem Możliwa przyczyna Kabel zasilający nie jest prawidłowo podłączony Po włączeniu projektora wskaźnik LED nie świeci Przycisk włączania / wyłączania jest uszkodzony Włącznik / wyłącznik znajduje się w pozycji wyłączonej Pilot nie jest skierowany w stronę projektora Projektor nie reaguje na W odbiorniku podczerwieni odbija się...
  • Seite 141: Specyfikacja Techniczna

    Specyfikacja techniczna System projekcyjny LCD TFT display 5.8 inch Natywna rozdzielczość 1920 x 1080 Jasność 4000 lumens Współczynnik kontrastu 4000:1 Obróć obraz 360° Soczewki 5 szklanych soczewek Skupiać podręcznik Język Angielski, francuski, hiszpański, portugalski, chiński itp. (Łącznie 23 języki) Rodzaj lampy Żywotność...
  • Seite 142: Continutul Pachetului

    Atentionari • Pentru o buna vizionare, va recomandam sa instalati videoproiectorul intr-o camera intunecata. • Manipulati cu grija videoproiectorul. Nu-l scapati pe jos si nu-i produceti socuri, intrucat ati putea defecta iremediabil produsul sau ati putea afecta modul de functionare al produsului. •...
  • Seite 143: Descriere Produs

    Descriere produs 1. Reglare pozitie pe plan 2. Receptor IR 3. Obiectiv 4. Intrari 5. Comutator principal Manual de utilizare...
  • Seite 144 6. Interfata de alimentare 7. Difuzor 8. Ventilator 9. Reglare focus 10. Keystone (corectie verticalitate imagine) 11. Difuzor 12. Reglare pozitie pe plan 13. Eticheta Descriere taste 1. Tasta OK 2. Taste cu sageti pentru navigare prin meniu 3. Tasta de pornire/oprire 4.
  • Seite 145 Receptor IR pentru telecomanda Intrare VGA Port pentru conectare stick USB HDMI 1/2 Intrare HDMI Intrare casti 3.5mm Intrare video Telecomanda 1. Indicator LED 2. Pornire/oprie videoproiector 3. Selectare sursa de redare 4. Taste cu sageti pentru navigare prin meniu 5.
  • Seite 146 Instalare Setari standard (Proiectie frontala) Consultati tabelul de mai jos pentru a regla dimensiunea imaginii si distanta (de la obiectiv pana la planul de proiectie). Raport imagine: 16:9 Diagonala imagine (inch) Distanta de proiectie (metri) 5” 1.60 m 70” 2.24 m 100”...
  • Seite 147: Metode De Instalare

    Metode de instalare Ecran Proiector Proiector Ecran Proiectie din spate Proiectie frontala Montaj pe tavan Montaj pe tavan Ecran Proiector Ecran Proiector Proiectie frontala Proiectie din spate Montaj pe masa Montaj pe masa Atentionari • Daca nu este corect instalat pe tavan sau pe masa, proiectorul s-ar putea defecta.
  • Seite 148 Oprirea: Cand videoproiectorul functioneaza, apasati tasta de pornire/ oprire de pe produs sau de pe telecomanda. Ledul indicator va deveni rosu. Videoproiectorul se intoarce la modul standby. Reglare imagine Reglare focus Impingeti in sus, pana la capat, rotita de reglare focus. Apoi, rotiti usor in jos, observand imaginea proiectata, pana cand aceasta devine clara.
  • Seite 149 Daca nu reusiti sa corectati forma trapezoidala a imaginii prin functia keystone, incercati sa corectati pozitia proiectorului cat mai perpendicular pe planul de proiectie. Setup (setari) In interfata Home, selectati Setup: Optiuni: Network, Projection, Advanced, Information 1. Network (conectare la reteaua WiFi): Optiuni: Scan (alegeti o retea din lista si introduceti parola), Auto IP, Static IP, Disconnect (deconecteaza de la reteaua WiFi) 2.
  • Seite 150 masa), Front Ceiling (proiectie frontala, montaj pe tavan), Rear Ceiling (proiectie din spate, montaj pe tavan) 3. Advanced: Language (limba), Boot Source (afisare la pornire), Sleeper time (programare ora de oprire), iOS Play Mode (cu optiunile: screen casting HD, screen mirroring HD, screen casting SD, screen mirroring SD), Local Update (update local), Online Update (update prin retea), Restore factory Default (resetare dispozitiv) Media (redare fisiere multimedia)
  • Seite 151 Formate suportate Video: MP4, MKV, WMV, RMVB, RM, AVI, FLV, TRP, VOB, 3GP, DIVW, TP, TS, MPG, M2TS, DAT Audio: MP3, AAC, FLAC, OGG, WAV, FLAC, DTS, WMA, M4A Imagine: BMP, JPG, PNG, JPEG Text: TXT Source (selectare sursa de redare) In interfata Home, selectati Source: Alegeti HDMI 1 sau 2, VGA, AV Nota: Asigurati-va ca sursa de redare selectata este conectata.
  • Seite 152 Pentru fiecare sursa de redare aveti setari suplimentare de imagine si sunet: iOS Cast Nota: Videoproiectorul trebuie conectat la Internet inainte de a folosi Apple Airplay pentru prima data. In interfata Home, selectati iOS Cast. Dispozitivul iOS si videoproiectorul trebuie sa fie conectate la acelasi router sau conectati dispozitivul iOS la reteaua generata de videoproiector.
  • Seite 153 Miracast In interfata Home, selectati Miracast. Deschideti dispozitivul Android si selectati optiunea Wireless display. Selectati apoi numele videoproiectorului dvs. Manual de utilizare...
  • Seite 154 Nota: Diferite versiuni de Android au diferite moduri de a seta optiunea Wireless Display. Pentru detalii, cititi manualul versiunii dvs. de Android. Manual de utilizare...
  • Seite 155 Probleme si solutii Problema Posibila cauza Cablul de alimentare nu este conectat LED-ul indicator nu se corect aprinde dupa pornirea videoproiectorului Butonul de pornire/oprire este defect Butonul de pornire/oprire este pe pozitia inchis Telecomanda nu este indreptata spre Videoproiectorul nu videoproiector raspunde la comenzile telecomenzii...
  • Seite 156: Specificatii Tehnice

    Specificatii tehnice Sistem proiectie Ecran LCD TFT 5.8 inch Rezolutie nativa 1920 x 1080 Luminozitate 4000 lumeni Raport contrast 4000:1 Rotire imagine 360° Lentile 5 lentile de sticla Focus Manual Limba Engleza, franceza, spaniola, portugheza, chineza etc. (23 de limbi in total) Tip lampa Durata de viata a lampei pana la 50000 ore...
  • Seite 157 Declaración UE de conformidad simplificada SC ONLINESHOP SRL declara que el Proyector WiFi PNI VP850 cumple con la Directiva EMC 2014/30/EU y la Directiva RED 2014/53/EU. El texto completo de la declaración de conformidad de la UE está disponible en la siguiente dirección de Internet: https://www.mypni.eu/products/7796/download/certifications...

Inhaltsverzeichnis