Herunterladen Inhalt Inhalt Diese Seite drucken

Werbung

Verfügbare Sprachen

Verfügbare Sprachen

© Copyright LOTRONIC 2016
M
I
N
I
D
M
X
C
O
M
I
N
I
D
M
X
C
O
M
I
N
I
C
O
N
T
R
O
M
I
N
I
C
O
N
T
R
O
D
M
X
S
T
E
U
D
M
X
S
T
E
U
DC-54DMX
(
15-1843)
GB - INSTRUCTION MANUAL
F - MANUEL D'UTILISATION
D - BEDIENUNGSANLEITUNG
DC54DMX
N
T
R
O
L
L
E
R
N
T
R
O
L
L
E
R
L
L
E
U
R
D
M
X
L
L
E
U
R
D
M
X
E
R
P
U
L
T
E
R
P
U
L
T
Page 1

Werbung

Inhaltsverzeichnis
loading

Inhaltszusammenfassung für afx light DC-54DMX 15-1843

  • Seite 1 DC-54DMX 15-1843) GB - INSTRUCTION MANUAL F - MANUEL D’UTILISATION D - BEDIENUNGSANLEITUNG © Copyright LOTRONIC 2016 DC54DMX Page 1...
  • Seite 2: Safety Introduction

    Thank you for having chosen our AFX LIGHT 54CH MINI DMX CONTROLLER. For your own safety, please read this user manual carefully before installing the device. SAFETY INTRODUCTION • If the device has been exposed to temperature changes due to environmental changes, do not switch it on immediately.
  • Seite 3 2. Connection of Signal Cable You can use the 3-pin XLR cable to connect the output socket of the master and the input socket of the slave light. Connect the DIGITAL OUT socket of the master and the IN socket of the slave light, then, connect the OUT socket to the IN socket of the next light.
  • Seite 4 CONNECTION 1- In the case of use on mains: Connect the power supply sector, connect the power supply to the unit by the 9V DC input. Place the power button on the position “EXTERNAL” 2- In the case of use on battery: Insert a 9V battery (6LR61) in the space provided for this purpose Place the power button on the heading “BATTERY”...
  • Seite 5 Press the "SELECT" to exit the internal synchronization. 2 - Manual operation You can use DMX controller to control the projectors manually (using sliders). This allows complete freedom of movement and function and adapts best to specific use. To select the manual mode, press the "B". The DMX controller will then display the number of page on which he is located (between 1 and 9, each page having six channels, which makes a total of 54 controllable channels).
  • Seite 6 When you select the program you can choose the projector which wants to attribute the scene (from 1-9). Press button “B”. The display of "PROJ." will indicate a blinking dot. Then select the number with the buttons "UP" or "DOWN." When the projector is selected, you can adjust the values of the different sliders to program the scene which you want to record.
  • Seite 7: Technical Specifications

    To stop a running program, press the "A" button again. If you use the sliders 'cross' and 'stand', you can adjust the internal synchronization between the projectors and adjust the brake time between scenes. During the execution of the program, you can still manually control the projectors, even if these projectors are controlled in the program.
  • Seite 8: Regles Generales

    Nous vous remercions pour l’achat de ce MINI CONTROLLEUR DMX AFX LIGHT. Pour votre sécurité, lisez attentivement ce manuel avant d’installer l’appareil. CONSIGNES DE SECURITE ET D’UTILISATION • Si l’appareil a été exposé à des changements de température, ne le mettez pas immédiatement sous tension. La condensation qui peut se produire, risque d’endommager les circuits.
  • Seite 9: Boutons De Contrôle

    2. Connexion du câble signal La connexion entre la sortie du Maître et l’entrée de l‘Esclave se fait au moyen du cordon XLR à 3 broches fourni. La sortie DMX de la console de commande doit être branchée sur l’entrée DMX du premier Maître. Branchez la sortie DMX du Maître sur l’entrée DMX de l’Esclave et ainsi de suite jusqu’au dernier Esclave.
  • Seite 10 BRANCHEMENT 1- Utilisation de l’adaptateur secteur: Brancher le connecteur sur la prise 9V du controlleur, brancher l’adaptateur sur une prise secteur. Mettre le bouton M/A sur la position “EXTERNAL” 2- Utilisation avec une pile: Insérer une pile 9V (6LR61) dans l’emplacement prévu dans le controlleur. Mettre le bouton M/A sur la position “BATTERY”...
  • Seite 11: 1 A

    Appuyer sur le bouton "SELECT" pour sortir de la synchronisation interne. 2 – Utilisation Manuelle Vous pouvez utiliser le contrôleur pour piloter les projecteurs manuellement (à l’aide des potentiomètres). Cela permet une totale liberté d’utilisation. Pour sélectionner le mode manuel, appuyez sur le bouton "B". Le contrôleur DMX va alors afficher la page sur laquelle il est de 1 à...
  • Seite 12 Lorsque le projecteur est sélectionner, vous pouvez régler les curseurs pour programmer la scène que vous voulez enregistrer, puis quand la scène est finie, appuyer sur le bouton "INSERT", votre scène est enregistrée, l’afficheur “SCENES” augmente de “1”. Procédez de la même façon pour la scène suivante. Si vous voulez modifier une scène enregistrée, sélectionner le mode programmation.
  • Seite 13: Caracteristiques Techniques

    or "DOWN", vous pouvez contrôler plusieurs projecteurs. Appuyer sur la touche "B" pour sélectionner un autre programme. Pour désactiver le contrôle manuel des projecteurs, appuyer 2 fois sur le bouton "B". Quand l’afficheur des projecteurs "PROJ." affiche "-", vous pouvez voir si d’autres projecteurs sont toujours en contrôle manuel en appuyant sur les touches "UP"...
  • Seite 14: Sicherheitshinweise

    Wir danken Ihnen für den Kauf dieses DMX MINI CONTROLLERS der Marke AFX LIGHT. Zur Ihrer eigenen Sicherheit lesen Sie bitte die Anleitung vor der ersten Inbetriebnahme aufmerksam durch. SICHERHEITSHINWEISE • Wenn das Gerät starken Temperaturschwankungen ausgesetzt war, schalten Sie es nicht sofort ein. Das entstehende Kondenswasser kann die Schaltungen beschädigen.
  • Seite 15: Beschreibung

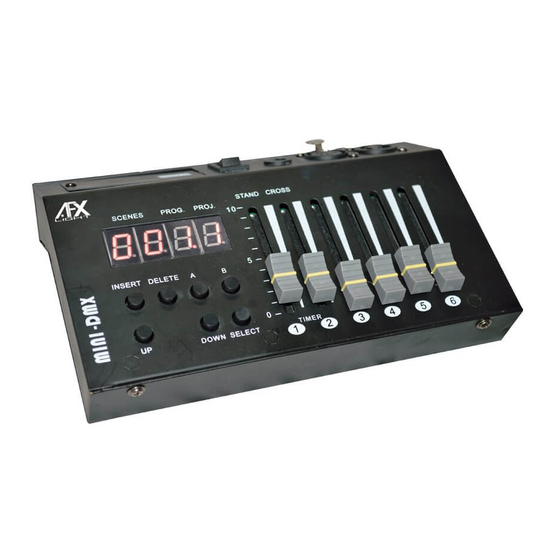
    angeschlossen werden, um Störungen zu verhindern. Dieser Endwiderstand besteht aus einem XLR Stecker, der einen 120Ω Widerstand zwischen Pin 2 und 3 besitzt. S. Abb. unten. O U T O U T O U T Hinweis: Benutzen Sie doppelt abgeschirmtes Kabel. Der Leiterdurchmesser jedes Kabels muss mindestens 0,5mm betragen. BESCHREIBUNG (1) Bedienfeld: INSERT, DELETE, AB, UP, DOWN, SELECT...
  • Seite 16: Bedienung

    5- Batterieversorgung: Eine 9V Batterie (6LR61) ins Batteriefach einlegen. Ein/Aus Schalter auf “BATTERY” stellen 6- Das Steuerpult kann verschiedene Strahler mit DMX512 Protokoll angeschlossen werden. BEDIENUNG 1 – Einstellungen Beim Einschalten führt das Gerät ein Reset durch, so dass alle Funktionen auf Null gestellt werden. Danach erscheint folgendes Display : Je nach angeschlossenem Gerätetyp können Sie einen Strahler mit einem anderen synchronisieren.
  • Seite 17: 1 A

    9). Jede Seite besitzt 6 Kanäle, das macht insgesamt 54 Kanäle. Hinweis : der blinkende Punkt zeigt an, dass der Strahler mittels der « UP » und « DOWN » Tasten gewählt werden kann. Sie können nune manuell die ans DMX Steuerpult angeschlossenen Strahler bedienen. In nachfolgender Tabelle finden Sie die DMX Kanäle auf jeder Seite : Seite Kanäle...
  • Seite 18 Wenn Sie eine bereits gespeicherte Szene ändern möchten, gehen Sie in Programmierbetrieb. Drücken sie die « INSERT » Taste und wählen Sie mit den UP/DOWN Tasten die Szene, die Sie ändern oder ersetzen möchten. Erneut „INSERT » drücken, um die neue Szene zu speichern. Zweimal die «...
  • Seite 19: Technische Daten

    Folgende Punkte müssen bei einer Inspektion geprüft werden: 1) Alle für die Montage verwendeten Schrauben und Bestandteile des Geräts müssen fest angeschlossen und rostfrei sein. 2) Die elektrischen Kabel müssen in einwandfreiem Zustand sein und dürfen keine Abnutzungen aufweisen. Der Installateur muss alle Sicherheitsvorkehrungen treffen und Sicherheitsbestimmungen beachten.

Inhaltsverzeichnis