Marantz M4U Schnellstartanleitung
Quickstart Guide
Guía de inicio rápido
Guide d'utilisation rapide
Schnellstart-Anleitung
Quickstart Guide (English)
Box Contents
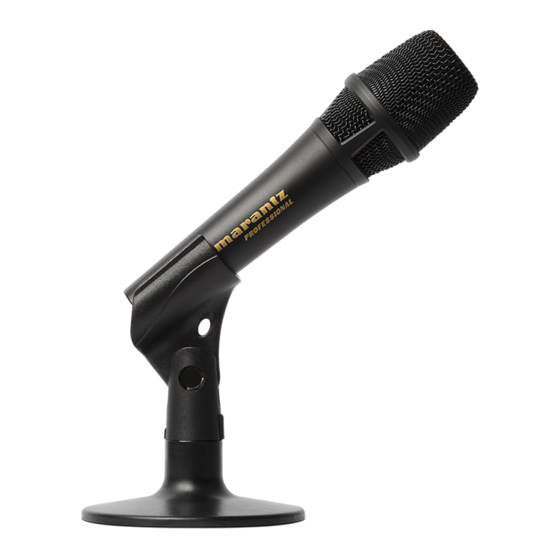
Microphone
Microphone Stand Base
A/D Converter
Microphone Stand Clamp
XLR to 3.5 mm Cable
Quickstart Guide
Mini-USB to USB-A Cable
Safety & Warranty Manual
Connecting Your Equipment
1. Position the Microphone Stand Base on the desk or other surface where
you'll be keeping M4U.
2. Screw the Microphone Stand Clamp to the Microphone Stand Base.
3. Fasten the microphone to the clamp. Push down to snap in the microphone,
which should connect with the clamp above the XLR Output. The On/Off
switch on the microphone should be facing up. With the microphone fastened
to the clamp, tilt the microphone up and down to adjust its angle as desired.
4. Use the included XLR to 3.5 mm cable to connect the microphone to the A/D
Converter. Connect the XLR end of the cable to the XLR Output on the
bottom of the microphone and the 3.5 mm end of the cable to the 3.5 mm Mic
Input on the A/D Converter.
5. Use the included Mini-USB to USB-A cable to connect the A/D Converter to
your computer. Connect the Mini-USB end of the cable to the corresponding
port on the A/D Converter and connect the USB-A end of the cable to the
corresponding port on your computer.
6. If you would like to monitor the microphone's audio output while you use it,
connect headphones (not included) to the 3.5 mm Audio Out on the A/D
Converter.
7. Use the microphone's On/Off switch to power it on. Then see the
Configuration
instructions below to make sure your computer is set up to
record audio from M4U.
Audio Configuration
To set M4U as your default audio recording device, follow the directions below
based on your computer's operating system.
Windows:
1. Access the Sound control panel. You can do this by going to Control Panel >
Hardware and Sound > Sound.
2. Click the Recording tab and select Marantz M4U Audio as the default
device.
3. Click Properties in the lower right-hand corner. In the new window, click the
Advanced tab and select 2-channel, 16-bit, 48000 Hz (Studio Quality) as the
default format.
4. Uncheck both boxes under Exclusive Mode.
5. Click OK to close the Properties window. Then Click OK to close the Sound
control panel.
6. Open the recording software that you plan to use on your computer.
7. Go to your software's settings and select M4U USB Microphone as your
audio input.
macOS:
1. Go to Applications > Utilities > Audio MIDI Setup.
2. In the Audio Devices window, select Marantz M4U Audio in the left column.
3. Right-click Marantz M4U Audio and select Use this device for sound input.
4. Quit Audio MIDI Setup.
5. Open the recording software that you plan to use on your computer.
6. Go to your software's settings and select M4U USB Microphone as your
audio input.
M4U
Guida rapida
marantzpro.com/support
For technical support.
Para soporte técnico.
Pour obtenir de l'assistance technique.
Per assistenza tecnica.
Für technischen Support.
marantzpro.com
For complete warranty information.
Para información completa sobre la garantía.
Pour obtenir toutes les informations relatives à la garantie.
Per informazioni complete in merito alla garanzia.
Für komplette Garantieinformationen.
Guía de inicio rápido (Español)
Contenido de la caja
Micrófono
Conversor A/D
Cable XLR a 3,5 mm
Cable Mini-USB a USB-A
Cómo conectar su dispositivo
1. Posicione la base del soporte del micrófono sobre el mismo escritorio o
superficie en donde utilizará el M4U.
2. Atornílle la abrazadera del soporte del micrófono a la base del mismo.
3. Sujete el micrófono a la abrazadera. Presione hacia abajo para encajar el
micrófono, el cual debería conectarse con la abrazadera por encima de la salida
XLR. El interruptor de encendido/apagado el micrófono debería quedar
orientado hacia arriba. Con el micrófono sujetado a la abrazadera, inclínelo hacia
arriba y hacia abajo para ajustar su ángulo según se desee.
4. Utilice el cable XLR a 3,5 mm incluido para conectar el micrófono al conversor
A/D. Conecte el extremo del cable que tiene el conector XLR a la salida XLR que
se encuentra en la parte inferior del micrófono y el extremo del cable que tiene el
conector de 3,5 mm a la entrada para micrófono de 3,5 mm en el conversor A/D.
5. Utilice el cable Mini-USB a USB-A incluido para conectar el conversor A/D a su
ordenador. Conecte el extremo del cable que tiene el conector Mini-USB al puerto
correspondiente del conversor A/D y el extremo del cable que tiene el conector
USB-A al puerto correspondiente de su ordenador.
6. Si desea monitorizar la salida de audio del micrófono mientras lo utiliza, conecte
auriculares (no incluidos) a la salida para auriculares de 3,5 mm del conversor
A/D.
7. Utilice el interruptor de encendido/apagado del micrófono para encenderlo.
Luego consulte las instrucciones de
Audio
asegurarse de que su ordenador se encuentre configurado para grabar audio
proveniente del M4U.
Configuración de audio
Para configurar el M4U como su dispositivo de grabación de audio predeterminado,
siga estas instrucciones para su dispositivo/sistema operativo.
Windows:
1. Acceda al panel de control de Sound (Sonido). Esto puede hacerse accediendo al
Control Panel (Panel de control) > Hardware and Sound (Hardware y sonido) >
Sound (Sonido).
2. Haga clic en la pestaña Recording (Grabación) y seleccione la M4U USB
Micrófono de como dispositivo predeterminado.
3. Haga clic en Properties (Propiedades) en la esquina inferior derecha. En la nueva
ventana, haga clic en la pestaña Advanced (Avanzadas) y seleccione 2-channel,
16-bit, 48000 Hz (Studio Quality) (2 canales, 16 bits, 48000 Hz [calidad de
estudio]) como formato predeterminado.
4. Deshaga la selección de las dos casillas que están bajo Exclusive Mode (Modo
exclusivo).
5. Haga clic en OK (Aceptar) para cerrar la ventana de Properties (Propiedades).
Luego haga clic en OK (Aceptar) para cerrar el panel de control de Sound (Sonido).
6. Abra el software de grabación que planea utilizar en su ordenador.
7. Abra los ajustes de su software y seleccione M4U USB Micrófono como su
entrada de audio.
macOS:
1. Vaya a Applications > Utilities > Audio MIDI Setup (Aplicaciones > Utilidades >
Configuración MIDI de audio).
2. En la ventana Audio Devices (Dispositivos de audio), seleccione M4U USB
Micrófono en la columna izquierda.
3. Haga clic derecho en M4U USB Microphone y seleccione Use this device for
sound input (Utilizar este dispositivo para la entrada de sonido).
4. Salga de la Audio MIDI Setup (Configuración MIDI de audio).
5. Abra el software de grabación que planea utilizar en su ordenador.
6. Abra los ajustes de su software y seleccione M4U USB Microphone como su
entrada de audio.
Base del soporte del micrófono
Abrazadera del soporte del micrófono
Guía de inicio rápido
Manual sobre la seguridad y garantía
Configuración de audio
a continuación para

Verwandte Anleitungen für Marantz M4U

Inhaltszusammenfassung für Marantz M4U
- Seite 1 6. Abra el software de grabación que planea utilizar en su ordenador. 7. Go to your software’s settings and select M4U USB Microphone as your 7. Abra los ajustes de su software y seleccione M4U USB Micrófono como su audio input.
- Seite 2 3. Faite un clic droit sur M4U USB Microphone et sélectionnez Use this device for sound input 3. Fare clic col tasto destro su M4U USB Microphone e selezionare Use this device for sound input (Utiliser ce périphérique pour l'entrée audio).