Herunterladen Diese Seite drucken
Madison MEK 61128 Bedienungsanleitung

Madison MEK 61128 Bedienungsanleitung

Elektronisches übungskeyboard mit 61 tasten

Werbung

Verfügbare Sprachen
  • DE

Verfügbare Sprachen

  • DEUTSCH, seite 11
CLAVIER ELECTRONIQUE D'APPRENTISSAGE A 61 TOUCHES
ELEKTRONISCHES ÜBUNGSKEYBOARD MIT 61 TASTEN
ELEKTRONISCH OEFENTOETSENBORD MET 61 TOETSEN
TECLADO ELETRÓNICO PRÁTICO COM 61 TECLAS
CLAVIATURA ELECTRONICA PENTRU INVATARE CU 61 CLAPE
TECLADO ELECTRONICO DE APRENDIZAJE DE 61 TECLAS
Electric products must not be put into household waste. Please bring them to a recycling centre. Ask your local authorities or your
dealer about the way to proceed.
NOTE IMPORTANTE : Les produits électriques ne doivent pas être mis au rebut avec les ordures ménagères. Veuillez les faire recycler à
un point de collecte spécialisé. Consultez les autorités locales ou votre revendeur sur la façon de les recycler.
WICHTIGER HINWEIS: Elektrogeräte gehören nicht in den Hausmüll. Sie müssen in speziellen Betrieben recycelt werden. Wenden Sie sich hierzu
an die örtlichen Behörden oder Ihren Fachhändler!
De elektrische producten mogen niet naast het huisvuil geplaatst worden. Gelieve deze te laten recycleren daar waar er centra's hiervoor
voorzien is. Raadpleeg de plaatselijke autoriteiten of uw verkoper ivm de manier van recycleren.
Produtos eléctricos não deverão ser postos em contentores de lixo caseiros. Por favor, deposite-os em contentores para reciclagem. Questione
as autoridades locais ou onde adquiriu o produto sobre como deverá proceder.
NOTA IMPORTANTA: produsele electronice nu trebuie aruncate la gunoiul menajer. Acestea trebuie reciclate selectiv, la centrele speciale de
colectare. Pentru informatii contactati autoritatile locale pentru informatii privind procedura de reciclare selectiva.
Los productos eléctricos, no pueden ser tirados a los contenedores normales. Por favor, cuando desee desacerse del equipo, llévelo a un centro
de reciclado. Pregunte a las autoridades locales, como proceder en este caso.
© Copyright Lotronic – 2017
61-KEY ELECTRONIC PRACTICE KEYBOARD
MEK 61128 (15-5007) / MEK61128-PACK (15-5008)
MANUEL DE L'UTILISATEUR
BEDIENUNGSANLEITUNG
GEBRUIKERSHANDLEIDING
MANUAL DE INSTRUÇÕES
MANUAL DE INSTRUCTIUNI
MANUAL DE INSTRUCCIONES
USER MANUAL
MEK61128 Manual
1

Werbung

loading

Inhaltszusammenfassung für Madison MEK 61128

  • Seite 1 ELEKTRONISCHES ÜBUNGSKEYBOARD MIT 61 TASTEN ELEKTRONISCH OEFENTOETSENBORD MET 61 TOETSEN TECLADO ELETRÓNICO PRÁTICO COM 61 TECLAS CLAVIATURA ELECTRONICA PENTRU INVATARE CU 61 CLAPE TECLADO ELECTRONICO DE APRENDIZAJE DE 61 TECLAS MEK 61128 (15-5007) / MEK61128-PACK (15-5008) USER MANUAL MANUEL DE L’UTILISATEUR BEDIENUNGSANLEITUNG GEBRUIKERSHANDLEIDING MANUAL DE INSTRUÇÕES...
  • Seite 2 Precautions Read it carefully before proceeding  Only use the supplied mains adaptor. Change it whenever it shows any wear and tear, or goes wrong.  Don’t disassemble the instrument nor make any change inside of it. In case of any anomalous function, stop using immediately and have it repaired by the qualified maintenance personnel.
  • Seite 3: Led Display

    Rear panel connectors: Connecting an external keyboard amplifier or stereo system Connect the "L OUT R" jacks to the "LINE IN" or "AUX IN' jack on the audio device or amplifier. Connecting headphones Plug in the headphones (not included) with a stereo mini-jack 6.35mm plug to the "STEREO" jack for private listening.
  • Seite 4 TONE SELECTION Choose among 128 realistic sounds from 000 to 127. Before selecting the tone, press the TONE button (28) and then the number of the desired tone via the number buttons. Or browse through the tones via the + and – keys of the number pad.
  • Seite 5 4. Start rhythm synchronization Press SYNC button and the digital dot starts flashing on the display. Press one of the 19 keys from the left to start the rhythm play. You can also press first SYNC and then MULTI- or SINGLE FINGER and then press one of the left- hand 19 keys so that rhythm chords and play are synchronized.
  • Seite 6: Memory Function

    RECORDING & PROGRAMMING 1. Programming Press the PROGRAM button and the programming features are displayed. Press the panel percussion button and play the percussions on the piano keys. You can record up to 32 percussion sounds. When your record is finished, press the PLAY button.
  • Seite 7 Contrôles 1. Haut-parleur 10. Accord à 1 doigt 19. Percussions 28. Sonorité 2. Interrupteur M/A 11. Programmation 20. Toutes les chansons démo 29. Rythme 3. Volume général 12. Arrêt des accords 21. Une chanson démo 30. Intro/End 4. Volume du rythme 13.
  • Seite 8 Préparatifs Mise en place des piles • Le clavier ne fonctionnera pas sur piles lorsqu’un adaptateur secteur est branché. Retirez le capot du compartiment à piles en-dessous du clavier et insérez six piles LR20 de 1.5V (non incluses) dans le compartiment en suivant les indications (+/-) à...
  • Seite 9 METRONOME (14) L’instrument offre 4 battements de métronome : ¼, 2/4, ¾ et 4/4. Appuyez plusieurs fois sur la touche METRONOME ème pour régler dans l’ordre ¼, 2/4, ¾ et 4/4. A la 5 pression, la fonction quitte. Le réglage par défaut est 120. DEMO ALL (20) L’instrument offre 30 morceaux de démonstration allant de «...
  • Seite 10 6. ACCORDS A PLUSIEURS DOIGTS Lorsque le rythme est activé, appuyez sur la touche FINGERED. « Fin » s’affiche. L’accord doigté se fait sur le clavier d’accord selon le tableau ci-après : Pour arrêter l’accompagnement, appuyez sur la touche CHORD OFF. Si vous voulez arrêter l’accompagnement et le rythme, appuyez sur la touche START/STOP.
  • Seite 11 2. ENREGISTREMENT & LECTURE Appuyez sur la touche REC et jouez une mélodie. Vous pouvez enregistrer jusqu’à 92 notes. Appuyez sur la touche PLAY pour écouter l’enregistrement. Pour quitter la fonction d’enregistrement et lecture, appuyez sur les touches REC ou START/STOP. MEMOIRE Si vous souhaitez enregistrer un réglage spécial concernant le tempo, la sonorité, le rythme, les accords ou toute autre information, appuyez sur la touche (23) et une des touches de mémoire (22).
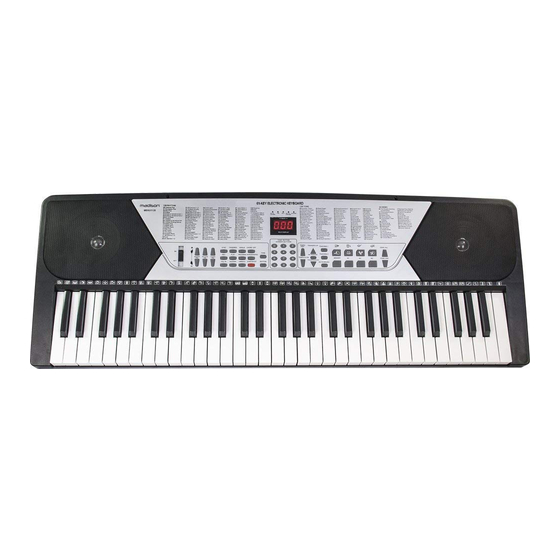
  • Seite 12 1. Lautsprecher 10.Ein-Finger-Akkord 19. Schlaginstrument 28. Klangfarbe 2. EIN/AUS Schalter 11. Programmieren 20. Demo All 29. Rhythmus 3. Hauptlautstärke 12. Akkorde AUS 21. Demo One 30. Intro/End 4. Rhythmusmlautstärke 13. LED Display 22. Speichertasten 31. Start/Stopp 5. Akkordlautstärke 14. Metronom 23.
  • Seite 13 Beim Einschalten des Keyboards erscheint der Wert 000, d.h. Klavierklang. Der Rhythmus ist ab Werk auf 000 eingestellt. Rhythmus, Klangfarbe oder Song wählen. Auf dem LED Display erscheint der eingestellte Rhythmus, Klangfarbe oder Songnummer. Beim Abspielen eines Rhythmus oder Songs blinkt ein Punkt auf dem Display im Takt. POWER Schalter (2) auf ON schieben, um das Keyboard einzuschalten.
  • Seite 14: Automatische Akkorde

    AUTOMATISCHE AKKORDE 1. Rhythmus starten: START/STOP Taste (31) drücken und die Rhythmusbegleitung startet sofort. Der Punkt auf dem Display blinkt regelmäßig. Erneut die START/STOP Taste drücken, um die Rhythmusbegleitung auszuschalten. 2. INTRO / ENDG (30): Wenn kein Rhythmus gewählt ist, die INTRO/ENDING Taste drücken und ein kurzes Stück spielen. Während des Rhythmus die ENTRO/END Taste drücken.
  • Seite 15: Aufnahme & Programmieren

    Die Taste CHORD OFF drücken, um die Begleitung zu beenden. Wenn Sie die Begleitung und den Rhythmus zusammen beenden wollen, die START/STOP Taste drücken. 7. INSERT Im Rhythmusbetrieb auf die Taste FILL-IN drücken. Ein Intermezzo wird automatisch eingeschleift. 8. TEMPO Einstellung Das Tempo ist ab Werk auf 120 Schläge/Min.
  • Seite 16 Waarschuwingen Aandachtig te lezen alvorens in gebruik te nemen Vervang de stroomadapter zodra hij sporen van slijtage of gebrek begint te vertonen Het instrument nooit demonteren, noch de interne delen veranderen. Bij gebrekkige werking steeds een gekwalificeerde technieker raadplegen. Het instrument en de versterker steeds uitschakelen alvorens ze aan te sluiten. Het volume niet gedurende langere periodes op maximum laten staan.
  • Seite 17 Connectors op de achterkant: Aansluiting op een versterker of een audiosysteem Ondanks de aanwezigheid van een interne luidspreker, kan u ook opteren om het toetsenbord aan te sluiten op een versterker of externe luidsprekers. Schakel eerst alle betrokken toestellen uit. Sluit de stereokabel aan op de L/R Uitgang op de achterzijde en op de LINE IN of de AUX IN van de externe uitrusting.
  • Seite 18 De vooraf ingestelde klankkleur is “000” en reproduceert een pianogeluid. De gewenste klankkleur kan ingesteld worden door de numerieke toetsen of de +/- toetsen. VIBRATO (32) Druk op de “VIBRATO” toets om de aangeslagen toetsen een vibrato effect te geven. Druk nogmaals op de toets om het effect te verlaten.
  • Seite 19: Intro / Ending

    2. INTRO / ENDING (30): Als geen ritme geselecteerd is, druk op de INTRO/ENDING toets en speel een kort stuk. Druk op de INTRO/ENDING toets tijdens het ritme. Het ritme stopt, het stuk wordt gespeelt en het ritme wordt verder afgespeeld. 3.
  • Seite 20 7. INSERT Druk tijdens het ritme modus op de “FILL IN” toets. Een tussenspel wordt automatisch ingevoegd. 8. Regeling van het tempo Het vooraf geregelde tempo is 120 slagen per minuut. Druk op de “TEMPO FAST” of “TEMPO SLOW” toets om het ritme te versnellen tot 240 of te vertragen tot 30.
  • Seite 21 CONTROLOS 1. Coluna 10. Acorde simples 19. Percussão 28. Tom 2. ON/OFF 11. Programa 20. Demonstração total 29. RHYTHM 3. Volume geral 12. Desativar acordes 21. Demonstração única 30. Entrada / Fim 4. Volume RHYTHM 13. Visor LED 22. Botões de memória 31.
  • Seite 22 COLOCAR AS PILHAS O leitor não é alimentado com a energia da bateria enquanto o adaptador de corrente estiver ligado. Remova a tampa do compartimento da bateria na parte inferior do teclado e insira seis pilhas LR20 "D" com 1.5V (não incluídas) no compartimento da bateria seguindo as indicações de polaridade (+/-) descritas no compartimento.
  • Seite 23 DEMO DE TODOS OS SONS (20) Prima DEMO ALL para aceder às músicas de demonstração. O visor mostra 000 e a primeira música da lista é reproduzida. Você pode selecionar outra música digitando o número desejado no teclado numérico ou através dos botões + e - no teclado numérico.
  • Seite 24 6. ACORDES MÚLTIPLOS COM ACOMPANHAMENTO AUTOMÁTICO Quando o ritmo ou a reprodução sincronizada estiverem ativados, prima FINGER como indicado abaixo: Para interromper o acompanhamento, prima CHORD OFF. Se quiser interromper o acompanhamento e o ritmo simultaneamente, prima START/STOP. 7. INSERT Durante a reprodução rítmica, se desejar inserir algum interlúdio, prima FILL IN antes de continuar o acompanhamento rítmico.
  • Seite 25 GRAVAR E PROGRAMAR 1. PROGRAMAR Pressione o botão PROGRAM e os recursos de programação são exibidos. Pressione o botão de percussão do painel e reproduza as percussões nas teclas do piano. Você pode gravar até 32 sons de percussão. Quando o registro estiver concluído, pressione o botão PLAY.
  • Seite 26 Control 1. Difuzor 10. Tasta coarda single 19. Percussions 28. Ton 2. Comutator ON/OFF 11. Program 20. Demo All 29. Ritm 3. Volum master 12. Functie OFF corzi 21. Demo One 30. Intro/End 4. Volum ritm 13. Afisaj LED 22. Memory keys 31.
  • Seite 27: Keyboard Percussion

    Pragatiri Conectarea bateriilor • Tastatura nu va functiona pe baterii cand este conectat si alimentatorul. Deschideti capacul bateriilor si introduceti 6 baterii LR20 de 1.5 v (nu sunt incluse) in compartimentul bateriilor, respectand polaritatea corecta. Inchideti capacul compartimentului bateriilor. Nota : Atunci cand tensiunea pe baterii scade, instrumentul nu mai poate functiona normal si bateriile trebuie schimbate.
  • Seite 28 METRONOM (14) Apasati butonul METRONOME pentru a parcurge ciclic urmatoarea secventa: 1/4->2/4->3/4->4/4->OFF. Valoarea implicita este 120. DEMO ALL (20) Apasati butopnul DEMO ALL pentru a accesa melodiile demo. Afisajul va arata 000 si prima melodie va fi redata. Puteti selecta o alta melodie prin introducerea numarului melodiei de la tastatura numerica sau puteti parcurge melodiile prin apasarea pe butoanele + si –.
  • Seite 29 6. ACORDURI CU MAI MULTE DEGETE Cand sunt activate ritmul sau redarea sincronizata, apasati butonul FINGER. Apasati clapele asa cum se arata in figura de mai jos: Pentru a opri acompaniamentul, apasati butonul CHORD OFF. Daca doriti sa opriti simultan acompaniamentul si ritmul, apasati butonul START/STOP.
  • Seite 30 2. INREGISTRARE SI REDARE Apasati butonul REC si redati o melodie. Puteti inregistra pana la 92 note. Apasati butonul PLAY pentru a reda inregistrarea. Pentru a opri inregistrarea si redarea, apasati butonul REC sau START/STOP. MEMORIE Daca doriti sa inregistrati setari speciale cum ar fi viteza, tonul, ritmul, acorduri sau alte informatii, apasati butonul de setare (23) si unul din butoanele MEMORY (22).
  • Seite 31 5. Volumen de los acordes 14. Metrónomo 23. Activación de la memoria 32. Vibrato 6. Grabación 15. Transposer + 24. Percusión teclado 33. Sustain 7. Sync 16. Transposer - 25. Tempo + 34. Fill-in (inserción) 8. Lectura 17. Aprendizaje 1 26.
  • Seite 32 Cuándo enciende el teclado, el valor por defecto que se muestra es 000 que es el sonido del piano. El ritmo está ajustado por defecto en 000. Seleccione el ritmo, la tonalidad o la canción. Se muestra el valor actual de la función. Durante la lectura de un ritmo o de una canción, los puntos en el display parpadean al ritmo de los golpes.
  • Seite 33 estudiante debe tocar las notas correctas. Las manchas pequeñas en la pantalla indican al estudiante para golpear las teclas. En caso de error, la melodía se detendrá hasta que se toca la nota correcta. Apriete en la tecla TEACHING 2 o START/STOP para quitar la función. ACORDES AUTOMATICOS 1.
  • Seite 34 Para parar el acompañamiento, apriete en la tecla CHORD OFF. Si usted desea parar el acompañamiento y el ritmo, apriete en la tecla START/STOP. 7. INSERT Durante el ritmo, apriete en la tecla FILL-IN para insertar un intermedio antes de continuar el acompañamiento. 8.

Diese Anleitung auch für:

Mek61128-pack15-500715-5008