Inhaltsverzeichnis
Werbung
Verfügbare Sprachen
Verfügbare Sprachen
Quicklinks
Werbung
Inhaltsverzeichnis

Inhaltszusammenfassung für Kasanova KGS000001NOC
- Seite 1 MANUALE DI ISTRUZIONI INSTRUCTIONS MANUAL • BEDIENUNGSANLEITUNG • MANUEL D’INSTRUCTION • MANUAL DE INSTRUCCIONES STERILIZZATORE UV UV STERILIZER BOX • UV-DESINFEKTIONSGERÄT STÉRILISATEUR UV • ESTERILIZADOR UV KGS000001NOC...
-
Seite 2: Posizione Dei Comandi
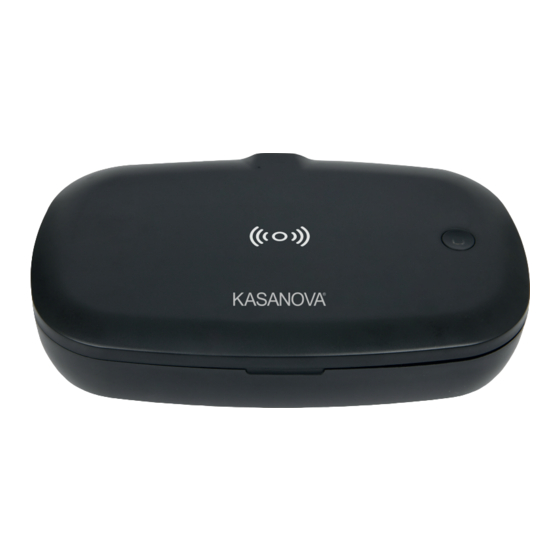
STERILIZZATORE UV Posizione dei comandi Indicatore LED Porta USB-C Coperchio (ricarica wireless) Indicatore LED Retro Fronte Pad di ricarica wireless Tasto [di accensione]: Premere 1 volta: Sterilizzazione profonda (5min) COLLEGAMENTO ALL’ALIMENTAZIONE 1. Posizionare lo sterilizzatore a raggi UV su una superficie piana, rigida e stabile. 2. - Seite 3 STERILIZZATORE UV * Premere una volta il pulsante di accensione per avviare la modalità di sterilizzazione profonda. * Una volta attivata la modalità di sterilizzazione profonda, l’indicatore LED sul coperchio dello sterilizzatore diventerà BLU, il che significa che per i successivi 5 minuti è attiva la sterilizzazio- ne del dispositivo inserito.
- Seite 4 STERILIZZATORE UV *Se lo smartphone non si ricarica, riposizionarlo sul pad di ricarica: potrebbe essere necessario rimuovere la cover del proprio smartphone per caricarlo correttamente. NOTA SULLE MISURE DI SICUREZZA *Nel caso scatti la protezione da sovratemperatura o quando si posiziona sul pad di ricarica un oggetto metallico come una moneta o simile, l’indicatore LED lampeggerà...
- Seite 5 STERILIZZATORE UV NOTES...
-
Seite 6: Location Of Controls
UV STERILIZER BOX Location of controls CONNECTING TO POWER 1. Place the UV Sterilizer Box on a flat, solid, stable surface. 2. Plug the small connector of the included USB power cable into the power port on the back of the sterilizer. - Seite 7 UV STERILIZER BOX * Press the power button once to deep sterilize. * When deep sterilize mode is activated, the LED indicator on the lid of the sterilizer will turn BLUE, and it will sterilize for the next 5 minutes. When it is finished, the LED indicator will flash BLUE 3 times then turn off.
- Seite 8 UV STERILIZER BOX * If your device does not begin to charge, try to reposition your device on the charging pad, and you may need to remove your smart phone case to charge properly. NOTE ON THE SAFETY FEATURES *When it is over-temperature protection or when a metal object such as a coin is placed on the charging pad and so on, the LED indicator will flash RED and BLUE.
- Seite 9 UV STERILIZER BOX NOTES...
-
Seite 10: Anordnung Der Schaltelemente
UV-DESINFEKTIONSGERÄT Anordnung der Schaltelemente LED-Anzeige USB-C Deckel (Drahtloses Aufladen) Anschlussbuchse LED-Anzeige Rückseite Vorderseite Drahtloses Ladepad [Power]-Taste: Einmal Drücken: Desinfektion (5 min) NETZANSCHLUSS 1. UV-Desinfektionsgerät auf eine ebene, feste und stabile Oberfläche legen. 2. Kleinen Stecker des USB-Kabels im Lieferumfang in die USB-Buchse auf der Rückseite des Desinfektionsgeräts stecken. - Seite 11 UV-DESINFEKTIONSGERÄT * Einmal auf die Einschalttaste drücken, um die gründliche Desinfektion zu starten. * Nach dem Einschalten des Desinfektionsbetriebs wird die LED-Anzeige auf dem Deckel BLAU, dies bedeutet, dass die Desinfektion des hineingelegten Geräts für die folgenden 5 Minuten läuft. Am Ende des Vorgangs blinkt die LED-Anzeige 3-mal BLAU und erlischt anschließend.
-
Seite 12: Gebrauch Des Drahtlosen Ladegeräts
UV-DESINFEKTIONSGERÄT GEBRAUCH DES DRAHTLOSEN LADEGERÄTS 1. An das Netz anschließen, wenn die LED-Anzeige auf der Rückseite dreimal ROT und BLAU blinkt, um dann im Standby ROT zu leuchten. 2. Smartphone auf den Deckel des Desinfektionsgeräts legen. 3. Die LED-Anzeige auf der Rückseite wird BLAU, um anzuzeigen, dass das Smartphone sich korrekt auflädt. - Seite 13 UV-DESINFEKTIONSGERÄT NOTES...
-
Seite 14: Emplacement Des Commandes
STÉRILISATEUR UV Emplacement des commandes Voyant LED Port USB Couvercle (recharge sans fil) Type-C Indicateur LED Arrière Avant Socle de chargement sans fil Bouton [marche/arrêt]: 1 pression: Stérilisation en profondeur (5min) RACCORDEMENT À L’ALIMENTATION 1. Posez le stérilisateur UV sur une surface plane, solide et stable. 2. - Seite 15 STÉRILISATEUR UV * Appuyez une fois sur le bouton marche/arrêt pour stériliser l’appareil en profondeur. * Lors de la stérilisation en profondeur, l’indicateur LED sur le couvercle du stérilisateur devient BLEU, ce qui revient à dire que l’appareil stérilisera le dispositif à son intérieur dans approxima- tivement 5 minutes.
- Seite 16 STÉRILISATEUR UV FONCTIONNEMENT DE LA RECHARGE SANS FIL 1. Branchez l’appareil, le voyant LED à l’arrière du dispositif clignotera en ROUGE et en BLEU pour 3 fois, après il deviendra ROUGE s’il est en mode veille. 2. Posez votre smartphone sur le couvercle du stérilisateur. 3.
- Seite 17 STÉRILISATEUR UV NOTES...
-
Seite 18: Ubicación De Los Controles
ESTERILIZADOR UV Ubicación de los controles Indicador LED Puerto de alimentación Tapa (Carga inalámbrica) USB tipo C Indicador LED Parte posterior Frente Base de carga inalámbrica Tecla de [encendido]: Presionar 1 vez: Esterilización profunda (5m) CONEXIÓN A LA FUENTE DE ALIMENTACIÓN 1. - Seite 19 ESTERILIZADOR UV * Presione una vez la tecla de encendido para iniciar el modo de esterilización profunda. * Una vez activado el modo de esterilización profunda, el indicador LED de la tapa del esteriliza- dor se pondrá AZUL, lo que significa que la esterilización del dispositivo introducido estará activa durante los próximos 5 minutos.
- Seite 20 ESTERILIZADOR UV USO DEL CARGADOR INALÁMBRICO 1. Conéctelo a la toma de corriente, el indicador LED ubicado en la parte posterior del dispositivo parpadeará tres veces en ROJO y AZUL, y luego quedará encendido en ROJO mientras esté en espera. 2.
- Seite 21 ESTERILIZADOR UV NOTES...
- Seite 22 Manuale d’Istruzione - Instructions manual Importato da/imported by/importiert aus/importé de/importado de: KASANOVA S.p.A. Viale Monterosa 91 - 20862 Arcore (MB) MADE IN P.R.C.