Herunterladen Inhalt Inhalt Diese Seite drucken

Werbung

Verfügbare Sprachen
  • DE

Verfügbare Sprachen

  • DEUTSCH, seite 13
Quick Start Guide
Doorbell Wired - DB11
www.imoulife.com

Werbung

Inhaltsverzeichnis
loading

Inhaltszusammenfassung für IMOU DB11

  • Seite 1 Quick Start Guide Doorbell Wired - DB11 www.imoulife.com...
  • Seite 2 Welcome Thank you for choosing IMOU. We are devoted to providing you easy smart home products. If you have problems using the product, please contact our service team before returning your product. Our service mail: service.global@imoulife.com Frequently asked questions can be found at...
  • Seite 3: Packing List

    Packing List Video Doorbell x1 Screwdriver x1 Chime Kit x1 Quick Start Guide x1 Screw Door Frame Power Port Wire Caps x3 Package x1 Screws x3 Screws x2 Doorbell Cable x2 Chime Cables x2...
  • Seite 4: Product Overview

    Product Overview Front Panel Rear Panel Screw Hole Front Panel Micro-SD Card Slot Detection Camera Reset Button IR Light Power Loudspeaker Input Port Indicator Call Button Light Microphone Behavior During Setup After Setup Blue Spinning Hotspot active Calling Blue Solid Power on Talking Blue Flashing...
  • Seite 5 Preparation Before beginning setup, there are some essential preparations to make. • Turn o the power Running to your existing doorbell and chime box at the breaker. • Remove your existing doorbell and disconnect wiring. Tips Bend the power cables so they do not fall through the hole in the wall. Remove the metal mounting plate from the back of the doorbell.
  • Seite 6 installing on brick installing on a metal door Note: For both installations, ensure the power cables from the wall t comfortably thtougl the hole in the mounting bracet.
  • Seite 7 Add Doorbell to Imou Life App Imou Life Windows Tips To ensure the best possible wireless performance, please make sure there are no obstacles and electromagnetic interference between the Doorbell and router.
  • Seite 8 Setup Setup WIFI Name Password Next Done Wiring the doorbell Next, you will complete the wiring for your new doorbell.
  • Seite 9 Note: If the power cables in the wall are not long enough, use the optional power cable connectors and wire caps. Ensure there is enough space to t the cable connetors and wire caps into the hole in your wall or dor frame. 12V1A...
  • Seite 10: Troubleshooting

    Troubleshooting Question Answer • Please con rm whether power voltage of the device The device cannot is normal, and whether power cable is well boot up? connected. • The device, mobile phone and router are too far away. Please put them within 30cm (12 inches) Connection is overtime? when con guring.
  • Seite 11 Safety Tips and Warnings The following description is the correct application method of the device.Please read the manual carefully before use, in order to prevent danger and property loss. Strictly conform to the manual during application and keep it properly after reading. Caution •...
  • Seite 12 Kurzanleitung Doorbell Wired - DB11 www.imoulife.com...
  • Seite 13 Willkommen Vielen Dank, dass Sie sich für IMOU entschieden haben. Wir sind bestrebt, einfachere Produkte für das intelligente Heim anzubieten. Wenn Sie Probleme bei der Verwendung des Produkts haben, wenden Sie sich bitte an unser Serviceteam. Unsere Service- Mail lautet: service.global@imoulife.com Häu g gestellte Fragen nden Sie unter...
  • Seite 14 Packungsinhalt Video- Gong- Schraubendreher x1 Kurzanleitung ×1 Türklingel x1 Kit x1 Schrauben und Türrahmen- Stromversorgungs- Kabelverbinder x3 Dübel ×1 Schrauben x3 Anschlussschrauben x2 Türklingelkabel x2 Gong-Kabel x2...
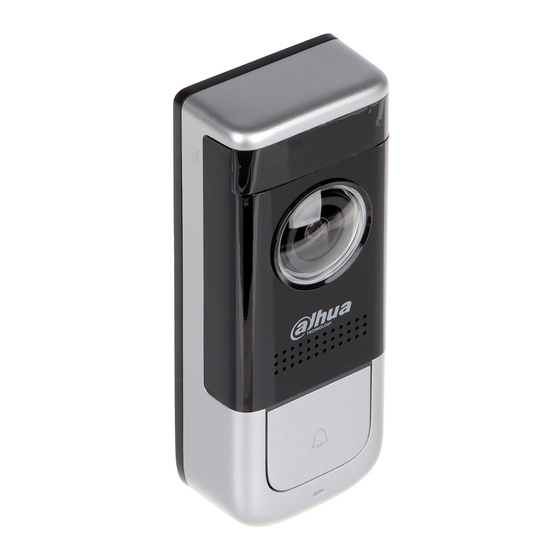
  • Seite 15 Produktübersicht Frontblende Geräterückseite Schraubloch Frontblende PIR- MicroSD- Erkennung Kartensteckplatz Kamera Rücksetztaste IR-LED Stromanschluss Lautsprecher Klingelknopf Mikrofon Verhalten Während der Einrichtung Nach der Einrichtung Rotiert blau Hotspot aktiv Telefonieren Leuchtet blau Einschalten Sprechen Blinkt blau Bereit zur Einrichtung Netzwerk anormal...
  • Seite 16: Montageplatte Befestigen

    Vorbereitung Bevor mit der Einrichtung begonnen werden kann, sind einige wesentliche Vorbereitungen zu tre en. • Schalten Sie die Stromversorgung Ihrer vorhandenen Türklingel und des Gongs an der Sicherung aus. • Entfernen Sie Ihre vorhandene Türklingel und trennen Sie die Verkabelung. Tips Biegen Sie die Stromkabel so, dass sie nicht durch das Loch in der Wand fallen.
  • Seite 17 Montage auf Ziegelsteinwand Montage auf Metalltür Hinweis: Für beide Installationen ist sicherzustellen, dass die Stromkabel von der Wand bequem durch das Loch in der Montagehalterung passen.
  • Seite 18: Türklingel Zur Imou Life-App Hinzufügen

    Türklingel zur Imou Life-App hinzufügen Imou Life Windows Tips Um die bestmögliche drahtlose Leistung zu gewährleisten, stellen Sie sicher, dass keineHindernisse und elektromagnetischen Interferenzen zwischen Türklingel und Router vorhanden sind.
  • Seite 19: Türklingel Anschließen

    Setup Setup WIFI Name Password Next Done Türklingel anschließen Als nächstes schließen Sie die Kabel für Ihre neue Türklingel an.
  • Seite 20 Hinweis: Wenn die Stromkabel in der Wand nicht lang genug sind, verwenden Sie die optionalen Kabelverbinder. Achten Sie darauf, dass genügend Platz vorhanden ist, um die Kabelverbinder durch das Loch in Ihrer Wand oder im Türrahmen zu führen. 12V1A...
  • Seite 21: Fehlerbehebung

    Fehlerbehebung Frage Antwort • Überprüfen Sie, ob die Versorgungsspannung des Das Gerät kann nicht neu Geräts normal ist und ob das Versorgungskabel starten? korrekt angeschlossen wurde. • Gerät, Mobiltelefon und Router sind zu weit voneinander entfernt. Halten Sie sie bei der Was kann ich tun, wenn Kon guration höchstens 30 cm voneinander entfernt.
  • Seite 22: Sicherheitshinweise

    Sicherheitshinweise Verwenden Sie das Gerät nur wie beschrieben. Lesen Sie die Bedienungsanleitung vor Gebrauch sorgfältig durch, um Gefahren und Schäden zu vermeiden. Halten Sie sich während des Gebrauchs strikt an das Handbuch und bewahren Sie es für späteres Nachschlagen auf. Vorsicht •...
  • Seite 23: Guía De Inicio Rápido

    Guía de inicio rápido Doorbell Wired - DB11 www.imoulife.com...
  • Seite 24 Bienvenido Gracias por elegir IMOU Nuestra misión es proporcionar productos fáciles de usar para un hogar inteligente. Si tiene problemas usando el producto, por favor diríjase a nuestro equipo de atención al cliente antes de devolver su producto. Nuestro correo electrónico de servicio: service.global@imoulife.com...
  • Seite 25 Presentación de la cámara videoportero juego de Guía de inicio destornillador x1 inteligente x1 timbre x1 rápido ×1 tornillos para el Bolsa con tornillos para marco puerto terminales x3 tornillos ×1 de puerta x3 de alimentación x2 cables de telefonillo x2 cables de timbre x2...
  • Seite 26: Visión General Del Producto

    Visión general del producto Panel frontal Panel trasero Ori cio de tornillo Panel frontal Detección Ranura para por infrarrojos tarjeta Micro SD pasivos(PIR) Cámara Botón de reinicio Luz IR Puerto de entrada Altavoz de alimentación indicadora Botón de llamada Micrófono Comportamiento Durante la instalación Después de la instalación...
  • Seite 27 Preparación Antes de comenzar la con guración, se deben realizar algunos preparativos. • Apague la alimentación del telefonillo actual y de la caja de timbre a través del disyuntor. • Retire su telefonillo actual y desconecte el cableado. Tips Doble los cables de alimentación para que no se caigan por el hueco de la pared. Retire la placa de montaje de metal de la parte posterior del telefonillo.
  • Seite 28 Instalar en ladrillo Instalar en una puerta de metal Nota: Para ambas instalaciones, asegúrese de que los cables de alimentación de la pared pasen con facilidad a través del ori cio del soporte de montaje.
  • Seite 29 Agregar telefonillo a la aplicación Imou Life Imou Life Windows Tips Para garantizar el mejor rendimiento inalámbrico posible, asegúrese de que no haya obstáculos ni interferencias electromagnéticas entre el telefonillo y el router.
  • Seite 30 Setup Setup WIFI Name Password Next Done Realizar el cableado del telefonillo A continuación, completará el cableado de su nuevo telefonillo.
  • Seite 31 Nota: Si los cables de alimentación de la pared no son lo su cientemente largos, utilice los conectores y terminales de cables opcionales. Asegúrese de que haya su ciente espacio para colocar los conectores y terminales de los cables en el ori cio de la pared o el marco de la puerta. 12V1A...
  • Seite 32: Solución De Problemas

    Solución de problemas Pregunta espuesta • Con rme si el voltaje de alimentación del ¿El dispositivo no puede dispositivo es normal y si el cable de alimentación arrancar? está bien conectado. • El dispositivo, el teléfono móvil y el router están demasiado lejos.
  • Seite 33: Consejos Y Advertencias De Seguridad

    Consejos y advertencias de seguridad La siguiente descripción es el método de aplicación correcto del dispositivo. Lea el manual detenidamente antes de usarlo para evitar peligros y pérdida de propiedad. Cumpla estrictamente con el manual durante la aplicación y guárdelo correctamente después de leerlo. Precaución •...
  • Seite 34: Guide De Démarrage Rapide

    Guide de démarrage rapide Doorbell Wired - DB11 www.imoulife.com...
  • Seite 35 Bienvenue Merci d’avoir choisi IMOU. Nous nous consacrons à fournir des produits pour la maison intelligente plus faciles à utiliser. Si vous rencontrez des di cultés lors de l’utilisation du produit, veuillez contacter notre équipe technique avant de renvoyer votre produit.
  • Seite 36 Contenu de l’emballage Guide de démarrage sonnette vidéo x1 tournevis x1 kit carillon x1 rapide ×1 vis de cadre de vis du port capuchons de Paquet de vis ×1 porte x3 d’alimentation x2 câbles x3 câbles de sonnette x2 câbles de carillon x2...
  • Seite 37: Présentation Du Produit

    Présentation du Produit Panneau frontal Panneau arrière Trou de vissage Panneau frontal Détection Emplacement de carte micro-SD Bouton de Caméra réinitialisation LED IR Port d’entrée Haut- d’alimentation parleur Voyant d’état Bouton d’appel Microphone Comportement Pendant l'installation Après l’installation Bleu rotatif Hotspot actif Appel en cours Bleu fixe...
  • Seite 38 Préparation Avant de commencer l’installation, certains préparatifs essentiels doivent être e ectués. • Coupez l’alimentation de votre sonnette existante et de votre carillon au disjoncteur. • Retirez votre sonnette existante et déconnectez le câblage. Tips Pliez les câbles d’alimentation pour qu’ils ne tombent pas à travers le trou dans le mur. Retirez la plaque de montage métallique à...
  • Seite 39 Installation sur de la brique Installation sur une porte métallique Remarque: Pour les deux installations, assurez-vous que les câbles d’alimentation du mur s’insèrent aisément dans le trou du support de montage.
  • Seite 40 Ajouter une sonnette à l’application Imou Life Imou Life Windows Tips Pour garantir les meilleures performances sans l possibles, veuillez vous assurer qu’il n’y a pas d’obstacles ni d’interférences électromagnétiques entre la sonnette et le routeur.
  • Seite 41 Setup Setup WIFI Name Password Next Done Câblage de la sonnette Ensuite, vous réaliserez le câblage de votre nouvelle sonnette...
  • Seite 42 Remarque: Si les câbles d’alimentation dans le mur ne sont pas assez longs, utilisez les connecteurs de câble d’alimentation et les capuchons de câbles en option. Assurez-vous qu’il y a su samment d’espace pour insérer les connecteurs de câble et les capuchons de câbles dans le trou du mur ou du cadre de porte.
  • Seite 43 Fehlerbehebung Question Réponse • Véri ez si la tension d’alimentation de l’appareil est Échec de l’amorçage de normale et si le câble d’alimentation est bien l’appareil connecté. • L’appareil, le téléphone portable et le routeur sont trop éloignés. Veuillez les positionner à moins de 30 cm lors de la con guration.
  • Seite 44 Astuces de sécurité et mises en garde La description ci-dessous constitue la méthode d’utilisation appropriée de cet appareil. Par mesure de précaution contre tout danger et perte matérielle, veuillez lire attentivement ce manuel avant toute utilisation de l’appareil. Veuillez vous conformer strictement aux instructions contenues dans ce manuel pendant l’utilisation de l’appareil et conserver correctement le document après lecture.
  • Seite 45: Guida Rapida

    Guida Rapida Doorbell Wired - DB11 www.imoulife.com...
  • Seite 46 Benvenuti Grazie per aver scelto IMOU. Il nostro obiettivo è quello di fornire prodotti per la domotica più facili da utilizzare. In caso di problemi durante l’utilizzo del prodotto, si prega di contattare il nostro team di assistenza prima di restituire il prodotto.
  • Seite 47: Contenuto Della Confezione

    Contenuto della confezione videocitofono x1 cacciavite x1 citofono x1 Snelstarthandleiding ×1 viti per il viti per gli ingressi Kit di viti ×1 morsetti x3 supporto x3 di corrente x2 cavi per il citofono x2 cavi per il campanello x2...
  • Seite 48: Panoramica Del Prodotto

    Panoramica del prodotto Pannello anteriore Pannello posteriore Foro per la vite Pannello anteriore Sensore di Slot per scheda movimento PIR micro-SD Telecamera Pulsante di reset Luce IR Porta di Altoparlante alimentazione Indicatore luminoso Pulsante di chiamata Microfono Stato Durante la con gurazione Dopo la con gurazione Blu rotante Hotspot attivo...
  • Seite 49 Preparazione Prima di iniziare la con gurazione, è necessario compiere alcune operazioni preliminari. • Spegnere l’interruttore principale della corrente che alimenta il vecchio citofono e il campanello. • Rimuovere il citofono e scollegarne i cavi. Tips Piegare i cavi in modo che non ricadano all’interno del foro nel muro. Rimuovere la piastra di montaggio di metallo dalla parte posteriore del citofono.
  • Seite 50 Installazione su mattoni Installazione su porta metallica Nota: in entrambi i tipi di installazione, veri care che i cavi di alimentazione a muro passino bene dal foro nella sta a di montaggio.
  • Seite 51 Aggiunta del videocitofono all’app Imou Life Imou Life Windows Tips Per garantire le migliori prestazioni del collegamento wireless, assicurarsi che non vi siano ostacoli o interferenze magnetiche fra il videocitofono e il router.
  • Seite 52 Setup Setup Setup Setup WIFI Name WIFI Name Password Password Next Next Done Done Cablaggio del videocitofono Cablaggio del videocitofono A questo punto, è necessario collegare i cavi del videocitofono. A questo punto, è necessario collegare i cavi del videocitofono.
  • Seite 53 Nota: se i cavi di alimentazione a muro non sono abbastanza lunghi, usare i cavi di alimentazione opzionali con i relativi morsetti. Accertarsi che nel foro all’interno del muro o del telaio della porta vi sia uno spazio su ciente a contenere i cavi aggiuntivi e i morsetti. 12V1A...
  • Seite 54: Risoluzione Dei Problemi

    Risoluzione dei problemi Domanda Risposta • Veri care che la tensione della corrente del Il dispositivo non si dispositivo sia normale e che il cavo di alimentazione riavvia. sia collegato bene. • Il dispositivo, il telefono cellulare e il router sono troppo distanti.
  • Seite 55 Suggerimenti e avvisi sulla sicurezza Quanto segue indica il metodo di applicazione corretto del dispositivo. Leggere attentamente il manuale prima dell’uso, per evitare pericoli e danni alle proprietà. Attenersi strettamente al manuale durante l’applicazione e conservarlo dopo la lettura. Attenzione •...
  • Seite 56 Snelstartgids Doorbell Wired - DB11 www.imoulife.com...
  • Seite 57 Welkom Bedankt dat u voor Imou heeft gekozen. Onze toewijding is om u eenvoudige Smart Home producten te bieden. Als u problemen ervaart met het gebruik van uw product, neem dan eerst contact op met onze service team: service.global@imoulife.com...
  • Seite 58: Inhoud Verpakking

    Inhoud verpakking videodeurbel x1 Snel Lasdop x3 Voedingsaansluitingschroef x2 startgids x 1 Deurkozijnschroef x3 Schroevenset ×1 Binnendeurbelkit x1 Schroevendraaier x1 Deurbelkabel x2 Binnendeurbelkabel x2...
  • Seite 59 Productoverzicht Voorpaneel Achterpaneel Schroefgat Voorpaneel MicroSD- PIR-Detectie kaartsleuf Camera Reset-Knop Infrarood-Licht Stroomaansluiting Luidspreker Indicatorlampje Bel knop Microfoon Weergave Tijdens installatie Na installatie Draaiend blauw Hotspot attivo Oproepen Constant blauw Stroom ingeschakeld Spreken Knippert blauw Klaar voor installatie Abnormaal netwerk...
  • Seite 60 Voorbereiding Voor dat u begint met de installatie moet u een aantal essentiële voorbereidingen tre en. • Schakel de stroom uit die naar uw bestaande deurbel loopt en de binnendeurbel in de meterkast. • Verwijder uw bestaande deurbel en koppel de draden los. Tips Buig de draden zodat ze niet in het gat in de muur vallen.
  • Seite 61 Installeren op steen Installatie op een metalen deur Opmerking: Zorg in beide situaties ervoor dat de draden uit de muur gemakkelijk door het gat in de montageplaat passen.
  • Seite 62 Deurbel toevoegen aan de Imou Life-app Imou Life Windows Tips Obstakels en elektromagnetische velden kunnen de connectie tussen uw router en uw deurbel verminderen. Zorg ervoor dat het WiFi signaal sterk genoeg is op de plek waar u, uw Imou deurbel installeert.
  • Seite 63 Setup Setup WIFI Name Password Next Done De deurbel bedraden Vervolgens voltooit u de bedrading voor uw nieuwe deurbel.
  • Seite 64 Opmerking: Gebruik de draadconnectoren en lasdoppen als de draden in de wand niet lang genoeg zijn. Zorg ervoor dat er voldoende ruimte is om de draadconnectoren en lasdoppen in het gat in uw muur of deurkozijn te plaatsen. 12V1A...
  • Seite 65: Probleemoplossing

    Probleemoplossing Vraag Antwoord • Controleer of de voedingsspanning van het apparaat Wil het apparaat niet normaal is en of de draden goed zijn aangesloten. opstarten? • Het apparaat, de mobiele telefoon en de router staan te ver uit elkaar. Plaats ze bij het con gureren binnen 30 cm.
  • Seite 66 Veiligheidstips en Waarschuwingen De volgende beschrijving geeft de juiste applicatiemethode van het apparaat. Lees voor gebruik de handleiding zorgvuldig door, om gevaar en materiële schade te voorkomen. Houd u strikt aan de handleiding tijdens het gebruik en bewaar deze zorgvuldig na het lezen. Let op •...
  • Seite 67: Guia Rápido

    Guia rápido Doorbell Wired - DB11 www.imoulife.com...
  • Seite 68 Bem-vindo Obrigado por escolher a IMOU. Estamos empenhados em fornecer produtos inteligentes e simpli cados para o lar. Se tiver problemas ao utilizar o produto, contacte a nossa equipa de assistência antes de devolver o produto. O nosso e-mail de assistência: service.global@imoulife.com...
  • Seite 69: Conteúdo Da Embalagem

    Conteúdo da embalagem Campainha com Guia de início Chave de fendas x1 Kit de sineta x1 vídeo x1 rápido x 1 Parafusos para Conjunto de Parafusos para porta ombreira Tampas de cabos x3 parafusos ×1 de alimentação x2 de porta x3 Cabo de campainha x2 Cabos de sineta x2...
  • Seite 70: Descrição Geral Do Produto

    Descrição geral do produto Painel traseiro Painel dianteiro Orifício de parafuso Painel dianteiro Deteção PIR Ranhura para cartão micro SD Câmara Botão "Repor" Luz IV Porta de entrada Altifalante de alimentação indicadora Botão Call Microfone Comportamento Durante a con guração Após a con guração Girar a azul Hotspot ativo...
  • Seite 71 Preparação Antes de iniciar a con guração, terá de fazer alguns preparativos essenciais. • Desligue a alimentação da campainha existente e a caixa da sineta no disjuntor. • Remova a campainha existente e desligue a cablagem. Tips Dobre os cabos de alimentação de forma a não caírem pelo orifício na parede. Remova a chapa de montagem metálica da parte traseira da campainha.
  • Seite 72 Instalação em tijolo Instalação em porta metálica Nota: para ambas as instalações, certi que-se de que os cabos de alimentação encaixam confortavelmente no orifício do suporte de montagem.
  • Seite 73 Adicione a campainha à aplicação Imou Life Imou Life Windows Tips Para garantir o melhor desempenho sem os, certi que-se de que não existem obstáculos e interferência eletromagnética entre a campainha e o router.
  • Seite 74 Setup Setup WIFI Name Password Next Done Instale a cablagem da campainha Em seguida, irá concluir a cablagem da sua campainha nova.
  • Seite 75 Nota: Se os cabos de alimentação na parede não forem su cientemente compridos, utilize os conectores do cabo de alimentação e tampas de cabos opcionais. Certi que-se de que existe espaço su ciente para encaixar os conectores do cabo e as tampas dos cabos no orifício na sua parede ou ombreira da porta.
  • Seite 76 Solução de problema Pergunta Resposta • Con rme se a tensão de alimentação do dispositivo O dispositivo não se encontra no estado normal, e se o cabo de consegue arrancar. alimentação está bem ligado. • O dispositivo, telemóvel e router estão demasiado afastados.
  • Seite 77 Dicas e avisos de segurança A descrição seguinte consiste no método de aplicação correto do dispositivo. Leia o manual atentamente antes da utilização a m de prevenir possíveis riscos e danos materiais. Siga estritamente o manual durante a aplicação e guarde-o após a leitura. Atenção •...
  • Seite 78 @imouglobal service.global@imoulife.com www.imoulife.com...

Inhaltsverzeichnis