helvi DIGICAR 540E Bedienungsanleitung
Digitales batterieladegerät mit starthilfe
Inhaltsverzeichnis
Verfügbare Sprachen
Verfügbare Sprachen
Quicklinks
EN
EN
IT
IT
D
D
INSTRUCTIONS MANUAL
INSTRUCTIONS MANUAL
MANUALE D'ISTRUZIONE
MANUALE D'ISTRUZIONE
BEDIENUNGSANLEITUNG
BEDIENUNGSANLEITUNG
DIGITAL BATTERY CHARGER AND STARTER
CARICA BATTERIE E AVVIATORE DIGITALE
CARICA BATTERIE E AVVIATORE DIGITALE
DIGITALES BATTERIELADEGERÄT
MIT STARTHILFE
DIGICAR 540E
DIGICAR 540E
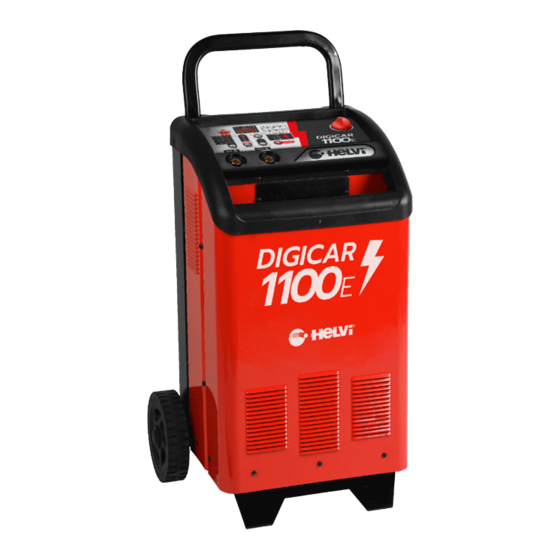
DIGICAR 1100E
DIGICAR 1100E
Inhaltsverzeichnis

Inhaltszusammenfassung für helvi DIGICAR 540E
- Seite 1 INSTRUCTIONS MANUAL INSTRUCTIONS MANUAL MANUALE D’ISTRUZIONE MANUALE D’ISTRUZIONE BEDIENUNGSANLEITUNG BEDIENUNGSANLEITUNG DIGITAL BATTERY CHARGER AND STARTER CARICA BATTERIE E AVVIATORE DIGITALE CARICA BATTERIE E AVVIATORE DIGITALE DIGITALES BATTERIELADEGERÄT MIT STARTHILFE DIGICAR 540E DIGICAR 540E DIGICAR 1100E DIGICAR 1100E...
- Seite 2 INDEX IT IT SAFETY RULES AND WARNINGS EN-1 AVVERTENZE SICUREZZA IT-1 GENERAL INFORMATION ON THE INFORMAZIONI GENERALI SUL BATTERY CHARGER EN-1 CARICA BATTERIE IT-1 INSTALLATION EN-2 INSTALLAZIONE IT-2 ASSEMBLING - HANDLE AND WHEELS EN-2 ASSEMBLAGGIO - MANICO E RUOTE IT-2 LOCATION EN-2 COLLOCAZIONE...
- Seite 3 SICHERHEITSANWEISUNGEN UND WARNUNGEN ALLGEMEINE INFORMATIONEN ZUM BATTERIELADEGERÄT INSTALLATION MONTAGE - GRIFF UND RÄDER EINSATZORT NETZANSCHLUSS INSTALLATIONSEMPFEHLUNGEN GERÄTFUNKTIONEN UND ANSCHLUSS INBETRIEBNAHME DES BATTERIELADEGERÄTES ZWANGSLADUNG GLEICHZEITIGES AUFLADEN VON MEHREREN BATTERIEN BETRIEB ALS BOOST STARTER SPANNUNGSTABILISIERUNGSFUNKTION D-6 FEHLERDIAGNOSE` WARTUNG UND PFLEGE...
-
Seite 17: Sicherheitsanweisungen Und Warnungen
WARNUNG! VOR DER INSTALLATION, INBETRIEBNAHME ODER WARTUNG DES BATTERIELADE- GERÄTS SOLLTEN SIE DIE ANWEISUNGEN DIESER GEBRAUCHSANWEISUNG SORGFÄLTIG LESEN UND BESONDERS DIE SICHERHEITSRICHTLINIEN BEACHTEN. Sollten Ihnen Teile dieser Gebrauchsanweisung unklar sein, wenden Sie sich bitte an Ihren Händler. HERZLICHEN GLÜCKWUNSCH ZU IHREM ERWERB! SIE SIND NUN IM BESITZ EINES DER SICHERSTEN UND TECHNOLOGISCH FORTGESCHRITTENSTEN BATTERIELADE- GERÄTE AUF DEM MARKT. - Seite 18 Das Batterie-Ladegerät bietet eine einfache Mögli- Um das Leben Ihrer Batterie zu verlängern, chkeit, den Ladestrom einzustellen, indem einfach empfiehlt es sich, die Batterie langsam mit die entsprechende Ladestufe entsprechend der (niedrigen Stromstärken) aufzuladen, um ein Akkukapazität eingestellt wird. Diese Ladeart ist als Überhitzen zu vermeiden.
-
Seite 19: Gerätfunktionen Und Anschluss
GERÄTFUNKTIONEN UND ANSCHLUSS FUNCTIONS 1617 Abbildung 1 - Kontrollpanel 12V / 24V positiver Stecker • Liquid Hauptschalter Batterieart LEDs zur Anzeige der gewählten Ladung / Boost Wahlumschalter Batterieart Ladestufe- / Boost-LED Timer zur Einstellung der Ladezeit Display Start/Stop-Taste zum Starten / Stoppen eines •... - Seite 20 Tabellen, die Sie auch auf dem • DRÜCKEN SIE DEN SCHALTER 11 FÜR 2 PANTONE Gerät finden, als Referenz: SEKUNDEN, UM DEN LADEVORGANG DIGICAR 540E ZU BESTÄTIGEN. Die entsprechende LED ch. Charging range 12 leuchtet auf. WHITE BATTERY CHARGING CHARGING •...
- Seite 21 müssen, so können diese parallel oder in Serie G L E I C H Z E I T I G E S A U F L A D E N V O N gesteckt werden. Das Verbinden in Serienschaltung MEHREREN BATTERIEN ist zu empfehlen, da dabei die fließende Stromstärke in jeder Batterie überwacht werden kann und der Warnung: Laden Sie keine Batterien mit unter-...
-
Seite 22: Spannungstabilisierungsfunktion
SPANNUNGSTABILISIERUNGSFUNKTION • Verbinden Sie die rote Klemme mit der posi- (achten Sie darauf, die Polarität der An- tiven Elektrode der Batterie. schlüsse nicht umzukehren, um das Batteri- • Verbinden Sie die schwarze Klemme mit der eladegerät nicht zu beschädigen). negativen Elektrode der Batterie. •... - Seite 23 SMALTIMENTO DI APPARECCHI DA ROTTAMARE DA PARTE DI PRIVATI NELL’UNIONE EUROPEA Questo simbolo che appare sul prodotto o sulla confezione indica che il prodotto non deve essere smaltito assieme agli altri rifiuti domesti- ci. Gli utenti devono provvedere allo smaltimento delle apparecchiature da rottamare portandole al luogo di raccolta indicato per il riciclag- gio delle apparecchiature elettriche ed elettroniche.
- Seite 24 77613006...