Herunterladen Inhalt Inhalt Diese Seite drucken

Werbung

Verfügbare Sprachen

Verfügbare Sprachen

AXEL
ROWEREK TRÓJKOŁOWY
PL
TRICYCLE
EN
DREIRAD
DE
INSTRUKCJA OBSŁUGI
PL
USER MANUAL
EN
BENUTZERHANDBUCH
DE

Werbung

Inhaltsverzeichnis
loading

Inhaltszusammenfassung für Kidwell AXEL

  • Seite 1 AXEL ROWEREK TRÓJKOŁOWY TRICYCLE DREIRAD INSTRUKCJA OBSŁUGI USER MANUAL BENUTZERHANDBUCH...
  • Seite 2 ROTRAXE01A0, ROTRAXE02A0 MODEL:...
  • Seite 3: Elementy Zestawu

    ELEMENTY ZESTAWU:...
  • Seite 5: Montaż I Demontaż

    MONTAŻ I DEMONTAŻ:...
  • Seite 9 MONTAŻ I DEMONTAŻ:...
  • Seite 12 Po złożeniu produktu proszę upewnić się czy wszystkie funkcje działają prawidłowo oraz są zabezpieczone zgodnie z zaleceniami instrukcji (elementy mocujące, nakrętki, śrubki, łączenia itp.). Montaż produktu Kidwell powinien być wykonany przez osobę dorosłą. Brak zastosowania się do poleceń zawartych w tym dokumencie może spowodować poważne obrażenia.
  • Seite 13 • Zawsze upewnij się czy wszystkie części pasują jak nakazuje tego instrukcja • Nie podejmuj się napraw lub modyfikacji produktu. Tylko wykwalifi kowani technicy serwisowi są do tego upoważnieni Regularnie sprawdzaj produkt czy nie ma żadnych zniszczonych elementów • oraz stan mocowania śrub, nakrętek itp. •...
  • Seite 14 ELEMENTY ZESTAWU Rama Duży koszyk Widelec Mały koszyk Koło przednie Koszyk na butelkę Kierownica Tylne koła Śruba do montażu dużego koszyka Błotnik Uchwyt dla rodzica Nakrętka do montażu dużego koszyka Siedzisko Metalowe podkładki Daszek Klucz imbusowy 5 mm Śruba do montażu siedziska MONTAŻ...
  • Seite 15 SIEDZISKO Osadź siedzisko na trzpieniu ramy rowerka oraz przykręć od spodu śrubą uprzednio umieszczając na niej podkładkę. Za pomocą załączonego klucza imbusowego 5 mm, dokręć z wyczuciem śrubę mocującą siedzisko. Rozłóż oparcie do pozycji siedzącej i zablokuj przed samoczynnym złożeniem przełącznikiem znajdującym się...
  • Seite 16: Czyszczenie I Konserwacja

    Oparcie siedziska można złożyć w celu zmniejszenia gabarytu rowerka. W tym celu skorzystaj z przełącznika blokady oparcia obracając go w pozycję poziomą i złóż oparcie. Pałąk dla dziecka posiada opcję otwierania w celu ułatwienia wchodzenia i schodzenia z rowerka. Naciśnij przycisk znajdujący się na środku pałąka od strony frontowej.
  • Seite 17 18m +...
  • Seite 19 Dear Customer! Thank you for choosing Kidwell, Our highest priority is the safety of your child and the creation of beautiful memories. We hope you will enjoy our product, in case of any questions please contact us at: info@kidwell.eu Please read through the entire manual carefully and follow all instructions. Before you start using our product make sure that all of the features are working as intended and are secure (fasteners, nuts, bolts, screws, etc.).
  • Seite 20: Specifications

    • All assembly elements must be properly attached, and particular attention must be paid to elements such as screws, fastening bolts, and nuts, etc. • Do not use the product for other purposes than for those that it was designed •...
  • Seite 21: Front Wheel

    ASSEMBLY AND DISASSEMBLY FRONT WHEEL Mount the wheel in the front fork while applying both plastic mountings to the fork tips until they lock. Put the plastic fender on the combined front wheel with the fork in such a way that its shorter part in relation to the fork axis is directed in accordance with the spring button.
  • Seite 22 CANOPY AND SHOPPING BASKET Install the canopy in the clips located in the upper part of the backrest. Place the shopping basket on the tricycle frame between the rear wheels, previously mounting the screw in it and holding it, tighten it from the bottom with the nut bolt.
  • Seite 23: Cleaning And Maintenance

    CLEANING AND MAINTENANCE Clean only with the use of neutral detergents and warm water. The seat upholstery can be washed in a washing machine at a temperature not exceeding 30 °, use the program for delicate fabrics. Do not tumble-dry. Do not use strong detergents (e.g. bleach). Do not iron.
  • Seite 26 Danke, dass Sie sich für den Kauf dieses Produkts der Marke Kidwell entschieden haben. Die Sicherheit des Kindes und das Schaffen schöner Erinnerungen haben für uns oberste Priorität. Sollten Sie noch Fragen haben, setzen Sie sich bitte mit uns in Verbindung und schreiben Sie uns an die folgende E-Mail-Adresse: info@kidwell.eu...
  • Seite 27: Spezifikation

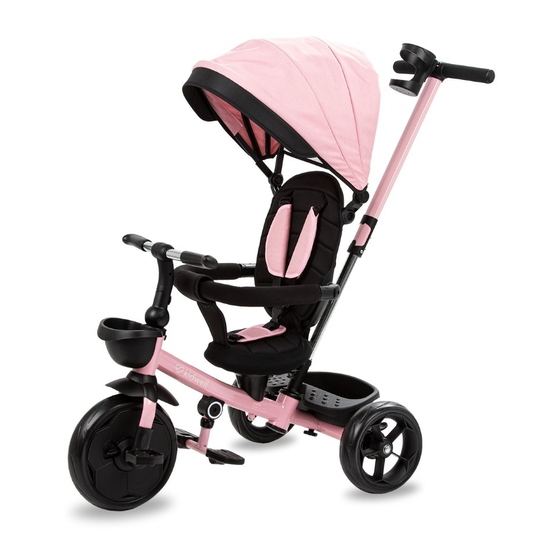
    • Das Fahrrad ist für eine Person bestimmt und darf nicht von mehr als einem Kind gleichzeitig benutzt werden • Das Spielzeug sollte auf einer ebenen Fläche ohne Hindernisse und abseits von Treppen verwendet werden • Vergewissern Sie sich immer, dass alle Teile wie in den Anweisungen dieser Anleitung beschrieben passen •...
  • Seite 28 TEILE Rahme Großer Korb Gabel Kleiner Korb Vorderrad Flaschenkorb Lenker Hinterräder Schutzblech Die Schraube zur Montage des großen Korbes Haltegriff Mutter zur Montage des großen Korbes Sitz Unterlegescheibe zur Befestigung Verdeck 5 mm Imbusschlüssel Schraube zur Befestigung des Sitze MONTAGE UND DEMONTAGE VORDERRÄDER vorderen Gabel...
  • Seite 29: Verdeck Und Grosser Korb

    SITZ Sitz auf den Bolzen am Rahmen des Fahrrads stecken und von unten mit der Schraube befestigen, auf die zuvor die Unterlegescheibe gesteckt wurde. Mit Hilfe des beigefügten Imbusschlüssels 5 mm Schraube zur Befestigung des Sitzes mit Gefühl anziehen. Lehne in die sitzende Position klappen und vor dem selbständigen Zusammenklappen mit dem Schalter an der Rückseite der Lehne, der in vertikale Position zu drehen ist, sichern.
  • Seite 30: Reinigung Und Wartung

    Die Lehne des Sitzes kann zur Verringerung der Abmaße des Fahrrads zusammengeklappt werden. Dazu mit dem Schalter die Blockade der Lehne lösen, diese in horizontale Position bringen und zusammenklappen. Der Bügel für das Kind besitzt die Option der Öffnung, um dem Kind das Setzen auf das Fahrrad und das Verlassen des Fahrrads zu erleichtern.
  • Seite 31: Garantiebeschränkungen

    GARANTIEBESCHRÄNKUNGEN Die Garantie erstreckt sich nicht auf Zerstörung oder Verlust einzelner Elemente durch Stürze, Abrieb, die falsche Montage oder eine Benutzung im Widerspruch zur Gebrauchsanleitung. 18m +...
  • Seite 32 NOTATKI/ NOTES/ ANMERKUNGEN...
  • Seite 33 NOTATKI/ NOTES/ ANMERKUNGEN...
  • Seite 34: Warunki Gwarancji

    Gwarancja door-to-door obowiązuje wyłącznie na terytorium Rzeczypospolitej Polskiej. Ujawnione wady będą usunięte bezpłatnie w trakcie trwania gwarancji przez Autoryzowany Serwis Producenta. Klient (reklamujący) jest zobowiązany do zgłoszenia reklamacji poprzez e-mail: reklamacje@kidwell.eu lub kontakt telefoniczny pod numerem: + 48 797 974 387.
  • Seite 35 UNIWERSALNA KARTA GWARANCYJNA W RAZIE AWARII PROSIMY O DOŁĄCZENIE KARTY GWARANCYJNEJ DO ODSYŁANEGO PRODUKTU Imię: Nazwisko: Kod pocztowy: Miejscowość: Telefon (wraz z kierunkowym): Adres e-mail: Produkt: Model: Index: EAN: Data zakupu: Kupujący (podpis): Sprzedawca: DERFORM Sady ul. Za Motelem 1 62-080 Tarnowo Podgórne...

Diese Anleitung auch für:

Rotraxe01a0Rotraxe02a0

Inhaltsverzeichnis