Herunterladen Inhalt Inhalt Diese Seite drucken
Pebaro 2010 Anleitung
Vorschau ausblenden Andere Handbücher für 2010:

Werbung

Verfügbare Sprachen

Verfügbare Sprachen

LEISTUNGSSTARKER
MIT ZUBEHÖR
Operating instructions for storage battery screwer with accessories
Instructions pour l'emploi de la visseuse à batteries et accessoires
Istruzioni d'uso avvitatrice a batteria con accessori
Anleitung • Instructions • Les instructions • Istruzione • Instructies

Werbung

Inhaltsverzeichnis
loading

Inhaltszusammenfassung für Pebaro 2010

  • Seite 1 LEISTUNGSSTARKER MIT ZUBEHÖR Operating instructions for storage battery screwer with accessories Instructions pour l’emploi de la visseuse à batteries et accessoires Istruzioni d’uso avvitatrice a batteria con accessori Anleitung • Instructions • Les instructions • Istruzione • Instructies...
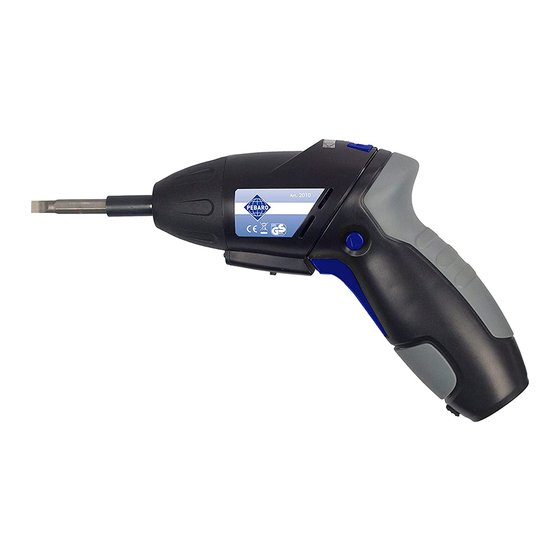
  • Seite 3 A Bit-Aufnahme B Ein/Aus C Akku-Kapazitätsanzeige D Taste Akku-Kapazitätsanzeige E Akku-Ladebuchse F Netzstecker-Ladegerät G Kleinstecker für Ladebuchse H Geräte-Gürteltasche mit 4 Bit-Einsätzen A Bit slot B On/Off C Charge indicator D Charge indicator key E Charging plug F Plug-in charger G Connecting plug H Belt tool bag with bit compartment A Siège des pointes B Interrupteur C Témoins de charge D Commande des témoins E Prise de charge de la batterie F Chargeur avec prise de courant G Fiche de contact pour la batterie...
  • Seite 4 Bevor Sie das Gerät in Betrieb nehmen, lesen Sie diese Gebrauchsanlei- tung aufmerksam und beachten Sie die Sicherheitshinweise! Für Schäden oder Unfälle, die durch Nichtbeachtung der Anleitung und Sicherheitsvorgaben entstehen, übernehmen wir keine Haftung. Die Anleitung ist sorgfältig aufzube- wahren und bei Weitergabe des Gerätes mit zu übergeben. Der Akku-Schrauber und das Zubehör darf nur nach seiner Bestimmung verwen- det werden.
  • Seite 5: Reinigung, Pflege Und Wartung

    Schraub-Bit einsetzen Erforderlichen Bit-Einsatz in die Bit-Aufnahme (A) des Akku-Schraubers ein- stecken. Darauf achten, dass die Bit-Form und -Größe mit der Schraubenkopfform übereinstimmt. Bedienung Das EIN-/AUS-Schalten des Akku-Schraubers erfolgt mit dem Geräteschalter (B), mit dem gleichzeitig auch die Drehrichtung bestimmt wird. Zum Einschrauben (Rechtslauf) den Schalter im unteren Bereich betätigen, zum Lösen (Linkslauf) den Schalter im oberen Bereich drücken. Prüfen der Akku-Kapazität Um die Leistung des Gerätes optimal zu erreichen, sollte der Akku immer voll aufgeladen sein. Alle drei farbigen LEDs leuchten beim Betätigen der Taste (D) gleichzeitig auf. Die Kapazität reduziert sich nacheinander bei Erlöschen der grünen und gelben LED. REINIGUNG, PFLEGE UND WARTUNG Reinigen Sie das Gerät nur mit einem trockenen Tuch. Nicht in Wasser tauchen oder mit lösungshaltigen Mitteln reinigen. Der Akku-Schrauber ist wartungsfrei, gehen Sie jedoch pfleglich damit um. ENTSORGUNG Dieses Produkt darf am Ende seiner Lebensdauer nicht im normalen Haushaltsabfall entsorgt werden. Es muss an einem Sammelpunkt für das Recycling von elektrischen und elektronischen Geräten abgegeben werden. TECHNISCHE DATEN Ladegerät 230 V - 50 Hz Ladespannung 6 V = Ladestrom 300 mA Drehzahl max. 180 U/Min Drehmoment max. 3 Nm Akku Li–Ionen 3,6 V...
  • Seite 6 Before using this tool, please, read attentively these instructions and fol- low the safety rules when using it. No guarantee is given for damages or accidents due to non-observance or these instructions and safety norms. Keep these directions and hand them over together with the tool if and when giving it away. The rechargeable screwer is not to be used for purposes different from the one it was made for.
  • Seite 7: Cleaning & Maintenance

    Operating the appliance The on/off switch (B) starts the cordless screwer and fixes the direction of rotation as well. To screw in – clockwise rotation – press the lower part of the switch, to unscrew – left rotation – press the upper part of the switch. Testing the battery capacity To have the best performance the battery should always be fully charged. All three LEDs light up when pressing the key (D). The charge reduction is given by the LEDs getting green then yellow. CLEANING, MAINTENANCE Use only a dry cloth to clean the appliance. Never dip it in water or use detergents. The screwer needs no further maintenance, just keep it clean. DISPOSAL When the appliance will have to be eliminated, do not throw it in the house- hold dustbin. It must disposed of at the recycling collector for electric and electronic instruments. TECHNICAL DATA Charger 230 V - 50 Hz Charging voltage 6 V = Charging amperage 300 mA Revolutions 180 p.min. max. Twisting moments 3 Nm max. Li–Ion battery 3.6 V...
  • Seite 8: Mise En Marche

    Avant de mettre en marche l’appareil, veuillez lire attentivement les con- seils d’usage et, lors de l’emploi veuillez observer les normes de sécurité indiquées. Les dégâts ou accidents dûs au manque d’observance des instructions d’usage et des normes de sécurité sont hors de notre responsabilité et garantie. Veuillez garder ces indications et les remettre avec l’appareil en cas de cession de celui-ci.
  • Seite 9: Données Techniques

    Introduction des pointes de vissage Choisir la pointe adaptée à la tête de la vis à serrer ou desserrer (type et dimen- sions). Introduire la pointe dans son siège (A). Emploi de l’appareil L’interrupteur (B) non seulement allume et éteint la visseuse mais il en définit également la direction derotation. Pour serrer les vis – rotation vers la droite – appuyez sur le bas de l’interrupteur, pour les desserrer - rotation vers la gauche – appuyez sur la partie haute de l’interrupteur. Contrôle de l’état de chargement Pour rendre au maximum la visseuse doit avoir la batterie complètement chargée, c.à.d. en appuyant sur le bouton (D) toutes les trois lampes témoins s’allument. Lorsque la charge se réduit les témoins passent au vert puis au jaune. NETTOYAGE ET MANUTENTION Pour nettoyer la visseuse il suffit de l’épousseter avec un linge propre et sec. Aucun contact avec de l’eau ou des produits détergents ! Aucune manutention n’est requise pour la visseuse, il faut toutefois en avoir soin. ECOULEMENT Pour se débarrasser de l’appareil lorsqu’il ne sert plus, il ne faut pas le jeter à la poubelle domestique, mais le porter au service de voirie pour recyclage des appareils électriques et électroniques. DONNÉES TECHNIQUES Chargeur 230 V – 50 Hz Tension de chargement 6 V = Courant de chargement 300 mA Rotations max. 180 rev./min Moment de rotation max. 3 Nm Accu Li-ions 3,6 V...
  • Seite 10: Messa In Funzione

    Prima di adoperare l’apparecchio è necessario leggere attentamente le istruzioni ed osservare poi anche le norme di sicurezza indicate! Non diamo alcuna garanzia e non abbiamo alcuna responsabilità per danni o incidenti dovuti alla non-osservanza delle istruzioni e norme. Queste istruzioni vanno custodite e nel caso di cessione dell’apparecchio consegnate insieme allo stesso.
  • Seite 11: Pulizia E Manutenzione

    Inserimento delle punte Scegliere la punta adatta per tipo e dimensione alla testa della vite da girare ed introdurla nella sede (A). Uso dell’apparecchio L’interruttore (B) dell’avvitatrice a batteria non solo accende e spegne l’apparec- chio, ma comanda pure il senso di rotazione per l’avvitamento. Per avvitare – rotazione in senso orario – premere la parte bassa dell’interruttore, per svitare – rotazione in senso anti-orario – pigiare l’interruttore nella parte alta. Controllo dello stato di carica Perché l’apparecchio sia efficiente al massimo la batteria deve essere completa- mente carica. Il tasto (D) comanda contemporaneamente tutte e tre le spie. Diminuendo la carica le spie passano al verde poi al giallo prima di spegnersi. PULIZIA E MANUTENZIONE Pulire l’avvitatrice semplicemente con un cencio asciutto. Non mettere a contatto con acqua o detergenti. L’avvitatrice a batteria ricaricabile non necessita manuten- zione, tuttavia è bene averne cura. SMALTIMENTO Giunto alla fine della sua vita l’apparecchio non va semplicemente gettato nella pattumiera di casa. Va portato al punto di scarico per il riciclaggio degli elettrici ed elettronici. DATI TECNICI Caricatore 23 V – 50 Hz Voltaggio di carica 6 V = Corrente di carico 300 mA Rotazioni mass. 180 giri/min Momento di rotazione mass. 3 Nm Accumulatore Li-ioni 3,6 V...
  • Seite 12 Peter Bausch GmbH & Co. KG Blombachstraße 21-23 42369 Wuppertal, Germany www.pebaro.de...

Inhaltsverzeichnis