AbleNet LITTLE Step-by-Step Kurzanleitung
Verfügbare Sprachen
Verfügbare Sprachen
Quicklinks
Quick Start Guide
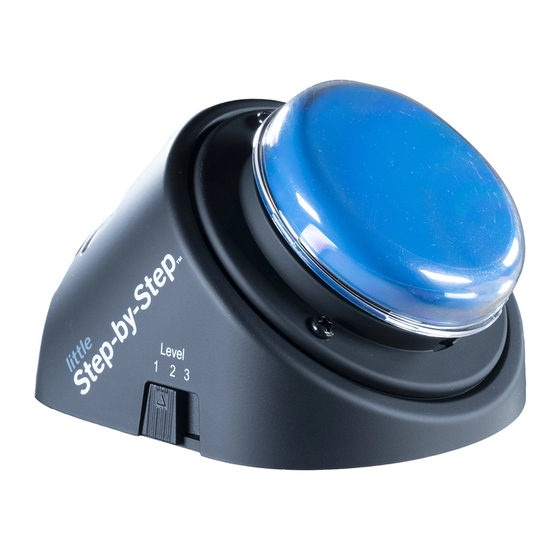
LITTLE Step-by-Step™
communication device
www.ablenetinc.com
Updated: April 22, 2020 2:23 PM
Getting Started
1.
Add one alkaline 9-volt battery to device (battery
not included). To open battery door, rotate D-ring
counterclockwise and lift up. To lock battery door, rotate
D-rignt clockwise.
2.
Turn device on
3.
Select desired level
4.
Press and hold record button until recording indicator
light turns on
5.
Press and hold colored switch top. Begin speaking into
microphone after you hear beep.
6.
When done recording message, release colored switch
top
7.
Repeat steps 5 and 6 to record additional messages.
8.
Press the record button to turn the recording indicator
light off
9.
Adjust volume as needed
10. Your device is ready to use
Change Colored Switch Tops
1.
Remove clear snap cap
2.
Rotate colored switch top counterclockwise to remove
and rotate clockwise to tighten.
3.
Re-attach clear snap cap
Clear snap cap for
symbol overlays
Colored switch top
activation surface (red,
green, yellow, and blue
switch tops inncluded)
Picture Symbol Overlays
A picture symbol can be placed under the clear snap cap to
give additional context to what will happen when the colored
switch top is activated. Symbol overlays should fit within a
2-in (5-cm) circle area.
Play Message With an Accessibility
Switch
1.
Plug an AbleNet accessibility switch with 1/8-in (3.5-mm)
switch plug into the accessibility switch input jack on
the device
2.
Activate the accessibility switch to play the message on
the device
Repeating a Message
1.
Play message you want repeated
2.
Press record button one time after the desired message
has ended
3.
The same message will repeat when the colored switch
top is activated
4.
To continue to the next message, press record button
one time
Sound output speaker
Recording indicator
light
Microphone
RECORD
OFF
SWITCH
Record button
On/off and
volume control
#6-32 threaded inserts
for AbleNet Universal
Mounting Plate
attachment (mounting
plate not included)
Activate Switch Adapted Toys or
Appliances
1.
While recording a message, press the record button one
time to assign the toy/appliance to that message
2.
Plug your toy or appliance into the 1/8-in (3.5-mm)
toy/appliance output jack on the device. Some toys
or appliances may require the included plug-to-plug
adapter to be used to connect to the device.
3.
The toy or appliance will activate as long as the message
is playing.
Note: Some electrical appliances will require a PowerLink to
be activated.
1/8-in (3.5-mm) toy/appliance
output jack
Levels
switch
TOY/APPL.
1/8-in (3.5-mm) accessibility
switch input jack
Requires one
alkaline 9-volt
battery (battery
not included)

Verwandte Anleitungen für AbleNet LITTLE Step-by-Step

Inhaltszusammenfassung für AbleNet LITTLE Step-by-Step
- Seite 3 Steckeradapter für den Anschluss an das Gerät. Aufnahmeanzeige aufleuchtet. Das Spielzeug oder Gerät wird aktiviert, solange die Stecken Sie einen AbleNet-Zugangsschalter mit einem Drücken und halten Sie die farbige Schaltoberfläche. Mitteilung abgespielt wird. 3,5 mm (1/8 in) Taster-Stecker in die Zugangsschalter- Sprechen Sie in das Mikrofon, nachdem Sie das Piepen hören.
-
Seite 5: Garantie Und Kontaktinformationen
Garantie et contact Garantie und Kontaktinformationen AbleNet manufactured products include a two-year limited Les produits fabriqués par AbleNet sont fournis avec une Für alle von AbleNet hergestellten Produkte gilt eine warranty. This warranty is against defects in materials and garantie limitée de deux ans. Cette garantie est applicable zweijährige beschränkte Garantie. - Seite 6 For private households: Pour les foyers particuliers : Für private Haushalte: Information on Disposal of Users of WEEE Renseignements quant à l’élimination des déchets d’équipements électriques et Informationen zum fachgerechten Entsorgen von Elektro- und Elektronik- électroniques (DEEE) Altgeräten This symbol on the product and/or accompanying documents means that used electrical and electronic equipment (WEEE) should not be mixed with Ce symbole...