Inhaltsverzeichnis
Werbung
Verfügbare Sprachen
Verfügbare Sprachen
Quicklinks
Werbung
Inhaltsverzeichnis

Verwandte Anleitungen für Technosmart TS-SV-CAM02

Inhaltszusammenfassung für Technosmart TS-SV-CAM02
- Seite 1 User Manual Model: TS-SV-CAM02...
-
Seite 3: Package Contents
English USER MANUAL: CAR DVR CAMERA Model: TS-SV-CAM02 TABLE OF CONTENTS 1) Package contents 2) Safety instructions 3) Installing and using the device 4) Features and specifications 1) PACKAGE CONTENTS A. Car DVR Camera B. Window suction cup C. Car Charger with 3m cable D. - Seite 4 • Only allow repairs to be carried out by a qualified service centre. Qualified service centre: after-sales department of the manufacturer or store, which is recognised and authorised to carry out such repairs, so that potential hazards can be prevented. If problems are encountered with the device, please return it to this department.
-
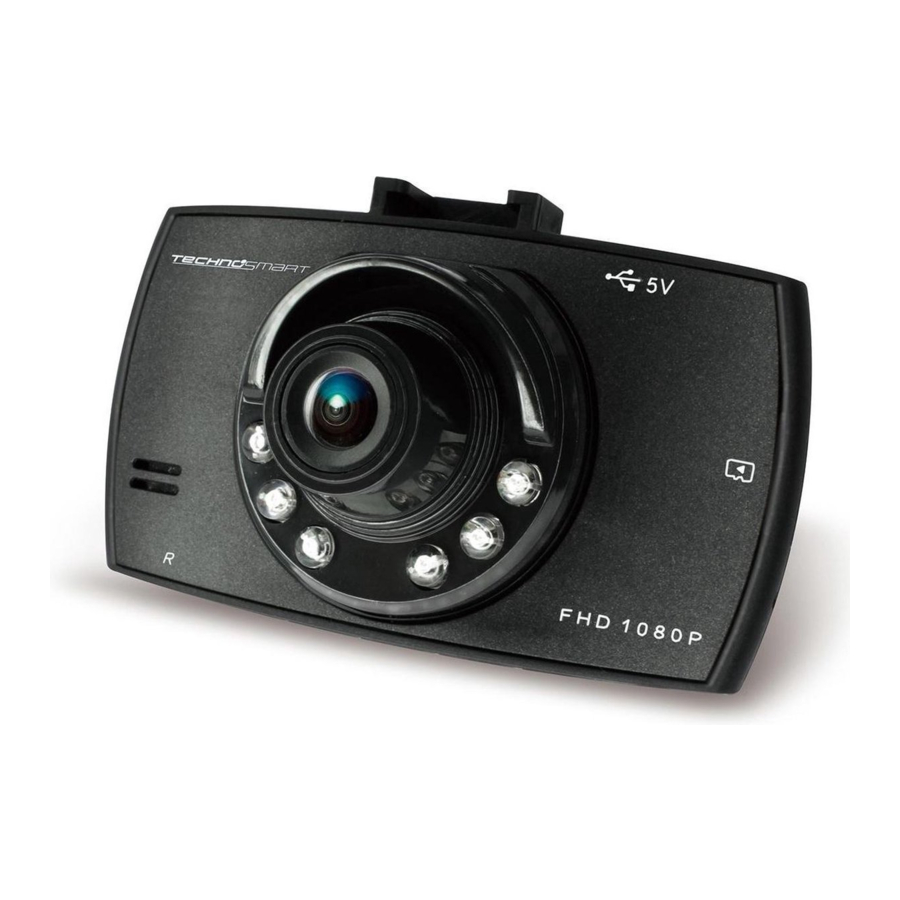
Seite 5: Product Overview
• Do not use the device if it has fallen into water or any kind of fluid; liquid has been spilled on it or if it has been exposed to rain or moisture (device only) • Do not use the device if it has been dropped or does not operate normally. •... - Seite 6 Charging the battery The device is powered by a rechargeable battery which can be charged by means of the included car charger. Connect the USB charging cable of the car charger to the mini USB port of the device and connect the car charger to the cigarette lighter output of your car. The device will start charging and the LED power indicator will turn ‘red’.
- Seite 7 Video mode When the device switches ON, its default setting is video mode! If you are in capture or playback mode, press the MODE button until the video mode icon appears in the LCD display Click the OK button to start recording. Click the OK button again to stop recording.
- Seite 8 file or picture file. Press the OK button to play/pause the selected video file. When playing a video, press the OK button to pause/resume the selected video System setup menu To enter the system setup menus, press the MODE button to select the setup mode you want to enter, either in Video, Capture or in Playback mode.
- Seite 9 Main menu Sub-menu Description MAIN SETUP Format Next Menu Cancel = back to main menu WARNING!!! Selecting “Execute” will DELETE all data stored on the Micro SD card. Language English English Français French German Deutsch Dutch Nederlands Italian Italiano Portuguese Portuguės Spanish Español...
- Seite 10 “Charging the battery”). o Make sure the Micro SD memory card is inserted in the device when connecting to your computer. If the Micro SD memory card is not inserted when connecting, the device will not appear in the list of connected devices on your computer. You can also remove the Micro SD Card from the Micro SD card slot of the device and insert it into the Micro SD Card slot of your computer.
-
Seite 11: Features And Specifications
4) FEATURES AND SPECIFICATIONS: Integrated rechargeable battery: 3.7 Vdc - 150 Mah Li-Ion (0.56Wh) Dimension device: 8 cm x 5.5 cm x 3.0 CM (LxWxD) Weight: 39 grams (device only) Display: LCD 2.2” Camera angle: 90 degree wide angle Focus: 20 cm to infinite Image size resolution: 3M / 2M / 1.3M / VGA Video resolution: 1080P –... -
Seite 12: Gebruikershandleiding
GEBRUIKERSHANDLEIDING: Nederlands DASHCAM MET DVR Model: TS-SV-CAM02 INHOUDSOPGAVE 1) Inhoud verpakking 2) Veiligheidsinstructies 3) Installatie en gebruik van het apparaat 4) Functies en specificaties 1) INHOUD VERPAKKING A. Dashcam met digitale videorecorder B. Zuignap voor op de voorruit C. Auto-oplader met kabel van 3m D. - Seite 13 gevallen. Schakel het apparaat in dat geval uit, haal de voeding van het apparaat en gebruik het niet meer. • Gebruik het apparaat niet als het niet goed werkt, is gevallen of op enige manier is beschadigd. • Probeer het apparaat niet te demonteren, te repareren of anderszins aan te passen. •...
- Seite 14 • Controleer het stroomsnoer regelmatig op beschadigingen. • Gebruik het apparaat niet als het stroomsnoer of de auto-oplader zichtbaar beschadigd is. • Zorg ervoor dat niemand op het stroomsnoer kan staan of dat het snoer anderszins kan worden bekneld. • Laat het stroomsnoer niet over scherpe randen hangen en houd het uit de buurt van hete voorwerpen en open vuur.
- Seite 15 1) Micro SD-kaartsleuf 9) Knop vorige (naar links) 2) TFT-scherm 10) Menuknop 3) Niet in gebruik 11) OK-knop 4) Montage-aansluiting voor op de ruit 12) Modusknop 5) Luidspreker 13) Knop volgende (naar rechts) 6) LED-verlichting 14) Resetten 7) Lens 15) Mini-USB-aansluiting 8) AAN-/UIT-knop 16) Indicatie-LED De batterij opladen...
- Seite 16 • Foto - vastleggen van (stilstaande) afbeeldingen • Afspelen - tonen van opgenomen video's en foto's. Zodra het apparaat is ingeschakeld, kunt u van modus veranderen met behulp van de MODE-knop LED-indicatielampjes Het LED-indicatielampje wordt blauw wanneer het apparaat AAN en in de video- modus staat;...
- Seite 17 Afspeelmodus Wanneer het apparaat wordt aangezet, staat het standaard in de videomodus! Om de afspeelmodus te selecteren, drukt u op de MODE-knop totdat het pictogram voor de afspeelmodus op het Lcd-scherm verschijnt. In de afspeelmodus, drukt u op de Links-knop en Rechts-knop om het gewenste video- of foto-bestand te selecteren.
- Seite 18 Hoofdmenu Submenu Beschrijving AFSPEELMODUS Verwijderen Volgende menu Eén verwijderen = Huidige bestand verwijderen Allemaal verwijderen = Alle bestanden op de Micro SD-kaart verwijderen Thumbnail Volgende menu Annuleren Execute (uitvoeren) = toon alle kleine afbeeldingen (thumbnails) op het Lcd- scherm Volume 4,5,6 Volumeregeling luidspreker HOOFDMENU...
- Seite 19 Volgende menu Selecteer een schijf om het apparaat rechtstreeks op de computer aan te sluiten als USB-flashdrive. Selecteer PC-cam om het apparaat te gebruiken als PC-camera. Versie BEKIJKEN Informatie firmware-versie Aansluiten op een computer/notebook Het apparaat kan worden gesynchroniseerd met een computer. Sluit de USB naar mini-USB-kabel aan op de Mini USB-poort van het apparaat en sluit het andere uiteinde van de kabel aan op de USB-poort van uw computer.
- Seite 20 Reset-knop Wanneer het apparaat niet goed functioneert of vastloopt, kunt u op de reset-knop drukken om de normale werking te herstellen. 4) FUNCTIES EN SPECIFICATIES: Geïntegreerde oplaadbare batterij: 3,7 V DC - 150 Mah Li-Ion (0,56Wh) Afmetingen apparaat: 8 cm x 5,5 cm x 3,0 cm (BxHxD) Gewicht: 39 gram (alleen het apparaat) Scherm: Lcd 2,2”...
-
Seite 21: Contenu Du Paquet
Français USER MANUAL: CAR DVR CAMERA Model: TS-SV-CAM02 SOMMAIRE 1) Contenu du paquet 2) Instructions de sécurité 3) Installation et utilisation de l’appareil 4) Caractéristiques et spécifications 1) CONTENU DU PAQUET A. Caméra DVR voiture B. Ventouse pare-brise C. Chargeur voiture avec câble 3m D. - Seite 22 de façon quelconque. • Ne pas essayer de démonter ou de réparer l’appareil, ou de le modifier de quelque manière que ce soit. • Faire uniquement réparer l’appareil par un centre de service qualifié. Centre de service qualifié : service après-vente du fabricant ou magasin, qui est reconnu et autorisé...
-
Seite 23: Caractéristiques Du Produit
garder éloigné d’objets chauds et de flammes nues. • Avant de nettoyer l’appareil, toujours le débrancher du cordon d’alimentation. • Ne pas ouvrir le boîtier car cela pourrait provoquer un choc électrique. • Ne pas utiliser l’appareil si le cordon d’alimentation est endommagé, s’il est devenu défectueux, s’il est tombé... -
Seite 24: Bouton Marche/Arrêt
1) Fente carte Micro SD 9) Bouton Gauche (précédent) 2) Écran TFT 10) Bouton Menu 3) Non utilisé 11) Bouton OK 4) Connexion pour montage pare-brise 12) Bouton Mode 5) Haut-parleur 13) Bouton Droite (suivant) 6) Flash à LED 14) Bouton Reset 7) Objectif 15) Connexion Mini USB 8) Bouton marche/arrêt... - Seite 25 Basculer entre les modes L’appareil est équipé de trois modes : • Vidéo – enregistre des vidéos • Photo – photos (fixes) • Lecture – lit les vidéos enregistrées et les photos Une fois l’appareil allumé, vous pouvez basculer entre les modes à l’aide du bouton MODE Voyants LED Le voyant LED...
- Seite 26 Mode Lecture Lorsque l’appareil est allumé, le réglage par défaut sera le mode vidéo ! Pour choisir le mode Lecture, appuyer sur le bouton MODE jusqu’à ce que l’icône du mode Lecture apparaisse sur l’écran LCD En mode Lecture, appuyer sur les boutons Gauche et Droite pour sélectionner le fichier vidéo ou le fichier photo souhaité.
- Seite 27 Menu principal Sous-menu Description MODE PHOTO Résolution photo 2048x1536 pixels 1600x1200 pixels 1.3M 1280x960 pixels 640x480 pixels MODE LECTURE Supprimer Menu suivant Supprimer Un = Supprimer le fichier actuel Supprimer Tous = Supprimer tous les fichiers de la carte Micro SD Thumbnail Menu suivant Annuler...
-
Seite 28: Menu Principal
Menu principal Sous-menu Description Entrer date Menu suivant Sélectionner la valeur souhaitée à l’aide des boutons GAUCHE DROITE . Appuyer sur le bouton pour passer à l’élément suivant et appuyer de nouveau sur le bouton MENU pour retourner au menu de configuration. -
Seite 29: Caractéristiques Et Spécifications
de l’appareil en insérant les connexions l’une dans l’autre jusqu’à ce qu’elles s’enclenchent. Placer maintenant la ventouse à l’intérieur du pare-brise près du rétroviseur. Enfoncer le levier pour que la ventouse adhère au pare-brise. Bouton Reset Au cas où l’appareil ne fonctionne pas correctement ou s’il se fige, appuyer sur le bouton Reset pour réinitialiser le fonctionnement normal. -
Seite 30: Sicherheitsanweisungen
BEDIENUNGSANLEITUNG: Deutsch AUTO-DVR-KAMERA Model: TS-SV-CAM02 INHALT 1) Packungsinhalt 2) Sicherheitsanweisungen 3) Installation und Verwendung des Geräts 4) Funktionen und technische Angaben 1) PACKUNGSINHALT A. Auto-DVR-Kamera B. Scheibensaugnapf C. Autoladegerät mit 3 m Kabel D. Kabel von USB nach Mini-USB E. Bedienungsanleitung 2) SICHERHEITSANWEISUNGEN Vor der Benutzung der Auto-DVR-Kamera (hierin „Gerät“... - Seite 31 Stromschlagrisiko zu verhindern. Berühren Sie das Gerät nicht, wenn es ins Wasser gefallen ist. Schalten Sie das Gerät AUS, entfernen Sie den Netzstecker vom Gerät und benutzen Sie es nicht erneut. • Benutzen Sie das Gerät nicht, wenn es defekt geworden, gefallen ist oder in irgendeiner Weise beschädigt wurde.
-
Seite 32: Installation Und Verwendung Des Geräts
• Überprüfen Sie das Netzkabel regelmäßig auf Schäden. • Benutzen Sie das Gerät nicht, wenn das Netzkabel oder das Autoladegerät Zeichen von Beschädigungen aufweisen. • Achten Sie darauf, dass niemand auf das Netzkabel treten oder es einklemmen kann. • Das Netzkabel darf nicht über scharfen Kanten hängen. Halten Sie es von heißen Gegenständen und offenen Flammen fern. - Seite 33 1) Steckplatz für Micro-SD-Karte 9) Taste Links (zurück) 2) TFT-Display 10) Menü-Taste 3) Nicht in Betrieb 11) OK-Taste 4) Verbindung zur Scheibenhalterung 12) Modus-Taste 5) Lautsprecher 13) Taste Rechts (weiter) 6) Beleuchtungs-LEDs 14) Zurücksetzen 7) Objektiv 15) Mini-USB-Anschluss 8) Ein-/Aus-Taste 16) Anzeige-LED Aufladen des Akkus Das Gerät wird durch einen Akku betrieben, der mittels des mitgelieferten...
- Seite 34 Wechsel zwischen Modi Das Gerät ist mit drei Modi ausgestattet: • Video – nimmt Videos auf • Aufnahme – (Stand-)Bilder • Wiedergabe-Modus – spielt aufgenommene Videos, Bilder ab. Sobald das Gerät eingeschaltet ist, können Modi durch die MODUS-Taste gewechselt werden. LED-Anzeigen Die LED-Anzeige wird blau, wenn das Gerät eingeschaltet ist und sich im...
- Seite 35 Bildauflösungsanzeige: zeigt die ausgewählte Auflösung zur Aufnahme von Fotos auf. Anzeige KEINE KARTE: zeigt an, dass die Micro-SD-Speicherkarte noch nicht eingesetzt wurde. Akkustandsanzeige: zeigt den Akkustand an. Wiedergabe-Modus Wenn das Gerät eingeschaltet wird, ist die Standardeinstellung der Video- Modus! Zur Auswahl des Wiedergabe-Modus drücken Sie die MODUS-Taste , bis das Wiedergabe-Modus-Symbol auf dem LCD-Display...
- Seite 36 Hauptmenü Untermenü Beschreibung Videozeit Ständige Aufnahme 1 Min. 1 Minute Videoschleife 3 Min. 2 Minuten Videoschleife 5 Min. 5 Minuten Videoschleife Tonaufnahme Video mit Tonaufnahme Keine Tonaufnahme mit dem Video BILD-MODUS Bildgrößen-Auflösung 2048 x 1536 Pixel 1600 x 1200 Pixel 1,3M 1280 x 960 Pixel 640 x 480 Pixel...
-
Seite 37: Scheibenhalterung
Frequenz 50 Hz / 60 Hz Wählen Sie 50 Hz oder 60 Hz (50 Hz empfohlen für die EU) Dateneingabe Nächstes Menü Wählen Sie den gewünschten Wert durch die Tasten LINKS RECHTS . Drücken Sie die OK- Taste , um zum nächsten Punkt zu gelangen und drücken Sie erneut die MENÜ-Taste , um zurück zum... -
Seite 38: Funktionen Und Technische Angaben
Drücken Sie den Hebel nach unten, damit der Saugnapf an der Scheibe haften kann. Taste zum Zurücksetzen Falls das Gerät nicht so funktioniert wie es sollte oder blockiert, können Sie die Taste zum Zurücksetzen drücken, damit es wieder normal funktioniert. 4) FUNKTIONEN UND TECHNISCHE ANGABEN: Integrierter Akku: 3,7 V DC –... - Seite 39 ANWEISUNGEN ZUM SCHUTZ DER UMWELT (WEE, Richtlinie zur Entsorgung von Elektro- und Elektronik-Altgeräten) Ihr Produkt wurde aus hochwertigen Materialien und Komponenten hergestellt, die man recyceln und wiederverwenden kann. Am Ende seiner Lebensdauer darf dieses Produkt nicht im normalen Hausmüll entsorgt werden, sondern es muss zu einer speziellen Sammelstelle für das Recycling von elektrischen und elektronischen Geräten gebracht werden.
-
Seite 40: Manual De Uso
MANUAL DE USO: Español CÁMARA DVR PARA COCHE Model: TS-SV-CAM02 CONTENIDOS 1) Contenido del paquete 2) Instrucciones de seguridad 3) Instalación y uso del dispositivo 4) Características y especificaciones 1) CONTENIDO DEL PAQUETE A. Cámara DVR para coche B. Ventosa para cristal C. - Seite 41 • No use el dispositivo si se ha averiado, caído o dañado de algún modo. • No trate de desmontar o reparar el dispositivo, ni modificarlo de ningún modo. • Las reparaciones solo pueden efectuarse en un centro de servicio cualificado. Un centro de servicio cualificado es el departamento de posventa del fabricante o de la tienda al que se ha considerado reconocido y se ha autorizado para realizar las reparaciones adoptando medidas de prevención de los riesgos potenciales.
-
Seite 42: Presentación Del Producto
• No abra la carcasa porque podría causar una descarga eléctrica. • No utilice el dispositivo si el cable está dañado, o si se ha averiado, caído o dañado de algún modo. Envíe el dispositivo al fabricante o al centro de servicio cualificado de su zona para que lo inspeccionen o lo reparen. - Seite 43 Carga de la batería El dispositivo se alimenta de una batería recargable que se puede cargar con el cargador para el coche incluido. Conecte el cable de carga USB del cargador para coche al puerto Mini USB dispositivo y conecte el cargador para coche a la toma del encendedor del coche. El dispositivo empezará...
- Seite 44 Modo de vídeo ¡Al encender el dispositivo, el modo de funcionamiento predefinido es el de vídeo! Si se encuentra en modo de captura o de reproducción, pulse el botón MODE hasta que aparezca el icono del modo de vídeo en la pantalla LCD Pulse el botón OK para empezar a grabar.
- Seite 45 reproducir o poner en pausa el archivo de vídeo seleccionado. Mientras se reproduce un vídeo, pulse el botón OK para poner en pausa o reanudar la reproducción del vídeo seleccionado. Menú de configuración del sistema Para acceder a los menús de configuración del sistema, pulse el botón MODE para seleccionar el modo de configuración al que quiere acceder, ya sea Vídeo, Captura o Reproducción.
- Seite 46 Menú principal Submenú Descripción Thumbnail (Miniatura) Next Menu (Menú siguiente) Cancelar Execute = mostrar todas las imágenes como archivos pequeños (miniaturas) en la pantalla LCD Volume (Volumen) 4, 5, 6 Configuración del volumen del altavoz CONFIGURACIÓN PRINCIPAL Format (Formatear) Next Menu (Menú siguiente) Cancel = volver al menú...
- Seite 47 Conexión a un ordenador de sobremesa o portátil El dispositivo se puede sincronizar con ordenadores. Conecte el cable de USB a Mini USB al puerto Mini USB del dispositivo y conecte el otro extremo del cable al puerto USB del ordenador. Cuando el dispositivo esté...
-
Seite 48: Características Y Especificaciones
Botón de reinicio Si el dispositivo no funciona como debiera o se congela, puede pulsar el botón de reinicio para reanudar el funcionamiento normal. 4) CARACTERÍSTICAS Y ESPECIFICACIONES: Batería recargable integrada: 3,7 Vcc - iones de litio de 150 mAh (0,56 Wh) Dimensiones del dispositivo: 8 cm x 5,5 cm x 3,0 cm (LxAxH) Peso: 39 gramos (solo el dispositivo) Pantalla: LCD de 2,2”... -
Seite 49: Manuale Utente
MANUALE UTENTE: Italiano FOTOCAMERA DVR PER AUTO Model: TS-SV-CAM02 INDICE 1) Contenuto della confezione 2) Istruzioni di sicurezza 3) Installazione e utilizzo del dispositivo 4) Caratteristiche e specifiche 1) CONTENUTO DELLA CONFEZIONE A. Fotocamera DVR per auto B. Supporto a ventosa per vetro C. - Seite 50 rimuovere il connettore di alimentazione dal dispositivo e non riutilizzarlo. • Non utilizzare il dispositivo se è diventato difettoso, se è caduto o se è stato danneggiato in qualche modo. • Non tentare di smontare o riparare il dispositivo, né di modificarlo in alcun modo. •...
-
Seite 51: Panoramica Del Prodotto
• Assicurarsi che il cavo di alimentazione non possa essere calpestato o schiacciato. • Non lasciare che il cavo di alimentazione venga appeso su spigoli vivi e tenerlo lontano da oggetti caldi e fiamme libere. • Prima di pulire il dispositivo, scollegare sempre il dispositivo dal cavo di alimentazione. - Seite 52 1) Slot card micro SD 9) Pulsante sinistro (precedente) 2) Display TFT 10) Pulsante Menu 3) Non in funzione 11) Pulsante OK 4) Attacco per il montaggio su vetro 12) Modalità pulsante 5) Altoparlante 13) Pulsante destro (successivo) 6) Illuminazione a LED 14) Ripristina 7) Lente 15) Connessione Mini USB...
-
Seite 53: Modalità Video
sullo schermo LCD . Il dispositivo si SPEGNE automaticamente. Commutazione tra le modalità Il dispositivo è dotato di tre modalità: • Video – registra video • Cattura – immagini (fisse) • Modalità riproduzione – riproduce video registrati, foto. Una volta che il dispositivo è acceso, le modalità possono essere attivate utilizzando il pulsante MODE Indicatori LED L’indicatore LED... - Seite 54 Indicatore di risoluzione immagine: indica la risoluzione selezionata per la creazione delle immagini. Indicatore NO CARD: indica che la scheda di memoria micro SD non è stata inserita. Indicatore di stato della batteria: indica il livello della batteria. Modalità di riproduzione Quando il dispositivo è...
- Seite 55 Menu principale Sottomenu Descrizione Registrazione voce ACCENSIONE Il video include la registrazione del suono SPEGNIMENTO Nessuna registrazione audio con video MODALITÀ IMMAGINE Risoluzione 2048x1536 pixel di dimensione 1600x1200 pixel dell'immagine 1.3M 1280x960 pixel 640x480 pixel MODALITÀ RIPRODUZIONE Cancella Menu successivo Delete One = Cancella file corrente Delete All = Cancellare tutti i file sulla scheda micro SD...
- Seite 56 Menu principale Sottomenu Descrizione Inserimento data Menu successivo Selezionare il valore desiderato mediante i pulsanti SINISTRA DESTRA . Premere il pulsante OK per passare alla voce successiva e premere nuovamente il pulsante MENU per tornare al menu di impostazione. Menu successivo Selezionare l'unità...
- Seite 57 Premere la leva verso il basso per consentire alla ventosa di aderire al vetro. Pulsante di ripristino Nel caso in cui il dispositivo non funzioni come dovrebbe o si blocchi, è possibile premere il pulsante di ripristino per riprendere il normale funzionamento. 4) CARATTERISTICHE E SPECIFICHE: Batteria ricaricabile integrata: 3.7 Vcc - 150 Mah agli ioni di litio (0,56 Wh) Dimensione dispositivo: 8 cm x 5,5 cm x 3,0 CM (LxLxP)
- Seite 58 ISTRUZIONI PER LA TUTELA DELL’AMBIENTE (RAEE, direttiva relativa ai rifiuti di apparecchiature elettriche ed elettroniche) Questo prodotto è stato realizzato utilizzando materiali e componenti di alta qualità che possono essere riciclati e riutilizzati. Al termine della durata, il prodotto non può essere smaltito come un normale rifiuto domestico, ma deve essere conferito a un centro di raccolta specifico per il riciclaggio di attrezzature elettriche ed elettroniche, Ciò...
-
Seite 60: Ec Declaration Of Conformity
Declare under our sole responsibility that the product: • Product Brand: Techno Smart • Product Model No: TS-SV-CAM02 • Product Description: Car DVR Camera • Product Rating Car DVR: Input: 5 Vdc -1A, Battery powered: 150 mAh Li-Ion (0.44 Wh) •... - Seite 62 Version 2019.3.20...