Estar T2-601 UHD Bedienungsanleitung
Digitales ansatzstück
Inhaltsverzeichnis
Verfügbare Sprachen
Verfügbare Sprachen
Quicklinks
USER MANUAL
EN
of digital Set Top Box
Please read this User Manual carefully to ensure proper use of this product and keep this manual for future reference.
Important Safety Instructions
1) Read these instructions.
2) Keep these instructions.
3) Heed all warnings.
4) Follow all instructions.
5) Do not use this apparatus near water.
6) Clean only with dry cloth.
7) Do not block any ventilation openings, install in accordance with the instructions.
8) Do not install near any heat sources such as radiations, heat registers, stoves, or other apparatus (including amplifiers) that
produce heat.
9) Do not defeat the safety purpose of the polarized plug. If the provided plug does not fit into your outlet, consult an electrician
for replacement of the obsolete outlet.
10) Protected the power cord from being walked on or pinched particularly at plugs, convenience receptacles, and the point where
they exit from the apparatus.
11) Only use attachments/accessories specified by the manufacturer.
12) Unplug this apparatus during lighting storms or when unused for long periods of time.
13) Refer all servicing to qualified service personnel. Servicing is required when the apparatus has been damaged in any way, such
as power- supply cord or plug is damaged, liquid has been spilled or objects have fallen into the apparatus, the apparatus has
been exposed to rain or moisture, does not operate normally, or has been dropped.
14) AC/DC adapter is used as the disconnect device, the disconnect device shall remain readily operable.
15) The ventilation should not be impeded by covering the ventilation openings with items, such as newspapers, table-cloth,
curtains, etc.
16) No naked flame sources, such as lighted candles, should be placed on the apparatus.
17) Attention should be drawn to the environmental aspects of battery disposal.
18) The use of apparatus in moderate climate.
19) The apparatus shall not be exposed to dripping or splashing and that no objects filled with liquids, such as vases, shall be
placed on the apparatus.
CAutIoN
WARNING: To reduce the risk of fire or electric shock, do not expose this apparatus to rain or moisture.
Risk of electric shock!
WARNING: The batteries shall not be exposed to excessive heat such as sunshine, fire or the like.
DO NOT OPEN!
AttENtIoN
Note: The marking plate was placed on bottom enclosure surface.
Risque de choc electrique!
NE PAS OUvRIR!
The symbol indicates that dangerous voltages constituting a risk of electric shock are present within this unit.
The symbol indicates that there are important operating and maintenance instructions in the literature accompanying
this unit.
This symbol indicates that this product incorporates double insulation between hazardous mains voltage and user
accessible parts .when servicing use only identical replacement parts .
CAUTION: When the apparatus was in electrostatic circumstance, it may be malfunction and need to reset by user.
The USB memory stick should be plug in the unit directly. USB extension cable should not be used to avoid failing of
data transferring and interference caused.
This marking indicates that this product should not be disposed with other household wastes throughout the EU.
To prevent possible harm to the environment or human health from uncontrolled waste disposal, recycle it
responsibly to promote the sustainable reuse of material resources. To return your used device, please use the return
and collection systems or contact the retailer where the product was purchased. They can take this product for
environmental safe recycling.
EN
1
Inhaltsverzeichnis

Verwandte Anleitungen für Estar T2-601 UHD

Inhaltszusammenfassung für Estar T2-601 UHD
- Seite 20 Bedienungsanleitung des digitalen Ansatzstückes Lesen Sie bitte diese Bedienungsanleitung sorgfältig durch, um die sachgemäße Benutzung dieses Produktes zu sichern, und bewahren Sie diese Anleitung für die künftige Referenz auf. Wichtige Sicherheitsinstruktionen 1) Lesen Sie bitte diese Instruktion durch. 2) Bewahren Sie diese Instruktionen auf. 3) Beachten Sie alle Warnungen.
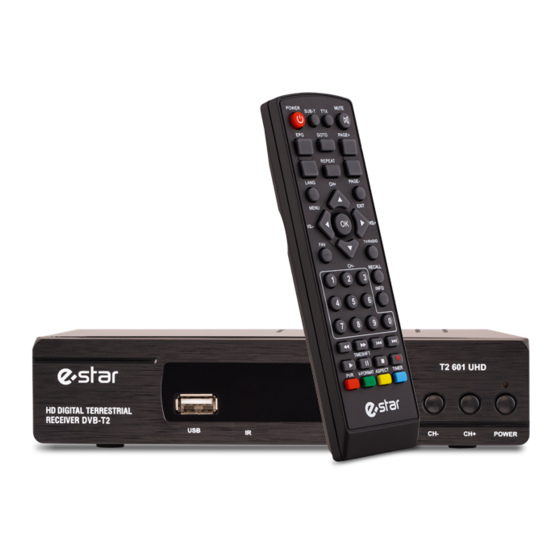
- Seite 21 Front- und Rückpaneel 1. Frontpaneel POWER 1. FERNSTEUERUNGSSENSOR: wird verwendet, um die Signale vom Fernsteuerungspult zu empfangen. 2. WARTEINDIKATOR: wird verwendet, um den Stromstand des digitalen Ansatzstückes visuell anzuzeigen, das grüne LED wird leuchten, wenn das Ansatzstück eingeschaltet ist, und das rote LED wird leuchten, wenn sich das Ansatzstück im Wartemodus befindet. 3.
-
Seite 23: Installationsmenü
3. System und Menü 3.1 System Das aktuelle System unterstützt: DTV-Modus und Multimedia-Modus. DTV-Modus ist für TV-Übertragung, Multi-Media-Modus ist für den Betrieb von Multimedia-, Spiel-, Aufnahme-, Platten-Management, etc. Auto-Eingang DTV-Modus nach dem Start des Systems, drücken Sie [SOURCE], um den verschiedenen Modus zu wechseln. 3.2Menü... - Seite 24 3.2.2 Kanalmenü Pic 3.2.2 Channel Menu 3.2.3 Vorzugsmenü Einstellung nur im DTV-Modus Einstellung nur im USB Modus Einstellung im USB&DTV Modus Pic 3.2.3 Preference Menu...
- Seite 25 3.2.4 Einstellungsmenü Einstellung nur im DTV-Modus Einstellung nur im USB Modus Einstellung im USB&DTV Modus Pic 3.2.4 Setting Menu 3.2.5 AV Menü Einstellung nur im DTV-Modus Einstellung nur im USB Modus Einstellung im USB&DTV Modus Pic 3.2.5 AV Menu...
-
Seite 26: Sprache & Links- Und Rechts-Kanalumschaltung
3.2.6 Spielmenü Einstellung nur im DTV-Modus Einstellung nur im USB Modus Einstellung im USB&DTV Modus Pic 3.2.6 Game Menu 4. DTV modus 4.1 Initialisierung Initialisierung wird benötigt für die erstmalige Eingabe in das Syste, indem Sie Sprache, Land, Zeitzone, aktive Antenne und Kanalnum- mer usw. - Seite 27 2. Drücken Sie [LINKS / RECHTS], um zwischen linkem und rechtem Kanal oder Stereo zu wählen, und drücken Sie [UP / DOWN], um die Sprache auszuwählen. 3. Drücken Sie [ENTER], um das Setup zu beenden. 4.3 EPG 1. Drücken Sie [EPG], um die Programminformationen zu überprüfen: Pic 4.3.1 EPG Menu Default EPG zeigt Now / Next Mode mit 7 Teilen: 1.
- Seite 28 3. Rote Taste drücken, um in den Wöchentlichen Modus zu gelangen: Pic 4.3.3 Weekly Mode 1. Drücken Sie [LINKS / RECHTS], um die Fenster zu wechseln. 2. Drücken Sie die gelbe Taste oder die blaue Taste, um Fernsehprogramme auf gestern oder morgen zu schalten. 4.4 Teletext Drücken Sie [TTX], um das Programm-Menü...
-
Seite 29: Haupt Menü
5. Multimedia-Modus Pic 5 Multi-media List Drücken Sie [SOURCE], um den DTV-Modus oder den Multi-Media-Modus zu wechseln. Wenn Sie Multimedia-Modus wählen, es wird geprüft, ob ein USB-Gerät (CARD) automatisch vorhanden ist. Wenn es keine USB (CARD) Geräte oder USB (CARD) Geräte herausgezogen wird, zeigt es wie pic 5.1: Pic5.1 NO USB(CARD) USB-Flash einlegen und die Initialisierung wird automatisch bearbeitet:... -
Seite 30: Automatische Suche
6.1 Installation [Installation] enthält die automatische Suche, die manuelle Suche und den Kanalfilter. Hinweis: Dieses Memü kann nicht im Multi- Media-Modus gewählt werden. Pic 6 Main Menu Drücken Sie [UP / DOWN], um [Installation] auszuwählen, drücken Sie dann [ENTER] oder [RIGHT], um das Standardpasswort (0000) einzugeben: Pic 6.1 Installation 6.1.1 Automatische Suche... -
Seite 31: Manuelle Suche
Das System scannt Programme und bewahrt sie automatisch auf: Pic 6.1.1Auto Search 6.1.2 Manuelle Suche 1.Drücken Sie [UP / DOWN], um [Manuelle Suche] auszuwählen, und drücken Sie dann [ENTER] oder [RIGHT]: Pic 6.1.2 Manual Search 2. Stellen Sie die Parameter vor der manuellen Suche ein, einschließlich der folgenden drei Parameter: (1) Kanal Nr .: Abtaststations-ID, jedes Land hat eine Standard-Stations-ID, man kann es mit der Zifferntaste (0 ~ 9) ändern, wenn die Stations-ID eingerichtet wurde, andere zwei Parameter werden nicht benötig einzustellen;... -
Seite 32: Osd-Sprache
6.3 OSD-Sprache [OSD Sprache] wird hauptsächlich verwendet, um die Sprache von Menü und Tipps zu ändern. Drücken Sie [UP / DOWN], um die Sprache auszuwählen, und drücken Sie dann [ENTER] zur Bestätigung. Wie Bild 6.12 zeigt: Pic 6.3 OSD Language Setting 6.3.1 Multimedia [Multimedia] kann nur im Multimedia-Modus eingerichtet werden. - Seite 33 6.4.1 Zeitgeber Timer wird verwendet, um das reservierte Programm zu verwalten und zu bearbeiten.Timer-Menü kann Namen, Startzeit und Art des reservierten Programms anzeigen und bearbeiten: Pic 6.4.1 Timer List Von links nach rechts sind: Nummer, Programmname, Datum, Uhrzeit, Modus, reservierter Typ. Pic 6.4.1.1 Timer Edit 1.
- Seite 34 6.4.2 Kindersicherung [Die Kindersicherung] dient zum Einrichten der Kindersicherung und zur Begrenzung des Programms, um zu vermeiden, dass Kinder einige ungeeignete Informationen erhalten., Wählen Sie [Kindersicherung] und tippen Sie dann auf [ENTER], um das Passwort zu öffnen. Passwort (die Voreinstellung ist vier mal 0), gehen Sie in das Menü, wie Bild 6.4.2 zeigt: Pic 6.4.2 Child Lock [Kindersicherung] 1.
- Seite 35 [AV] dient zum Einstellen der zugehörigen Optionen für Videoausgang, Helligkeit, Auflösung, Ausgabeformat usw. Im [Hauptmenü] drücken Sie [UP / DOWM], um [AV] auszuwählen, tippen Sie auf [ENTER]Wie Bild 6.5 zeigt: Pic 6.5 AV Setting 6.5.1 Videoauflösung [Videoauflösung] Für die Einstellung der Ausgabevideoauflösung und der Bildwiederholrate, unterstützt sie bis zu 1080P_60 (Full HD). Nach Auswahl von [Videoauflösung] tippen Sie auf [ENTER].
-
Seite 36: Aufnahme & Timeshift
Das Spiel vom System zur Verfügung gestellt: 1, Kasten-Mann 2, Tetris 3, Hit-Ratte 4, gehen Sie Bang 5, Sudoku 7. Aufnahme & Timeshift 7.1 Aufnahme Im Vollbildmodus, wenn Sie das Fernsehprogramm aufnehmen möchten, drücken Sie [REC]. Wenn Sie keine Verbindung zu einem USB (CARD) hergestellt haben, wird diese folgende Meldung angezeigt: Pic 7.1 Without USB(CARD) Equipment... - Seite 37 Bei der Aufnahme drücken Sie [INFO], um detaillierte Informationen anzuzeigen, drücken Sie erneut [INFO] und zeigen die Liste der aufgenommenen Bilder wie Bild 7.1.3 Pic 7.1.3 Record List 7.2 Timeshift Timeshift wird verwendet, um vorherige TV-Programm wiedergeben, gibt es 3 Möglichkeiten, Timeshift verwenden. Sie können die Einstellung in [Hauptmenü] ->...