Herunterladen Diese Seite drucken

Werbung

Verfügbare Sprachen
  • DE

Verfügbare Sprachen

  • DEUTSCH, seite 18
Phono Preamp Pro
REGISTER NOW
ENREGISTRER
This product comes with a 1 year limited warranty.
Register this product within 30 days of sale to activate a
complimentary 2 year warranty extension and receive free advanced
technical support. Learn more and register now.
Ce produit a une garantie limitée de 1 an.
Enregistrez ce produit dans les 30 jours suivant son achat pour activer
l'extension de garantie de 2 ans et bénéficer de notre service après-
vente gratuit. Pour en savoir plus, enregistrez ce produit dès à présent.
GOgroove.com/warranty

Werbung

loading

Inhaltszusammenfassung für Go groove Phono Preamp Pro

  • Seite 1 Phono Preamp Pro REGISTER NOW ENREGISTRER This product comes with a 1 year limited warranty. Register this product within 30 days of sale to activate a complimentary 2 year warranty extension and receive free advanced technical support. Learn more and register now.
  • Seite 4 Product diagram Schéma du produit Diagrama de product Producktabbildung Schema del prodotto 产品图...
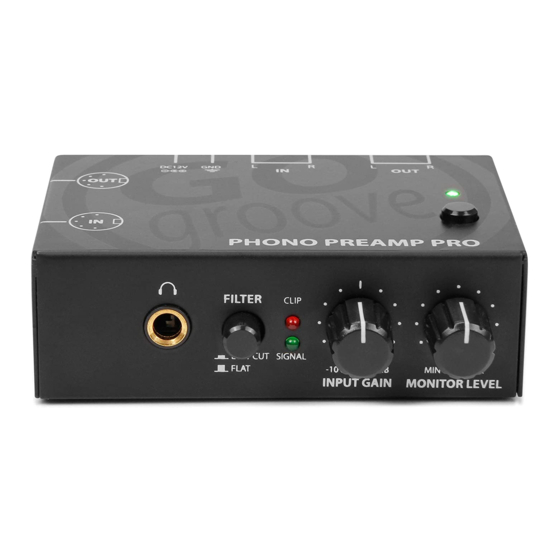
  • Seite 5 AC adapter Adaptateur secteur Adaptador AC DIN output Sortie DIN Salida DIN DIN input Entrée DIN Entrada DIN LED power indicator Indicateur LED de puissance Indicador LED de encendido Power button Bouton d'alimentation Botón de encendido 1/4 Headphone port Port casque 1/4 Puerto de auriculares 1 / 4 Filter button Bouton de filtre...
  • Seite 6 Operating instructions Power Connect the AC adapter to the DC 12V input. Connect the ground wire from the turn table to the GND screw. Press the power button to turn on. The power indicator will be lit.
  • Seite 7 Input RCA: Connect your turntable to the RCA IN ports L and R . NOTE: The signal indicator will be lit when receiving audio. DIN: Connect DIN cable to the DIN IN port. NOTE: The signal indicator will be lit when receiving audio.
  • Seite 8 Output The preamp can be connected to amplifiers, mixers and recording units. Do not use the RCA and DIN outputs simultaneously. RCA: Connect RCA cables to the RCA OUT ports DIN: Connect DIN cable to the DIN OUT port. L and R.
  • Seite 9 Controls MONITOR: Connect headphones with 1/4 connector to the headphone port. Use the Monitor Level knob to adjust the volume. INPUT GAIN: Adjust the input gain until the Clip indicator blinks briefly during the loudest parts of the music. If sound is distorted, turn the gain down further. FILTER: Press the Filter button to remove turntable rumble.
  • Seite 10 Mode d’emploi Puissance Connectez l’adaptateur secteur à l’ e ntrée DC 12V. Connectez le fil de terre de la platine à la vis GND. Appuyez sur le bouton d’alimentation pour mettre en marche. Le témoin d’alimentation s’allumera.
  • Seite 11 Entrée RCA : connectez votre platine aux ports RCA IN L et R. REMARQUE : L’indicateur de signal s’allumera à la réception d’un signal audio. DIN : Connecter le câble DIN au port DIN IN. REMARQUE : L’indicateur de signal s’allumera à la réception d’un signal audio.
  • Seite 12 Sortie Le préampli peut être connecté à des amplificateurs, des tables de mixage et des unités d’ e nregistrement. N’utilisez pas les sorties RCA et DIN simultanément. RCA : connectez les câbles RCA aux ports RCA DIN: Connectez le câble DIN au port DIN OUT. OUT L et R.
  • Seite 13 Commandes MONITEUR : connectez un casque avec un connecteur 1/4 au port casque. Utilisez le bouton de niveau du moniteur pour régler le volume. GAIN D’ENTRÉE : Ajustez le gain d’ e ntrée jusqu’à ce que l’indicateur de clip clignote brièvement pendant les morceaux de musique les plus forts.
  • Seite 14: Instrucciones De Uso

    Instrucciones de uso Activar Conectar el adaptador AC a la entrada DC de 12 V. Conecte el cable de tierra del tocadiscos al tornillo GND. Pulse el botón de encendido para activar. El indicador de encendido se iluminará.
  • Seite 15 Entrada RCA: conecte su tocadiscos a los puertos RCA IN L y R. NOTA: el indicador de señal se iluminará cuando reciba audio. DIN: conecte el cable DIN al puerto DIN IN. NOTA: el indicador de señal se iluminará cuando reciba audio.
  • Seite 16 Salida El preamplificador se puede conectar a los amplificadores, a los mezcladores y a las unidades de grabación. No use las salidas RCA y DIN simultáneamente. RCA: conecte los cables RCA a los puertos RCA DIN: conecte el cable DIN al puerto DIN OUT. OUT L y R.
  • Seite 17 Controles MONITOR: conecte los auriculares con un conector 1 / 4 al puerto de auriculares. Use el modulador de nivel de monitor para ajustar el volumen. GANANCIA DE ENTRADA: ajuste la ganancia de entrada hasta que el indicador de clip parpadee brevemente durante las partes más altas de la música.
  • Seite 18 Bedienungsanleitung Leistung Schließen Sie den Netzadapter an den DC-12-V Eingang an. Verbinden Sie das Massekabel vom Plattenteller mit der GND-Schraube. Drücken Sie den Netzschalter, um einzuschalten. Die Stromanzeige leuchtet auf.
  • Seite 19 Eingang Cinch: Schließen Sie Ihren Plattenspieler an die Cinch-Eingänge L und R an. HINWEIS: Die Signalanzeige leuchtet auf, wenn Audio empfangen wird. DIN: Schließen Sie das DIN-Kabel an den DIN-IN-Anschluss an. HINWEIS: Die Signalanzeige leuchtet auf, wenn Audio empfangen wird.
  • Seite 20 Ausgang Der Vorverstärker kann an Verstärker, Mixer und Aufnahmegeräte angeschlossen werden. Verwenden Sie die Cinch- und DIN-Ausgänge nicht gleichzeitig. Cinch: Schließen Sie Cinch-Kabel an die Cinch- DIN: Schließen Sie das DIN-Kabel an den DIN- OUT-Anschlüsse L und R an. OUT-Anschluss an.
  • Seite 21 Kontrollelemente MONITOR: Schließen Sie Kopfhörer mit 6,35-mm-Stecker an den Kopfhöreranschluss an. Verwenden Sie den Monitor-Level-Regler, um die Lautstärke einzustellen. EINGANGSVERSTÄRKUNG: Justieren Sie die Eingangsverstärkung solange, bis die Clip-Anzeige während der lautesten Stellen der Musik kurz blinkt. Wenn der Klang verzerrt ist, drehen Sie die Verstärkung weiter nach unten.
  • Seite 22 Istruzioni d’uso Accensione Connettere l’adattatore AC all’ingresso DC. Connettere il cavo di messa a terra dal giradischi alla vite GND. Premere il pulsante di accensione per accendere. Il pulsante di accensione si illuminerà.
  • Seite 23 Ingresso RCA: Connettere il giradischi alle porte RCA IN L e R. NOTA: L’indicatore del segnale si accenderà quando riceve l’audio. DIN: Connettere il cavo DIN alla porta DIN IN. NOTA: L’indicatore del segnale si accenderà quando riceve l’audio.
  • Seite 24 Uscita Il preamplificatore può essere connesso ad amplificatori, mixer e unità di registrazione. Non utilizzare le uscite RCA e DIN simultaneamente. RCA: Connettere i cavi RCA alle porte RCA DIN: Connettere il cavo DIN alla porta DIN OUT. OUT L e R.
  • Seite 25 Controlli MONITOR: Connettere le cuffie con il connettore da 1/4 alla porta per le cuffie. Utilizzare la manopola di Livello del Monitor per regolare il volume. GUADAGNO D’INGRESSO: Regolare il guadagno d’ingresso fino a quando l’indicatore Clip non inizierà a lampeggiare brevemente durante la parte più...
  • Seite 26 操作说明 电源 将电源适配器连接到 输入。 将转盘地线连接到地线螺丝。 按下电源按钮开机,电源指示灯会亮起来。...
  • Seite 27 输入 RCA:把转盘连接到 RCA “入”(IN) 插口左 (L) 和右 (R)。 注意:接收音频时信号指示灯会亮起来。 DIN: 连接 DIN 插线到 DIN “入”(IN) 接口。 注意:接收音频时信号指示灯会亮起来。...
  • Seite 28 输出 前置放大器可以连接到扩音器、混音器和录音装置。请勿同时使用 RCA 和 DIN 输出。 RCA:把 RCA 插线连接到 RCA “ DIN: 连接 DIN 插线到 DIN “出”(OUT) 出”(OUT) 插口左 (L) 和右 (R)。 接口。...
  • Seite 29 控制 显示器:用 1/4 连接器连接耳机到耳机接口。 用显示器电平旋钮调节音量。 输入增加:调节输入增加直到限幅指示灯在音乐最响的部分短暂闪烁。如 果声音扭曲,把增加再调低一些。 滤音器:按下“滤音器”按钮来移除转盘翁翁的声音。...
  • Seite 30 Product specifications Spécifications du produit Especificaciones del producto Produktspezifikationen Specifiche del prodotto 产品规格 Input Entrée Connector: RCA, DIN Connecteur: RCA, DIN Impedance: Phono 47 kOhm Impédance: Phono 47 kOhm Power: 12V ⎓ 500 mA Puissance: 12 V ⎓ 500 mA Sensitivity: -28d BV Sensibilité: -28 dBV Output...
  • Seite 31 FCC Compliance Notice This device complies with Part 15 of the FCC Rules. Operation is subject to the following two conditions: 1) this device may not cause harmful interference, and 2) this device must accept any interference received, including interference that may cause undesired operation.
  • Seite 32: Warranty Garantie Garantía

    © 2018 AP Global, Inc. Tous droits réservés. Accessory Power, le logo Accessory Power, GOgroove, le logo GOgroove et Phono Preamp Pro les autres marques et logos sont des marques déposées ou des marques de AP Global, Inc. aux États-Unis et/ou dans d’autres pays.