Ecco EC7008-WK Installations- Und Bedienungsanleitung
Drahtloses kamera-/überwachungssystem
Inhaltsverzeichnis
Verfügbare Sprachen
Verfügbare Sprachen
Quicklinks
!
WARNING!
Failure to install or use this product according to manufacturer's recommendations may result in property damage, serious bodily/personal injury,
and/or death to you and those you are seeking to protect!
Do not install and/or operate this safety product unless you have read and understand the safety information
contained
1. Proper installation combined with operator training in the use, care, and maintenance of safety products are essential to ensure the safety of
you and those you are trying to protect.
2. Exercise caution when working with live electrical connections.
3. This product must be properly grounded. Inadequate grounding and/or shorting of electrical connections can cause high current arcing, which
can cause personal injury and/or severe vehicle damage, including fire.
4. Proper placement and installation are vital to the performance of this safety product. Install this product so that the performance of the system
is maximized and the controls are placed within convenient reach of the operator so that s/he can operate the system without losing eye contact
with the roadway.
5. It is the responsibility of the vehicle operator to ensure during use that all features of this product work correctly. In use, the vehicle operator
should ensure the field-of-view of the camera/monitor is not blocked by vehicle components (i.e., open trunks or compartment doors), people,
vehicles, or other obstructions.
6. Never take the right-of-way for granted. It is your responsibility to be sure you can proceed safely before entering an intersection, driving
against traffic, responding at a high rate of speed, walking on or around traffic lanes.
7. This equipment is intended for use by authorized personnel only. The user is responsible for understanding and obeying all laws regarding
safety products. Therefore, the user should check all applicable city, state, and federal laws and regulations. The manufacturer assumes no
liability for any loss resulting from the use of this safety product.
Installation, Wiring and Function
!
Caution! When drilling into any vehicle surface, make sure that the area is free from any electrical wires, fuel lines,
vehicle upholstery, etc. that could be damaged.
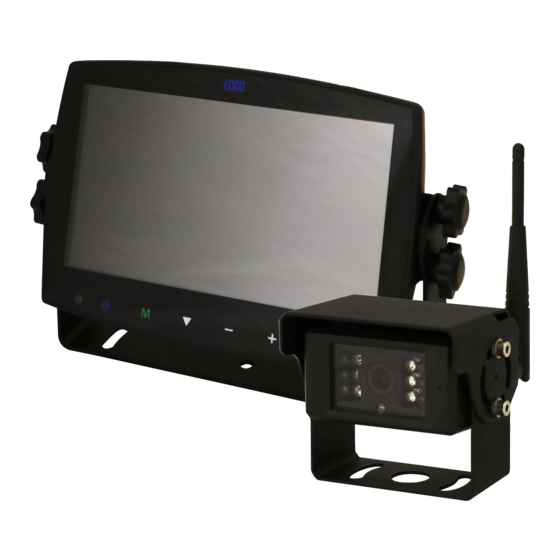
CAMERA SYSTEM MODEL EC7008-WK
OPERATING INSTRUCTIONS:
Remote
Control
Sensor
Power
Menu
Record/Select
Digital Color LED Screen
M
S
Camera Channel Select
Volume Increase/Menu Navigation
Volume Decrease/Menu
Navigation
Installation Instructions
Wireless Camera/Monitor System
Ecante-5
Loudspeaker
Dimming Sensor
U-Support Bracket
Mini SD Card Slot
Pedestal Mount Slot
Page 1 of 11
Inhaltsverzeichnis

Inhaltszusammenfassung für Ecco EC7008-WK
-
Seite 34: Installations- Und Bedienungsanleitung Drahtloses Kamera-/Überwachungssystem
Bundesebene prüfen. Der Hersteller übernimmt keine Haftung für Verluste, die durch die Verwendung dieses Sicherheitsprodukts entstehen. Installation, Verdrahtung und Funktion Achtung! Achten Sie beim Bohren in eine Fahrzeugoberfläche darauf, dass der Bereich frei von elektrischen Leitungen, Kraftstoffleitungen, Fahrzeugpolstern usw. ist, die beschädigt werden könnten. BETRIEBSANLEITUNG KAMERASYSTEM MODELL EC7008-WK: Ecante-5 Steckplatz für miniSD-Karte Digitaler LED-Farbbildschirm... -
Seite 35: Anweisungen Zur Verkabelung
6. Leistungsschalter reagieren sehr empfindlich auf hohe Temperaturen und werden „falsch ausgelöst“, wenn sie in heißen Umgebungen montiert oder nahe ihrer Kapazitätsgrenze betrieben werden. EC7008-WK Das Gerät ist für elektrische Systeme von 12 bis 24 VDC (Extreme 10 bis 30 VDC) ausgelegt. Die Verdrahtung erfolgt wie in Abbildung 1 gezeigt: Alle Kabel sollten mindestens über 26 AWG verfügen. -
Seite 36: Erkennung Der Monitorteile
ERKENNUNG DER MONITORTEILE Aktivieren bzw. deaktivieren Drücken, um den Monitor Sie per Tastendruck die ein-/auszuschalten Stummschaltung MUTE POWER Lauter stellen und Drücken Sie die Taste OK, um Menüauswahl links das Menüelement aufzurufen oder die Benutzereinstellungen zu speichern. Die Taste OK dient als Kurzbefehl zum Start- en/Beenden der Aufnahme Lauter stellen und... - Seite 37 KOPPLUNG DER ZWEITEN KAMERA 1. Klicken Sie auf der Fernbedienung auf „Menü“ 2. Wechseln Sie mit dem Rechtspfeil mit der Bezeichnung „Lautstärke“ zur gelb hervorgehobenen Menüoption PAIRING (KOPPLUNG) 3. Bestätigen Sie die Auswahl mit der Taste OK A. Während des Kopplungsvorgangs wird auf dem Monitor ein Countdown von 50 Sekunden abwärts angezeigt 4.
-
Seite 38: Lautstärkeeinstellung
LAUTSTÄRKEEINSTELLUNG In den Modi mit einem Kamerabild kann die Lautstärke über die Tasten „+“ und „-“ am Monitor bzw. „<“ und „>“ auf der Fernbedienung eingestellt werden. In den Modi mit zwei bzw. vier Kamerabildern wird über die Menüoption „Split Audio“ (Geteiltes Audio) die Audiowiedergabe von einer Kamera ausgewählt (Einzelheiten siehe unten). - Seite 39 MENÜOPTION: SPLIT-AUDIO (GETEILTES AUDIO) AUSWAHL EIN/AUS Über die Menüoption „Split-Audio“ (Geteiltes Audio) können Sie auswählen, von welcher Kamera das Audiosignal wiedergegeben wird. Kehren Sie zu einem der Einzelbildmodi zurück, wenn Sie die Lautstärke ändern möchten. Die im Einzelbildmodus ausgewählte Lautstärke wird in alle anderen Wiedergabemodi übertragen. Im Wiedergabemodus mit zwei oder vier Kamerabildern kann die Lautstärke nicht eingestellt werden.
- Seite 40 Über den Monitor: Über die Fernbedienung: 1. Drücken Sie „M“, um in das Menü zu gelangen 1. Drücken Sie MENU, um in das Menü zu gelangen 2. Drücken Sie „+“ bzw. „-“, um die Option AUTOSCAN (AUTOMATISCHER 2. Drücken Sie „<“ bzw. „>“, um die Option AUTOSCAN (AUTOMATISCHER SCAN) hervorzuheben SCAN) hervorzuheben 3.
-
Seite 41: Monitormodell Ec7008-Wm Installation Und Montage
MENÜOPTION: PLAY (WIEDERGABE) IEDERGABE DER AUFNAHME Informationen zur Einrichtung des Passcodes finden Sie im Abschnitt „Record“ („Aufnahme“). Sie benötigen den Passcode, um nach der Ersteinrichtung auf das Menü zuzugreifen. Über den Monitor: Über die Fernbedienung: 1. Drücken Sie „S“, um in den Einzelbildmodus zu gelangen, der angepasst 1. - Seite 42 Abbildung 2 Abbildung 3 Anleitung für Sockelmontage: 1. Wählen Sie eine ebene Fläche für die Installation aus. 2. Für die Montage des Sockels mit dem Klebstoff müssen Sie die Oberfläche zuvor durch Einreiben mit Alkohol reinigen, wie in Abbildung 4 gezeigt. 3.
-
Seite 43: Kameramodell Ec2027-Wc Installation Und Montage
KAMERAMODELL EC2027-WC INSTALLATION UND MONTAGE: Wichtig! Montieren Sie die Kamera an einem Ort, der optimale Sicht auf den Bereich direkt hinter dem Fahrzeug ermöglicht. Im Allgemeinen empfiehlt sich die Anbringung der Kamera oben am Fahrzeug, um ein gutes Sichtfeld zu erhalten. Wird die Kamera weiter unten angebracht, so verkleinert sich das Sichtfeld und die Wahrscheinlichkeit von Schäden durch Spritzer von der Fahrbahn erhöht sich. -
Seite 44: Ersatzteile Und Zubehör
MONITOR EC7008-WM KABEL PCY-7008-WM ANTENNE ECANTE-R SOCKELHALTERUNG MB01 SONNENBLENDE AS7000SS Spezifikationen: Monitor LCD-Monitor EC7008-WK mit 177,8 mm (7”) Kamera EC2027-WC LCD-Größe 177,8 mm (7”) Bildgebendes Gerät 8,5 mm (1/3”) CMOS Auflösung 800 x 3 (RGB) x 480 TV-System PAL/NTSC Kontrast 500:1 Array-Größe... -
Seite 45: Dkonformitätserklärung
ECC0 (Hersteller) ECCO garantiert, dass dieses Produkt zum Zeitpunkt des Erwerbs den Spezifikationen von ECCO für dieses Produkt (auf Anfrage bei ECCO erhältlich) entspricht. Diese beschränkte Garantie gilt sechzig (60) Monate ab dem Zeitpunkt des Erwerbs. BEI SCHÄDEN AN TEILEN ODER PRODUKTEN, DIE DURCH MANIPULATION, UNFALL, MISSBRAUCH, UNSACHGEMÄSSE VERWENDUNG, FAHRLÄSSIGKEIT, NICHT GENEHMIGTE VERÄNDERUNGEN, FEUER ODER SONSTIGE GEFAHR;...