NEC WM-46S-L Bedienungsanleitung Zur Wandbefestigung
Quicklinks
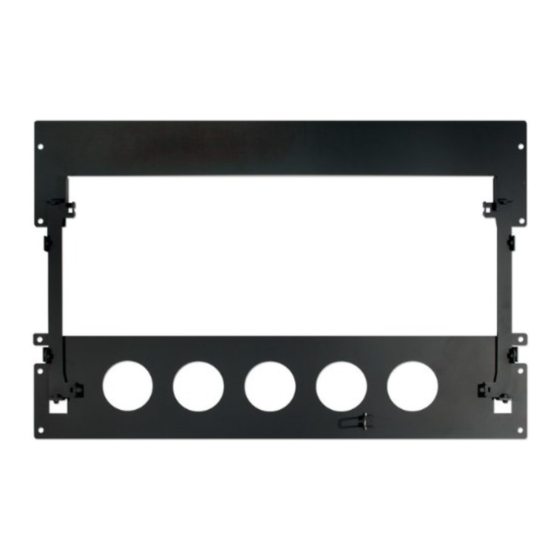
Wall mount User's Manual
Manuel de l'utilisateur du montage mural
Manual de usuario para el montaje en pared
Bedienungsanleitung zur Wandbefestigung
Manuale Utente della staffa a muro
薄型壁掛け金具 (横置き用) 取扱説明書
壁挂架用户手册
(WM-46S-L)
This wall mount is exclusively for use with the NEC MultiSync X461S and NEC MultiSync X551S. Do not use
this with other models.
Ce montage mural est à utiliser exclusivement avec les appareils NEC MultiSync X461S et NEC MultiSync
X551S. Ne l'utilisez pas avec d'autres modèles.
Este montaje en pared es de uso exclusivo para el NEC MultiSync X461S y NEC MultiSync X551S. No lo
utilice con otros modelos.
Diese Wandbefestigung ist ausschließlich zur Verwendung mit dem NEC MultiSync X461S und NEC MultiSync
X551S vorgesehen. Verwenden Sie sie nicht mit anderen Modellen.
Questa staffa a muro è esclusivamente per l'uso con NEC MultiSync X461S e NEC MultiSync X551S. Non
utilizzarla con altri modelli.
LCD-X461S
この薄型壁掛け金具は
NEC MultiSync X461S
此壁挂架仅适用于
Contents
•
Wall bracket (top) × 1
•
Wall bracket (bottom) × 1
•
Monitor bracket × 2
•
Tilt bracket × 2
•
Screw (M6) × 8
Lieferumfang
•
Wandhalterung (oben) × 1
•
Wandhalterung (unten) × 1
•
Bildschirmhalterung × 2
•
Kipphalterung × 2
•
Schraube (M6) × 8
物品清单
•
1
壁挂支架(上端)×
•
1
壁挂支架(下端)×
•
2
显示器支架 ×
•
2
倾斜式支架 ×
•
M 6
8
螺丝(
)×
LCD-X551S
および
専用です。その他の機種には使用しないでください。
NEC MultiSync X551S
以及
Contenu
•
Support mural (haut) × 1
•
Support mural (bas) × 1
•
Support de moniteur × 2
•
Support d'inclinaison × 2
•
Vis (M6) × 8
Contenuti
•
Staffa a muro (superiore) × 1
•
Staffa a muro (inferiore) × 1
•
Staffa monitor × 2
•
Staffa basculante × 2
•
Vite (M6) × 8
– 1 –
。请勿将其用于其他型号。
Contenidos
•
Soporte de pared (superior) × 1
•
Soporte de pared (inferior) × 1
•
Soporte de monitor × 2
•
Soporte de inclinación × 2
•
Tornillo (M6) × 8
付属品
•
1
壁側金具(上) ×
•
1
壁側金具(下) ×
•
ディスプレイ金具 ×
•
チルト金具 ×
2
•
ネジ(
M6
) ×
8
2

Verwandte Anleitungen für NEC WM-46S-L

Inhaltszusammenfassung für NEC WM-46S-L
- Seite 1 壁挂架用户手册 (WM-46S-L) This wall mount is exclusively for use with the NEC MultiSync X461S and NEC MultiSync X551S. Do not use this with other models. Ce montage mural est à utiliser exclusivement avec les appareils NEC MultiSync X461S et NEC MultiSync X551S.
- Seite 2 Caution • Die Montage und Demontage des Bildschirms von der Wandbefestigung muss von einer ausreichenden Anzahl von Personen durchgeführt • DO NOT mount the monitor yourself. Ask your dealer for assistance. werden, um die Sicherheit zu gewährleisten (zwei Personen oder mehr). For proper installation it is strongly recommended to use a trained, Falls nicht, könnte der Bildschirm herunterfallen und Verletzungen qualified technician.
- Seite 3 Installation Procedure/Procédure d’installation/Procedimiento de instalación/ Installationsverfahren/Procedura d’installazione/ 設置手順 / 安装步骤 Attach the wall brackets (top) and (bottom) to the wall as shown on the installation drawing (separate sheet). NOTE: As shown on the diagram below, the wall mount holes in wall brackets (top) and (bottom) are ⌀11 holes (Fig. 1). When mounting, choose screws (M10 or equivalent) suited to the wall’s conditions.
- Seite 4 Place a protective sheet on a table or other flat surface, then place the monitor on top with the back of the monitor facing up. Remove the two optional stand holders attached to the bottom of the monitor (Fig. 2-1), then switch the monitor’s left and right handles from diagonal (Fig.
- Seite 5 Mounting the monitor brackets Montage des supports du moniteur Montaje de los soportes de monitor Montage der Bildschirmhalterungen Montaggio delle staffe monitor ディスプレイ金具の取り付け 安装显示器支架 3-1. When mounting only the monitor brackets Mount the two monitor brackets to the left and right sides of the back of the monitor using the included screws (M6). (Fig. 3-1) Lorsque vous installez uniquement les supports du moniteur Installez les deux supports de moniteur sur les côtés gauche et droit à...
- Seite 6 3-2. When using the tilt brackets By using the tilt brackets, the monitor can be installed at an angle of 5° with respect to the wall. Mount the two tilt brackets and the two monitor brackets to the left and right sides of the back of the monitor using the included screws (M6).
- Seite 7 Lift the monitor and hook the monitor brackets into the V-shaped notches in the wall bracket (top) (Fig. 4). Caution: Do not release your hands from the monitor until you are sure it is securely fastened to the wall bracket. Moving, installing or mounting should be performed by a sufficient number of persons to ensure safety (two or more people).
- Seite 8 Pull the bottom of the monitor slightly forward and lift the prop at the center of the wall bracket (bottom) (Fig. 5-2) to provide space for wires (Fig. 5-1). Caution: Do not turn on the power or leave for long periods of time with the prop lifted. During the procedure, be careful not to get your fingers caught.
- Seite 9 Put the prop back in its original position, then fasten the monitor brackets and wall bracket (bottom) using the included screws (M6). Fasten at the fastening points on the left and right sides. Also, depending on the installation conditions, the fastening points on the bottom can also be used (Fig. 6). (Be sure the set screws on the left and right sides are fastened with the same force.) Caution: Do not let the monitor bang against the wall bracket (bottom).