Inhaltsverzeichnis
Werbung
Verfügbare Sprachen
Verfügbare Sprachen
Quicklinks
Charging Station Cart
36-Outlet Model: CSCXS36AC, CSCXB36AC
PROTECT YOUR INVESTMENT!
Register your product for quicker service and ultimate peace of mind.
You could also win an ISOBAR6ULTRA surge protector-a $100 value!
Copyright © 2018 Tripp Lite. All trademarks are the sole property of their respective owners.
Owner's Manual
Table of Contents
www.tripplite.com/warranty
1111 W. 35th Street, Chicago, IL 60609 USA • www.tripplite.com/support
2
2
3
5
5
5
5
6
7
7
8
8
8
9
17
25
33
1
Werbung
Kapitel
Inhaltsverzeichnis

Inhaltszusammenfassung für Tripp Lite CSCXS36AC
-
Seite 1: Inhaltsverzeichnis
Register your product for quicker service and ultimate peace of mind. You could also win an ISOBAR6ULTRA surge protector—a $100 value! www.tripplite.com/warranty 1111 W. 35th Street, Chicago, IL 60609 USA • www.tripplite.com/support Copyright © 2018 Tripp Lite. All trademarks are the sole property of their respective owners. -
Seite 2: Important Safety Instructions
1. Important Safety Instructions SAVE THESE INSTRUCTIONS This manual contains instructions and warnings that must be followed during the installation and operation of the product described in this manual. Failure to comply may invalidate the warranty and cause property damage or personal injury. AC Unit: •... -
Seite 3: Feature Identification
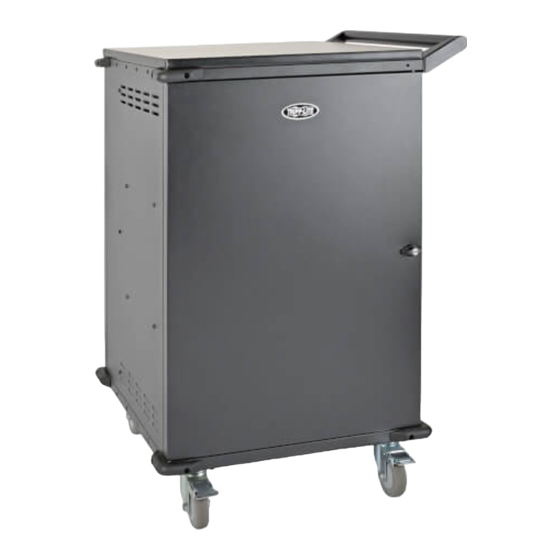
3. Feature Identification Front View Included Accessory Hardware 10 x Hex Screws Hex Key Laminate Desktop Surface Reversible Handle Power Cord Manager Power Cord Access Hole Corner Safety Bumpers (6 Total) Storage Shelves with Removable Dividers Locking Front Door Keys Swivel Locking Casters... -
Seite 4: Rear View
3. Feature Identification Rear View Power Unit C13 to BS 1363 (CSCXB32AC) or Schuko (CSCXS32AC) Power Cord, 3 m Power Brick Storage Baskets 9-Outlet AC Power Distribution Units* (4 Total) Locking Rear Door CSCXB32AC* CSCXS32AC* *Plug and outlet type will vary by model. For more information, refer to 4.4 Connecting Devices and Powering the AC Unit. -
Seite 5: Setup
4. Setup Caution! Read All Instructions and Warnings Before Installation! Warning: Charging stations can be extremely heavy. Do not attempt to unpack the charging station without assistance. Follow the unpacking instructions document that shipped with this product before proceeding with setup. Use extreme caution when handling the charging station and be sure to follow all handling and installation instructions. -
Seite 6: Connecting Devices And Powering The Ac Unit
4. Setup 4.4 Connecting Devices and Powering the AC Unit Your charging station contains three baskets . To connect the device power bricks, place the bricks in the basket. Plug the power brick into an outlet on the AC charger unit , then run the device cable and connector through a device slot . -
Seite 7: Door Locks
4. Setup Connect all devices and place on their respective shelves. Once all devices are connected and stored, find the AC unit’s input plug and cable located in the charging station’s bottom compartment. Run the cable’s C13 connector through the cable access hole . -
Seite 8: Specifications
Regulatory Compliance Identification Numbers For the purpose of regulatory compliance certifications and identification, your Tripp Lite product has been assigned a unique series number. The series number can be found on the product nameplate label, along with all required approval markings and information. When requesting compliance information for this product, always refer to the series number. The series number should not be confused with the marketing name or model number of the product. -
Seite 9: Español
Pantalla 6. Especificaciones 7. Almacenamiento, Servicio y Limpieza 8. Garantía English Français Русский Deutsch 1111 W. 35th Street, Chicago, IL 60609 EE. UU. • www.tripplite.com/support Copyright © 2018 Tripp Lite. Todas las marcas registradas son propiedad de sus respectivos propietarios. -
Seite 10: Instrucciones De Seguridad Importantes
1. Instrucciones de Seguridad Importantes CONSERVE ESTAS INSTRUCCIONES Este manual contiene instrucciones y advertencias que deben observarse durante la instalación y operación del producto descrito en este manual. El no hacerlo puede invalidar la garantía y causar daños a la propiedad o lesiones personales. Unidad de CA: •... -
Seite 11: Identificación De Característica
3. Identificación de Características Vista Frontal Accesorios Incluidos 10 x Tornillos Hex Llave Hex Superficie de Escritorio Laminada Manija Reversible Administrador del Cable de Alimentación Orificio de Acceso para el Cable de Alimentación Esquineros de Seguridad (6 en Total) Estantes de Almacenamiento con Divisores Removibles Puerta Delantera con Cerradura Llaves Ruedas Giratorias con Bloqueo... -
Seite 12: Vista Posterior
3. Identificación de Características Vista Posterior Unidad de Potencia Cable de Alimentación C13 a BS 1363 (CSCXB32AC) o Schuko (CSCXS32AC), 3 m Canastillas de Almacenamiento para Bloques de Potencia Unidades de Distribución de Energía de CA 9 Tomacorrientes* (4 en Total) Puerta Posterior con Cerradura CSCXB32AC* CSCXS32AC*... -
Seite 13: Instalación
4. Instalación ¡Precaución! ¡Lea todas las instrucciones y las advertencias antes de realizar la instalación! Advertencia: Las estaciones de carga pueden ser muy pesadas. No trate de desempacar la estación de carga sin ayuda. Siga el documento de instrucciones de desempacado enviadas con este producto antes de proceder con la instalación. Tenga extrema precaución al manipular la estación de carga y asegúrese de seguir todas las instrucciones de manejo e instalación. -
Seite 14: Conexión De Dispositivos Y Alimentación De La Unidad De Ca
4. Instalación 4.4 Conexión de Dispositivos y Alimentación de la Unidad de CA Su estación de carga contiene tres canastillas . Para conectar los bloques de alimentación de dispositivo, coloque los bloques en la canastilla. Enchufe el bloque de alimentación en un tomacorriente en la unidad de carga de CA , luego conduzca el cable del dispositivo y el conector a través de una ranura de dispositivo . -
Seite 15: Cerraduras De Las Puertas
4. Instalación Conecte todos los dispositivos y colóquelos en sus estantes respectivos. Una vez que todos los dispositivos estén conectados y almacenados, encuentre la clavija y cable de CA de la unidad situados en el compartimiento inferior de la estación de carga. Conduzca el conector C13 del cable a través del orificio para acceso del cable . -
Seite 16: Especificaciones
Según la Directiva de Residuos de Aparatos Eléctricos y Electrónicos (WEEE, por sus siglas en inglés) [Waste Electrical and Electronic Equipment] y regulaciones aplicables, cuando los clientes adquieren un nuevo equipo eléctrico y electrónico de Tripp Lite tienen el derecho a lo siguiente: •... -
Seite 17: Français
6. Caractéristiques techniques 7. Stockage, entretien et nettoyage 8. Garantie English Español Русский Deutsch 1111 W. 35th Street, Chicago, IL 60609 USA • www.tripplite.com/support Copyright © 2018 Tripp Lite. Toutes les marques commerciales appartiennent exclusivement à leurs propriétaires respectifs. -
Seite 18: Importantes Consignes De Sécurité
1. Importantes consignes de sécurité CONSERVEZ CES INSTRUCTIONS Ce manuel contient des instructions et des avertissements devant être suivis pour l'installation et l'utilisation du produit décrit dans ce manuel. Le non-respect de ces instructions peut entraîner l'annulation de la garantie et occasionner des dégâts matériels ou des blessures. Unité... -
Seite 19: Identification Des Éléments
3. Identification des éléments Vue de face Accessoires inclus 10 vis à tête hexagonale Clé Allen Panneau supérieur laminé Poignée réversible Support du cordon d'alimentation Passe-fils du cordon d'alimentation Protections d'angles (6 au total) Étagères de stockage avec séparateurs Porte avant verrouillable Clés Roulettes pivotantes verrouillables... -
Seite 20: Vue Arrière
3. Identification des éléments Vue arrière Unité d'alimentation Cordon électrique C13 vers BS 1363 (CSCXB32AC) ou Schuko (CSCXS32AC) de 3 m Paniers de Stockage des blocs d'alimentation Unités de distribution CA à 9 sorties* (4 au total) Porte arrière verrouillable CSCXB32AC* CSCXS32AC* *Le type de fiche et de sortie varie selon le modèle. -
Seite 21: Installation
4. Installation Attention ! Lisez toutes les instructions et tous les avertissements avant de commencer l'installation ! Avertissement : les stations de charge peuvent être très lourdes. N'essayez pas de déballer la station de charge sans assistance. Lisez et respectez les instructions de déballage fournies avec ce produit avant de procéder à l'installation. Soyez extrêmement prudent lors de la manutention de la station de charge et veillez à... -
Seite 22: Raccordement Des Appareils Et Alimentation De L'unité Ca
4. Installation 4.4 Raccordement des appareils et alimentation de l'unité CA Votre station de charge est équipée de trois paniers . Pour connecter les blocs d'alimentation des appareils, placez-les dans le panier. Branchez le bloc d'alimentation à une prise du chargeur CA, puis faites passer le câble et la fiche de l'appareil dans un emplacement prévu pour les appareils. -
Seite 23: Serrures Des Portes
4. Installation Connectez tous les appareils et placez-les sur leurs étagères respectives. Lorsque tous les appareils sont connectés et en place, prenez le cordon d'alimentation de l'unité CA qui se trouve dans le compartiment inférieur de la station de charge. Faites passer le connecteur C13 du câble à travers l’orifice d’accès de câble . -
Seite 24: Caractéristiques Techniques
Informations de conformité DEEE pour les clients Tripp Lite et les spécialistes du recyclage (Union européenne) Dans le cadre de la directive sur les Déchets d'équipements électriques et électroniques (DEEE) et des règlement d'application, lorsqu'un consommateur achète un équipement électrique ou électronique neuf chez Tripp Lite, il est habilité... -
Seite 25: Руководство Пользователя
6. Технические характеристики 7. Хранение, техническое обслуживание и очистка 8. Гарантийные обязательства English Español Français Deutsch 1111 W. 35th Street, Chicago, IL 60609 USA • www.tripplite.com/support Охраняется авторским правом © 2018 Tripp Lite. Все торговые знаки являются исключительной собственностью своих соответствующих владельцев. -
Seite 26: Важные Указания По Технике Безопасности
1. Важные указания по технике безопасности СОХРАНИТЕ НАСТОЯЩИЕ УКАЗАНИЯ В настоящем Руководстве содержатся указания и предупреждения, которые необходимо соблюдать в процессе установки и эксплуатации описанного в нем изделия. Несоблюдение этих указаний и предупреждений может привести к аннулированию гарантии и причинить материальный ущерб или вред здоровью людей. Модуль... -
Seite 27: Схема Расположения Функциональных Элементов
3. Схема расположения функциональных элементов Вид спереди Вспомогательная оснастка в комплекте 10 винтов с головкой под шестигранник Шестигранный ключ Ламинированная столешница Переставная рукоятка Приспособление для размещения шнура питания Отверстие для шнура питания Защитные угловые амортизаторы (всего 6 шт.) Полки для хранения со съемными разделительными перегородками Запирающаяся... - Seite 28 3. Схема расположения функциональных элементов Вид сзади Блок питания Шнур питания длиной 3 м с разъемами C13 и BS 1363 (CSCXB32AC) или Шуко (CSCXS32AC) Корзина для хранения блоков питания 9-розеточные блоки распределения питания переменного тока* (всего 4 шт.) Запираемая задняя дверца CSCXB32AC* CSCXS32AC* *Типы...
-
Seite 29: Начальная Установка
4. Начальная установка Внимание! Перед установкой внимательно ознакомьтесь со всеми указаниями и предупреждениями! Внимание! Зарядные станции могут быть крайне тяжеловесными. Не пытайтесь распаковывать зарядную станцию в одиночку. Прежде чем приступать к выполнению процедур начальной установки, выполните указания, изложенные в инструкции по распаковке, поставляемой в комплекте с изделием. -
Seite 30: Подключение Устройств И Питание Модуля Переменного Тока
4. Начальная установка 4.4 Подключение устройств и питание модуля переменного тока В корпусе зарядной станции находятся три корзины ( ) . Для подсоединения блоков питания подключаемых устройств расположите их в корзине. Включите блок питания в одну из розеток зарядного устройства переменного тока ( ), а... -
Seite 31: Дверные Замки
4. Начальная установка Подключите все устройства и разместите их на соответствующих полках. После подключения всех устройств найдите входной разъем и кабель модуля переменного тока, находящиеся в нижнем отсеке зарядной станции. Проведите разъем C13 кабеля через отверстие для ввода кабелей . Затем вставьте этот разъем в блок питания, расположенный внутри зарядной станции с... -
Seite 32: Технические Характеристики
конкретных применений производитель не дает каких-либо заверений или гарантий относительно пригодности данных изделий для какого-либо конкретного применения или их соответствия каким-либо конкретным требованиям. Информация по выполнению требований Директивы WEEE для покупателей и переработчиков продукции компании Tripp Lite (являющихся резидентами Европейского союза) Согласно... -
Seite 33: Deutsch
5. Optional: Adapter-Set für Bildschirmhalterung 6. Technische Daten 7. Lagerung, Wartung und Reinigung 8. Garantie English Español Français Русский 1111 W. 35th Street, Chicago, IL 60609 USA • www.tripplite.com/support Copyright © 2018 Tripp Lite. Alle Handelsmarken sind alleiniges Eigentum des jeweiligen Inhabers. -
Seite 34: Wichtige Sicherheitshinweise
1. Wichtige Sicherheitshinweise BITTE BEWAHREN SIE DIESE ANLEITUNG AUF Diese Betriebsanleitung enthält Anweisungen und Warnhinweise, die bei Installation und Betrieb des hierin beschriebenen Produkts befolgt werden müssen. Die Nichtbeachtung kann zum Erlöschen von Gewährleistungs-/Garantieansprüchen führen und Sachschäden bzw. Verletzungen verursachen. Wechselstromeinheit: •... -
Seite 35: Eigenschaften
3. Eigenschaften Vorderansicht Im Lieferumfang enthaltenes Zubehör 10 x Sechskantschrauben Sechskantschlüssel Laminierte Oberfläche Wendebarer Griff Stromkabelaufwicklung Zugriffsöffnung Stromkabel Ecksicherheitspuffer (insgesamt 6) Lagerregale mit herausnehmbaren Trennwänden Verschließbare Vordertür Schlüssel Feststellbare Drehrollen... -
Seite 36: Rückansicht
3. Eigenschaften Rückansicht Netzteil C13 bis BS 1363 (CSCXB32AC) oder Schuko (CSCXS32AC) Stromkabel, 3 m Lagerkörbe für Netzteile Wechselstromverteilungseinheiten mit 9 Steckplätzen* (insgesamt 4) Verschließbare Hintertür CSCXB32AC* CSCXS32AC* *Die Art der Stecker und Steckdosen variiert je nach Modell. Weitere Informationen finden Sie im Abschnitt 4.4 Anschluss von Geräten und Stromversorgung der Wechselstromeinheit. -
Seite 37: Einrichtung
4. Einrichtung Achtung! Lesen Sie vor der Installation sämtliche Anleitungen und Warnhinweise durch! Achtung: Ladestationen können sehr schwer sein. Versuchen Sie nicht, die Ladestation ohne fremde Hilfe auszupacken. Folgen Sie den diesem Produkt beiliegenden Hinweisen zum Auspacken, bevor Sie mit dem Einrichten beginnen. Lassen Sie beim Umgang mit der Ladestation äußerste Vorsicht walten und befolgen Sie unbedingt sämtliche Anweisungen zu Umgang und Installation. -
Seite 38: Anschluss Von Geräten Und Stromversorgung
4. Einrichtung 4.4 Anschluss von Geräten und Stromversorgung der Kühlung Ihre Ladestation umfasst drei Körbe . Platzieren Sie die Netzteile in den Körben, um sie anzuschließen. Stecken Sie jedes Netzteil in die Steckdose der entsprechenden Wechselstromladeeinheit und führen Sie anschließend das Gerätekabel und den Stecker durch einen Geräteschlitz Wiederholen Sie diesen Vorgang gegebenenfalls für jedes Gerät. -
Seite 39: Türverriegelungen
4. Einrichtung Schließen Sie alle Geräte an und platzieren Sie sie auf den entsprechenden Regalen. Wenn alle Geräte angeschlossen und verstaut sind, lokalisieren Sie den Eingangsstecker und das Kabel im unteren Fach der Wechselstromeinheit. Stecken Sie den C13-Kabelstecker durch die Kabelzugangsöffnung . -
Seite 40: Technische Daten
• Rücksendung von Altgeräten zum Recycling beim Kauf eines neuen, gleichwertigen Geräts (dies variiert je nach Land) • Rücksendung der neuen Geräte zum Recyling, wenn ihr Lebenszyklus abgelaufen ist Tripp Lite hat den Grundsatz, sich kontinuierlich zu verbessern. Spezifikationen können ohne Ankündigung geändert werden. 1111 W. 35th Street, Chicago, IL 60609 USA • www.tripplite.com/support...