DIGOO DG-IR805 Benutzerhandbuch
Verfügbare Sprachen
Verfügbare Sprachen
DIGOO DG-IR805
QUICK USER GUIDE
Know Your Rroduct
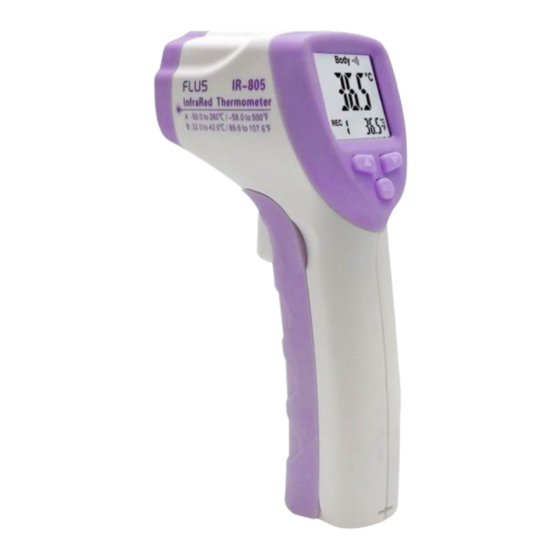
Meter Description
A IR sensor
B LCD display
C Down button
D Menu button
E Up button
F Measurement trigger
G Battery compartment cover
LCD Display Description
○
1
Measurement Icon
○
2
Human body mode
○
3
Buzzer Icon
○
4
Battery Icon
○
5
Temperature Unit (℃/℉)
○
6
Memory data display
○
7
Record data
○
8
Current Reading
What's in the Box
I/M
DG-IR805
9V Battery
Specifications
Name
Household Non-contact Infrared Thermometer
Model
IR-805
Measuring
BODY: 32.0℃~42℃(89.6℉~107.6℉)
Range
SCAN: -50℃~260℃(-58℉~500℉)
32.0℃~35.9℃(89.6℉~96.6℉): ±0.3℃/0.5℉
36.0℃~39.0℃(96.8℉~102.2℉): ±0.2℃/0.4℉
Accuracy
39.1℃~42.5℃(102.3℉~108.5℉): ±0.3℃/0.5℉
-50℃~0℃(-58℉~32℉): ±3℃/5.4℉
0℃~260℃(32℉~500℉): ±1.5% or ±2℃/3.6℉
Resolution
0.1℃/0.1℉
Measuring
5-15cm (5cm works best)
Distance
Operating
10℃~50℃
Temp
Relative
≤85%
Humidity
Auto
Automatic shutdown after 8s
Shutdown
Power
9V Battery
Supply
How to Set-Up
Operating Steps:
1. Open the battery compartment, installing the battery.
2. Hold the meter by its handle grip and point it toward the parts
to be measured with distance of 5cm, press the measuring
trigger, measuring finished when the meter sounds a "tick".
3. Release the trigger to read the measuring dat.
Function Description
1. Data Storage: Auto storage for measuring data,
press"
""
" button to read the stored readings.
2. Mode selection of "SCAN" and "BODY" ; power the meter on,
press"
"button once to select related mode.
3. Temperature units selection-Menu F1;power the meter on,press "
will display in the left bottom of LCD, press "
4. Turn On/off buzzer -Menu F2;power the meter on,press "
display at the left bottom of LCD, press the button again, the meter enters into F2,
press "
" "
" button to turn on/off the buzzer.
5. Alarm value setup-Menu F3: power the meter on,press "
in the left bottom of LCD, press the button twice, the meter enters into F3, press "
button to set the alarm value (adjustable 1.5℃ or 2.7℉).
6. Turn on/ off the backlight-Menu F4: power the meter on,press "
display in the left bottom of LCD, press the button three times, the meter enters into F4,
press "
" "
" button to turn on/ off the backlight to set the alarm value.
7. Exit the setup mode press "
" button for 3s to exit the setup mode.
NOTE
◆ If the meter has been stored in a cold or hot environment, allow it 15 to 20 minutes to
acclimate to room temperature before making measurements.Both ambient temperature
and distance affect accuracy.
◆Measurement readings are varied from skin color and thickness.
◆Do not keep the meter in the sun or immerse it in water.
Note: Make sure the skin is dry and that no hair interferes with the measurement.
◆When the low battery icon
appears, replace the meter's battery.
"
"
◆Do not use volatile liquids to clean the unit, swipe it with dry soft cloth.
◆LCD display "HI": over-range measurement,that is, the measuring data is above
42.5℃/108.5℉ in "BODY" mode,or above 265℃/509℉ in "SCAN" mode.
◆LCD display "LO": under-range measurement, that is, the measuring data is below
32℃/0℉ in "BODY" mode, or below -50℃/-48℉ in "SCAN" mode.
This guide is for reference only and does not constitute any form of warranty. If you
have any questions, please browse https://www.mydigoo.com/ for more informations.
Made in China
" button for 3s,F1
" "
" button to select temperature units.
" button for 3s,F1 will
" button for 3s,F1 will display
" "
" button for 3s,F1 will
"

Inhaltszusammenfassung für DIGOO DG-IR805
- Seite 2 Liste Wie man einstellt DIGOO DG-IR805 Arbeitsweise 1. Öffnen Sie den Batteriefachdeckel und setzen Sie die Batterie ein. 2. Bitte halten Sie den Instrumentengriff. Der Infrarotsensor zeigt in Benutzerhandbuch 9V Batterie einem Abstand von 5 cm auf das zu messende Objekt. Bitte halten Sie den Schalter gedrückt.