Herunterladen Inhalt Inhalt Diese Seite drucken

Werbung

Verfügbare Sprachen
  • DE

Verfügbare Sprachen

18 - 22
8 - 12
automotive innovations
23 - 27
13 - 17
3 - 7
U
A
T
O
L
I
G
H
T
Ref : ALX9
2
1
3
4
5
25 mm
55 mm
85 mm
33 mm
51 mm
13 mm

Werbung

Inhaltsverzeichnis
loading

Inhaltszusammenfassung für Beeper ALX9

  • Seite 1 18 - 22 8 - 12 automotive innovations 23 - 27 13 - 17 3 - 7 Ref : ALX9 25 mm 55 mm 85 mm 33 mm 51 mm 13 mm...
  • Seite 2 Pick up the original car headlight switch output line Choose headlight control + or - Pick up the original car small lamp switch output line Pick up car lock - Choose small lights control + or - Choose this product on the wiring harness Lock + terminal...
  • Seite 3: Fonctions Principales

    Il est recommandé de faire installer cet appareil par un technicien professionnel de lʼautomobile. Le BEEPER AutoLight ALX9 a été conçu pour contrôler le système dʼéclairage du véhicule et allumer les lumières automatiquement quand il commence à faire nuit. Vos feux de croisement seront automatiquement contrôlés, sans avoir besoin de le faire manuellement.
  • Seite 4: Instructions De Montage

    INSTRUCTIONS DE MONTAGE • Câblage : Vérifiez soigneusement les différents branchements avant la connexion finale et veillez à isoler les fils qui ne sont pas utilisés. • Capteur de luminosité : Installez le capteur de lumière sur le pare-prise et assurez-vous quʼil soit à lʼécart des zones dʼombres éventuelles.
  • Seite 5 GUIDE DʼINSTALLATION PAR ÉTAPES 1. Retirez la garniture dans 2. Connectez les différents fils 3. Connectez les fils au 4. Fixez le boîtier avec le commutateur dʼéclairage selon le schéma de connexion boîtier lʼadhésif fourni 5. Fixez le capteur de 6.
  • Seite 6: Résolution Des Problèmes

    RÉSOLUTION DES PROBLÈMES Les phares ne sʼallument pas automatiquement dans le noir : Assurez-vous que le système est activé / Assurez-vous que le câble dʼalimentation est connecté sur le +12V de la batterie / Assurez-vous que le fil blanc de détection est correctement connecté au +12V après-contact / Assurez-vous que le fil jaune de polarité a a été choisi correctement, en accord avec la polarité...
  • Seite 7: Données Techniques

    LUNDI au VENDREDI, de 09h00 à 12h00 et de 14h00 à 18h00. 0.45 € TTC par minute Ce produit est conforme aux exigences des directives européennes en vigueur. Vous trouverez la déclaration de conformité à cette adresse : http://beeper.fr/boutique/45-alx9.html...
  • Seite 8: Kit Components

    INTRODUCTION Thank you for using a BEEPER product for the safety and comfort of your vehicle. Thank you to attentively read the instruction manual before the installation of the appariel on your vehicle. It is also recommended to make install this device by a professional technician of the car.
  • Seite 9: Installation Instructions

    INSTALLATION INSTRUCTIONS • Wiring: Carefully check the various connections before final connection and take care to insulate the wires that are not used. • Luminosity sensor: Install the luminosity sensor on the windshield and be sure that it is away from potential dark zones.
  • Seite 10 STAGE BY STAGE INSTALLATION GUIDE 1. Remove the case in the 2. Connect the various wires 3. Connect the wires to the 4. Fix the control box with lighting switch according to the plugging chart control box the provided adhesive 5.
  • Seite 11: Troubleshooting Table

    TROUBLESHOOTING TABLE Headlamp canʼt be turned ON in dark automatically / Small lamp canʼt be turned ON in dark automatically: Make sure that the system is activated / Make sure that the electric cable is connected on the +12V of the battery / Make sure that the detection white wire is correctly connected to the +12V after-contact / Make sure that the yellow wire of polarity has been correctly selected, in agreement with the headlights polarity of the vehicle / Make sure that the orange wire of polarity has been correctly selected, in agreement with the nightlights polarity of the vehicle.
  • Seite 12: Technical Datas

    The BEEPER AutoLight ALX9 is guaranteed 2 years. All our general terms of after-sales service on www.beeper.fr/cgv WARRANTY YEARS This product is in conformity with the requirements of the European directives in force. You will find the declaration of conformity at this address: http://beeper.fr/boutique/45-alx9.html...
  • Seite 13: Funciones Principales

    INTRODUCCIÓN Gracias por usar un BEEPER producto. Por favor lea completa y atentamente el manual de utilización antes de la instalación del producto sobre su vehículo. Se recomienda que el producto sea instalada por un técnico profesional del automóvil. El BEEPER AutoLight ALX9 se concibió para controlar el sistema de alumbrado del vehículo y encender las luces automáticamente cuando comienza a hacer noche.
  • Seite 14: Instrucciones De Montaje

    INSTRUCCIONES DE MONTAJE • Cableado: Compruebe cuidadosamente las distintas conexiones antes de la conexión final y vela por aislar los cables que no se utilizan. • Captador de luminosidad: Instale el captador de luminosidad sobre lo prevé-toma y garantiza que esté...
  • Seite 15 GUÍA DE INSTALACIÓN ETAPAS PARA ETAPAS 1. Retire la guarnición en el 2. Conecte los distintos cables 3. Conecte los cables a la 4. Fije la central con el interruptor de alumbrado según el esquema de conexión central pegamento proporcionado 5.
  • Seite 16: Resolución De Los Problemas

    RESOLUCIÓN DE LOS PROBLEMAS Los faros no se encienden automáticamente en el negro: Garantiza que el sistema se activa/garantiza que el cable de alimentación se conecta sobre el +12V de la batería/garantizan que el hilo blanco de detección se conecta correctamente al +12V después contacto/aseguran que el hilo amarillo de polaridad tenga se eligió...
  • Seite 17: Datos Técnicos

    El BEEPER AutoLight ALX9 se garantiza 2 años. Todas nuestras condiciones generales de servicio postventa sobre www.beeper.fr/cgv GARANTÍA ANOS Este producto se ajusta a las exigencias de las directivas europeas vigentes. Encontrará la declaración de conformidad con esta dirección: http://beeper.fr/boutique/45-alx9.html...
  • Seite 18 Es wird empfohlen, dieses Gerät durch einen professionellen Techniker der Autoindustrie installieren zu lassen. BEEPER AutoLight ALX9 ist geplant worden, um das System der Beleuchtung des Fahrzeugs zu kontrollieren und die Lichter automatisch anzuzünden, wenn er beginnt, Nacht zu machen. Ihre Abblendlichter werden automatisch ohne zu müssen kontrolliert, es manuell zu machen.
  • Seite 19: Montageinstruktionen

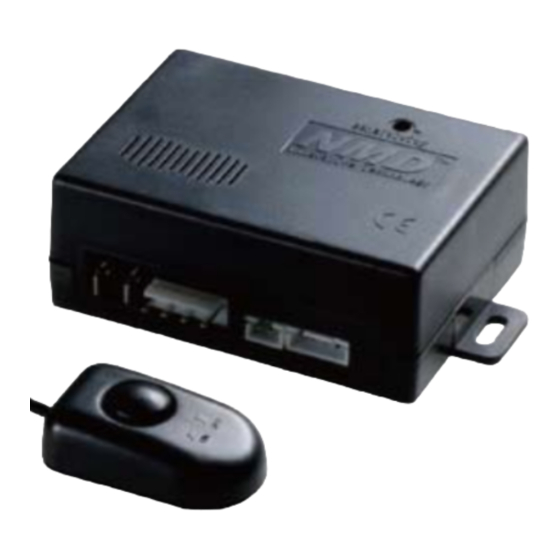
    MONTAGEINSTRUKTIONEN • Kabelverbindung: Sorgsam prüfen Sie die verschiedenen Verzweigungen vor der Endverbindung und achten darauf zu isolieren Söhne, die nicht benutzt werden. • Helligkeitsempfänger : Installieren Sie den Lichtempfänger auf es abwehrt-Ergreifung und gewährleistet, dass er an der Abweichung ist mögliche Schattenzonen. •...
  • Seite 20: Einrichtungsführer Schritt Für Schritt

    EINRICHTUNGSFÜHRER SCHRITT FÜR SCHRITT 1. Ziehen Sie die Garnitur im 2. Verbinden Sie die verschiedenen 3. Schließen Sie die Kabel an 4. Legen Sie das Gehäuse Beleuchtungsschalter zurück Kabel nach dem Verbindungsschema die Zentrale an mit dem gelieferten Klebstoff fest 5.
  • Seite 21: Lösung Der Probleme

    LÖSUNG DER PROBLEME Die Scheinwerfer zünden sich nicht automatisch im schwarzen an: Gewährleisten Sie Sie, dass das System aktiviert wird/gewährleistet, dass das Anschlußkabel auf dem +12V der Batterie/gewährleisten verbunden ist, dass das weiße Feststellungskabel richtig an das +12V nach-Kontakt/gewährleisten angeschlossen wird, dass das gelbe Polaritätskabel hat richtig, im Einvernehmen mit der Polarität der Scheinwerfer des Fahrzeugs/gewährleisten gewählt worden, dass das orangee Polaritätskabel hat richtig, im Einvernehmen mit der Polarität der Kontroll-Lampen des Fahrzeugs gewählt worden.
  • Seite 22: Technische Angaben

    BEEPER AutoLight ALX9 ist 2 Jahre garantiert. All unsere allgemeinen Bedingungen von Kundendienst auf www.beeper.fr/cgv GARANTIE JAHRE Dieses Produkt steht mit den Forderungen der gültigen europäischen Richtlinien im Einklang. Sie werden die Erklärung der übereinstimmung mit dieser Adresse finden: http://beeper.fr/boutique/45-alx9.html...
  • Seite 23: Funzioni Principali

    Si raccomanda di fare installare quest'apparecchio da un tecnico professionale della macchina. IL BEEPER AutoLight ALX9 è stato concepito per controllare il sistema d'illuminazione del veicolo ed accendere le luci automaticamente quando si fa scuro. I vostri proiettori anabbaglianti saranno automaticamente controllati, senza avere bisogno di farlo manualmente.
  • Seite 24: Utilizzo Del Sistema

    ISTRUZIONI D'ASSEMBLAGGIO • Cablaggio: Verificate accuratamente i vari allacciamenti prima del collegamento finale ed attenzione ad isolare cavi che non sono utilizzati. • Captatore di luminosità: Installate il sensore della luce sullo para-presa e garantisce che sia alla divergenza zone di ombre eventuali. •...
  • Seite 25 GUIDA D'IMPIANTO TAPPA PER TAPPA 1. Ritirate la guarnizione nel 2. Collegate i vari cavi secondo lo 3. Collegate i cavi a cassa 4. Fissate la cassa con commutatore d'illuminazione schema di collegamento l'adesivo fornito 5. Fissate il captatore di 6.
  • Seite 26: Risoluzione Dei Problemi

    RISOLUZIONE DEI PROBLEMI I fari non si accendono automaticamente nel nero: Garantite che il sistema è attivato/garantisce che il cavo d'alimentazione è collegato sul +12V della batteria/garantito che il cavo bianco d'individuazione è correttamente collegato al +12V dopo-contatto/garantito che il cavo giallo di polarità ha è stato scelto correttamente, in accordo con la polarità...
  • Seite 27: Dati Tecnici

    DATI TECNICI GARANZIE • INFORMAZIONI LEGALI IL BEEPER AutoLight ALX9 è garantito 2 anni. Tutte le nostre condizioni generali di servizio clienti su www.beeper.fr/cgv GARANZIA ANNI Questo prodotto è conforme alle prescrizioni delle direttive europee in vigore. Troverete la dichiarazione di conformità a quest'indirizzo: http://beeper.fr/boutique/45-alx9.html...
  • Seite 28 IXIT Beeper modifiées sans préavis. Ces données sont sous réserves de vérification de la compatibilité avec votre véhicule à faire par vos soins. IXIT BEEPER se Parc des Grillons 228 rue de I'Ancienne Distillerie dégage de toute responsabilité...

Inhaltsverzeichnis