Werbung
Quicklinks
Park Tool Co.
5115 Hadley Ave. N., St. Paul, MN 55128 (USA) www.parktool.com
NOTES
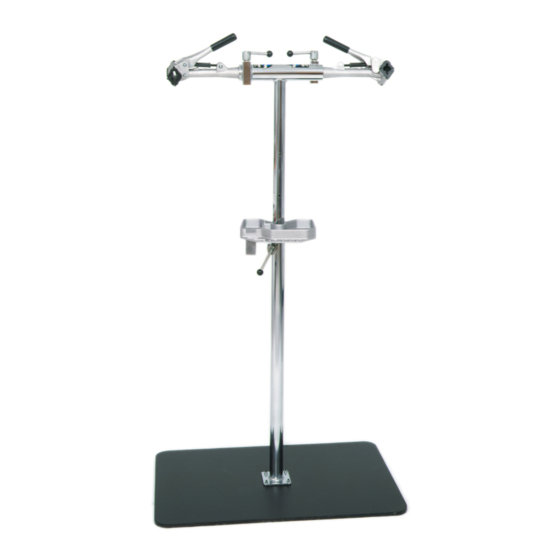
• The clamps of the repair stand can be rotated 360 degrees,
allowing easy access to any component of the bike. To
adjust the rotational angle of the clamp, loosen the lock-
ing lever (#8) of the lock block assembly, rotate the clamp
to the desired position, and re-tighten the lever to lock the
clamp.
• The upright tube assembly can be rotated 360 degrees,
allowing one bike to be swung out of the way to work on a
second bike. Loosen the locking lever (#8) of the lock block
assembly at the top of the base support weldment (#13).
Then rotate the T-support weldment (#11) and re-tighten the
lever to lock the position.
• Some bike manufacturers recommend not clamping thin-
walled or carbon fiber frames. Consult manufacturer for
suggested clamping location.
• To avoid damaging the frame finish, clean tube before
clamping.
PRS-2 OS-1
PRS-2 OS-2
#135
HINWEISE
• Die Halteklauen des Montageständers können um 360°
gedreht werden, so dass die Fahrräder bequem an jeder
Stelle bearbeitet werden können. Lösen Sie zur Einstel-
lung den Verschlusshebel der Fixiereinheit (#8), drehen
Sie die Halteklaue in die gewünschte Position und fixieren
Sie den Hebel wieder.
• Das T-Rohr kann bei Bedarf ebenfalls um 360° gedreht
werden. Lösen Sie dazu den Hebel der Fixiereinheit (#8)
am Standrohr (#13). Drehen Sie anschließend das T-Rohr
(#11) in die gewünschte Position und fixieren Sie den
Hebel wieder.
• Einige Rahmenhersteller warnen vor dem Klemmen dün-
nwandiger oder aus Carbonfasern bestehender Rahmen.
Klären Sie mit dem Hersteller geeignete Klemmbereiche
oder verwenden Sie im Zweifelsfall die ISC-4 Sitzrohr-
Innenklemme von Park Tool.
• Reinigen Sie den Rahmen vorher im Klemmbereich zur
Vermeidung von Lackschäden.
PRS-2 OS-1 and PRS-2 OS-2
Deluxe Double Arm Repair Stand
Deluxe Doppel-Montageständer (mit 100-3C Justierbare Hebel-Halteklaue)
Deluxe Doppel-Montageständer (mit 100-3D Micro-Adjust Profi-Halteklaue)
Stahl-Bodenplatte für PRS-2 OS-1 und PRS-2 Deluxe Doppel-Montageständer (optional)
• The two clamping jaws each have a recess to provide clear-
ance for cables. Make sure any brake or shift cables are in
one of the recesses before closing the clamp.
• When clamping heavy bikes in the repair stand, loosen
locking lever (#8) on lock block assembly and remove
clamp from stand. Secure clamp to the bike, then use both
hands to lift the bike (with the clamp attached). Slide clamp
back into the stand and tighten locking lever to secure.
• Keeping the front of the bike slightly lower than the back
will help prevent the front wheel and handlebars from
flopping and hitting the frame's top tube. A Park Tool HBH-2
Handlebar Holder should be used to prevent handlebar
flopping if the bike is being rotated in the repair stand.
• For bolting the PRS-2 OS-1 or PRS-2 OS-2 directly to the
floor, use the Park Tool FP-2 Floor Plate (sold separately).
• Beide Klemmbacken der Halteklaue verfügen über Auss-
parungen für Züge. Beachten Sie die Lage der Züge vor
dem Schließen der Halteklaue.
• Erleichtern Sie sich das Fixieren schwerer Fahrräder im
Montageständer indem Sie nach Lösen des Fixierhebels
(#8) die Halteklaue aus dem Montageständer entfernen
und direkt an das stehende Fahrrad klemmen. Heben
Sie anschließend das Fahrrad mit beiden Händen an
und schieben Sie den Halteklauenschaft in die Ständer-
aufnahme. Drehen Sie das Fahrrad in die gewünschte
Arbeitsposition und fixieren Sie den Hebel.
• Eine in Fahrtrichtung leicht abfallende Position des
Fahrrads im Montagständer verhindert das Umschlagen
von Lenker und Vorderrad. Beim Drehen des Fahrrads
im Ständer empfiehlt sich der Einsatz des HBH-2 Lenker-
Haltebügels.
• Verwenden Sie für die permanente Bodenmontage des
Montageständers die FP-2 Bodenbefestigung (als Zubehör
lieferbar).
© 2015 Park Tool Co. / PARK TOOL® and the color BLUE are registered trademarks of Park Tool Co.
Werbung

Verwandte Anleitungen für Park Tool PRS-2 OS-1


Inhaltszusammenfassung für Park Tool PRS-2 OS-1
- Seite 1 • Reinigen Sie den Rahmen vorher im Klemmbereich zur • Verwenden Sie für die permanente Bodenmontage des Vermeidung von Lackschäden. Montageständers die FP-2 Bodenbefestigung (als Zubehör lieferbar). © 2015 Park Tool Co. / PARK TOOL® and the color BLUE are registered trademarks of Park Tool Co.
- Seite 2 PRS-2 OS-2 Soporte de Reparación Doble DeLuxe (con mordaza de micro Ajuste 100-3D) #135 Base de Acero para Soportes de Reparación PRS-2 OS-1 y PRS-2 OS-2 (Opcional) NOTAS • Las mordazas del soporte de reparación pueden rotar 360 • Las dos mandíbulas de la mordaza tienen un canal para grados, facilitando el acceso a cualquier componente de la los cables.
- Seite 3 Deluxe Double Arm Repair Stand (with 100-3C Adjustable Linkage Clamp) PRS-2 OS-2 Deluxe Double Arm Repair Stand (with 100-3D Micro Adjust Clamp) #135 Steel Base for PRS-2 OS-1 and PRS-2 OS-2 Repair Stands (optional, sold separately) Assembly of PRS-2 OS-1 and PRS-2 OS-2 No Spring...
- Seite 4 5115 Hadley Ave. N., St. Paul, MN 55128 (USA) www.parktool.com Part No. Description Part No. Description Qty. Qty. 100-3C Adjustable Linkage Clamp (for PRS-2 OS-1) 124-2 “T” Support Weldment 100-3D Micro Adjust Clamp (for PRS-2 OS-2) Work Tray 113S Threaded Lock Block...