Herunterladen Inhalt Inhalt Diese Seite drucken

Fiam eTensil Bedienungs- Und Wartungsanleitung

Elektroschrauber mit automatischer abschaltung
Inhaltsverzeichnis

Werbung

Verfügbare Sprachen
  • DE

Verfügbare Sprachen

  • DEUTSCH, seite 60
English version begins on page 18
Avvitatori elettrici ad arresto automatico
Electric screwdrivers with automatic shut off
Visseuses électriques à coupure automatique
Atornilladores eléctricos recto brushless
Elektroschrauber mit automatischer Abschaltung
MANUALE D'USO E MANUTENZIONE
USE AND MAINTENANCE MANUAL
MANUEL D'UTILISATION ET DE MAINTENANCE
MANUAL DE USO Y MANTENIMIENTO
BEDIENUNGS- UND WARTUNGSANLEITUNG
Cod. 681211000 R.00

Werbung

Inhaltsverzeichnis
loading

Inhaltszusammenfassung für Fiam eTensil

  • Seite 1 English version begins on page 18 Avvitatori elettrici ad arresto automatico Electric screwdrivers with automatic shut off Visseuses électriques à coupure automatique Atornilladores eléctricos recto brushless Elektroschrauber mit automatischer Abschaltung MANUALE D’USO E MANUTENZIONE USE AND MAINTENANCE MANUAL MANUEL D’UTILISATION ET DE MAINTENANCE MANUAL DE USO Y MANTENIMIENTO BEDIENUNGS- UND WARTUNGSANLEITUNG Cod.
  • Seite 4: Inhaltsverzeichnis

    SOMMARIO Definizione Dei simboli utilizzati avveRtenze Di siCuRezza GeneRale peR l’utensile CaRatteRistiChe Gamma avviamento Dell’utensile utilizzo Dell’utensile ReGolazione Della Coppia opzioni Di funzionamento impuGnatuRa Dell’utensile e montaGGio su bRaCCio Di Reazione moDelli alimentatoRe DesCRizione Dell’alimentatoRe infoRmazioni leD alimentatoRe infoRmazioni pulsante impostazione veloCità ConnettoRe inGRessi usCite (solo peR moDello tpu-2) CaRatteRistiChe teCniChe Dell’alimentatoRe manutenzione...
  • Seite 5: Definizione Dei Simboli Utilizzati

    DEfINIzIONE DEI SIMBOLI UTILIzzATI: RAEE: il prodotto è oggetto di smaltimento differenziato in conformità alla direttiva Raee 2012/19/ue. Questo prodotto non va trattato come rifiuto domestico. ATTENzIONE, RISCHIO DI PERICOLO: l ’operatore deve consultare il presente manuale ogni volta che vedrà...
  • Seite 6: Avvertenze Di Sicurezza Generale Per L'utensile

    AVVERTENzE DI SICUREzzA GENERALE PER L’UTENSILE ATTENzIONE : Leggere tutte le avvertenze e tutte le istruzioni. La mancata ottem- peranza alle avvertenze e alle istruzioni può dare luogo a scosse elettriche, a incendi e/o a lesioni serie. Conservare tutte le avvertenze e le istruzioni per riferimenti futuri. Il termine “utensile elettrico”...
  • Seite 7 il termine “interruttore differenziale (RCD)” può essere sostituito dal termine “interruttore per guasti verso terra (GfCi)” oppure “interruttore per correnti di dispersione (elCb)”. 3) Sicurezza personale a) Non distrarsi, controllare quello che si sta facendo e usare il buon senso quan- do si azionano utensili elettrici.
  • Seite 8 c) Scollegare la spina dalla rete di alimentazione e/o il gruppo di batterie dall’u- tensile elettrico prima di effettuare qualsiasi regolazione, cambiare accessori o riporre gli utensili elettrici. Tali misure di sicurezza preventive riducono il ri- schio di avvio accidentale dell’utensile elettrico. d) Riporre gli utensili elettrici inutilizzati fuori dalla portata dei bambini e non permetterne l’uso a persone inesperte dell’utensile o che non conoscano que- ste istruzioni.
  • Seite 9: Caratteristiche Gamma

    2000 1650 * fiam consiglia di utilizzare l’avvitatore fino all’80% del valore di coppia massimo dichiarato. tenere in con- siderazione questo aspetto in funzione della specifica applicazione. ** i valori di coppia indicati si riferiscono ad analisi di laboratorio basate sulla norma iso5393 con avvitatore impostato alla velocità...
  • Seite 10: Utilizzo Dell'utensile

    UTILIzzO DELL’UTENSILE leD n° 2 leD n° 1 pulsante inversione senso di rotazione leva di avviamento prima di premere la leva di avviamento utensile controllare i led posti sul pulsante di inversione senso di rotazione. Rotazione sinistra (antioraria): - leD n°1 acceso - leD n°2 spento Rotazione destra (oraria): - leD n°1 acceso...
  • Seite 11: Regolazione Della Coppia

    REGOLAzIONE DELLA COPPIA Figura 1 Figura 2 Figura 3 prima di effettuare eventuali regolazioni scollegare l’utensile dall’ali- mentatore. la coppia di serraggio si regola variando la compressione della molla della frizione. Questo si ottiene avvitando o svitando la ghiera filettata di regolazione mediante l’inserimento del cacciavite in dotazione nell’apposita nicchia ricavata sul guscio esterno;...
  • Seite 12: Opzioni Di Funzionamento

    OPzIONI DI fUNzIONAMENTO attraverso la pressione prolungata (> 4 secondi) del pulsante reverse si accede alla programmazione “smart pro”...
  • Seite 13: Impugnatura Dell'utensile E Montaggio Su Braccio Di Reazione

    (figura 3) o sull’apposita ghiera (figura 2 cod. 6920779180). Gli utensili vanno staffati come indicato nelle figure sopra riportate. non staffare in punti diversi dell’utensile perché può recare danno all’u- tensile stesso e comprometterne la funzionalità; in tal caso fiam non risponde per i danni arrecati all’utensile.
  • Seite 14: Modelli Alimentatore

    MODELLI ALIMENTATORE Codice Nome Descrizione tpu-1 unità di alimentazione 686200100 tpu-2 unità di alimentazione con segnali di ingresso/uscita integrati 686200101 DESCRIzIONE DELL’ALIMENTATORE led 1 led s1 led s2 led 2 led s3 led 3 led 4 led h led l pulsante impostazione velocità...
  • Seite 15: Informazioni Led Alimentatore

    INfORMAzIONI LED ALIMENTATORE Colore Led Descrizione funzione scatto frizione, l’utensile è arrivato in coppia led 1 verde stallo motore oppure rilascio pts (avviamento a leva + spinta) in mo- dalità di avviamento leva+pts (avviamento a leva + spinta) o modalità led 2 Rosso pulsante+pts (avviamento a leva + spinta)
  • Seite 16: Connettore Ingressi Uscite (Solo Per Modello Tpu-2)

    CONNETTORE INGRESSI USCITE (SOLO PER MODELLO TPU-2) segnali disponibili sul connettore Db15 presente nel modello tpu-2: Direzione DB15 Segnale funzione Segnale femmina ingresso stop motore Comando di inibizione dei comandi ingresso svita Comando di svitatura uscita errore segnalazione errore uscita Rotazione segnalazione che il motore è...
  • Seite 17: Caratteristiche Tecniche Dell'alimentatore

    1.000.000 di cicli (lampeggia in rotazione la luce frontale) e la necessità di un controllo che va affidato all’assistenza tecnica fiam. nel caso in cui non si intenda procedere con il controllo previsto, è possibile resettare la segnalazione seguendo le istruzioni riportate nella tabella a pag.
  • Seite 18 TABLE Of CONTENTS explanation of symbols useD GeneRal safety WaRninGs foR usinG the tool RanGe speCifiCations staRtinG the tool usinG the tool toRQue aDjustment opeRatinG options holDinG the tool anD fittinG it to the ReaCtion aRm poWeR supply unit moDels DesCRiption of the poWeR supply unit poWeR supply unit leDs infoRmation speeD settinG button infoRmation...
  • Seite 19: Explanation Of Symbols Used

    EXPLANATION Of SYMBOLS USED: WEEE: the product must be disposed of separately in accordance with the Weee 2012/19/eu Directive. this product must not be treated as domestic waste. CAUTION, HAzARD RISK: the operator must refer to this manual every time this danger symbol appears.
  • Seite 20: General Safety Warnings For Using The Tool

    GENERAL SAfETY WARNINGS fOR USING THE TOOL CAUTION! Read all warnings and all the instructions. Failure to follow the warnings and instructions could lead to the risk of electric shock, fire or serious injury. Keep all the warnings and instructions for future reference. The term “power tool”...
  • Seite 21 3) Personal safety a) Always pay close attention to what you are doing. Use your common sense and do not use a tool if you are not concentrating. Never use the electric tool when you are tired or under the influence of drugs, alcohol or medications. Just one moment of carelessness while operating an electric tool can lead to serious personal injury.
  • Seite 22 d) When not in use, always keep electric tools out of the reach of small children and do not allow them to be used by persons unfamiliar with the tool or who have not read these instructions. Electric tools are dangerous if used by inexpe- rienced persons.
  • Seite 23: Range Specifications

    2000 1650 * fiam recommends that the screwdriver be used up to 80% of the maximum declared torque. take this aspect into consideration depending on the job in question. ** the torque values shown refer to laboratory analysis based on iso 5393 standard with the screwdriver set to maximum speed (hi).
  • Seite 24: Using The Tool

    USING THE TOOL leD no. 2 leD no. 1 forward/reverse rotation button start lever before pressing the lever that starts the tool check the leDs on the reverse rotation switch. Left rotation (counter-clockwise): - leD no. 1 on - leD no. 2 off Right rotation (clockwise): - leD no.
  • Seite 25: Torque Adjustment

    TORQUE ADJUSTMENT Fig. 1 Fig. 2 Fig. 3 before making any adjustments always unplug the tool from the power supply unit. tightening torque is adjusted by varying clutch spring compression. this is achieved by tightening or untightening the threaded adjuster ring by inserting the key provided into the slot in the outer body of the screwdriver;...
  • Seite 26: Operating Options

    CAUTION! DO NOT USE MAGNETISED BLADES WITH TOOLS IN THE ETENSIL RANGE. failure to observe this rule could cause the product to malfunction. if it is impossible to avoid the use of magnetised blades, use the mag- netic insert key supplied or contact fiam technical assistance.
  • Seite 27: Holding The Tool And Fitting It To The Reaction Arm

    Do not clamp the tool at other points because this could damage it and compromise its working operation; in such case fiam cannot be held responsible for any damage to the tool.
  • Seite 28: Power Supply Unit Models

    POWER SUPPLY UNIT MODELS Code Name Description tpu-1 power supply unit 686200100 tpu-2 power supply unit with integrated input/output signals 686200101 DESCRIPTION Of THE POWER SUPPLY UNIT led 1 led s1 led s2 led 2 led s3 led 3 led 4 led h led l speed setting button...
  • Seite 29: Power Supply Unit Leds Information

    POWER SUPPLY UNIT LEDs INfORMATION Colour Led function description Clutch triggered, the tool has reached the set torque led 1 Green motor stalled or pts released (lever start + push-to-start) in start mode leveR +pts (lever start + push-to-start) or button +pts mode (lever led 2 start + push-to-start) external stop tool command (only on tpu 2 model, equipped with inputs/...
  • Seite 30: Inputs Outputs Start Up Button (For Tpu-2 Model Only)

    INPUTS OUTPUTS START UP BUTTON (fOR TPU-2 MODEL ONLY) signals available on the Db15 connector on the tpu -2: Signal DB15 Sisgn function Direction female input stop motor Control disable command input untighten untightening command output error error signal output Rotation signal that the motor is running  ...
  • Seite 31: Power Supply Unit Technical Specifications

    MAINTENANCE the tool signals when 1,000,000 cycles have been reached (the front light flashes in rotation) and the need for an inspection which must be carried out by fiam technical assistance. if you do not wish to proceed with the inspection, the signal can be reset by following the instructions given in the table on page 12, function no.
  • Seite 32 TABLE DES MATIèRES Définition Des symboles utilisés aveRtissements De séCuRité GénéRale pouR l’outil CaRaCtéRistiQues Gamme DémaRRaGe De l’outil utilisation De l’outil RéGlaGe Du Couple options De fonCtionnement poiGnée De l’outil et montaGe suR bRas De RéaCtion moDÈle Dispositif D’alimentation DesCRiption Du Dispositif D’alimentation infoRmations leD Dispositif D’alimentation infoRmations bouton De paRamétRaGe De la vitesse ConneCteuR entRées soRties (uniQuement pouR moDÈle tpu-2)
  • Seite 33: Définition Des Symboles Utilisés

    DéfINITION DES SYMBOLES UTILISéS: DEEE: l ’élimination du produit est sujette au tri sélectif conformément à la directive Deee 2012/19/ue. Ce produit ne doit pas être traité en tant que déchet domestique. ATTENTION, RISQUE DE DANGER: l ’opérateur devra consulter ce manuel à chaque fois qu’il verra ce symbole de danger.
  • Seite 34: Avertissements De Sécurité Générale Pour L'outil

    AVERTISSEMENTS DE SéCURITé GéNéRALE POUR L’OUTIL ATTENTION : Lisez tous les avertissements et toutes les instructions. Le non-respect des avertissements et des instructions peut entraîner des risques d’électrocution, d’in- cendie et/ou de blessures graves. Conservez l’intégralité des avertissements et des instructions pour des consultations futures.
  • Seite 35 f) En cas d’utilisation inévitable d’un outil électrique dans un lieu humide, utilisez une alimentation protégée par un disjoncteur différentiel (RCD). L’utilisation d’un disjoncteur différentiel réduit le risque d’électrocution. RemaRQue: le terme «disjoncteur différentiel (RCD)» peut être remplacé par le terme «disjoncteurs de fuite à...
  • Seite 36 b) N’utilisez pas l’outil électrique s’il est impossible de l’allumer ou de l’éteindre avec l’interrupteur. out appareil qui ne peut pas être commandé par l’interrupteur est dangereux et doit être réparé. c) Débranchez la fiche de la prise et/ou séparez le bloc batteries de l’outil élec- trique avant d’effectuer les réglages, de changer les accessoires ou de ranger l’outil.
  • Seite 37: Caractéristiques Gamme

    2000 1650 * fiam recommande d’utiliser la visseuse jusqu’à 80% de la valeur de couple maximum déclarée. il convient de prendre en compte cet aspect en fonction de l’application spécifique. ** les valeurs de couple indiquées se réfèrent à des analyses de laboratoire basées sur la norme iso 5393 avec une visseuse réglée à...
  • Seite 38: Utilisation De L'outil

    UTILISATION DE L’OUTIL leD n° 2 leD n° 1 bouton d’inversion sens de rotation levier de démarrage avant de presser le levier de démarrage de l’outil, contrôlez les led situées sur le bouton d’inversion du sens de rotation. Rotation gauche (anti-horaire): - leD n°...
  • Seite 39: Réglage Du Couple

    RéGLAGE DU COUPLE Fig. 1 Fig. 2 Fig. 3 avant de réaliser d’éventuels réglages, débranchez l’outil du dispositif d’alimentation. le réglage du couple de serrage s’effectue en modifiant la compression du ressort de l’embrayage. pour ce faire, il est nécessaire de visser ou de dévisser la bague filetée de réglage en insérant le tournevis fourni avec l’outil dans l’emplacement spécialement creusé...
  • Seite 40: Options De Fonctionnement

    OPTIONS DE fONCTIONNEMENT une pression prolongée (> 4 secondes) du bouton reverse permet d’accéder à la pro- grammation “smart pro”...
  • Seite 41: Poignée De L'outil Et Montage Sur Bras De Réaction

    à des points de l’outil différents de ceux indiqués car cela pourrait entraîner des dommages sur l’outil en question et compromet- tre son fonctionnement ; le cas échéant, fiam ne peut être tenue pour responsable des dommages subis par l’outil.
  • Seite 42: Modèle Dispositif D'alimentation

    MODèLE DISPOSITIf D’ALIMENTATION Code Description tpu-1 unité d’alimentation 686200100 tpu-2 unité d’alimentation avec des signaux d’entrée/sortie intégrés 686200101 DESCRIPTION DU DISPOSITIf D’ALIMENTATION led 1 led s1 led s2 led 2 led s3 led 3 led 4 led h led l bouton de paramétrage de la vitesse prise d’alimentation...
  • Seite 43: Informations Led Dispositif D'alimentation

    INfORMATIONS LED DISPOSITIf D’ALIMENTATION Colour Led Description fonction Déclenchement embrayage, l’outil a atteint le couple led 1 vert blocage du moteur ou bien relâchement pts (Démarrage par levier + poussée) en mode de Démarrage levieR +pts (Démarrage par levier + led 2 Rouge poussée) ou mode bouton +pts (Démarrage par levier + poussée)
  • Seite 44: Connecteur Entrées Sorties (Uniquement Pour Modèle Tpu-2)

    CONNECTEUR ENTRéES SORTIES (UNIQUEMENT POUR MODèLE TPU -2) signaux disponibles sur le connecteur Db15 présent dans le modèle tpu -2 : Direction DB15 Signal fonction du signal femelle entrée arrêt moteur Commande de désactivation des commandes entrée Dévisse Commande de dévissage sortie erreur signalement erreur...
  • Seite 45: Caractéristiques Techniques Du Dispositif D'alimentation

    1 000 000 cycles (l’éclairage frontal clignote durant la rotation), et qu’il nécessite un contrôle à confier à l’assistance technique fiam. si l’utilisateur ne souhaite pas procéder au contrôle prévu, il est possible de réinitiali- ser le signal en suivant les instructions reportées dans le tableau à...
  • Seite 46 ÍNDICE DefiniCión De los símbolos utilizaDos aDveRtenCias De seGuRiDaD GeneRal paRa la heRRamienta CaRaCteRístiCas De la Gama aRRanQue De la heRRamienta uso De la heRRamienta ReGulaCión Del paR opCiones De funCionamiento empuñaDuRa De la heRRamienta y montaje en bRazo De ReaCCión moDelos De alimentaDoR DesCRipCión Del alimentaDoR infoRmaCión leD alimentaDoR...
  • Seite 47: Definición De Los Símbolos Utilizados

    DEfINICIóN DE LOS SÍMBOLOS UTILIzADOS: RAEE: el producto debe ser eliminado mediante recogida diferenciada, de conformidad con la Directiva Raee 2012/19/ue. este producto no debe procesarse como residuo doméstico. ATENCIóN, RIESGO DE PELIGRO: el operador debe consultar este manual cada vez que vea este símbolo de peligro.
  • Seite 48: Advertencias De Seguridad General Para La Herramienta

    ADVERTENCIAS DE SEGURIDAD GENERAL PARA LA HERRAMIENTA ATENCIóN: Lea todas las advertencias e instrucciones. El incumplimiento de las advertencias y de las instrucciones puede provocar descargas eléctricas, incendios y/o lesiones graves. Conserve todas las advertencias e instrucciones para referencias futuras. El término “herramienta eléctrica”...
  • Seite 49 (RCD). El uso de un interruptor diferencial (RCD) reduce el riesgo de descarga eléctrica. nota: el término “interruptor diferencial (RCD)” puede ser sustituido por el término “interruptor de circuito por falla a tierra (GfCi)” o “interruptor para corrientes de fuga (elCb)”. 3) Seguridad personal a) No se distraiga, controle lo que está...
  • Seite 50 b) No utilice la herramienta eléctrica si el interruptor de encendido y de apagado no se acciona correctamente. Cualquier herramienta eléctrica que no pueda ser controlada con el interruptor es peligrosa y debe ser reparada. c) Desconecte la clavija de la red eléctrica y/o del grupo de baterías de la herra- mienta eléctrica antes de realizar regulaciones, sustituir accesorios o guardar las herramientas eléctricas.
  • Seite 51: Características De La Gama

    2000 1650 * fiam recomienda utilizar el atornillador hasta el 80 % del valor de par máximo declarado. tenga en cuenta este aspecto en función de la aplicación específica. ** los valores de par indicados se refieren a análisis de laboratorio basados en la norma iso 5393 con el ator- nillador configurado en la velocidad máxima (hi).
  • Seite 52: Uso De La Herramienta

    USO DE LA HERRAMIENTA leD n° 2 leD n° 1 pulsador de inversión del sentido de rotación palanca de arranque antes de presionar la palanca de arranque de la herramienta, controle los leD situa- dos en el pulsador de inversión del sentido de rotación. Rotación izquierda (sentido antihorario): - leD 1 encendido - leD 2 apagado...
  • Seite 53: Regulación Del Par

    REGULACIóN DEL PAR Fig. 1 Fig. 2 Fig. 3 antes de realizar regulaciones, desconecte la herramienta del alimen- tador. el par de apriete se regula modificando la compresión del muelle del embrague. esto se logra enroscando o desenroscando el casquillo ro- scado de regulación, introduciendo el destornillador suministrado de serie en la ca- vidad específica de la cubierta exterior;...
  • Seite 54: Opciones De Funcionamiento

    OPCIONES DE fUNCIONAMIENTO Con la presión prolongada (> 4 segundos) de la tecla reverse, se accede a la progra- mación “smart pro”...
  • Seite 55: Empuñadura De La Herramienta Y Montaje En Brazo De Reacción

    herramienta.
  • Seite 56: Modelos De Alimentador

    MODELOS DE ALIMENTADOR Código Nombre Descripción tpu-1 unidad de alimentación 686200100 tpu-2 unidad de alimentación con señales de entrada/salida integradas 686200101 DESCRIPCIóN DEL ALIMENTADOR led 1 led s1 led s2 led 2 led s3 led 3 led 4 led h led l pulsador para seleccionar la velocidad Conector...
  • Seite 57: Información Led Alimentador

    INfORMACIóN LED ALIMENTADOR Color Led Descripción función activación del embrague, la herramienta ha alcanzado el par led 1 verde bloqueo del motor o liberación del pts (arranque por palanca + empuje) en modo de arranque palanCa + pts (arranque por palanca + empuje) o led 2 Rojo en modo pulsaDoR + pts (arranque por palanca + empuje)
  • Seite 58: Conector Entradas Salidas (Solo Para El Modelo Tpu-2)

    CONECTOR ENTRADAS SALIDAS (SOLO PARA EL MODELO TPU-2) señales disponibles en el conector Db15 presente en el modelo tpu -2: Dirección DB15 Señal función Señal hembra entrada parada motor mando de inhibición de los mandos entrada Desatornilla mando de desatornillado salida error señala un error...
  • Seite 59: Características Técnicas Del Alimentador

    12, función 6.
  • Seite 60 INHALT Definition DeR veRWenDeten symbole allGemeine siCheRheitshinWeise füR Das WeRKzeuG meRKmale DeR bauReihe staRten Des WeRKzeuGs veRWenDunG Des WeRKzeuGs DRehmomentReGulieRunG funKtionsoptionen GRiff Des WeRKzeuGs unD montaGe auf DRehmomentabstutzunG moDelle netzGeRät besChReibunG netzGeRät leD-infoRmationen netzGeRät infoRmationen taste GesChWinDiGKeitseinstellunG ansChluss ausGänGe einGänGe (nuR füR moDell tpu -2) teChnisChe Daten DeR netzGeRät WaRtunG...
  • Seite 61: Definition Der Verwendeten Symbole

    DEfINITION DER VERWENDETEN SYMBOLE: WEEE: Das produkt wird gemäß Weee-Richtlinie 2012/19/eG getrennt entsorgt. Dieses produkt darf nicht als hausmüll behandelt werden. ACHTUNG, GEfAHRENSITUATION: Der bediener muss diese anleitung lesen, wenn er dieses Gefahrensymbol sieht. PfLICHT, DIE BEDIENUNGSANLEITUNG zU LESEN: bitte lesen sie diese bedienungsanleitung, bevor sie das produkt verwenden.
  • Seite 62: Allgemeine Sicherheitshinweise Für Das Werkzeug

    ALLGEMEINE SICHERHEITSHINWEISE füR DAS WERKzEUG ACHTUNG: Lesen Sie alle Warnhinweise und Anweisungen. Die Nichtbeachtung von Warnhinweisen und Anweisungen kann zu Stromschlag, Feuer und/oder schweren Ver- letzungen führen. Bewahren Sie alle Warnhinweise und Anweisungen zur späteren Verwendung auf. Der Begriff „Elektrowerkzeug“ in den Warnhinweisen bezieht sich auf Elektrowerkzeuge, die entweder an das Stromnetz angeschlossen sind (mit Kabel) oder mit Batterie betrie- ben werden (kabellos).
  • Seite 63 geschützte Stromversorgung. Die Verwendung eines Fehlerstromschutzschal- ters (FI-Schalter) verringert die Gefahr eines Stromschlags. hinWeis: Der begriff „fehlerstromschutzschalter (fi-schalter)“ kann durch den begriff „RCD- bzw. Gf- Ci-schutzschalter“ ersetzt werden. 3) Persönliche Sicherheit a) Lassen Sie sich nicht ablenken, überprüfen Sie, was Sie tun, und verwenden Sie gesunden Menschenverstand bei der Bedienung von Elektrowerkzeugen.
  • Seite 64 b) Verwenden Sie das Elektrowerkzeug nicht, wenn der Ein-/Ausschalter nicht ord- nungsgemäß betätigt werden kann. Jedes Elektrowerkzeug, das nicht mit dem Schalter bedient werden kann, ist gefährlich und muss repariert werden. c) ziehen Sie den Stecker aus der Steckdose und/oder entfernen Sie den Akku vom Elektrowerkzeug, bevor Sie Einstellungen vornehmen, zubehörteile au- stauschen oder die Elektrowerkzeuge aufbewahren.
  • Seite 65: Merkmale Der Baureihe

    2000 1650 * fiam empfiehlt die verwendung des schraubers für bis zu 80% des angegebenen maximalen Drehmo- ments. berücksichtigen sie dies für ihre spezielle anwendung. ** Die angegebenen Drehmomentwerte beziehen sich auf die laboranalyse nach iso 5393 mit dem schrauber auf maximaldrehzahl (hi).
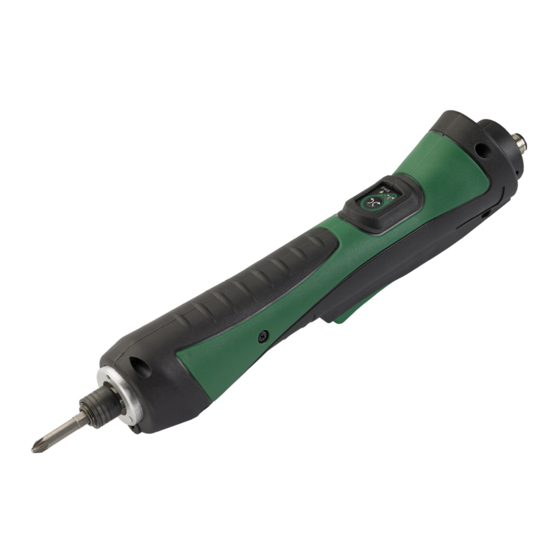
  • Seite 66: Verwendung Des Werkzeugs

    VERWENDUNG DES WERKzEUGS leD nr. 2 leD nr. 1 taste Drehrichtungsumkehr starthebel vor dem Drücken des starthebels des Werkzeugs die leDs auf der taste für die Drehrichtungsumkehr überprüfen. Linkslauf (gegen den Uhrzeigersinn): - leD nr. 1 leuchtet - leD nr. 2 ausgeschaltet Rechtslauf (im Uhrzeigersinn): - leD nr.
  • Seite 67: Drehmomentregulierung

    DREHMOMENTREGULIERUNG Abb. 1 Abb. 2 Abb. 3 trennen sie das Gerät von der stromversorgung, bevor sie einstellun- gen vornehmen. Das anziehmoment wird durch ändern des Drucks der Kupplungsfeder eingestellt. Dies wird durch ein- oder ausschrauben der einstellgewin- demutter durch einführen des mitgelieferten schraubendrehers in die spezielle aussparung der außenschale erreicht.
  • Seite 68: Funktionsoptionen

    ACHTUNG! WERKzEUGE DER BAUREIHE ETENSIL NICHT MIT MAGNETISIER- TEN KLINGEN VERWENDEN. Die nichteinhaltung dieser Regel kann zu fehlfunktionen des produkts führen. Wenn der einsatz von magnetisierten Klingen notwendig ist, verwenden sie den mitgelieferten spezialschlüssel für den magne- teinsatz und/oder wenden sie sich an den technischen Kundendienst von fiam.
  • Seite 69: Griff Des Werkzeugs Und Montage Auf Drehmomentabstutzung

    Ringmutter (abbildung 2 art. 6920779180) erfolgen. Die Werkzeuge müssen wie in den vorstehenden abbildungen dargestellt einge- spannt werden. nicht an anderen stellen des Werkzeugs spannen, da dies das Werkzeug beschädigen und seine funktionalität beeinträchtigen kann. in diesem fall haftet fiam nicht für schäden am Werkzeug.
  • Seite 70: Modelle Netzgerät

    MODELLE NETzGERäT Artikelnr. Name Beschreibung tpu-1 netzgerät 686200100 tpu-2 netzgerät mit integrierten eingangs-/ausgangssignalen 686200101 BESCHREIBUNG NETzGERäT led 1 led s1 led s2 led 2 led s3 led 3 led 4 led h led l taste zum auswählen der Drehzahl stromversorgungsbuchse power i/o-anschluss (nur für modell tpu -2)
  • Seite 71: Led-Informationen Netzgerät

    LED-INfORMATIONEN NETzGERäT farbe Led funktionsbeschreibung Kupplungsauslösung, Werkzeug hat Drehmoment erreicht led 1 Grün motorblockierung oder pts losgelassen (start über hebel + schubkraft) bei start in modus hebel +pts (start über hebel + schubkraft) oder mo- led 2 dus taste +pts (start über hebel + schubkraft) externer befehl Werkzeugstopp (nur bei modell tpu 2, das mit eingängen/ led 3 ausgängen ausgestattet ist)
  • Seite 72: Anschluss Ausgänge Eingänge (Nur Für Modell Tpu-2)

    ANSCHLUSS AUSGäNGE EINGäNGE (NUR füR MODELL TPU-2) auf dem Db15-stecker von modell tpu -2 verfügbare signale: Signal- DB15 Signal funktion richtung Buchse eingang motorstopp befehl zum sperren der steuerung eingang abschrauben befehl zum abschrauben ausgang fehler fehlermeldung ausgang Drehung signal, dass der motor sich dreht  ...
  • Seite 73: Technische Daten Der Netzgerät

    Wenn sie die prüfung nicht durchführen wollen, können sie die signalisie- rung zurücksetzen, indem sie den anweisungen in der tabelle auf seite 12, funktion nr. 6, folgen. in diesem fall lehnt fiam jegliche verantwortung für folgeschäden und/ oder fehlfunktionen ab.
  • Seite 76 Meet us on: Fiam Utensili Pneumatici Spa Fiam France Fiam España Succursale Sucursal Viale Crispi 123 73, cours Albert Thomas Travessera de Gràcia, 11, 5ª planta 36100 Vicenza - Italy 69003 Lyon - France 08021 Barcelona, España Tel.

Inhaltsverzeichnis