Herunterladen Diese Seite drucken

Werbung

Verfügbare Sprachen
  • DE

Verfügbare Sprachen

  • DEUTSCH, seite 23
13-0815_52in_Tripod_QSG_Enlish_V1_r1_translated.ai 1 8/27/2013 4:05:14 PM
Quick Setup Guide
Guide d'installation rapide
Schnellanleitung
クイッ ク設定ガイ ド
快速入 指南
Guida di approntamento
rapido
Guía de instalación rápida
B00DHPCSA0

Werbung

loading

Inhaltszusammenfassung für AmazonBasics CA013-1

  • Seite 1 13-0815_52in_Tripod_QSG_Enlish_V1_r1_translated.ai 1 8/27/2013 4:05:14 PM 13-0815_52in_Tripod_QSG_Enlish_V1_r1_translated.ai 1 8/27/2013 4:05:14 PM Quick Setup Guide Guide d’installation rapide Schnellanleitung クイッ ク設定ガイ ド 快速入 指南 Guida di approntamento rapido Guía de instalación rápida B00DHPCSA0...
  • Seite 2 13-0815_52in_Tripod_QSG_Enlish_V1_r1_translated.ai 2 8/27/2013 4:05:32 PM 13-0815_52in_Tripod_QSG_Enlish_V1_r1_translated.ai 2 8/27/2013 4:05:32 PM English.........3 Français ......13 Deutsch ......23 日本語 ......33 Italiano......43 Italiano......53 Español ......63...
  • Seite 3: Specifications

    13-0815_52in_Tripod_QSG_Enlish_V1_r1_translated.ai 3 8/27/2013 4:05:32 PM 13-0815_52in_Tripod_QSG_Enlish_V1_r1_translated.ai 3 8/27/2013 4:05:32 PM Quick Setup Guide English • AmazonBasics 52-Inch Travel Tripod Contents • Tripod (with quick release plate installed) • Carrying bag • This Quick Setup Guide Specifications • Max supportable weight: 8 lbs (3.6 kg)
  • Seite 4 13-0815_52in_Tripod_QSG_Enlish_V1_r1_translated.ai 4 8/27/2013 4:05:32 PM 13-0815_52in_Tripod_QSG_Enlish_V1_r1_translated.ai 4 8/27/2013 4:05:32 PM Product overview Tripod head 1 Quick-release mounting plate Attach to your camera. 2 Mounting plate locking knob Loosen to remove the quick-release mounting plate. Tighten to hold it in place. 3 Mounting plate base Slide the quick-release plate into the base to attach your...
  • Seite 5 13-0815_52in_Tripod_QSG_Enlish_V1_r1_translated.ai 5 8/27/2013 4:05:32 PM 13-0815_52in_Tripod_QSG_Enlish_V1_r1_translated.ai 5 8/27/2013 4:05:32 PM Tripod base 1 Center column 2 Dual-level center column locks Loosen to adjust the height of the center column. Tighten to lock the column in position. 3 Leg angle stops Position the leg in one of three angles.
  • Seite 6 13-0815_52in_Tripod_QSG_Enlish_V1_r1_translated.ai 6 8/27/2013 4:05:32 PM 13-0815_52in_Tripod_QSG_Enlish_V1_r1_translated.ai 6 8/27/2013 4:05:32 PM Setup Extend the legs 1. Swing each leg down. 2. With one hand, grab all four leg locks on one leg and twist them counterclockwise to loosen them all at once. 3.
  • Seite 7 13-0815_52in_Tripod_QSG_Enlish_V1_r1_translated.ai 7 8/27/2013 4:05:32 PM 13-0815_52in_Tripod_QSG_Enlish_V1_r1_translated.ai 7 8/27/2013 4:05:32 PM Adjust the legs You can lock the legs into one of three angle positions. 1. Push in the leg slightly. 2. Pull out the leg release tab. 3. Raise the leg to one of the preset angles, then push the leg release tab in to lock it under the leg angle...
  • Seite 8 13-0815_52in_Tripod_QSG_Enlish_V1_r1_translated.ai 8 8/27/2013 4:05:32 PM 13-0815_52in_Tripod_QSG_Enlish_V1_r1_translated.ai 8 8/27/2013 4:05:32 PM Attach your camera 1. Loosen the mounting plate locking knob. 2. Push in the safety lock pin and slide the quick- release mounting plate off the tripod. 3. Securely screw the quick-release mounting plate into the bottom of your camera.
  • Seite 9 13-0815_52in_Tripod_QSG_Enlish_V1_r1_translated.ai 9 8/27/2013 4:05:32 PM 13-0815_52in_Tripod_QSG_Enlish_V1_r1_translated.ai 9 8/27/2013 4:05:32 PM column locks to raise or lower your tripod, then tighten the locks to hold the height position. To shoot low-angle shots: 1. Remove your camera. 2. Unscrew and remove the weight hook from the bottom of the center column.
  • Seite 10 13-0815_52in_Tripod_QSG_Enlish_V1_r1_translated.ai 10 8/27/2013 4:05:32 PM 13-0815_52in_Tripod_QSG_Enlish_V1_r1_translated.ai 10 8/27/2013 4:05:32 PM Position your camera angle 1. Loosen the ball head angle knob. 2. Position your camera at the angle you want. Note: To position the camera at a 90˚ angle, line the camera lens over the ball head notch.
  • Seite 11 Note: You may need to rotate the head slightly so the legs fit between the knobs. 6. Stow the tripod into the carrying bag. © 2013 Amazon.com, Inc. or its affiliates. All Rights reserved. Amazon and the AmazonBasics logo are trademarks of Amazon.com, Inc. or its affiliates. Made in China...
  • Seite 12 13-0815_52in_Tripod_QSG_Enlish_V1_r1_translated.ai 12 8/27/2013 4:05:33 PM 13-0815_52in_Tripod_QSG_Enlish_V1_r1_translated.ai 12 8/27/2013 4:05:33 PM...
  • Seite 13: Guide D'installation Rapide

    13-0815_52in_Tripod_QSG_Enlish_V1_r1_translated.ai 13 8/27/2013 4:05:33 PM 13-0815_52in_Tripod_QSG_Enlish_V1_r1_translated.ai 13 8/27/2013 4:05:33 PM Guide d’installation rapide Français • Trépied de voyage de 132 cm (52 po) AmazonBasics Contenu • Trépied (avec plaque à dégagement rapide installée) • Sac de transport • Ce guide d’installation rapide Caractéristiques...
  • Seite 14 13-0815_52in_Tripod_QSG_Enlish_V1_r1_translated.ai 14 8/27/2013 4:05:33 PM 13-0815_52in_Tripod_QSG_Enlish_V1_r1_translated.ai 14 8/27/2013 4:05:33 PM Vue d'ensemble du produit Tête du trépied 1 Plaque de montage à dégagement rapide Fixez-la à votre appareil photo. 2 Bouton de verrouillage de la plaque de montage Desserrez pour retirer la plaque de montage à...
  • Seite 15 13-0815_52in_Tripod_QSG_Enlish_V1_r1_translated.ai 15 8/27/2013 4:05:33 PM 13-0815_52in_Tripod_QSG_Enlish_V1_r1_translated.ai 15 8/27/2013 4:05:33 PM Base du trépied 1 Colonne centrale 2 Verrous de colonne centrale à deux niveaux Desserrez pour régler la hauteur de la colonne centrale. Serrez pour verrouiller la colonne en position. 3 Butées d'angle de branche Positionnez la branche sur l'un des trois angles.
  • Seite 16: Installation

    13-0815_52in_Tripod_QSG_Enlish_V1_r1_translated.ai 16 8/27/2013 4:05:33 PM 13-0815_52in_Tripod_QSG_Enlish_V1_r1_translated.ai 16 8/27/2013 4:05:33 PM Installation Extension des branches 1. Basculez chaque branche vers le bas. 2. Saisir d'une main les quatre verrous d'une branche et tournez-les dans le sens antihoraire pour les desserrer tous ensemble.
  • Seite 17 13-0815_52in_Tripod_QSG_Enlish_V1_r1_translated.ai 17 8/27/2013 4:05:33 PM 13-0815_52in_Tripod_QSG_Enlish_V1_r1_translated.ai 17 8/27/2013 4:05:33 PM Réglage des branches Vous pouvez verrouiller les branches sur une des trois positions angulaires. 1. Appuyez légèrement sur la branche. 2. Tirez la languette de dégagement de la branche. 3. Levez la branche à l'un des angles prédéfinis, puis poussez la languette de dégagement de la branche...
  • Seite 18 13-0815_52in_Tripod_QSG_Enlish_V1_r1_translated.ai 18 8/27/2013 4:05:33 PM 13-0815_52in_Tripod_QSG_Enlish_V1_r1_translated.ai 18 8/27/2013 4:05:33 PM Fixation de votre caméra 1. Desserrez le bouton de verrouillage de la plaque de montage. 2. Poussez la goupille du verrouillage de sécurité et faites glisser la plaque de montage à dégagement rapide hors du trépied.
  • Seite 19 13-0815_52in_Tripod_QSG_Enlish_V1_r1_translated.ai 19 8/27/2013 4:05:33 PM 13-0815_52in_Tripod_QSG_Enlish_V1_r1_translated.ai 19 8/27/2013 4:05:33 PM Utilisation de votre trépied Réglage de la hauteur de votre appareil photo Desserrez les deux blocages de la colonne centrale pour lever ou abaisser votre trépied, puis resserrez les blocages pour maintenir la position.
  • Seite 20 13-0815_52in_Tripod_QSG_Enlish_V1_r1_translated.ai 20 8/27/2013 4:05:33 PM 13-0815_52in_Tripod_QSG_Enlish_V1_r1_translated.ai 20 8/27/2013 4:05:33 PM 5. Réglez la hauteur de la colonne et serrez les verrous. 6. Refixez l'appareil photo. Réglage de l'angle de votre appareil photo 1. Desserrez le bouton de la rotule. 2. Positionnez votre appareil photo à...
  • Seite 21 13-0815_52in_Tripod_QSG_Enlish_V1_r1_translated.ai 21 8/27/2013 4:05:34 PM 13-0815_52in_Tripod_QSG_Enlish_V1_r1_translated.ai 21 8/27/2013 4:05:34 PM Panoramique Desserrez le bouton de tension panoramique de sorte à pouvoir faire tourner l'appareil photo sur 360° dans le sens horaire ou antihoraire. Attention : Si le bouton n'est pas desserré et que vous essayez de faire un panoramique vers la gauche, vous risquez de desserrer la tête du trépied de sa base.
  • Seite 22 6. Rangez le trépied dans son sac de transport. © 2013 Amazon.com, Inc. ou ses filiales. Tous droits réservés. Amazon et le logo AmazonBasics sont des marques de commerce d'Amazon.com, Inc. ou de ses filiales.
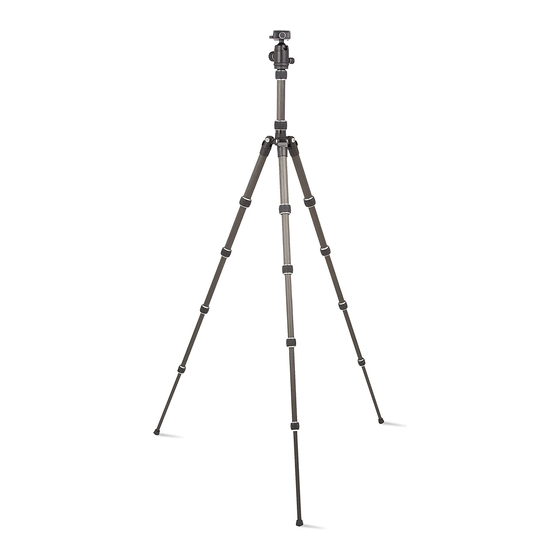
  • Seite 23 13-0815_52in_Tripod_QSG_Enlish_V1_r1_translated.ai 23 8/27/2013 4:05:34 PM 13-0815_52in_Tripod_QSG_Enlish_V1_r1_translated.ai 23 8/27/2013 4:05:34 PM Schnellanleitung Deutsch • AmazonBasics Reisestativ, 132 cm Inhalt • Stativ (mit installierter Schnellwechselplatte) • Tragetasche • Diese Schnellanleitung Technische Daten • Max. Tragfähigkeit: 3.6 kg (8 lbs)
  • Seite 24 13-0815_52in_Tripod_QSG_Enlish_V1_r1_translated.ai 24 8/27/2013 4:05:34 PM 13-0815_52in_Tripod_QSG_Enlish_V1_r1_translated.ai 24 8/27/2013 4:05:34 PM Produktübersicht Stativkopf 1 Schnellwechsel- Montageplatte An Ihrer Kamera befestigen. 2 Verriegelungsknopf der Montageplatte Zum Abnehmen der Schnellwechsel- Montageplatte lösen. Zum Befestigen festziehen. 3 Montageplattensockel Die Schnellwechselplatte in den Sockel hineinschieben, um die Kamera am Stativ zu befestigen.
  • Seite 25 13-0815_52in_Tripod_QSG_Enlish_V1_r1_translated.ai 25 8/27/2013 4:05:34 PM 13-0815_52in_Tripod_QSG_Enlish_V1_r1_translated.ai 25 8/27/2013 4:05:34 PM Stativsockel 1 Mittelsäule 2 Zweifache Mittelsäulenver- riegelung Zum Justieren der Höhe der Mittelsäule lösen. Zur Arretierung der Säule in Position festziehen. 3 Beinwinkelanschläge Das Bein in einem von drei Winkeln positionieren. 4 Beinfreigaberiegel Herausziehen, um den Beinwinkel einzustellen.
  • Seite 26 13-0815_52in_Tripod_QSG_Enlish_V1_r1_translated.ai 26 8/27/2013 4:05:34 PM 13-0815_52in_Tripod_QSG_Enlish_V1_r1_translated.ai 26 8/27/2013 4:05:34 PM Einrichtung Die Beine ausfahren 1. Jedes Bein nach unten schwenken. 2. Mit einer Hand alle vier Beinverriegelungen auf einem Bein festhalten und gegen den Uhrzeigersinn drehen, um sie alle gleichzeitig zu lösen. 3.
  • Seite 27 13-0815_52in_Tripod_QSG_Enlish_V1_r1_translated.ai 27 8/27/2013 4:05:34 PM 13-0815_52in_Tripod_QSG_Enlish_V1_r1_translated.ai 27 8/27/2013 4:05:34 PM Die Beine justieren Sie können die Beine in einer von drei Winkelpositionen arretieren. 1. Das Bein leicht eindrücken. 2. Den Beinfreigaberiegel herausziehen. 3. Das Bein auf einen der voreingestellten Winkel anheben, dann den Beinfreigaberiegel drücken, um das Bein...
  • Seite 28 13-0815_52in_Tripod_QSG_Enlish_V1_r1_translated.ai 28 8/27/2013 4:05:34 PM 13-0815_52in_Tripod_QSG_Enlish_V1_r1_translated.ai 28 8/27/2013 4:05:34 PM Kamera befestigen 1. Den Verriegelungsknopf an der Montageplatte lösen. 2. Den Sicherheitsver- riegelungsstift drücken und die Schnellwechsel- Montageplatte vom Stativ herunter- schieben. 3. Die Schnellwechsel- Montageplatte sicher in Ansicht die Unterseite der unten Kamera einschrauben.
  • Seite 29 13-0815_52in_Tripod_QSG_Enlish_V1_r1_translated.ai 29 8/27/2013 4:05:34 PM 13-0815_52in_Tripod_QSG_Enlish_V1_r1_translated.ai 29 8/27/2013 4:05:34 PM Verwendung des Stativs Kamerahöhe festlegen Die beiden Verriegelungen der Mittelsäule lösen, um das Stativ nach oben oder unten zu verstellen. Dann die Verriegelungen festziehen, um die Höhenposition zu sichern. Für Aufnahmen in tiefen Winkeln: 1.
  • Seite 30 13-0815_52in_Tripod_QSG_Enlish_V1_r1_translated.ai 30 8/27/2013 4:05:34 PM 13-0815_52in_Tripod_QSG_Enlish_V1_r1_translated.ai 30 8/27/2013 4:05:34 PM einführen und den Gewichtshaken wieder einbauen, um sie zu sichern. 5. Die Säulenhöhe justieren und die Verriegelungen festziehen. 6. Die Kamera wieder anbringen. Kamerawinkel festlegen 1. Den Kugelkopf- Winkelknopf lösen. 2.
  • Seite 31 13-0815_52in_Tripod_QSG_Enlish_V1_r1_translated.ai 31 8/27/2013 4:05:35 PM 13-0815_52in_Tripod_QSG_Enlish_V1_r1_translated.ai 31 8/27/2013 4:05:35 PM Schwenken Den Schwenk- Zugregelungsknopf lösen, damit Sie die Kamera im oder gegen den Uhrzeiger- sinn um volle 360˚ drehen können. Vorsicht: Wenn Sie den Knopf nicht lösen und dann versuchen, nach links zu schwenken, können Sie den Stativkopf vom Stativsockel losschrauben.
  • Seite 32 Beine zwischen die Knöpfe passen. 6. Das Stativ in der Tragetasche verstauen. © 2013 Amazon.com, Inc. oder seine verbundenen Unternehmen. Alle Rechte vorbehalten. Amazon und das AmazonBasics-Logo sind Marken von Amazon.com, Inc. oder seinen verbundenen Unternehmen. Hergestellt in China...
  • Seite 33 13-0815_52in_Tripod_QSG_Enlish_V1_r1_translated.ai 33 8/27/2013 4:05:35 PM 13-0815_52in_Tripod_QSG_Enlish_V1_r1_translated.ai 33 8/27/2013 4:05:35 PM クイック設定ガイ ド 日本語 • Amazonベーシック 旅行用三脚 (132 cm) 梱包されているもの • 三脚 (クイックリリース雲台装填) • キャリングバッグ • クイック設定ガイド 仕様 • 最大耐荷重 : 3.6 kg...
  • Seite 34 13-0815_52in_Tripod_QSG_Enlish_V1_r1_translated.ai 34 8/27/2013 4:05:35 PM 13-0815_52in_Tripod_QSG_Enlish_V1_r1_translated.ai 34 8/27/2013 4:05:35 PM 製品概要 三脚ヘッ ド部 1 クイック リ リースマウント 雲台 カメラを取り付けるため の雲台。 2 マウント雲台ロッ ク ノブ クイックリリースマウン ト雲台をはずす際にゆ るめる。 好みの位置でキープす る際に締める。 3 マウント雲台用台座 カメラを三脚に取り付ける際に 、 クイックリリース雲台をスライ ドさせて取り付ける台座。 4 安全ロックピン クイックリリース設置雲台を取り 外す際に押す。 5 水準器 7 パンテンシ...
  • Seite 35 13-0815_52in_Tripod_QSG_Enlish_V1_r1_translated.ai 35 8/27/2013 4:05:35 PM 13-0815_52in_Tripod_QSG_Enlish_V1_r1_translated.ai 35 8/27/2013 4:05:35 PM 三脚ベース 1 センターコラム 2 2段階センターコラムロッ ク センターコラムの長さを 調整する際にゆるめる。 コ ラムの位置をロックする 際に締める。 3 脚部アングルストップ 3つのアングルのひとつで 脚部の位置を調整。 4 脚部リ リースタブ 脚部のアングルの位置を セッティングする際に引き 出す。 脚部をアングルの1 つに固定する際に押す。 5 おも り用フッ ク 三脚を安定させるのに役 立つおもり (別売り) をぶら 下げる。...
  • Seite 36 13-0815_52in_Tripod_QSG_Enlish_V1_r1_translated.ai 36 8/27/2013 4:05:35 PM 13-0815_52in_Tripod_QSG_Enlish_V1_r1_translated.ai 36 8/27/2013 4:05:35 PM セッティ ング 脚部の伸張 1. それぞれの脚部を回し下ろします。 2. 片手で1脚に4つついているすべての脚部ロックを握り、 4つ同 時に反時計回りに回しゆるめます。 3. 好みの高さまで脚部のセクションを延ばします。 4. 脚部を締めるには、 それぞれの脚部ロックを時計回りに回しま す。 5. 各脚部で上記の手順を繰り返します。...
  • Seite 37 13-0815_52in_Tripod_QSG_Enlish_V1_r1_translated.ai 37 8/27/2013 4:05:35 PM 13-0815_52in_Tripod_QSG_Enlish_V1_r1_translated.ai 37 8/27/2013 4:05:35 PM 脚部の調整 3つのアングルの好みの位置 でロックをかけることができま す。 1. 脚部をわずかに押します。 2. 脚部リリースタブを引き出 します。 3. プリセッ トされているアン グルの1つまで脚部を持ち 上げ、 脚部アングルストップ でロックするため脚部リリ ースタブを押します。...
  • Seite 38 13-0815_52in_Tripod_QSG_Enlish_V1_r1_translated.ai 38 8/27/2013 4:05:35 PM 13-0815_52in_Tripod_QSG_Enlish_V1_r1_translated.ai 38 8/27/2013 4:05:35 PM カメラの取り付け 1. マウント雲台ロック ノブ をゆるめます。 2. 安全ロックピンを押し、 ク イックリリースマウント雲 台を三脚からスライドし てはずします。 3. クイックリリースマウント 雲台をカメラ底部にしっ かりとねじ入れます。 4. クイックリリースマウント 雲台を三脚にスライドし て取り付けます。 安全ロッ 下からの図 クがかかります。 5. 安全のため、 マウント雲 台ロック ノブを締めます。...
  • Seite 39 13-0815_52in_Tripod_QSG_Enlish_V1_r1_translated.ai 39 8/27/2013 4:05:36 PM 13-0815_52in_Tripod_QSG_Enlish_V1_r1_translated.ai 39 8/27/2013 4:05:36 PM 三脚の使用 カメラの高さ調整 三脚を上げ下げするには2つ のセンターコラムロックをゆ るめ、 好みの高さをキープす るためにロックを締めます。 ローアングルの撮影 : 1. カメラを取り外します。 2. センターコラムの下部から おもり用フックをねじって 外します。 3. 下部のコラムロックをゆる め、 センターコラムを外し ます。 4. 下部よりコラムを再度挿し 入れ、 きちんとはまるよう にするため、 おもり用フッ クを置き換えます。 5. コラムの高さを調整し、 ロ ックを締めます。...
  • Seite 40 13-0815_52in_Tripod_QSG_Enlish_V1_r1_translated.ai 40 8/27/2013 4:05:36 PM 13-0815_52in_Tripod_QSG_Enlish_V1_r1_translated.ai 40 8/27/2013 4:05:36 PM カメラアングルの位置調整 1. ボールヘッ ドアングルノブ をゆるめます。 2. 好みのアングルにカメラ を調整します。 注記 : カメラを垂直にす るには、 ボールヘッ ドのく ぼみ越しにカメラのレンズ をラインアップさせます。 3. 好みの位置でロックする ため、 ボールヘッ ドアング ルノブを締めます。 パン 時計回りまたは反時計回りで 360度フルにカメラを回転で きるようにするため、 パンテ ンションノブをゆるめます。 注意 : ノブをゆるめずに左に パンを行った場合、...
  • Seite 41 13-0815_52in_Tripod_QSG_Enlish_V1_r1_translated.ai 41 8/27/2013 4:05:36 PM 13-0815_52in_Tripod_QSG_Enlish_V1_r1_translated.ai 41 8/27/2013 4:05:36 PM 意ください。 注記 : パンを終了するには、 位置をロックするためノブを締めま す。 三脚の収納 1. カメラを取り外します。 2. センターコラムロックをゆるめます。 素早く コラムを持ち上げ、 下部のロックを締めます。 上部のセクションを素早く下げます。 3. 各脚ロックを反時計回りに回し、 脚部を折りたたみます。 4. 4つのすべての脚部ロックを手で包み込み、 4つ同時に時計回 りに回して締めます。 5. 脚部リリースタブを引っ張り、 脚部をはね上げます。 注記 : ノブが脚部の間に納まるようにするため、 ヘッ ド部をわ ずかに回転させなければならない場合があります。...
  • Seite 42 13-0815_52in_Tripod_QSG_Enlish_V1_r1_translated.ai 42 8/27/2013 4:05:36 PM 13-0815_52in_Tripod_QSG_Enlish_V1_r1_translated.ai 42 8/27/2013 4:05:36 PM...
  • Seite 43 13-0815_52in_Tripod_QSG_Enlish_V1_r1_translated_CHINESE.ai 1 8/27/2013 4:06:26 PM 13-0815_52in_Tripod_QSG_Enlish_V1_r1_translated_CHINESE.ai 1 8/27/2013 4:06:26 PM 快速入门指南 快速入门指南 简体中文 简体中文 • 亚马逊倍思 1.321米旅游三脚架 亚马逊倍思 1.321米旅游三脚架 目录 目录 • 三脚架(已安装快装板) • 脚架袋 • 本快速设置指南 规格 规格 • 最大承重量: 3.6 kg...
  • Seite 44 13-0815_52in_Tripod_QSG_Enlish_V1_r1_translated_CHINESE.ai 2 8/27/2013 4:06:34 PM 13-0815_52in_Tripod_QSG_Enlish_V1_r1_translated_CHINESE.ai 2 8/27/2013 4:06:34 PM 产品概述 产品概述 三脚架云台 三脚架云台 1 快拆式固定板 快拆式固定板 固定相机。 2 固定板止动旋钮 固定板止动旋钮 旋松以取下快拆式固 定板。拧紧以将其固 定。 3 固定板底座 固定板底座 将快装板滑入底座,以便将 相机固定到三脚架上。 4 安全锁销 安全锁销 推动以取下快拆式固定板。 5 水准仪 水准仪 校正圆心中的气泡,确保相 机保持水平。 6 球形云台弯角钮 球形云台弯角钮...
  • Seite 45 13-0815_52in_Tripod_QSG_Enlish_V1_r1_translated_CHINESE.ai 3 8/27/2013 4:06:34 PM 13-0815_52in_Tripod_QSG_Enlish_V1_r1_translated_CHINESE.ai 3 8/27/2013 4:06:34 PM 三脚架底座 三脚架底座 1 中柱 中柱 2 双重中柱锁 双重中柱锁 旋松以调节中柱高度。 拧紧以锁定中柱。 3 脚管角度止动片 脚管角度止动片 脚管可调节至三个角度 的任一位置。 4 脚管释放拉片 脚管释放拉片 拉出以调节脚管角度。 推入到其中一个角度止 动片下方以固定脚管。 5 重锤钩 重锤钩 挂一个重锤(单独出售) 以帮助三脚架保持平稳。 6 可调角度的脚管 可调角度的脚管 拉出脚管释放拉片并将 脚管移动至任意位置...
  • Seite 46 13-0815_52in_Tripod_QSG_Enlish_V1_r1_translated_CHINESE.ai 4 8/27/2013 4:06:34 PM 13-0815_52in_Tripod_QSG_Enlish_V1_r1_translated_CHINESE.ai 4 8/27/2013 4:06:34 PM 设置 设置 延长脚管 延长脚管 1. 将每根脚管摇下。 2. 用一只手,抓住一根脚管上的四个脚管锁,并按逆时针方向 将它们同时旋松。 3. 将脚管管节延长至所需高度。 4. 按顺时针方向将每个脚管锁拧紧。 5. 对于每根脚管都重复此步骤。...
  • Seite 47 13-0815_52in_Tripod_QSG_Enlish_V1_r1_translated_CHINESE.ai 5 8/27/2013 4:06:34 PM 13-0815_52in_Tripod_QSG_Enlish_V1_r1_translated_CHINESE.ai 5 8/27/2013 4:06:34 PM 调节脚管 调节脚管 您可以将脚管锁定到三个角度 您可以将脚管锁定到三个角度 的任一位置。 的任一位置。 1. 将脚管轻轻推入。 2. 拉出脚管释放拉片。 3. 将脚管提升至某一预设角 度,然后推入脚管释放拉 片以将其锁定到角度止动 片的下方。...
  • Seite 48 13-0815_52in_Tripod_QSG_Enlish_V1_r1_translated_CHINESE.ai 6 8/27/2013 4:06:34 PM 13-0815_52in_Tripod_QSG_Enlish_V1_r1_translated_CHINESE.ai 6 8/27/2013 4:06:34 PM 固定相机 固定相机 1. 旋松固定板止动旋钮。 2. 将安全锁销推进,并将 快拆式固定板从三脚架 滑出。 3. 将快拆式固定板紧紧拧入 相机底部。 4. 将快拆式固定板滑入三脚 架。安全锁将其接合。 5. 拧紧固定板止动旋钮以确 保安全。 底视图...
  • Seite 49 13-0815_52in_Tripod_QSG_Enlish_V1_r1_translated_CHINESE.ai 7 8/27/2013 4:06:35 PM 13-0815_52in_Tripod_QSG_Enlish_V1_r1_translated_CHINESE.ai 7 8/27/2013 4:06:35 PM 使用三脚架 使用三脚架 调节相机高度 调节相机高度 旋松两个中柱锁以提高或降 低三脚架,然后拧紧柱锁以 固定高度位置。 低角度拍摄: 低角度拍摄: 1. 移开相机。 2. 将重锤钩旋松并从中柱底 部移开。 3. 旋松底层柱锁,将中柱移 开。 4. 将中柱从底部重新插入, 并重新放置重锤钩将其固 定。 5. 调节中柱高度并拧紧 柱锁。 6. 重新固定相机。...
  • Seite 50 13-0815_52in_Tripod_QSG_Enlish_V1_r1_translated_CHINESE.ai 8 8/27/2013 4:06:35 PM 13-0815_52in_Tripod_QSG_Enlish_V1_r1_translated_CHINESE.ai 8 8/27/2013 4:06:35 PM 调节相机角度 调节相机角度 1. 旋松球形云台弯角钮。 2. 将相机调节至所需角度。 注意 注意:如需将相机调节至 90˚ 角,需在球形云台凹 槽上移动相机镜头。 3. 拧紧球形云台弯角钮以将 其固定。 平移 平移 旋松平移张力旋钮,以便按 顺时针或逆时针方向将相机 旋转 360˚。 小心 小心:如果在未旋松旋钮的 情况下向左平移,您可以从 三脚架底座上旋松三脚架云 台。 注意 注意:如需停止平移,拧紧 旋钮以固定位置。...
  • Seite 51 13-0815_52in_Tripod_QSG_Enlish_V1_r1_translated_CHINESE.ai 9 8/27/2013 4:06:35 PM 13-0815_52in_Tripod_QSG_Enlish_V1_r1_translated_CHINESE.ai 9 8/27/2013 4:06:35 PM 存放三脚架 存放三脚架 1. 移开相机。 2. 旋松中柱锁。尽量提高中柱,然后拧紧底层柱锁。尽量拉低 顶管节。 3. 按逆时针方向将每个脚管锁旋松并折叠脚管。 4. 用手握住四个脚管锁,然后按顺时针方向将它们同时拧紧。 5. 拉出脚管释放拉片并将脚管向上翻折。 注意 注意:您可能需要轻轻旋转云台以使脚管固定在旋钮间。 6. 将三脚架存放在脚架袋中。 © 2013 亚马逊公司或其附属公司。保留所有权利。亚马逊和亚马逊倍思的徽标是亚马逊公司或其附属 公司的商标。 台湾制造...
  • Seite 52 13-0815_52in_Tripod_QSG_Enlish_V1_r1_translated_CHINESE.ai 10 8/27/2013 4:06:35 PM 13-0815_52in_Tripod_QSG_Enlish_V1_r1_translated_CHINESE.ai 10 8/27/2013 4:06:35 PM...
  • Seite 53 13-0815_52in_Tripod_QSG_Enlish_V1_r1_translated.ai 43 8/27/2013 4:05:36 PM 13-0815_52in_Tripod_QSG_Enlish_V1_r1_translated.ai 43 8/27/2013 4:05:36 PM Guida di approntamento rapido Italiano • AmazonBasics Treppiede da viaggio da 132 cm (52 pollici) Contenuto • Treppiede (con piastra a sgancio rapido installata) • Borsa da trasporto • Questa Guida di approntamento rapido Dati tecnici •...
  • Seite 54 13-0815_52in_Tripod_QSG_Enlish_V1_r1_translated.ai 44 8/27/2013 4:05:36 PM 13-0815_52in_Tripod_QSG_Enlish_V1_r1_translated.ai 44 8/27/2013 4:05:36 PM Descrizione del prodotto Testa del treppiede 1 Piastra di montaggio a sgancio rapido Da collegare alla fotocamera. 2 Manopola di bloccaggio della piastra di montaggio Allentarla per rimuovere la piastra di montaggio a sgancio rapido.
  • Seite 55 13-0815_52in_Tripod_QSG_Enlish_V1_r1_translated.ai 45 8/27/2013 4:05:36 PM 13-0815_52in_Tripod_QSG_Enlish_V1_r1_translated.ai 45 8/27/2013 4:05:36 PM Base del treppiede 1 Colonna centrale 2 Dispositivi di bloccaggio della colonna centrale a due livelli Allentarli per regolare l’altezza della colonna centrale. Serrarli per bloccare in posizione la colonna. 3 Fermi di angolazione delle gambe Posizionano la gamba in...
  • Seite 56 13-0815_52in_Tripod_QSG_Enlish_V1_r1_translated.ai 46 8/27/2013 4:05:36 PM 13-0815_52in_Tripod_QSG_Enlish_V1_r1_translated.ai 46 8/27/2013 4:05:36 PM Approntamento Estendere le gambe 1. Abbassare ciascuna gamba. 2. Con una mano, afferrare tutti e quattro i dispositivi di bloccaggio su una gamba e girarli in senso antiorario per allentarli tutti contemporaneamente. 3.
  • Seite 57 13-0815_52in_Tripod_QSG_Enlish_V1_r1_translated.ai 47 8/27/2013 4:05:36 PM 13-0815_52in_Tripod_QSG_Enlish_V1_r1_translated.ai 47 8/27/2013 4:05:36 PM Regolare le gambe Le gambe possono essere bloccate su una delle tre posizioni di angolazione. 1. Spingere leggermente in dentro la gamba. 2. Aprire la linguetta di rilascio della gamba. 3.
  • Seite 58 13-0815_52in_Tripod_QSG_Enlish_V1_r1_translated.ai 48 8/27/2013 4:05:36 PM 13-0815_52in_Tripod_QSG_Enlish_V1_r1_translated.ai 48 8/27/2013 4:05:36 PM Fissare la fotocamera 1. Allentare la manopola di bloccaggio della piastra di montaggio. 2. Premere il perno di bloccaggio di sicurezza e far scorrere la piastra di montaggio a sgancio rapido per toglierla dal treppiedi.
  • Seite 59 13-0815_52in_Tripod_QSG_Enlish_V1_r1_translated.ai 49 8/27/2013 4:05:37 PM 13-0815_52in_Tripod_QSG_Enlish_V1_r1_translated.ai 49 8/27/2013 4:05:37 PM Usare il treppiede Mettere in posizione l’altezza della fotocamera Allentare i due dispositivi di bloccaggio della colonna centrale per sollevare o abbassare il treppiede, quindi serrare i dispositivi di bloccaggio per mantenere la posizione dell’altezza.
  • Seite 60 13-0815_52in_Tripod_QSG_Enlish_V1_r1_translated.ai 50 8/27/2013 4:05:37 PM 13-0815_52in_Tripod_QSG_Enlish_V1_r1_translated.ai 50 8/27/2013 4:05:37 PM 4. Reinserire la colonna dal basso e rimettere a posto il gancio per peso per fissarla. 5. Regolare l’altezza della colonna e serrare i dispositivi di bloccaggio. 6. Ricollegare la fotocamera. Mettere in posizione l’angolo della fotocamera 1.
  • Seite 61 13-0815_52in_Tripod_QSG_Enlish_V1_r1_translated.ai 51 8/27/2013 4:05:37 PM 13-0815_52in_Tripod_QSG_Enlish_V1_r1_translated.ai 51 8/27/2013 4:05:37 PM Ripresa in movimento Allentare la manopola di tensionamento per riprese in movimento in modo da poter girare in senso orario o antiorario la fotocamera di 360˚ completi. Attenzione: se si tenta di effettuare la ripresa in movimento verso sinistra senza prima allentare la...
  • Seite 62 6. Riporre il treppiede nella borsa da trasporto. © 2013 Amazon.com, Inc. o sue affiliate. Tutti i diritti riservati.  Amazon e il logo AmazonBasics sono marchi commerciali di Amazon.com, Inc. o delle sue affiliate. ...
  • Seite 63: Guía De Instalación Rápida

    13-0815_52in_Tripod_QSG_Enlish_V1_r1_translated.ai 53 8/27/2013 4:05:37 PM 13-0815_52in_Tripod_QSG_Enlish_V1_r1_translated.ai 53 8/27/2013 4:05:37 PM Guía de instalación rápida Español • AmazonBasics trípode de viaje de 132 cm Contenido • Trípode (con placa de liberación rápida instalada) • Bolsa de transporte • Esta guía de instalación rápida Especificaciones •...
  • Seite 64 13-0815_52in_Tripod_QSG_Enlish_V1_r1_translated.ai 54 8/27/2013 4:05:37 PM 13-0815_52in_Tripod_QSG_Enlish_V1_r1_translated.ai 54 8/27/2013 4:05:37 PM Descripción general del producto Cabezal de trípode 1 Placa de montaje de cambio rápido Acóplela a su cámara. 2 Perilla de bloqueo de la placa de montaje Afloje para retirar la placa de montaje de cambio rápido.
  • Seite 65 13-0815_52in_Tripod_QSG_Enlish_V1_r1_translated.ai 55 8/27/2013 4:05:37 PM 13-0815_52in_Tripod_QSG_Enlish_V1_r1_translated.ai 55 8/27/2013 4:05:37 PM Base del trípode 1 Columna central 2 Bloqueos de la columna central de doble nivel Afloje para ajustar la altura de la columna central. Apriete para bloquear la columna en posición.
  • Seite 66: Montaje

    13-0815_52in_Tripod_QSG_Enlish_V1_r1_translated.ai 56 8/27/2013 4:05:37 PM 13-0815_52in_Tripod_QSG_Enlish_V1_r1_translated.ai 56 8/27/2013 4:05:37 PM Montaje Extienda las patas 1. Mueva cada pata hacia abajo. 2. Con una mano, sujete los cuatro bloqueos de las patas sobre una pata y gírelos en el sentido contrario a las agujas del reloj para aflojarlos a la vez.
  • Seite 67 13-0815_52in_Tripod_QSG_Enlish_V1_r1_translated.ai 57 8/27/2013 4:05:37 PM 13-0815_52in_Tripod_QSG_Enlish_V1_r1_translated.ai 57 8/27/2013 4:05:37 PM 5. Repita esta acción con todas las patas. Ajuste las patas Puede bloquear las patas en una de las tres posiciones de ángulo. 1. Empuje ligeramente la pata. 2. Retire la pestaña de liberación de la pata.
  • Seite 68 13-0815_52in_Tripod_QSG_Enlish_V1_r1_translated.ai 58 8/27/2013 4:05:37 PM 13-0815_52in_Tripod_QSG_Enlish_V1_r1_translated.ai 58 8/27/2013 4:05:37 PM Acople su cámara 1. Afloje la perilla de bloqueo de la placa de montaje. 2. Presione el pasador de bloqueo de seguridad y deslice la placa de montaje de cambio rápido para retirarla del trípode.
  • Seite 69 13-0815_52in_Tripod_QSG_Enlish_V1_r1_translated.ai 59 8/27/2013 4:05:38 PM 13-0815_52in_Tripod_QSG_Enlish_V1_r1_translated.ai 59 8/27/2013 4:05:38 PM Uso de su trípode Ajuste la altura de su cámara Afloje los dos bloqueos de la columna central para subir y bajar su trípode y, a continu- ación, apriete los bloqueos para fijar la posición de altura.
  • Seite 70 13-0815_52in_Tripod_QSG_Enlish_V1_r1_translated.ai 60 8/27/2013 4:05:38 PM 13-0815_52in_Tripod_QSG_Enlish_V1_r1_translated.ai 60 8/27/2013 4:05:38 PM 5. Ajuste la altura de la columna y apriete los bloqueos. 6. Vuelva a colocar la cámara. Ajuste el ángulo de su cámara 1. Afloje la rosca del ángulo de cabezal de rótula. 2.
  • Seite 71 13-0815_52in_Tripod_QSG_Enlish_V1_r1_translated.ai 61 8/27/2013 4:05:38 PM 13-0815_52in_Tripod_QSG_Enlish_V1_r1_translated.ai 61 8/27/2013 4:05:38 PM Barrido Afloje la rosca de tensión para barrido, de forma que pueda girar la cámara 360˚en sentido de las agujas del reloj o contrario a las agujas del reloj. Precaución: Si no afloja la rosca e intenta realizar un barrido hacia la izquierda, puede que desenrosque el...
  • Seite 72 6. Guarde el trípode en la bolsa de transporte. © 2013 Amazon.com, Inc. o sus afiliadas. Todos los derechos reservados. Amazon y el logotipo de AmazonBasics son marcas comerciales de Amazon.com Inc o sus afiliadas.
  • Seite 73 13-0815_52in_Tripod_QSG_Enlish_V1_r1_translated.ai 63 8/27/2013 4:05:38 PM 13-0815_52in_Tripod_QSG_Enlish_V1_r1_translated.ai 63 8/27/2013 4:05:38 PM...
  • Seite 74 BlankPage_Print.pdf 1 8/27/2013 4:55:29 PM...
  • Seite 75 BlankPage_Print.pdf 1 8/27/2013 4:55:29 PM...
  • Seite 76 13-0815_52in_Tripod_QSG_Enlish_V1_r1_translated.ai 64 8/27/2013 4:05:38 PM 13-0815_52in_Tripod_QSG_Enlish_V1_r1_translated.ai 64 8/27/2013 4:05:38 PM 13-0815...