Seite 1
[ DE ] Installationsanleitung [ EN ] Installer Manual [ FR ] Notice installateur [ NL ] Installatiehandleiding...
Seite 2
ROMApad Deutsch Hiermit erklärt die Firma ROMA KG, dass dieses Produkt mit den grundlegenden Anforderungen und allen relevanten Vorschriften der Richtlinie 1999/5/EG übereinstimmt. Die Konformitätserklärung ist unter der Internetadresse www.roma.de/ce verfügbar. Abbildungen ohne Gewähr. Hinweis Achtung! Français Par la présente, ROMA KG déclare que l’appareil est conforme aux exigences essentielles et aux autres dispositions pertinentes de la directive 1999/5/CE.
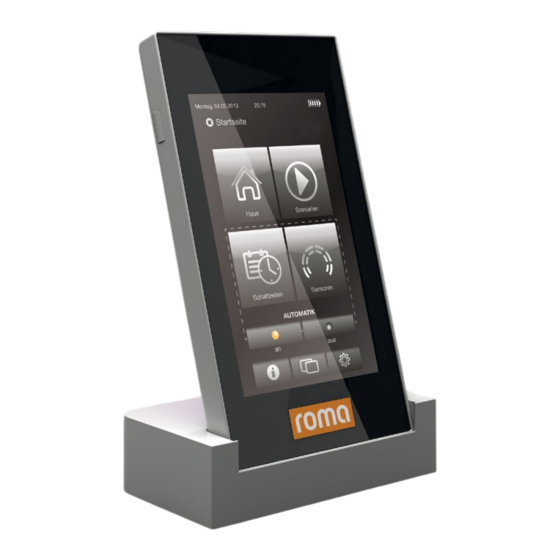
ROMApad 1. Einleitung Das ROMApad ist eine mobile lokale Haussteuerung, mit der bis zu 200 io-homecontrol Produkte bedient und gesteuert werden können. Die Bedienung gestaltet sich durch das 5 Zoll große Touchscreen Display sowie der bedienerfreundlichen Bedienoberfläche sehr einfach. Das Steuern von io-Antrieben bzw. von io-Produkten geschieht wie bei modernen Smartphones direkt mit dem Finger.
ROMApad 3. Voraussetzungen 1. Die Anlage muss elektrisch betriebene Produkte umfassen, die mit der io-homecontrol -Technologie ® ausgestattet sind (Rollläden, Garagentor, Dachfenster, Jalousien, Lampen usw.). 4. Lieferumfang ROMApad Netzteil Tischständer USB-Kabel 5. Das ROMApad im Detail 5.1. Vorderansicht ROMA-Taste: Kurz drücken: Wenn das ROMApad eingeschaltet ist und sich das Display im Standby-Betrieb befindet, wird es akti- viert und die zuletzt angezeigte Seite wird aufgerufen.
ROMApad DE 6. Inbetriebnahme 6.1. Grundeinstellungen am ROMApad: Schalten Sie das ROMApad mit der Taste Ein/Aus/Standby ein. Ein Fenster zur Konfiguration des ROMApads wird angezeigt. Befolgen Sie die Anweisungen der Bildschirmabfolge (bis zum Punkt: Konfiguration des Hauses). Bitte Sprache auswählen: Mit „OK“...
Seite 7
Wählen Sie das Datumsformat und das Uhrzeitformat. Mit „OK“ bestätigen. Stellen Sie die Standby-Zeit ein: • Wählen Sie den Zeitraum wann das Display des ROMApad in den Standby-Betrieb bei angeschlos- sener Spannungsversorgung bzw. in der Ladestation wechselt. • Wählen Sie den Zeitraum wann...
ROMApad 6.2. Programmieren von io-homecontrol -Produkten ® Mit der Taste „Weiter" die Programmierung starten 6.2.1 Sicherheitshinweise Tore lesen und bestätigen Bitte die Sicherheitshinweise auf dem Display lesen und durch Setzen des Hakens bestätigen. Taste „Weiter“ drücken 6.2.2. Programmieren von Produkten mit Hilfe eines vorhandenen Senders mit Rückmeldung (2W)
Seite 9
6.2.3. Programmieren von Produkte mit Hilfe eines vorhandenen Senders ohne Rückmeldung (1W) Beispiele für io-homecontrol -Funksender ohne Rückmeldefunktion: ® • Smoove Origin io • Smoove 1 io • Situo io • Situo Mobile io • Situo Auto/Manu io • Keytis io usw.
Seite 10
ROMApad Sie können nun auswählen: • Benennen • Identifizieren • Löschen „Identifizieren“ auswählen und die Identifizierung mit „OK“ starten Der Motor, bei dem der Identifi- zierungsprozess gestartet wurde, fährt nun zyklisch 1s AUF - Pause - 1s Ab - Pause - …...
Seite 11
• Andernfalls klicken Sie auf „abbrechen“ und machen weiter mit dem Kapitel „Konfiguration des Hauses“. Befolgen Sie die Bildschirmanweisungen für das Einlernen sämtlicher io-homecontrol -Sensoren der Anlage (Temperatur-, ® Sonnen-, Windsensoren). Wenn alle Sensoren von ROMApad erkannt wurden, klicken Sie auf „weiter“...
7.1. Konfiguration der Stockwerke und Außenbereiche Zur Konfiguration des Hauses müssen Sie zunächst die Stockwerke und Außenbereiche auswählen, in denen io-Produkte verbaut sind: • Klicken Sie auf das Stockwerk bzw. den Außenbereich, um es auszuwählen. . • Klicken Sie erneut darauf, um es zu löschen.
Außenbereich, um die Liste der zugeordneten Anwendungen anzuzeigen, und ziehen Sie die entsprechende Anwendung auf das Symbol des Papierkorbs (die Anwendung wird nicht aus dem ROMApad gelöscht, sondern in die Liste „Nicht zugeordnete Produkte“ übertragen). • Wenn alle Anwendungen platziert sind: mit der Taste „Fertig“ abschließen Die Konfiguration des Hauses ist nun abgeschlossen.
Szenario“ Um eine Anwendung aus dem Szenario zu entfernen, ziehen Sie diese in den Papierkorb. (Die Anwendung wird nicht aus dem ROMApad gelöscht) Klicken Sie auf ein Symbol einer Anwendung, geben die gewünschte Position für die Ausführung des Szenarios und bestätigen mit „OK“...
ROMApad 8. Szenarien Geben Sie Ihrem Szenario einen eindeutigen Namen. 8.2. Ändern eines Szenarios Durch anklicken eines Szenarios können Sie dieses beliebig ändern. 8.3. Löschen eines Szenarios Um ein Szenario zu löschen, ziehen Sie dieses in den Papierkorb. 8.3. Ausführen eines Szenarios...
Suomea Italiano Anzeige English ROMApad Ελληνικά Danske Español Datum und Uhrzeit DE 9. Kurzbeschreibung der Benutzeroberfläche Svenska Polska Sonnenaufgang und -untergang Português Sprache Halten Sie die ROMA-Taste (> 0,5 s) gedrückt, um zum Nederlandse Suomea Italiano Anzeige Startmenü zurückzukehren. Danske Ελληνικά...
Seite 17
ROMApad MEIN HAUS MEIN HAUS MEINE SZENARIEN MEINE SZENARIEN 9. Kurzbeschreibung der Benutzeroberfläche Klicken Sie auf das Symbol „MEINE WOCHE“, um einen oder mehrere Tage zu programmieren, um vorhandene Programmierungen anzuzeigen und in eine Woche aufzuneh- men oder um den Automatikbetrieb zu aktivieren/deaktivieren.
10.1. ROMApad-UpdateChecker: Software installieren Unter www.roma.de gelangen Sie über dem Menüpunkt AUTOMATION, zur ROMApad-Seite. Dort laden Sie die „Software ROMApad UpdateChecker“ auf Ihren PC und führen die Installation aus. 10.2. Verbindung mit dem PC Starten Sie die UpdateChecker-Software und verbinden das ROMApad mittels dem Micro-USB-Kabel mit dem PC.
ROMApad 10. Update ROMApad Sobald ihr PC das ROMApad erkannt hat, wird automatisch ein Backup des Pads erstellt und auf dem PC gespeichert. 10.3. Aktuelle Softwarestand und Aktualisierung der Software suchen Der UpdateChecker zeigt, nach erfolg- reicher Verbindung, den aktuellen Softwarestand des ROMApad an.
ROMApad DE 10. Update ROMApad 10.5. Wiederherstellen Ging Ihre Konfiguration auf einen ROMApad verloren, oder wollen Sie eine frühere abgespeicherte Version wieder herstellen, klicken Sie auf „Wiederherstellen“ und suchen sich die besagte Datei aus. Bei jedem Backup ist das Datum und die Uhrzeit, der Erstellung, hinterlegt.
USB-Schnittstelle 5 V DC 500 mA max. 11.2. Funktionen Max. Anzahl Szenarien Speicherkapazität 4 Wochen (max. 30 Szenarien pro Tag) Max. Anzahl speicherbarer io-homecontrol ® Anwendungen und -Sensoren Umstellung Sommer-/Winterzeit automatisch Funkreichweite 200 m im Freifeld; 20 m durch zwei Stahlbetonwände 11 .3.
Seite 23
2.2. Specific safety instructions 8.3. Delete a scenario 3. Requirements 8.4. Run a scenario 4. Contents 8.5. Cancel a scenario 5. The ROMApad in Detail 9. Overview of the interface 5.1. Front panel 10. Update ROMApad 5.2. Side 10.1. ROMApad-UpdateChecker: installing software 5.3.
ROMApad 1. Introduction The ROMApad is a mobile local home control which allows you to operate und control up to 200 io-home- control products. The operation is very easy because of the 5 inch touchscreen display as well as the user-friendly interface.
Touchscreen: used to navigate through the various menus. 5.2. Side Button on/off/standby: • Long press (2 s): switches the ROMApad on and off. • Brief press (< 2 s): switches the ROMApad to standby mode. 5.3. Underneath 2 pins: for the electrical connection with the table mount in order to recharge the ROMApad.
ROMApad 6. Configuring the installation 6.1. Configuring the ROMApad: Switch on the ROMApad using the On/Standby button. A window opens in which you can configure the installation. Follow the screen sequence (through to the end of house configuration). Please select the language: Confirm with „OK“...
Seite 27
Select the date format and time format. Confirm with „OK“. Set the standby periods: • Select the period for which the ROMApad must be inac- tive before being switched to standby when connected to the mains power supply. • Select the period for which...
6.2.2. Detecting end-products with feedback function (2W) Examples of io-homecontrol remote control transmitters with ® feedback function: • Telis 1 io • Telis Composio io • Impresario Chronis io • Easy Sun io • Keytis io usw. Should you have got a “2W” transmitter (transmitter with feedback), please choose this transmitter available and start the installation with “OK”...
Seite 29
6.2.3. Detecting end-products without feedback function (1W) Example of io-homecontrol remote control transmitters ® without feedback function: • Smoove Origin io • Smoove 1 io • Situo io • Situo Mobile io • Situo Auto/Manu io • Keytis io usw.
Seite 30
ROMApad Now you could choose: • Rename • Identify • Delete Press “Identify” and “OK” to start identifying The motor, started with process of identifying, is now running cyclically 1 sec “OPEN” – break – 1 sec “CLOSE” – break - …...
• If not, click “no“ and go directly to the section “Configuring the house“. Follow the instructions that appear on the screen to detect all of the Somfy io-homecontrol sensors in the installation ® (temperature, sunlight, wind sensors). When the ROMApad has recognised all the sensors, click “continue“.
ROMApad EN 7. Configuring the house 7.1.Configuring floors and outside areas To configure the house, you must first define the various floors and outside areas: • Click the elements to select them. • Click them again to remove them. • Once you have selected the floors and outside areas in the installation, click the “next“...
Seite 33
(the end-product is not deleted from the ROMApad; it returns to the "unplaced devices" list). • When entering all applications: Press “Fertig” button to finish.
“OK”. After completing desired scenario, please confirm it with “OK”. Info: Further functions of scenarios, planning weeks and automatic programms controlled with a sensor you will find at www.roma.de/de/automation/romapad.html.
ROMApad 8. Szenarios Give your scenario an explicit name 8.2. Change a scenario By clicking on a scenario you could change it arbitrarily. 8.3. Delete a scenario To delete scenario, drag it to the Trash. 8.4. Run a scenario To start scenario manually, drag it into the scene player.
Suomea Italiano Anzeige English ROMApad Ελληνικά Danske Español Datum und Uhrzeit 9. Overview of the interface Svenska Polska Sonnenaufgang und -untergang Português Sprache Press and hold down (> 0.5 s) the reactivation button to return Nederlandse Suomea Italiano Anzeige to the home menu.
Seite 37
ROMApad 9. Overview of the interface Click the “MY WEEK“ icon to programme one or more days or view existing programmes and incorporate them into a week. Click the “MY SENSORS“ icon to adjust the sensor thresholds and define the associated scenarios, or to activate/deactivate automatic mode.
ROMApad EN 10. Update ROMApad 10.1. ROMApad-UpdateChecker: installing software On www.roma.de, the AUTOMATION menu item will take you to the ROMApad site. Here you can download the "Software ROMApad UpdateChecker" on your PC and install it. 10.2. Connecting to the PC...
UpdateChecker will show the current software version of the ROMApad. When the 'Update' field is greyed out, your ROMApad has the most recent software. If your PC is connected to the Internet, you can update the software to the most recent version by looking under "finding...
EN 10. Update ROMApad 10.5. Repairs If you have lost a configuration on the ROMApad, or if you wish to restore a previously saved version, click on "Restore" and select the file in question. Every backup lists the date and time of the configuration, e.g.
ROMApad 11. Technical data 11.1. ROMApad Radio frequency 868-870 MHz, io-homecontrol two-way ® three band, with LBT (Listen-Before-Talk), (searches for an unoccupied radio frequency prior to transmitting). Protection rating IP20 Operating temperature + 0 °C bis + 40 °C Dimensions (l x w x h)
Seite 43
11.2. Fonctionnalités 7.3. Configuration des applications par 11.3. Adaptateur secteur pièces et parties extérieures Vous trouverez plus d’information anisi que le logiciel PC de mise à jour du ROMApad, permettant également de sauvegarder vos paramètres d’installation, en suivant le lien: www.roma.de/romapad...
• Un support de table qui permet de poser et de connecter électriquement le ROMApad. Lorsque le ROMApad est posé sur ce support, la prise branchée sur le secteur, il se recharge. • Un câble USB qui permet de mettre à jour le ROMApad à l’aide d’un ordinateur connecté à Internet et de le recharger.
ROMApad 3. Pré requis 1. L’installation doit posséder des équipements électriques intégrant la technologie io-homecontrol (volet ® roulant, porte de garage, fenêtre de toit, store, lumière etc). 4. Contents ROMApad Prise électrique Support de table Câble USB 5. Le ROMApad en détail 5.1.
ROMApad 6. Configuration de l’installation 6.1. Paramétrage du ROMApad: Une fenêtre s’affiche pour paramétrer l’installation, suivre l’enchaîne- ment des écrans (jusqu’à la fin de la configuration de la maison). Lire la présentation : Valider avec «démarrer». Les a étapes de l´installation s´affichent.
Seite 47
Valider avec «OK». Régler la mise en veille : • Choisir le temps d’inactivité nécessaire avant la mise en veille, quand le ROMApad est branché. • Choisir le temps d’inactivité nécessaire avant la mise en veille, quand le ROMApad est débranché.
ROMApad 6.2. Découverte des applications io-homecontrol ® Démarrer la programmation avec le bouton «suivant». 6.2.1 Lire et valider les consignes de sécurité concernant les cotes Veuillez lire les consignes de sécurité qui s´affichent sur l´écran. Confirmer en cochant la case.
Seite 49
ROMApad Découverte des applications sans retour d’information 6.2.3. (1W) Exemple de télécommandes io-homecontrol sans retour d’information : ® • Smoove Origin io • Smoove 1 io • Situo io • Situo Mobile io • Situo Auto/Manu io • Keytis io usw.
Seite 50
ROMApad Vous avez le choix entre : • nommer • identifier • annuler Sélectionner le bouton «identifier» et démarrer l´identification avec «OK». Le moteur par lequel la procédure d´identification a démarré, excécute des cycles d´1 sec. MONTEE - Pause - 1s DESCENTE - Pause ...
Seite 51
«Configuration de la maison». Suivre les instructions qui s’affichent à l’écran pour découvrir tous les capteurs Somfy io-homecontrol de l’installation (capteurs de ® température, de soleil, de vent). Lorsque tous les capteurs ont été reconnus par le ROMApad, cliquer sur «continuer».
ROMApad FR 7. Configuration de la maison 7.1. Configuration des niveaux et des parties extérieures Pour configurer la maison, il faut d’abord indiquer les différents niveaux, ainsi que les parties extérieures : • Cliquer sur les éléments pour les sélectionner. • Cliquer à nouveau dessus pour les supprimer.
(l’application n’est pas supprimée du ROMApad, elle revient dans la liste « équipements non placés »). • Lorsque toutes les applications ont été placées : finaliser avec le bouton «terminé».
“nouveau scénario” Faire glisser l’application vers la corbeille pour la supprimer du scénario. (L’application n’est pas supprimée du ROMApad). Cliquer sur l’icône d’une applica- tion, indiquer la position souhaitée pour lancer un scénario et valider avec “OK” Lorsque le scénario souhaité est configuré, le valider avec “OK”...
ROMApad 8. Scénarios Donner un nom explicite au scénario. 8.2. Modifier un scénario En cliquant sur un scénario, on peut le modifier à son gré. 8.3.Supprimer un scénario Faire glisser le scénario vers la corbeille pour le supprimer. 8.3. Lancer un scénario Faire glisser le scénario...
Seite 56
Suomea Italiano Anzeige English ROMApad Ελληνικά Danske Español Datum und Uhrzeit 9. Discription succincte de l’interface Svenska Polska Sonnenaufgang und -untergang Português Sprache Faire un appui long (> 0,5 s) sur le bouton de réactivation pour Nederlandse Suomea Italiano Anzeige revenir au menu d’accueil.
ROMApad 9. Discription succincte de l’interface Cliquer sur l’icône « MA SEMAINE » pour programmer une ou plusieurs journées ou visualiser les programmations existantes et les intégrer dans une semaine Cliquer sur l’icône « MES CAPTEURS » pour régler le seuil des capteurs et définir les scénarios associés, ou pour activer/...
Recherche des mises à jour" et procéder à l’installation. 10.2. Connexion à un ordinateur Lancer le logiciel de recherche des mises à jour et connecter le ROMApad à l’ordinateur à l’aide du micro-câble USB. Suivre les instructions affichées sur le ROMApad et valider avec "connecter"...
Cliquer sur “Mettre à jour” pour démarrer la mise à jour du logiciel. Lorsque l’envoi des données de mise à jour sur le ROMApad est terminé, cliquer sur “oui”. La mise à jour peut durer jusqu’à 15 minutes environ et un redémarrage de la...
ROMApad 10. Mise à jour du ROMApad 10.5. Réinitialiser Pour récupérer une configuration sur un ROMApad ou restaurer une version antérieure, cliquer sur “Réinitialiser” et rechercher ledit fichier. La date et l’heure de la mise à jour sont enregistrées lors de chaque sauvegarde.
ROMApad 10. Données techniques 10.1. ROMApad Fréquence radio 868-870 MHz, io-homecontrol bidirectionnel ® tri-bandes, avec « LBT » (Listen Before Talk), (sélection automatique de la fréquence radio libre). Indice de protection IP20 Température d’utilisation + 0 °C bis + 40 °C Dimensions (L x l x h) 87 x 158 x 15 mm Boîtier plastique...
Seite 63
2.2. Bijzondere veiligheidsrichtlijnen 8.3. Uitvoeren van een scenario 3. Vereisten 8.4. Annuleren van een scenario 4. Inhoud 9. Beknopte beschrijving van de interface 76 5. De ROMApad in detail 10. Update ROMApad 5.1. Voorkant 10.1. ROMApad-UpdateChecker: Software installeren 5.2. Zijkant 10.2.
ROMApad in deze steun geplaatst is en de stekker in het stopcontact steekt, wordt hij opgeladen. • Een USB-kabel, die het mogelijk maakt de software van de ROMApad bij te werken via een computer met internetverbinding. Er wordt opnieuw geladen.
ROMApad 3. Vereisten 1. De installatie moet elektrische toepassingen omvatten die voorzien zijn van de io-homecontrol -technologie ® (rolluik, garagedeur, dakvenster, zonwering, verlichting enz.). 4. Inhoud ROMApad Netstekker Tafelsteun USB-kabel 5. De ROMApad in détail 5.1. Voorkant Wektoets: Kort indrukken: zo haalt u het scherm uit de stand- bystand en keert u terug naar de laatst weergegeven pagina wanneer de ROMApad al ingeschakeld is;...
ROMApad 6. Configuratie van de installatie 6.1. De ROMApad instellen Schakel de ROMApad in met de aan/uit/stand-bytoets. Er wordt een venster weergegeven om de installatie in te stellen. Volg de opeenvolgende schermen (tot het einde van de configuratie van het huis).
Seite 67
Kies de datum- en tijdnotatie. Bevestigen met „OK“ Stel de stand-bystand in: • Kies de gewenste periode van inactiviteit voordat de ROMApad in stand-by gaat wanneer hij op het stopcontact aangesloten is. • Kies de gewenste periode van inactiviteit voordat de ROMApad...
ROMApad 6.2. Detectie van io-homecontrol -toepassingen ® Met de knop „volgende“ de programmering starten. 6.2.1 Veiligheidsvoorschriften lezen en bevestigen. Graag de veiligheidsvoorschriften op het display lezen en bevestigen door af te vinken. Druk op de knop „volgende“. 6.2.2. Detectie van toepassingen met statusmelding (2W)
Seite 69
ROMApad 6.2.3. Detectie van toepassingen zonder statusmelding (1W) Exemple de télécommandes io-homecontrol sans retour d’information : ® • Smoove Origin io • Smoove 1 io • Situo io • Situo Mobile io • Situo Auto/Manu io • Keytis io usw.
Seite 70
ROMApad U kunt nu kiezen: • Benoemen • Identificeren • Wissen „Identificeren“ kiezen en de identificatie start met „OK“ De motor, waarvan het identifica- tieproces werd gestart, draait nu cyclisch 1 sec. OMHOOG - pauze - 1 sec. OMLAAG - pauze - ...
• Zo niet, dan klikt u op „nee“ en gaat u meteen door naar „Configuratie van het huis“. Volg de instructies op het scherm om alle Somfy io-homecontrol -sensoren van de installatie (temperatuur-, ® zon- en windsensoren) te detecteren. Wanneer alle sensoren door de ROMApad herkend zijn, klikt u op „doorgaan“.
ROMApad NL 7. Configuratie van det huis 7.1. Configuratie van verdiepingen en buitenzones Om het huis te configureren moeten eerst de verschillende verdiepingen en buitenzones aangeduid worden: • Klik op de elementen om ze te selecteren. • Klik er opnieuw op om de keuze ongedaan te maken.
Sleep de toepas- sing vervolgens naar het vuilnisbakpictogram (de toepas- sing wordt niet gewist uit de ROMApad, maar verschijnt opnieuw in de lijst "niet-geplaatste toepassingen"). • Wanneer alle toepassingen zijn ingegeven, afsluiten met de knop „voltooien“.
"OK" Wanneer het gewenste scenario afgewerkt is, bevestigt u dit met "OK" Info: Verdere functies voor scenario’s, week-planning en sensor- gestuurde, automatische programma’s vindt u in de handleiding op www.roma.de/ de/automation/romapad.html...
ROMApad 8. Scenario’s Geef uw scenario een unieke naam. 8.2. Een scenario wijzigen Door te klikken op een scenario kunt u deze willekeurig wijzigen. 8.3. Verwijderen van een scenario Om een scenario te verwijderen, sleept u deze naar de prullenbak 8.3.
Suomea Italiano Anzeige English ROMApad Ελληνικά Danske Español Datum und Uhrzeit 9. Beknopte beschrijving van de interface Svenska Polska Sonnenaufgang und -untergang Português Sprache Houd de wektoets lang ingedrukt (> 0,5 sec.) om terug te keren Nederlandse Suomea Italiano Anzeige naar het welkommenu.
Seite 77
ROMApad MEIN HAUS MEIN HAUS MEINE SZENARIEN MEINE SZENARIEN 9. Beknopte beschrijving van de interface Klik op het pictogram "MIJN WEEK" om een of meerdere dagen te programmeren of om de bestaande programma’s weer te geven en ze te integreren in een week.
Daar kunt u de "Software ROMApad UpdateChecker" downloaden naar uw pc en installeren. 10.2.Verbinding met de PC Start de UpdateChecker software en verbindt de ROMApad middels de Micro USB kabel met de PC. Volg de aanwijzingen op de ROMApad en bevestig met "verbinden".
ROMApad 10. Update ROMApad Zodra uw PC de ROMApad herkent, wordt automatisch een back-up gemaakt en op de PC opgeslagen. 10.3. Huidige versie van de software en de software-update zoeken De UpdateChecker geeft, na geslaagde verbinding, de huidige software-versie van de ROMApad aan.
ROMApad EN 10. Update ROMApad 10.5. Herstellen Is een configuratie op een ROMApad verloren gegaan, of wilt u een eerder opgeslagen versie terugzetten, klik op "Herstellen" en kies het betreffende bestand. Bij iedere back-up staat de datum en tijd van de configuratie, bijvoor- beeld, de configuratie van de 20.05.2014...
ROMApad 11. Technische gegevens 11.1. ROMApad Radiofrequentie 868-870 MHz, io-homecontrol bidirectioneel ® tri-band, met "LBT" (Listen Before Talk), (automatische keuze van de vrije radiofrequentie). Beschermingsgraad IP20 Bedrijfstemperatuur + 0 °C bis + 40 °C Afmetingen (l x b x h)