k'nex 15159 Montageanleitung

Verwandte Anleitungen für k'nex 15159


Inhaltszusammenfassung für k'nex 15159
-
Seite 2: Battery Information
1. This device may not cause harmful interference and • For additional building help go to the K'NEX web site: 2. This device must accept any interference received, including interference that may cause undesired operation. This model is tested to comply with FCC standards - FOR HOME OR OFFICE USE. - Seite 3 BUILDING BASICS Spacers There are places in your model where you need to add blue and silver spacers. Be sure to use Start Building Connectors the right color and count them carefully. To begin your model, find the There are blue and gray connectors with special long follow the numbers.
- Seite 19 Did you install 2 AA (or LR6) batteries in the motor? Est-ce que tu as installé 2 piles AA (ou LR6) dans le moteur ? ¿Instalaste dos pilas AA (o LR6) en el motor? Heb je 2 AA (of LR6) batterijen gestoken in de motor? Hai installato 2 batterie AA (o LR6) nel motore? Foram instaladas as pilhas 2 AA (ou LR6) no motor? Heb je er 2 AA (of LR6) batterijen ingestoken?
-
Seite 21: Track Building Tips
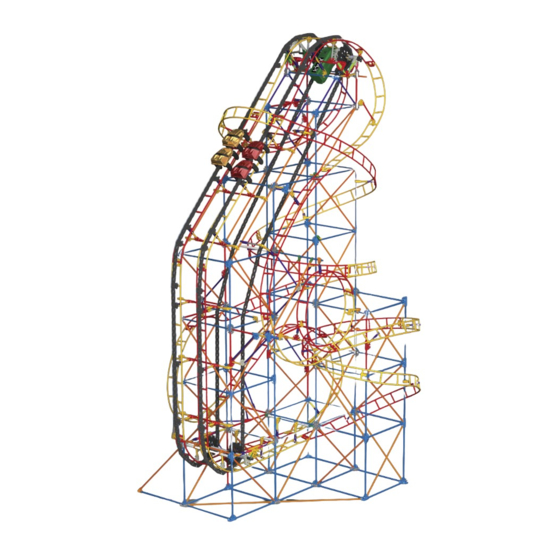
Track Building Tips: Track comes in two different shapes. Always connect the track top side to top side throughout the build. Top Side of Track Attach the black chain guides to the top of the track and attach the connectors to the bottom of the track exactly as shown. Be sure to push the connectors on firmly until they “click”. - Seite 22 Track A...
- Seite 23 Always join this end of the track to the previous track piece first, then connect the rest of the track to the tower. Connecte toujours le côté supérieur du circuit contre le côté supérieur tout au long de la construction. Al construir, conecta siempre la pista de lado superior a lado superior.
- Seite 34 Track B...
- Seite 48 Attaching IMPORTANT: Attach all the chain links in the same direction. Chain Links IMPORTANT : Attache les chaînons dans le même sens. IMPORTANTE: Conecta los eslabones de la cadena en la misma dirección. WICHTIG: Befestige die kettenglieder immer in die gleiche richtung. IMPORTANTE: Collegare le maglie della catena nella stessa direzione.
- Seite 50 Attaching Graphic Attaching Sound Module Attaching Coaster Cars To attach the cars, slide them onto an open end of the track. If the cars gets stuck on the way down, make sure they are not hitting any K’NEX parts.
- Seite 51 T T I I P P S S & & T T R R O O U U B B L L E E S S H H O O O O T T I I N N G G If the motor is not working properly: •...
- Seite 52 BUILDING IDE W VE CO STER ™ onus instructions at www.knex.com/thrill-rides Idée de construction Plans supplementaires á www.knex.com/thrill - rides Idea para la construcción Instrucciones de la prima en www.knex.com/thrill - rides Bauvorschlag Zusätzliche Bauanleitungen bei www.knex.com/thrill - rides Idea di costruzione Bonus Istruzioni a www.knex.com/thrill - rides Ideia de construção Instruções do bônus em www.knex.com/thrill - rides...
- Seite 53 Si el Motor o el Módulo del Sonido no funcionan: et il n’est pas possible de les enlever. • Compartan la experiencia K'NEX con su niño y hagan que la construcción con K'NEX sea una • Comprueba si tienes pilas nuevas y si están instaladas correctamente.
-
Seite 54: Informationen Zu Den Batterien
• Controlla che la carrozza non abbia colpito qualche altra parte K’NEX. Batterien der Baugröße AA (oder LR6) einlegen, wobei auf den richtigen Polanschluss (+/-) • Condividi l'esperienza di K'NEX con tuo figlio e rendi la costruzione con K'NEX un divertimento per • I pezzi della rotaia sono collegati correttamente? zu achten ist. - Seite 55 "estalido". In je model zijn er plaatsen waar blauwe en zilveren tussenstukken moeten toegevoegd worden. • Deel de K'NEX ondervinding met je kind en maak van het bouwen met K'NEX een aangenaam Espaçadores Verzeker je ervan de juiste kleur te gebruiken en tel ze zorgvuldig.