Saris Gran Fondo Montageanleitung
Quicklinks
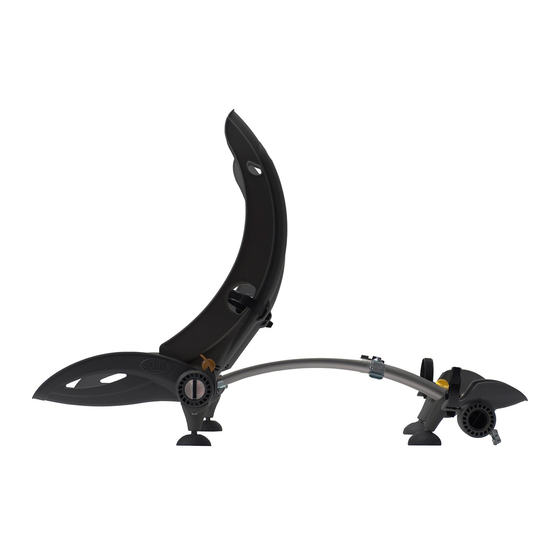
Gran Fondo
2 Bike
2 Bicicletas
#XXX
2 vélos
2 biciclette
2 Fahrräder
2 Fietsen
PARTS / PIEZAS / PIÈCES / COMPONENTI / TEILE / ONDERDELEN
Item & Part Number
QTY
CANT.
Elemento y número de pieza
Quantité
Elément & numéro des pièces
Q.TÀ
Articolo e codice
Artikel und Teilenummer
MENGE
Aantal
Item- & onderdeelnummer
2
Large Wheel Holders
Soportes para ruedas grandes
Grands porte-roues
Supporti porta ruota grandi
Große Radhalter
Grote wieldragers
2
Medium Wheel Holders
Soportes para ruedas medianos
Porte-roues moyens
Supporti porta ruota medi
Mittlere Radhalter
Medium wieldragers
4
Wheel Straps
Correas para ruedas
Sangles de roue
Cinghie ferma ruota
Radgurte
Spanriemen voor de wielen
2
Legs
Patas
Tiges
Barra longitudinali
Beine
Benen
1
Upper Crossbar
Barra superior
Tube horizontal supérieur
Traversa superiore
Oberer Querträger
Bovenste dwarsarm
Lower Crossbar
1
Barra inferior
Tube horizontal inférieur
Traversa inferiore
Unterer Querträger
Onderste dwarsarm
2
Upper Feet
Pies de apoyo superiores
Pieds supérieurs
Piedini superiori
Oberer Fuß
Bovenste steunvoeten
4
Large Bolts
Pernos grandes
Grands boulons
Bulloni grandi
Große Schrauben
Grote bouten
2
Small Bolts
Pernos pequeños
Petits boulons
Bulloni piccoli
Kleine Schrauben
Kleine bouten
6
Nylock Nuts
Tuercas Nylock
Ecrous Nylock
Dadi Nylock
Sicherungsmuttern
Nylock eindmoeren
1
4mm Hex
Llave hexagonal de 4 mm
Clé hexagonale 4 mm
Chiave esagonale da 4 mm
4-mm-Sechskant
4mm zeskantige moersleutel
Assembly Instructions
Instrucciones de montaje
Instructions d'assemblage
Istruzioni di montaggio
Montageanleitung
Instructies voor montage
Large Wheel Holder
Soporte para ruedas grande
Grand porte-roue
Supporto porta ruota grande
Großer Radhalter
Grote wieldrager
Wheel Straps
Side Hook
Correas para ruedas
Gancho lateral
Sangles de roue
Crochet latéral
Cinghie ferma ruota
Gancio laterale
Radgurte
Seitlicher Haken
Spanriemen voor de wielen
Zijdelingse haak
Lower Hook
Gancho inferior
Crochet inférieur
Gancio inferiore
Unterer Haken
Onderste haak
Rear Wheel Holder
Soporte de rueda trasera
Porte-roue arrière
Supporto porta ruota posteriore
Hinterrad-halter
Achterwieldrager
Medium Wheel Holder
Soporte para ruedas mediano
Porte-roue moyen
Upper Hook
Supporto porta ruota medio
Gancho superior
Mittlerer Radhalter
Crochet supérieur
Medium wieldrager
Gancio superiore
Oberer Haken
Bovenste haak
Straps
Correas
Sangles
Cinghie
Gurte
Ophangriemen
Leg
Pata
Tige
Barra longitudinale
Bein
Been
Lower Crossbar
Barra inferior
Tube horizontal inférieur
Traversa inferiore
Unterer Querträger
Onderste dwarsarm
Yellow Knob
Pomo amarillo
Molette jaune
Manopola gialla
Gelber Knopf
Gele knop
Upper Crossbar
Barra superior
Tube horizontal supérieur
Traversa superiore
Oberer Querträger
Bovenste dwarsarm
Leg
Upper Foot
Pata
Pie de apoyo superior
Tige
Pied supérieur
Barra longitudinale
Piedino superiore
Bein
Oberer Fuß
Been
Bovenste steunvoet
Rear Foot
Pie de apoyo trasero
Pied arrière
Piedino posteriore
Hinterer Fuß
Achterste steunvoet
1

Verwandte Anleitungen für Saris Gran Fondo


Inhaltszusammenfassung für Saris Gran Fondo
- Seite 1 Gran Fondo Assembly Instructions Instrucciones de montaje Instructions d’assemblage Istruzioni di montaggio 2 Bike Montageanleitung 2 Bicicletas #XXX 2 vélos Instructies voor montage 2 biciclette 2 Fahrräder 2 Fietsen PARTS / PIEZAS / PIÈCES / COMPONENTI / TEILE / ONDERDELEN Item &...
- Seite 2 (www.saris.com). foot pads are free of any debris that could scratch vehicle’s finish. Asegúrese de consultar la Guía de adaptación de Saris antes de instalar el NOTA: Antes de instalar el portabicicletas, limpie todas las superficies del vehículo que puedan entrar en contacto con el portabicicletas o sus portabicicletas sobre el vehículo(www.saris.com).
- Seite 3 1.2: Align assembled WHEEL HOLDER and slide onto one end of UPPER 1.2: ATTACH WHEEL HOLDERS CROSSBAR. 1.2: CONEXIÓN DE LOS SOPORTES PARA RUEDAS 1.2: ARRIMEZ LES PORTE-ROUES 1.2: Alinee el SOPORTE PARA RUEDAS montado e insértelo en un 1.2: FISSARE I SUPPORTI PORTARUOTA extremo de la BARRA SUPERIOR.
- Seite 4 1.4: Separate the LARGE WHEEL HOLDER and the MEDIUM WHEEL 1.4: ATTACH WHEEL HOLDERS HOLDER to create a small gap. 1.4: CONEXIÓN DE LOS SOPORTES PARA RUEDAS 1.4: ARRIMEZ LES PORTE-ROUES 1.4: FISSARE I SUPPORTI PORTARUOTA 1.4: Separar el SOPORTE PARA RUEDAS GRANDE y el SOPORTE PARA 1.4: RADHALTER MONTIEREN RUEDAS MEDIANO dejando un pequeño espacio.
- Seite 5 1.6: Secure with NUTS and tighten BOLTS with 4mm wrench. 1.6: SECURE WITH NUTS 1.6: FIJACIÓN CON TUERCAS 1.6: Asegure con TUERCAS y apriete los PERNOS con la llave de 4 mm. 1.6: SECURISEZ L’ENSEMBLE A L’AIDE D’ECROUS 1.6: FISSARE CON I DADI 1.6: MIT MUTTERN BEFESTIGEN 1.6: Sécurisez l’ensemble à...
- Seite 6 2.2: INSERT SMALL BOLTS 2.2: Insert one of the SMALL BOLTS through the sleeve and leg, 2.2: INSERCIÓN DE PERNOS PEQUEÑOS securing with a NUT. 2.2: INSEREZ LES PETITS BOULONS 2.3: Use the 4mm ALLEN KEY and a 10 mm or adjustable wrench to 2.2: INSERIRE I BULLONI PICCOLI tighten the BOLT.
- Seite 7 2.4: Unscrew and remove the YELLOW KNOB from both LOWER FEET. 2.4: UNSCREW AND REMOVE THE YELLOW KNOB FROM BOTH LOWER FEET. 2.4: DESENROSQUE Y EXTRAIGA EL POMO AMARILLO DE AMBOS PIES DE APOYO INFERIORES. 2.4: Desenrosque y extraiga el POMO AMARILLO de ambos PIES DE 2.4: DÉVISSEZ ET ÔTEZ LA MOLETTE JAUNE DES DEUX PIEDS INFERIEURS.
- Seite 8 3: ATTACH WHEEL STRAPS 3: MONTAJE DE LAS CORREAS PARA RUEDAS 3: ARRIMEZ LES SANGLES DE ROUE 3.1: Rotate the LARGE WHEEL HOLDER up by depressing the yellow lever. 3.2: Insert the end of the WHEEL STRAP through the slot on wheel holders with 3: FISSARE LE CINGHIE FERMA RUOTA tabs pointing away from wheel holders.
- Seite 9 Bevestig de BOVENSTE OPHANGRIEMEN zodat de fietsdrager juist komt te hangen. Bevestig de haken nooit aan glas, niet-ondersteunde plastic of dakdragers. Op onze website (www.saris.com) kan u controleren welke fietsdrager op welk type voertuig past en of u specifieke instructier–ichtlijnen in acht moet nemen.
- Seite 10 4.3: Attach the 2 hooks marked LOWER to the lower trunk lip. Make sure straps 4.3: ATTACH LOWER HOOKS are parralle to the legs. Some vehicles have a plastic lip or plastic trim at the 4.3: CONEXIÓN DE LOS GANCHOS INFERIORES trunk lip.
- Seite 11 5.1: LOAD BIKES: ADJUST WHEEL HOLDER 5.1: CARGA DE BICICLETAS: AJUSTE DEL SOPORTE PARA RUEDAS 5.1: CHARGEZ LES VELOS : AJUSTEZ LE PORTE-ROUE 5.1: For standard road bikes, set the YELLOW LEVER on the Wheel Holder 5.1: CARICARE LE BICICLETTE: REGOLARE IL SUPPORTO PORTARUOTA Assembly to STANDARD.
- Seite 12 6.1: SECURE WHEEL STRAPS 6.1: FIJACIÓN DE LAS CORREAS PARA RUEDAS 6.1: SECURISEZ LES SANGLES DE ROUE 6.1: Secure WHEEL STRAPS on front and rear wheels by pulling the 6.1: FISSARE LE CINGHIE FERMA RUOTA WHEEL STRAP through the hole in the LARGE WHEEL HOLDER and 6.1: RADGURTE BEFESTIGEN squeezing the buttons on the straps ends.
- Seite 13 Depress hinge plate on BUCKLE to rethread straps. NOTE: Make sure to IF YOU NEED TO RETHREAD STRAPS attach them to the proper BUCKLE (see label on hook) SI NECESITA VOLVER A ENSARTAR LAS CORREAS SI VOUS DEVEZ REPASSER LES SANGLES Pulse la charnela de la HEBILLA para volver a ensartar las correas.
-
Seite 14: Warranty
9) No part of carrier, including straps, should ever come in contact with spoiler. (Available at any Saris dealer or www.saris.com). If your vehicle is not listed or you have any questions, please contact our 10) Do not open rear deck (trunk) with carrier installed. -
Seite 15: Garanzia
13) Per pulire la rastrelliera utilizzare solo detergenti idrosolubili. 4) Sostituire tutte le cinghie di montaggio ai primi segni di usura. I pezzi di ricambio sono disponibili presso il proprio rivenditore Saris locale 14) Potrebbe non essere possibile utilizzare i tergilunotto quando il portabiciclette è fissato al veicolo.