Herunterladen Inhalt Inhalt Diese Seite drucken
Inhaltsverzeichnis

Werbung

Verfügbare Sprachen
  • DE

Verfügbare Sprachen

  • DEUTSCH, seite 54
Axonics SNM System®
Remote Control
Remote Control User Manual
Benutzerhandbuch der Fernbedienung
Manuel d'utilisation de la télécommande
Manual de usuario del control remoto
Manuale per l'utente del telecomando
Gebruikershandleiding voor de afstandsbediening
Modulation
Technologies

Werbung

Inhaltsverzeichnis

Fehlerbehebung

loading

Inhaltszusammenfassung für Axonics 2301

  • Seite 1 Axonics SNM System® Remote Control Remote Control User Manual Benutzerhandbuch der Fernbedienung Manuel d’utilisation de la télécommande Manual de usuario del control remoto Manuale per l’utente del telecomando Gebruikershandleiding voor de afstandsbediening Modulation Technologies...
  • Seite 3 Languages English ................1 Deutsch ................ 49 Francais ................ 97 Espanol ............... 145 Italiano ............... 193 Nederlands ..............241...
  • Seite 5 Axonics SNM System® Remote Control User Manual Model 2301 !USA Rx ONLY Modulation Technologies...
  • Seite 6 Axonics®, Axonics Modulation®, Axonics Modulation Technologies®, Axonics Sacral Neuromodulation System® and r-SNM® are trademarks of Axonics Modulation Technologies, Inc., registered or pending registration in the U.S. and other countries Caution: The Axonics Sacral Neuromodulation System should be used only on the order of a doctor...
  • Seite 7: Inhaltsverzeichnis

    Contents Introduction ......... 5 Manual overview .
  • Seite 8 Specifications ........42 Axonics contact information......45...
  • Seite 9: Introduction

    Introduction The Axonics Sacral Neuromodulation (SNM) therapy is provided to relieve the symptoms of urinary and fecal dysfunction. Patients are given a Remote Control to monitor the battery status and settings of their Axonics SNM System. This manual describes how to use the Remote Control. Axonics recommends you read this manual before using your Remote Control.
  • Seite 10: Manual Overview

    Manual overview This manual describes the steps for safe use of your Remote Control. The manual includes: Description of Remote Control buttons, indicators and ■ functions Steps for using your Remote Control ■ Troubleshooting Remote Control issues ■ Additional information about the Remote Control ■ Note: The Remote Control may behave differently when communicating with the Trial Stimulator (TS) and the Permanent Stimulator (PS). This manual will highlight when certain behavior is specific to the TS or PS.
  • Seite 11: Refer To Your Therapy Guides

    Refer to your Therapy Guides Refer to the following Therapy Guides which are provided by your doctor for more information regarding your system: Trial System Guide – for more information about the trial ■ stimulation period Patient Therapy Guide – for more information about ■ permanent SNM therapy...
  • Seite 12: Remote Control Precautions

    Remote Control precautions If you have other active implants (such as a pacemaker), ■ the Remote Control may cause issues with such implant(s). Contact your doctor if you experience issues or have any questions. If you have cochlear implants, the external portion of these ■ implants should be kept away from the Remote Control. This will help avoid and/or reduce unwanted audible clicks. Some equipment may generate signals, called ■ Electromagnetic Interference or EMI. EMI can block the Remote Control’s signals to the Stimulator. If you have issues using your Remote Control, move away from such sources. This includes computer monitors, cellular telephones and other electronic equipment. Warning: Do not attempt to modify or service this product. If there is an issue with the product, please consult your doctor.
  • Seite 13: Recommended Use And Care

    Recommended use and care Carry your Remote Control with you at all times in case you need to adjust your stimulation or check the battery status of your Stimulator. If you need to store your Remote Control, put it in a cool, dry place away from direct heat and light. Clean your Remote Control with a damp, soft cloth as needed. Bring your Remote Control to all visits with your healthcare provider.
  • Seite 14 Recommended use and care DO NOT Do not drop the Remote Control in liquid or clean it with ✕ harsh cleaners. Do not drop the Remote Control or mishandle it in a way ✕ that causes damage. Do not use the Remote Control near flammable or ✕ explosive gases. Do not allow other people to use your Remote Control. ✕ 10 10...
  • Seite 15: How To Use Your Remote Control

    ■ Monitor charging of your Stimulator (PS only) ■ Change your stimulation program (TS only) ■ Receive notice of errors in your Remote Control or ■ Stimulator Note: Do not make stimulation changes regularly. Your doctor should change your stimulation settings if needed. Axonics recommends you only change your stimulation if you experience discomfort 11 11...
  • Seite 16: Summary Of Buttons And Lights

    Summary of buttons and lights Stimulation Level Active Program Connect Down System Error Stimulator Battery Status 12 12...
  • Seite 17 Summary of buttons and lights Stimulation Level Shows the strength of stimulation. Turn up stimulation level or Turn on stimulation to default level. Connect Connect or disconnect the Remote Control to the Stimulator. Down Turn down stimulation level or Turn off stimulation. Active Program Shows which stimulation program is active. System Error Shows there is an error in the Remote Control or Stimulator. Stimulator For TS, shows how long until the battery is Battery Status depleted. For PS, shows if the battery needs charging. Note: For a detailed description of the lights see the section View Stimulator status 13 13...
  • Seite 18: How Your Remote Control Communicates

    How your Remote Control communicates with your Stimulator The Remote Control sends and receives signals to and from the Stimulator. Your Remote Control must be near the Stimulator to send and receive signals. Only the Remote Control given to you by your doctor can send and receive signals to and from your Stimulator. To use your Remote Control, hold it comfortably in front of you. The Remote Control should be held on the same side of the body as the Stimulator. 14 14...
  • Seite 19: Use Scenarios

    Use scenarios The following pages show how to use Note: If you have your Remote Control to: issues using your Remote Control, 1) Connect to your Stimulator. please refer to the 2) View Stimulator status. Troubleshooting section of this manual. 3) Turn down your stimulation level. For more help please 4) Turn up your stimulation level. contact your doctor. 5) Turn your stimulation off.
  • Seite 20: Connect To Your Stimulator

    1) Connect to your Stimulator 16 16...
  • Seite 21 1) Connect to your Stimulator Hold the Remote Control on the same side of your body as the Stimulator. Press the “Connect” button on the center of the Remote Control. The stimulation level lights will flash. Flashing lights mean the Remote Control is trying to connect to the Stimulator. It may take up to 25 seconds for the Remote Control to connect to the Stimulator.
  • Seite 22: View Stimulator Status

    2) View Stimulator status Stimulation Level Active Program Stimulator Battery Status 18 18...
  • Seite 23 2) View Stimulator status Stimulator battery status lights Solid green: Stimulator battery will last for 4 or more days Flashing green (PS only): Stimulator battery is charging Solid orange: Stimulator battery will last for 2 to 4 days Flashing orange: Stimulator battery will last for 2 days or less Stimulation Level lights No stimulation Default level set by your doctor Maximum level 19 19...
  • Seite 24 2) View Stimulator status Active Program Program 1 is active Program 2 is active (TS only)
  • Seite 26: Turn Down Your Stimulation Level

    3) Turn down your stimulation level...
  • Seite 27 3) Turn down your stimulation level If you experience discomfort, you can use your Remote Control to turn down stimulation. The Remote Control must be connected to the Stimulator (see Connect to Your Stimulator). Press the “Down” button one time. 2 A. Permanent Stimulator: Watch for the stimulation level lights to decrease by one. The Remote Control will vibrate. This may take 3 seconds. Trial Stimulator: The Remote Control will vibrate and the stimulation level lights will flash. After multiple adjustments the stimulation level may change. This may take 3 seconds.
  • Seite 28: Turn Up Your Stimulation Level

    4) Turn up your stimulation level...
  • Seite 29 4) Turn up your stimulation level The Remote Control must be connected to the Stimulator (see Connect to Your Stimulator). Press the “Up” button one time. 2 A. Permanent Stimulator: Watch for the stimulation level lights to increase by one. The Remote Control will vibrate. This may take 3 seconds. Trial Stimulator: The Remote Control will vibrate and the stimulation level lights will flash. After multiple adjustments the stimulation level lights may change. This may take 3 seconds. Note: Stimulation level can only be turned up by one level at a time. It may take up to 30 seconds for the stimulation level to fully increase, depending on your stimulation settings.
  • Seite 30: Turn Your Stimulation Off

    5) Turn your stimulation off (HOLD)
  • Seite 31 5) Turn your stimulation off If you experience extreme discomfort, you can use your Remote Control to turn off stimulation. The Remote Control must be connected to the Stimulator (see Connect to Your Stimulator). Press and Hold the “Down” button for 5 seconds. Watch for the stimulation level lights to all turn off. The Remote Control will vibrate. This may take 3 seconds.
  • Seite 32: Turn Your Stimulation On

    6) Turn your stimulation on (HOLD)
  • Seite 33 6) Turn your stimulation on The Remote Control must be connected to the Stimulator (see Connect to Your Stimulator). Press and Hold the “Up” button for 5 seconds. Watch for the stimulation level lights to light up. The Remote Control will vibrate. This may take 3 seconds. Note: Stimulation level will be at the level set before turning the Stimulator off. Note: You should not need to regularly turn your stimulation off and on.
  • Seite 34: Trial Stimulator Only

    7) Change your stimulation program Trial Stimulator only...
  • Seite 35 7) Change your stimulation program Trial Stimulator only The Remote Control allows you to change the active program (providing stimulation) if your doctor has set 2 programs to your external Trial Stimulator. Only change your program if instructed by your doctor. The Remote Control must be connected to the Stimulator (see Connect to Your Stimulator). Press and hold the “Connect” button for at least 5 seconds. The Remote Control will vibrate and you will see either: The active program light change from “1”...
  • Seite 36 8) Monitor charge status Permanent Stimulator only The Stimulation Battery Status light will flash green when your Stimulator is charging. When charging is done or if charging stops for any reason, the Stimulation Battery Status light will stop flashing. See the Charging System manual for more information about charging your Stimulator.
  • Seite 37: See A System Error

    9) See a system error When you try to connect to your Stimulator, the Remote Control will check for errors. Permanent Stimulator: Call your doctor if the red error light is on. Trial Stimulator: The red light may mean that your Stimulator is disconnected from the cable. Check that the Stimulator is still connected to the cable coming from your back.
  • Seite 38: Turn Off Your Remote Control

    10) Turn off your Remote Control...
  • Seite 39 10) Turn off your Remote Control The Remote Control must be connected to the Stimulator (see Connect to Your Stimulator). Press and release the “Connect” button. Watch for all the lights on the Remote Control to turn off. This means the Remote Control has stopped communicating with the Stimulator and is off. Note: The Remote Control will automatically turn off after 12 seconds of no activity by the user.
  • Seite 40: Troubleshooting

    Troubleshooting This section will help you solve issues with your Remote Control. Contact your doctor if you need help. Summary of issues addressed in this section: Remote Control will not communicate to Stimulator. ■ System Error light is on. ■ Cannot change stimulation level. ■ Cannot change stimulation program. ■ Damaged Remote Control. ■ Discomfort or pain due to stimulation. ■...
  • Seite 41 Troubleshooting scenarios Issue Presentation Resolution Remote Control Remote Control Move Remote Control will not connect lights scroll then closer to Stimulator to Stimulator turns off. Battery and retry connection Status indicator is For the PS only, try not on. charging the Stimulator. If issue persists, contact your doctor. Remote Control Contact your doctor does not respond for a new remote. when “Connect”...
  • Seite 42 Troubleshooting scenarios Issue Presentation Resolution System Red error Disconnect Remote Control from Error light flashes Stimulator; Press “Up” and “Down” indicator for 12 buttons to check if they are stuck; is visible seconds then Reconnect to Stimulator. turns off. If you have 2 programs available, try switching to the other program. If issue persists, contact your doctor. Red error If you have a TS, check to make sure light is on all...
  • Seite 43 Troubleshooting scenarios Issue Presentation Resolution Unable Remote Control connects to Contact your to adjust Stimulator but stimulation doctor. stimulation cannot be turned up or level turned down. Remote Control lights are Reconnect and scrolling or Remote Control retry adjustment. lights are not on. Contact your doctor. Unable to The currently active Only 1 program adjust program light flashes for may be set for stimulation several seconds when your Stimulator. program attempting to change the Contact your active program.
  • Seite 44 Troubleshooting scenarios Issue Presentation Resolution Damage to Remote Control Stop use of the Remote Remote Control appears physically Control. Contact your damaged. doctor to discuss replacement. Discomfort or Constant pain or Turn down stimulation pain due to discomfort in the level. If issue persists, stimulation groin or buttocks. turn off stimulation and contact your doctor. Remote Control Light(s) will not Retry turning the will not turn off turn off. Remote Control off (press and release “Connect”...
  • Seite 45: Additional Information

    Additional Information...
  • Seite 46: Replacement And Disposal

    Replacement and disposal Replacement: If your Remote Control is lost or not working, contact your doctor to get a new Remote Control. The Remote Control battery is expected to last up to 5 years. When the battery runs out you should get a new Remote Control. Disposal: Follow your local government rules to dispose of the Remote Control. If you no longer need a working device, return it to your doctor. Warning: Do not throw the Remote Control in fire as the battery may explode.
  • Seite 47: Specifications

    Specifications Item Specification Operating Conditions Temperature 5°C - 40°C (41°F – 104°F) Pressure 70kPa – 106kPa Humidity 15% - 95% Storage & Shipment Conditions – Short Term (3 days or less) Temperature -25°C - 70°C (-13°F – 158°F) Pressure 57kPa – 106kPa Humidity 15% - 95% Storage &...
  • Seite 48 Weight Expected 5 years Battery Life* Communication Radiofrequency telemetry Model: 2301 IC: 20225-P Quality of Wireless Service: This device operates in the 401-406 MHz frequency and the maximum effective radiated power is below the limit of 25 µW ERP/EIRP as specified in EU: EN ETSI 301 839 and EN ETSI 302-537 and USA: FCC 47 CFR Part 95;...
  • Seite 49 FCC and IC Compliance This device may not interfere with stations operating in the 400.150–406.000 MHz band in the Meteorological Aids, Meteorological Satellite, and Earth Exploration Satellite Services and must accept any interference received, including interference that may cause undesired operation. Note: Changes and modifications to the Remote Control not authorized by Axonics could void FCC and IC certification and negate your authority to use the product.
  • Seite 50: Axonics Contact Information

    Axonics contact information Please contact your doctor if you have questions about your health or the Axonics SNM therapy. Axonics Patient Support Axonics, located in Irvine, CA (USA) can help answer questions or concerns about your Axonics SNM therapy. Please note that Axonics cannot discuss or comment on your medical condition. Call: +1-949-396-6320 ■ Hours: M-F, 8:00 am - 5:00 pm (Pacific Time) ■...
  • Seite 51: Label Symbols

    Label Symbols Symbol Description Remote Control Remote Control User Manual (this document) Product Serial Number Manufacturer Product Model Number Manufacturing Date IEC 60601-1/EN60601-1, Type BF Equipment Non ionizing electromagnetic radiation Conformité Européenne (European Conformity): 2018. This symbol means that the device fully complies with AIMD Directive 90/385/EEC (Notified Body reviewed) and RED 2014/53/EU (self-certified) Industry Canada certification number...
  • Seite 52 Label Symbols Symbol Description Classified by CSA with respect to safety For USA audiences only !USA Rx ONLY Caution: US Federal law restricts this device for sale by or on the order of a physician Refer to instructions for use (Consult accompanying documents) Temperature limitation Humidity limitation Pressure limitation Do not use if package is damaged...
  • Seite 53 Axonics SNM System® Fernbedienung Benutzerhandbuch Modell 2301 !USA Rx ONLY Modulation Technologies...
  • Seite 54 Axonics®, Axonics Modulation®, Axonics Modulation Technologies®, Axonics Sacral Neuromodulation System® und r-SNM® sind Marken von Axonics Modulation Technologies, Inc. eingetragen oder angemeldet in den USA und anderen Ländern. Vorsicht: Das sakrale Neuromodulationssystem von Axonics darf nur auf ärztliche Anordnung verwendet werden...
  • Seite 55 Inhalt Einführung ......... 53 Überblick über das Benutzerhandbuch .
  • Seite 56 Technische Daten....... . . 90 Kontaktinformationen für Axonics ....93...
  • Seite 57: Einführung

    Einführung Die sakrale Neuromodulationstherapie (SNM-Therapie) von Axonics wird angeboten, um die Symptome der Blasen- und Darmdysfunktion zu lindern. Der Patient erhält eine Fernbedienung zur Überwachung des Akkuladestands und der Einstellungen des Axonics SNM Systems. Dieses Benutzerhandbuch beschreibt die Verwendung der Fernbedienung. Axonics empfiehlt, dass Sie vor der Verwendung der Fernbedienung dieses Handbuch durchlesen.
  • Seite 58: Überblick Über Das Benutzerhandbuch

    Überblick über das Benutzerhandbuch Dieses Benutzerhandbuch beschreibt die Schritte zur sicheren Verwendung Ihrer Fernbedienung. Das Benutzerhandbuch umfasst: Beschreibung der Tasten, Anzeigen und Funktionen der ■ Fernbedienung Anleitung zur Verwendung der Fernbedienung ■ Fehlersuche bei Problemen mit der Fernbedienung ■ Zusätzliche Informationen über die Fernbedienung ■ Hinweis: Die Fernbedienung kann sich bei der Kommunikation mit dem Trial Stimulator (TS) und dem Permanent Stimulator (PS) anders verhalten. In diesem Benutzerhandbuch wird hervorgehoben, wenn ein bestimmtes Verhalten für den TS oder PS spezifisch ist.
  • Seite 59: Therapieleitfaden Konsultieren

    Therapieleitfaden konsultieren Weitere Informationen zu Ihrem System finden Sie in den folgenden von Ihrem Arzt bereitgestellten Therapieleitfäden: Leitfaden Testsystem - weitere Informationen über die ■ Stimulationstestzeit Therapieleitfaden für den Patienten - weitere Informationen ■ zur permanenten SNM-Therapie...
  • Seite 60: Vorsichtshinweise Zur Fernbedienung

    Vorsichtshinweise zur Fernbedienung Wenn Sie andere aktive Implantate haben (z. B. einen ■ Herzschrittmacher), kann die Fernbedienung Probleme mit solchen Implantaten verursachen. Wenn Sie Probleme oder Fragen haben, wenden Sie sich bitte an Ihren Arzt. Wenn Sie ein Cochlearimplantat haben, sollte der externe Teil ■ von Cochlearimplantaten von der Fernbedienung ferngehalten werden.
  • Seite 61: Anwendungs- Und Pflegehinweise

    Anwendungs- und Pflegehinweise DAS IST RICHTIG Tragen Sie die Fernbedienung stets bei sich, falls Sie die Stimulation anpassen oder den Akkuladestand Ihres Stimulators überprüfen müssen. Bewahren Sie die Fernbedienung nur kühl und trocken und vor direkter Wärme- und Lichteinwirkung geschützt auf. Reinigen Sie die Fernbedienung bei Bedarf mit einem feuchten, weichen Tuch. Bringen Sie die Fernbedienung bei allen Arztterminen mit.
  • Seite 62 Anwendungs- und Pflegehinweise DAS IST FALSCH Lassen Sie das Ladegerät nicht in Flüssigkeiten fallen und ✕ reinigen Sie es nicht mit aggressiven Reinigungsmitteln. Lassen Sie die Fernbedienung nicht fallen und vermeiden ✕ Sie unsachgemäße Handhabung, damit keine Schäden verursacht werden. Verwenden Sie die Fernbedienung nicht in der Nähe von ✕ brennbaren oder explosiven Gasen. Erlauben Sie anderen nicht, Ihre Fernbedienung zu ✕ benutzen.
  • Seite 63: Verwendung Der Fernbedienung

    ■ Erhöhen oder verringern Sie Ihre Stimulationsstufe ■ Schalten Sie Ihre Stimulation ein und aus ■ Überwachen des Akkuladestands Ihres Stimulators (nur PS) ■ Ändern Sie Ihr Stimulationsprogramm (nur TS) ■ Anzeige von Fehlermeldungen über die Fernbedienung oder ■ den Stimulator Hinweis: Nehmen Sie keine regelmäßigen Stimulationsänderungen vor. Ihr Arzt sollte bei Bedarf die Stimulationseinstellungen ändern. Axonics empfiehlt, die Stimulation nur dann zu ändern, wenn Sie Beschwerden haben.
  • Seite 64: Übersicht Der Tasten Und Anzeigelämpchen

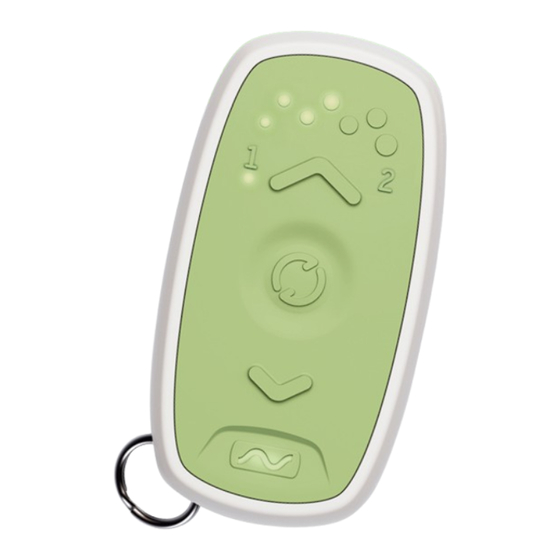
    Übersicht der Tasten und Anzeigelämpchen Stimulationsstufe Aktives Programm Nach oben Verbindung Nach unten Systemfehler Stimulator Akkuladestand...
  • Seite 65 Übersicht der Tasten und Anzeigelämpchen Stimulationsstufe Zeigt die Stärke der Stimulation. Nach oben Verstärkt die Stimulation oder aktiviert die Stimulation auf Standardstufe. Verbindung Herstellen oder Trennen der Verbindung zwischen Fernbedienung und Stimulator. Nach unten Verringert die Stimulationsstufe oder deaktiviert die Stimulation. Aktives Programm Zeigt an, welches Stimulationsprogramm aktiv ist. Systemfehler Gibt an, dass an der Fernbedienung oder am Stimulator ein Fehler aufgetreten ist. Stimulator Zeigt beim TS an, wie lange der Akku noch Akkuladestand hält, bevor er neu geladen werden muss. Zeigt bei PS an, ob der Akku geladen werden muss. Hinweis: Für eine detaillierte Beschreibung der Anzeigelämpchen siehe den Abschnitt Stimulatorstatus anzeigen...
  • Seite 66: Wie Kommuniziert Ihre Fernbedienung Mit Ihrem Stimulator

    Wie kommuniziert Ihre Fernbedienung mit Ihrem Stimulator? Die Fernbedienung sendet Signale an und empfängt Signale vom Stimulator. Ihre Fernbedienung muss sich in der Nähe des Stimulators befinden, um Signale zu senden und zu empfangen. Nur die Fernbedienung, die Sie von Ihrem Arzt erhalten haben, kann Signale an Ihren Stimulator senden und von ihm welche empfangen. Um Ihre Fernbedienung zu verwenden, halten Sie sie locker vor dem Körper. Die Fernbedienung sollte auf derselben Körperseite gehalten werden, in der der Stimulator implantiert ist.
  • Seite 67: Anwendungsszenarien

    Anwendungsszenarien Auf den folgenden Seiten ist die Hinweis: Wenn bei Verwendung der Fernbedienung für der Nutzung der folgende Zwecke beschrieben: Fernbedienung Probleme auftreten, 1) Verbindungsaufbau zum sehen Sie bitte Stimulator. im Abschnitt „Fehlersuche“ dieses 2) Status des Stimulators. Handbuchs nach. 3) Stimulationsstufe reduzieren. Wenn Sie weitere Hilfe 4) Stimulationsstufe erhöhen. benötigen, wenden Sie sich bitte an Ihren Arzt.
  • Seite 68: Verbindungsaufbau Zum Stimulator

    1) Verbindungsaufbau zum Stimulator...
  • Seite 69 1) Verbindungsaufbau zum Stimulator Halten Sie die Fernbedienung auf derselben Körperseite, auf der der Stimulator implantiert ist. Drücken Sie auf die Verbindungstaste in der Mitte der Fernbedienung. Die Lämpchen zur Angabe der Stimulationsstufe blinken. Blinkende Anzeigelämpchen bedeuten, dass die Fernbedienung versucht, sich mit dem Stimulator zu verbinden. Es kann bis zu 22 Sekunden dauern, bis die Fernbedienung sich mit dem Stimulator verbunden hat.
  • Seite 70: Ladestand Des Stimulators Anzeigen

    2) Ladestand des Stimulators anzeigen Stimulationsstufe Aktives Programm Akkuladestand des Stimulators...
  • Seite 71 2) Ladestand des Stimulators anzeigen Akkustatusanzeige des Stimulators Konstant grün: Der Stimulatorakku hält noch mindestens 4 Tage Grün blinkend (nur PS): Der Stimulatorakku wird geladen Konstant orange: Der Stimulatorakku hält noch 2 bis 4 Tage Orange blinkend: Der Stimulatorakku hält noch maximal 2 Tage Anzeigelämpchen für Stimulationsstufen Keine Stimulation Vom Arzt eingestellte Standardstufe Maximale Intensität...
  • Seite 72 2) Ladestand des Stimulators anzeigen Aktives Programm Programm 1 ist aktiv Programm 2 ist aktiv (nur TS)
  • Seite 74: Reduzieren Sie Ihre Stimulationsstufe

    3) Reduzieren Sie Ihre Stimulationsstufe 70 70...
  • Seite 75 3) Reduzieren Sie Ihre Stimulationsstufe Wenn Sie starke Beschwerden haben, können Sie die Stimulation mit der Fernbedienung reduzieren. Die Fernbedienung muss mit dem Stimulator verbunden sein (siehe Verbindungsaufbau zum Stimulator). Drücken Sie die „nach unten“-Taste einmal. 2 A. Permanenter Stimulator: Achten Sie darauf, dass ein Anzeigelämpchen der Stimulationsstufe weniger angezeigt wird. Die Fernbedienung vibriert. Dies kann 3 Sekunden dauern Teststimulator: Die Fernbedienung vibriert und die Anzeigelämpchen der Stimulationsstufe blinken. Nach mehreren Anpassungen kann sich das Stimulationsniveau ändern. Dies kann 3 Sekunden dauern.
  • Seite 76: Stimulationsstufe Erhöhen

    4) Stimulationsstufe erhöhen...
  • Seite 77 4) Stimulationsstufe erhöhen Die Fernbedienung muss mit dem Stimulator verbunden sein (siehe Verbindungsaufbau zum Stimulator). Drücken Sie die „nach oben“-Taste einmal. 2 A. Permanenter Stimulator: Achten Sie darauf, dass ein weiteres Anzeigelämpchen angezeigt wird. Die Fernbedienung vibriert. Dies kann 3 Sekunden dauern. Teststimulator: Die Fernbedienung vibriert und die Stimulationsstufen-LED blinken. Nach mehreren Anpassungen können sich die Anzeigelämpchen der Stimulationsstufe ändern. Dies kann 3 Sekunden dauern. Hinweis: Die Stimulation kann jeweils nur um eine Stufe erhöht werden. Es kann, abhängig von Ihren Stimulationseinstellungen, bis zu 30 Sekunden dauern bis sich die Stimulation vollständig erhöht hat.
  • Seite 78: Stimulation Ausschalten

    5) Stimulation ausschalten (HALTEN)
  • Seite 79 5) Stimulation ausschalten Wenn Sie starke Beschwerden haben, können Sie die Stimulation mit der Fernbedienung ausschalten. Die Fernbedienung muss mit dem Stimulator verbunden sein (siehe Verbindungsaufbau zum Stimulator). Drücken Sie die „nach unten“-Taste und halten Sie diese 5 Sekunden gedrückt. Achten Sie darauf, dass alle Anzeigelämpchen der Stimulationsstufe erlöschen. Die Fernbedienung vibriert. Dies kann 3 Sekunden dauern.
  • Seite 80: Stimulation Einschalten

    6) Stimulation einschalten (HALTEN)
  • Seite 81 6) Stimulation einschalten Die Fernbedienung muss mit dem Stimulator verbunden sein (siehe Verbindungsaufbau zum Stimulator). Drücken Sie die „nach oben“- Taste und halten Sie diese 5 Sekunden gedrückt. Achten Sie darauf, dass die Anzeigelämpchen der Stimulationsstufe aufleuchten. Die Fernbedienung vibriert. Dies kann 3 Sekunden dauern. Hinweis: Die Stimulation ist auf der Stufe, die vor dem Ausschalten des Stimulators eingestellt wurde. Hinweis: Es sollte nicht nötig sein, die Stimulation häufig ein- und auszuschalten. Ihr Arzt sollte bei Bedarf die Stimulation anpassen.
  • Seite 82: Nur Test-Stimulator

    7) Stimulationsprogramm ändern nur Test-Stimulator...
  • Seite 83 7) Stimulationsprogramm ändern nur Test-Stimulator Mit der Fernbedienung können Sie das aktive Programm (Stimulation) ändern, wenn Ihr Arzt 2 Programme für Ihren externen Test-Stimulator eingestellt hat. Ändern Sie Ihr Programm nur, wenn Sie von Ihrem Arzt dazu aufgefordert werden. Die Fernbedienung muss mit dem Stimulator verbunden sein (siehe Verbindungsaufbau zum Stimulator). Halten Sie die Taste „Verbinden“...
  • Seite 84: Ladezustand Überwachen

    8) Ladezustand überwachen nur Permanenter Stimulator Die Statusanzeige des Stimulationsakkus blinkt grün, wenn der Stimulator geladen wird. Wenn der Ladevorgang beendet ist oder der Ladevorgang aus irgendeinem Grund stoppt, hört die Statusanzeige des Stimulationsakkus auf zu blinken. Weitere Informationen zum Laden des Stimulators finden Sie im Ladesystem-Handbuch.
  • Seite 85: Erkennen Von Systemfehlern

    9) Erkennen von Systemfehlern Während des Verbindungsaufbaus zum Stimulator sucht die Fernbedienung nach Fehlern. Permanenter Stimulator: Wenn das rote Fehlerlämpchen leuchtet, wenden Sie sich an Ihren Arzt. Teststimulator: Das rote Lämpchen kann bedeuten, dass der Stimulator vom Kabel getrennt ist. Stellen Sie sicher, dass der Stimulator immer noch an das von Ihrem Rücken kommende Kabel angeschlossen ist. Schließen Sie den Stimulator an das Kabel an, falls er noch nicht angeschlossen ist.
  • Seite 86: Fernbedienung Ausschalten

    10) Fernbedienung ausschalten...
  • Seite 87 10) Fernbedienung ausschalten Die Fernbedienung muss mit dem Stimulator verbunden sein (siehe Verbindungsaufbau zum Stimulator). Drücken und loslassen der „Verbinden“ Taste. Achten Sie darauf, dass alle Lämpchen der Fernbedienung ausgeschaltet sind. Dies bedeutet, dass die Fernbedienung die Verbindung mit dem Stimulator beendet hat und ausgeschaltet ist. Hinweis: Die Fernbedienung schaltet sich nach 12 Sekunden ohne Aktivität automatisch aus.
  • Seite 88: Fehlersuche

    Fehlersuche Dieser Abschnitt soll bei der Lösung von Problemen mit der Fernbedienung helfen. Wenn Sie Hilfe benötigen, wenden Sie sich an Ihren Arzt. Übersicht der Probleme, die in diesem Abschnitt behandelt werden: Die Fernbedienung kommuniziert nicht mit dem Stimulator. ■ Systemfehlerlämpchen leuchtet. ■ Kann die Stimulationsstufe nicht ändern. ■ Kann das Stimulationsprogramm nicht ändern. ■ Beschädigte Fernbedienung. ■ Beschwerden oder Schmerzen aufgrund der Stimulation. ■...
  • Seite 89 Fehlerszenarien Problem Symptome Lösung Fernbedienung Die Anzeigelämpchen Fernbedienung näher zum nimmt keine der Fernbedienung Stimulator bringen und Verbindung zum leuchten nacheinander den Verbindungsaufbau Stimulator auf. auf und erlöschen dann. erneut versuchen. Akuladestandanzeige Nur beim PS: Versuchen leuchtet nicht. Sie den Stimulator zu laden Wenn das Problem fortbesteht, den Arzt kontaktieren.
  • Seite 90 Fehlerszenarien Problem Symptome Lösung Systemfe- Rotes Fernbedienung vom Stimulator trennen. Auf hleranzeige Fehlerlämp- die „nach oben“- und „nach unten“-Tasten nicht chen blinkt drücken, um zu prüfen, ob sie klemmen. sichtbar 12 Sekunden Verbindung mit dem Stimulator erneut lang und herstellen. erlischt dann. Wenn Sie 2 Programme zur Verfügung haben, wechseln Sie zu dem anderen Programm.
  • Seite 91 Fehlerszenarien Problem Symptome Lösung Stimulations- Die Fernbedienung verbindet Wenden Sie sich an stufe kann sich mit dem Stimulator, aber die Ihren Arzt nicht geändert Stimulation kann nicht erhöht werden oder reduziert werden. Anzeigelämpchen der Verbindung neu Fernbedienung leuchten herstellen und nacheinander auf oder leuchten Anpassung erneut nicht. versuchen. Wenden Sie sich an Ihren Arzt.
  • Seite 92 Fehlerszenarien Problem Symptome Lösung Beschädigte Fernbedienung Verwendung der Fernbedienung. scheint physische Fernbedienung einstellen. Schäden zu haben. Den Arzt kontaktieren, um einen Ersatz anzufordern. Beschwerden oder Ständige Schmerzen Reduzieren der Stimulation. Schmerzen aufgrund oder Beschwerden in Falls das Problem der Stimulation. Leiste oder Gesäß. fortbesteht, Stimulation ausschalten und Arzt kontaktieren.
  • Seite 93: Weitere Informationen

    Weitere Informationen...
  • Seite 94: Auswechseln Und Entsorgen

    Auswechseln und Entsorgen Ersatz: Wenn die Fernbedienung verloren geht oder nicht funktioniert, wenden Sie sich an Ihren Arzt, um eine neue Fernbedienung zu erhalten. Der Akku der Fernbedienung hat eine voraussichtliche Lebensdauer von bis zu 5 Jahren. Wenn der Akku leer ist, sollten Sie sich eine neue Fernbedienung besorgen. Entsorgung: Befolgen Sie die örtlich geltenden Vorschriften bei der Entsorgung der Fernbedienung. Wenn Sie kein Gerät mehr benötigen, geben Sie es an Ihren Arzt zurück.
  • Seite 95: Technische Daten

    Technische Daten Artikel Technische Daten Betriebsbedingungen Temperatur 5°C bis 40°C (41°F – 104°F) Druck 70kPa bis 106kPa Luftfeuchtigkeit 15% - 95% Lagerungs- und Versandbedingungen Kurzfristig (bis 3 Tage) Temperatur -25°C bis 70°C (-13°F – 158°F) Druck 57kPa bis 106kPa Luftfeuchtigkeit 15% - 95% Lagerungs- und Versandbedingungen Langfristig (mehr als 3 Tage) Temperatur...
  • Seite 96 Technische Daten Erwartete 5 Jahre Batterielaufzeit* Datenaustausch Hochfrequenz-Telemetrie: Modell: 2301 IC: 20225-P Qualität der Funkverbindung: Dieses Gerät wird im Frequenzbereich von 401-406 MHz betrieben und die maximale effektive Strahlungsleistung liegt unter dem Grenzwert von 25 μW ERP/EIRP, der durch die folgenden Bestimmungen festgelegt wurde: EU: EN ETSI 301-839 und EN ETSI 302-537 und USA: FCC 47 CFR Part 95; Unterabschnitt I.
  • Seite 97 Hilfsmittel, den Wettersatellitendienst oder den Erderkundungssatellitendienst stören und muss empfangene Störungen hinnehmen, darunter auch Störungen, die zu unerwünschtem Betriebsverhalten führen. Hinweis: Änderungen und Modifikationen der Fernbedienung, die nicht von Axonics genehmigt wurden, können die FCC-und IC-Zulassung und Ihre Genehmigung zur Nutzung des Produkts ungültig machen.
  • Seite 98: Kontaktinformationen Für Axonics

    Kontaktinformationen für Axonics Bei Fragen zu Ihrer Gesundheit oder zur Axonics SNM Therapie wenden Sie sich bitte an Ihren Arzt. Axonics-Patienten-Support Axonics mit Sitz in Irvine, Kalifornien, USA, beantwortet gerne Ihre Fragen und Bedenken zur Axonics SNM Therapie. Bitte beachten Sie, dass Axonics weder Angaben zu Ihrem Gesundheitszustand machen noch diesen mit Ihnen besprechen kann. Tel.: +1-949-396-6320 ■ Geschäftszeiten: Montags bis freitags, 8:00 bis 17:00 Uhr ■ (Ortszeit, Pazifikküste der USA)
  • Seite 99: Symbole Auf Dem Etikett

    Symbole auf dem Etikett Symbol Beschreibung Fernbedienung Fernbedienung Benutzerhandbuch (dieses Dokument) Seriennummer des Produkts Hersteller Modellnummer des Produkts Herstellungsdatum IEC 60601-1/EN60601-1, Gerät des Typs BF Nichtionisierende elektromagnetische Strahlung Conformité Européenne (Europäische Konformität). 2018. Dieses Symbol bedeutet, dass das Gerät in vollem Umfang der Direktive 90/385/EWG (von der benannten Stelle geprüft) für aktive implantierbare medizinische Geräte (AIMD) und der Direktive 2014/53/EG (Selbstdeklaration) für Funkanlagen entspricht Industry Canada Zertifizierungsnummer...
  • Seite 100 Symbole auf dem Etikett Symbol Beschreibung Sicherheitsklassifizierung der CSA Nur für Kunden in den USA !USA Vorsicht: Nach US-Bundesgesetz darf dieses Gerät nur durch einen Arzt oder auf Rx ONLY dessen Anweisung verkauft werden. Siehe Gebrauchsanleitung (Beiliegende Dokumente beachten) Temperaturbegrenzung Feuchtigkeitsbegrenzung Druckbegrenzung Nicht verwenden, wenn die Verpackung beschädigt ist Befugter Vertreter in der Europäischen Union Schutz vor einer Staubmenge, die den Betrieb des Geräts beeinträchtigen IP57 würde.
  • Seite 101 Axonics SNM System® Télécommande Manuel d’utilisation ref. 2301 !USA Rx ONLY Modulation Technologies...
  • Seite 102 Axonics®, Axonics Modulation®, Axonics Modulation Technologies®, Axonics Sacral Neuromodulation System® et r-SNM® sont des marques commerciales d’Axonics Modulation Technologies, Inc., déposées ou en attente d’homologation aux États-Unis et dans d’autres pays. Avertissement : le système de neuromodulation sacrée Axonics ne peut être utilisé que sur prescription médicale.
  • Seite 103 Table des matières Introduction ........101 Présentation du manuel .
  • Seite 104 Spécifications ........138 Coordonnées d’Axonics ......141...
  • Seite 105: Introduction

    Introduction Le traitement de neuromodulation sacrée Axonics (SNM) est destiné à soulager les symptômes liés aux troubles fonctionnels urinaires ou fécaux. Les patients reçoivent une télécommande qui leur permet de surveiller l’état de charge et les paramètres de leur système Axonics SNM. Ce manuel décrit comment utiliser la télécommande. Axonics vous conseille de lire ce manuel avant d’utiliser votre télécommande.
  • Seite 106: Présentation Du Manuel

    Présentation du manuel Ce manuel décrit les étapes pour une utilisation en toute sécurité de votre télécommande. Il comprend : une description des boutons, témoins et fonctions de la ■ télécommande, les étapes d’utilisation de votre télécommande, ■ une section portant sur le dépannage de votre ■ télécommande, des informations supplémentaires sur votre télécommande. ■ Remarque : la télécommande peut se comporter différemment lorsqu’elle communique avec le stimulateur-test (TS) et le stimulateur permanent (PS). Ce manuel met en évidence les comportements spécifiques au stimulateur-test (TS) ou au stimulateur permanent (PS).
  • Seite 107: Reportez-Vous À Vos Guides De Traitement

    Reportez-vous à vos Guides de traitement Reportez-vous aux Guides de traitement suivants fournis par votre médecin pour plus d’informations sur votre système : Guide du système de test - pour plus d’informations sur la ■ période de stimulation du test Guide de thérapie à l’intention du patient - pour plus ■ d’informations sur la thérapie SNM permanente...
  • Seite 108: Précautions Relatives À La Télécommande

    Précautions relatives à la télécommande Tout autre dispositif actif implanté (p. ex. stimulateur ■ cardiaque) peut engendrer des problèmes entre la télécommande et l’implant en question. Consultez votre médecin en cas de problèmes ou si vous avez des questions. Si vous avez des implants cochléaires, leur partie externe ■ doit être maintenue à distance de la télécommande. Cela aidera à éviter et/ou réduire les clics audibles non désirés. Certains équipements peuvent émettre des signaux, appelés ■ interférences électromagnétiques ou IEM. Les IEM sont susceptibles de bloquer les signaux que la télécommande envoie au stimulateur. Si vous rencontrez des difficultés d’utilisation de votre télécommande, éloignez-vous de toutes les sources d’IEM, notamment les écrans d’ordinateur, téléphones cellulaires ou autres types d’équipements...
  • Seite 109 Recommandations d’utilisation et d’entretien À FAIRE Portez votre télécommande sur vous à tout moment pour pouvoir ajuster la stimulation ou pour vérifier l’état de la batterie de votre stimulateur. Si vous souhaitez stocker votre télécommande, placez- la dans un endroit frais et sec à l’abri de la chaleur et de l’humidité. Nettoyez votre télécommande à l’aide d’un chiffon doux humidifié lorsque nécessaire. Apportez votre télécommande à tous vos rendez-vous médicaux.
  • Seite 110: Recommandations D'utilisation Et D'entretien

    Recommandations d’utilisation et d’entretien À ÉVITER Ne plongez pas la télécommande dans un liquide et ne le ✕ nettoyez pas avec des produits de nettoyage corrosifs. Ne faites pas tomber la télécommande et évitez toutes ✕ les mauvaises manipulations qui risqueraient de l’endommager. N’utilisez pas la télécommande près de gaz inflammables ✕ ou explosifs. Ne laissez pas d’autres personnes utiliser votre ✕ télécommande...
  • Seite 111: Comment Utiliser Votre Télécommande

    ■ recevoir des avis d’erreur dans votre télécommande ou votre ■ stimulateur. Remarque : ne changez pas la stimulation régulièrement. Votre médecin se chargera de modifier vos paramètres de stimulation au besoin. Axonics vous conseille de ne changer vos paramètres de stimulation que si vous ressentez une gêne.
  • Seite 112: Présentation Des Boutons Et Des Voyants Lumineux

    Présentation des boutons et des voyants lumineux Niveau de stimulation Programme actif Haut Connexion État de la Erreur système batterie du stimulateur...
  • Seite 113 Présentation des boutons et des voyants lumineux Niveau de stimulation Affichage du niveau de stimulation. Haut Permet d’élever le niveau de stimulation ou d’enclencher la stimulation à son niveau par défaut Connexion Connexion ou déconnexion de la télécommande au stimulateur. Permet de baisser le niveau de stimulation ou d’arrêter la stimulation.
  • Seite 114: Méthode De Communication De Votre Télécommande Avec

    Méthode de communication de votre télécommande avec votre stimulateur La télécommande et le stimulateur échangent des signaux. Votre télécommande doit être à proximité du stimulateur pour pouvoir envoyer et recevoir des signaux. Seule la télécommande qui vous a été remise par votre médecin peut envoyer et recevoir des signaux vers et depuis votre stimulateur. Pour utiliser votre télécommande, tenez-la confortablement devant vous, du même côté du corps que le stimulateur.
  • Seite 115: Possibilités D'utilisation

    Possibilités d’utilisation Les pages qui suivent décrivent Remarque : en comment utiliser la télécommande cas de difficultés pour les actions suivantes : d’utilisation de votre télécommande, 1) Vous connecter à votre stimulateur reportez-vous à la 2) Afficher l’état du stimulateur section Dépannage de ce manuel. Si vous 3) Baisser votre niveau de stimulation avez besoin de plus 4) Augmenter votre niveau de d’aide, consultez stimulation votre médecin.
  • Seite 116: Connexion À Votre Stimulateur

    1) Connexion à votre stimulateur...
  • Seite 117 1) Connexion à votre stimulateur Tenez la télécommande du même côté du corps que celui où se trouve votre stimulateur. Appuyez sur le bouton « Connexion » situé au centre de la télécommande. Les voyants lumineux indiquant le niveau de stimulation se mettent à clignoter. Les voyants lumineux signifient que la télécommande essaie de se connecter au stimulateur. Cela peut prendre jusqu’à...
  • Seite 118: Afficher L'état Du Stimulateur

    2) Afficher l’état du stimulateur Niveau de stimulation Programme actif État de la batterie du stimulateur...
  • Seite 119 2) Afficher l’état du stimulateur Voyants lumineux d’état de la batterie du stimulateur Vert : l’autonomie de la batterie du stimulateur est de 4 jours au minimum Vert clignotant (PS seulement) : la batterie du stimulateur est en cours de chargement Orange fixe : l’autonomie de la batterie du stimulateur est de 2 à 4 jours Orange clignotant : l’autonomie de la batterie du stimulateur est de moins de 2 jours Voyants lumineux du niveau de stimulation Pas de stimulation Niveau par défaut configuré...
  • Seite 120 2) Afficher l’état du stimulateur Programme actif Le programme 1 est actif Le programme 2 est actif (TS uniquement)
  • Seite 122: Baisser Votre Niveau De Stimulation

    3) Baisser votre niveau de stimulation...
  • Seite 123 3) Baisser votre niveau de stimulation Si vous ressentez une gêne, vous pouvez réduire la stimulation à l’aide de votre télécommande. La télécommande doit être connectée au stimulateur (voir la section Vous connecter à votre stimulateur). Appuyez sur le bouton « Bas » une fois. 2 A. Stimulateur permanent : surveillez les voyants lumineux du niveau de stimulation pour baisser d’un niveau. La télécommande vibrera. Cela peut prendre 3 secondes. Stimulateur-test : la télécommande vibrera et les voyants lumineux du niveau de stimulation clignoteront.
  • Seite 124: Augmenter Votre Niveau De Stimulation

    4) Augmenter votre niveau de stimulation...
  • Seite 125 4) Augmenter votre niveau de stimulation La télécommande doit être connectée au stimulateur (voir la section Vous connecter à votre stimulateur). Appuyez sur le bouton « Haut » une fois. 2 A. Stimulateur permanent : surveillez les voyants lumineux du niveau de stimulation pour augmenter d’un niveau. La télécommande vibrera. Cela peut prendre 3 secondes. Stimulateur-test : la télécommande vibrera et les voyants lumineux du niveau de stimulation clignoteront.
  • Seite 126: Arrêter Votre Stimulation

    5) Arrêter votre stimulation (APPUI LONG)
  • Seite 127 5) Arrêter votre stimulation Si vous ressentez une gêne extrême, vous pouvez arrêter la stimulation à l’aide de votre télécommande. La télécommande doit être connectée au stimulateur (voir la section Vous connecter à votre stimulateur). Appuyez sur le bouton « Bas » et maintenez-le enfoncé pendant 5 secondes. Attendez que les voyants lumineux de niveau de stimulation s’éteignent tous. La télécommande vibrera. Cela peut prendre 3 secondes.
  • Seite 128: Mettre En Marche Votre Stimulation

    6) Mettre en marche votre stimulation (APPUI LONG)
  • Seite 129 6) Mettre en marche votre stimulation La télécommande doit être connectée au stimulateur (voir la section Vous connecter à votre stimulateur). Appuyez sur le bouton « Haut » et maintenez-le enfoncé pendant 5 secondes. Attendez que les voyants lumineux du niveau de stimulation s’allument. La télécommande vibrera. Cela peut prendre 3 secondes. Remarque : le niveau de stimulation sera au niveau réglé avant l’arrêt du stimulateur. Remarque : vous ne devriez pas avoir besoin d’activer et de désactiver votre stimulation trop souvent.
  • Seite 130 7) Changer votre programme de stimulation (stimulateur-test seulement)
  • Seite 131 7) Changer votre programme de stimulation (stimulateur-test seulement) La télécommande vous permet de changer le programme actif (fournissant la stimulation) si votre médecin a réglé 2 programmes sur votre stimulateur-test externe. Ne changez votre programme que si votre médecin vous le demande. La télécommande doit être connectée au stimulateur (voir la section Vous connecter à votre stimulateur). Appuyez et maintenez le bouton de connexion pendant au moins 5 secondes.
  • Seite 132: (Stimulateur Permanent Seulement)

    8) Surveiller l’état de charge (Stimulateur permanent seulement) Le voyant lumineux d’état de charge de la batterie clignote en vert quand votre stimulateur est en train de charger. Une fois la batterie chargée ou si la charge est interrompue pour une raison ou une autre, le voyant lumineux d’état de charge de la batterie s’arrête de clignoter. Reportez-vous au manuel du chargeur pour plus d’informations sur comment recharger votre stimulateur.
  • Seite 133: Afficher Une Erreur Système

    9) Afficher une erreur système À chaque tentative de connexion à votre stimulateur, la télécommande vérifie la présence d’erreurs. Stimulateur permanent : appelez votre médecin si le voyant lumineux rouge signalant une erreur est allumé. Stimulateur-test : le voyant lumineux rouge peut signifier que votre stimulateur est débranché du câble. Vérifiez que le stimulateur est toujours branché...
  • Seite 134: Éteindre Votre Télécommande

    10) Éteindre votre télécommande...
  • Seite 135 10) Éteindre votre télécommande La télécommande doit être connectée au stimulateur (voir la section Vous connecter à votre stimulateur). Appuyez sur le bouton de connexion, puis relâchez-le. Attendez que tous les voyants de la télécommande s’éteignent. Cela signifie que la télécommande ne communique plus avec le stimulateur et qu’elle est éteinte. Remarque : la télécommande s’éteint automatiquement après 12 secondes si l’utilisateur ne s’en sert pas.
  • Seite 136: Dépannage

    Dépannage Cette section vous aidera à résoudre certains problèmes rencontrés avec votre télécommande. Consultez votre médecin si vous avez besoin d’aide. Résumé des problèmes traités dans cette section : La télécommande ne communique pas avec le stimulateur ■ Voyant lumineux signalant une erreur système activé ■ Impossible de changer le niveau de stimulation ■ Impossible de changer le programme de stimulation ■ Télécommande endommagée ■ Gêne ou douleurs causées par la stimulation ■...
  • Seite 137 Scénarios de dépannage Problème Présentation Solution La télécommande Les voyants lumineux Rapprochez la ne se connecte pas de la télécommande télécommande du au stimulateur s’éclairent à tour de stimulateur, puis essayez rôle, puis s’éteignent. de la connecter à L’indicateur d’état de nouveau. charge n’est pas Pour le stimulateur activé.
  • Seite 138 Scénarios de dépannage Problème Présentation Solution Le voyant Le voyant Déconnectez la télécommande du lumineux lumineux stimulateur. Appuyez sur les boutons « signalant rouge Haut » et « Bas » pour vérifier s’ils sont une erreur clignote coincés, puis reconnectez la système pendant 12 télécommande au stimulateur. est activé...
  • Seite 139 Scénarios de dépannage Problème Présentation Solution Réglage du La télécommande se connecte Consultez votre niveau de au stimulateur, mais il est médecin stimulation impossible d’augmenter ou de impossible baisser la stimulation. Les voyants lumineux de la Rétablissez la télécommande défilent ou ils ne connexion, puis s’éclairent pas.
  • Seite 140 Scénarios de dépannage Problème Présentation Solution Télécommande La télécommande Cessez toute utilisation de endommagée semble la télécommande. matériellement Consultez votre médecin endommagée. pour discuter de son remplacement. Gêne ou douleurs Gêne ou douleurs Baissez votre niveau de causées par la constantes dans stimulation. Si le problème stimulation l’aine ou dans les persiste, arrêtez la...
  • Seite 141: Informations Complémentaires

    Informations complémentaires...
  • Seite 142: Remplacement Et Mise Au Rebut

    Remplacement et mise au rebut Remplacement : si votre télécommande ne fonctionne plus ou si vous la perdez, consultez votre médecin pour en obtenir une autre. La batterie de la télécommande devrait durer jusqu’à 5 ans. Lorsque la batterie est épuisée, vous devez vous procurer une nouvelle télécommande. Mise au rebut : jetez votre télécommande conformément aux réglementations locales.
  • Seite 143: Spécifications

    Spécifications Item Spécification Conditions de fonctionnement Température 5 °C - 40 °C (41°F – 104°F) Pression 70kPa – 106kPa Humidité 15% - 95% Conditions de stockage et d’expédition à court terme (3 jours ou moins) Température -25 °C - 70 °C (-13 °F – 158 °F) Pression 57kPa –...
  • Seite 144 Poids Durée de vie moyenne 5 ans de la batterie* Communication Télémétrie RF Ref. : 2301 IC : 20225-P Qualité du service sans fil : ce dispositif fonctionne sur la plage de fréquence 401-406 MHz et la puissance électrique nominale transmise par radiation est inférieure à la limite de 25 uW ERP/EIRP spécifiée par la norme européenne EN ETSI 301-839 et EN ETSI 302-537 et des États-Unis FCC 47 CFR...
  • Seite 145 (MetSat) ou Earth Exploration Satellite Service (EESS) et doit accepter toutes les interférences reçues, y compris celles qui peuvent provoquer un fonctionnement non désiré. Remarque : toute modification apportée à la télécommande n’ayant pas été autorisée par Axonics peut entraîner une annulation de la certification FCC et IC, et de votre droit à utiliser le produit.
  • Seite 146: Coordonnées D'axonics

    Coordonnées d’Axonics Veuillez contacter votre médecin si vous avez des questions relatives à votre santé ou au traitement Axonics SNM. Soutien d’Axonics aux patients Axonics, située à Irvine, en Californie, aux États-Unis, est disponible pour répondre à vos questions relatives au traitement Axonics SNM. Veuillez noter qu’Axonics n’est pas en mesure de formuler d’observation à propos de votre état de santé ou d’en discuter avec vous. Téléphone : +1-949-396-6320 ■ Heures d’ouverture : du lundi au vendredi de 8 h à 17 h ■...
  • Seite 147: Symboles De L'étiquette

    Symboles de l’étiquette Symbole Description Télécommande Manuel d’utilisation de la télécommande (ce document) Numéro de série du produit Fabricant Numéro de ref. du produit Date de fabrication IEC 60601-1/EN60601-1, Équipement de type BF Rayonnements électromagnétiques non ionisants Conformité Européenne : 2018. Ce symbole signifie que le dispositif est conforme à la directive 90/385/CEE (étudiée par l’or- ganisme notifié) relative aux dispositifs médicaux implantables actifs (DMIA) et à la directive 2014/53/UE (auto-certification) concernant les équipements radioélectriques (RED).
  • Seite 148 Symboles de l’étiquette Symbole Description Conforme aux normes CSA en matière de sécurité Pour les États-Unis uniquement !USA Avertissement : Conformément aux lois fédérales des États-Unis, la vente de ce dispositif ne Rx ONLY peut être effectuée que par un médecin ou à sa demande. Reportez-vous aux instructions d’utilisation (consultez les documents qui l’accompagnent) Restrictions de température Restrictions d’humidité...
  • Seite 149 Control remoto del Axonics SNM System® Manual del usuario del Modelo 2301 !USA Rx ONLY Modulation Technologies...
  • Seite 150 Axonics®, Axonics Modulation®, Axonics Modulation Technologies®, Axonics Sacral Neuromodulation System® y r-SNM® son marcas comerciales de Axonics Modulation Technologies, Inc., patentadas o pendientes de patente en los EE. UU. y en otros países. Precaución: el sistema de neuromodulación sacra de Axonics solo debe usarse bajo prescripción médica.
  • Seite 151 Índice Introducción ........149 Descripción general del manual .
  • Seite 152 Especificaciones....... . . 186 Información de contacto de Axonics ....189...
  • Seite 153: Introducción

    Introducción El tratamiento de neuromodulación sacra (Sacral Neuromodulation, SNM) de Axonics se proporciona para aliviar los síntomas de las disfunciones urinaria y fecal. Los pacientes reciben un control remoto para controlar el estado de la batería y las configuraciones del Axonics SNM System. Este manual describe cómo usar el control remoto. Axonics recomienda que lea este manual antes de usar el control remoto.
  • Seite 154: Descripción General Del Manual

    Descripción general del manual Este manual describe los pasos para un uso seguro de su control remoto. El manual incluye: Descripción general de botones, indicadores y funciones del ■ control remoto Pasos para usar el control remoto ■ Resolución de problemas del control remoto ■ Información adicional sobre el control remoto ■ Nota: puede que el control remoto se comporte de forma distinta al comunicarse con el estimulador de prueba (TS) y el estimulador permanente (PS).
  • Seite 155: Consulte Las Guías De Tratamiento

    Consulte las guías de tratamiento Consulte las siguientes guías de tratamiento que le facilita su médico para obtener más información sobre su sistema: Guía del sistema de prueba: para obtener más información ■ sobre el período de estimulación de prueba Guía de tratamiento del paciente: para obtener más ■ información sobre el tratamiento de la SNM permanente...
  • Seite 156: Precauciones Del Control Remoto

    Precauciones del control remoto Si tiene otros implantes activos (como un marcapasos), es ■ posible que el control remoto cause problemas con dichos implantes. Póngase en contacto con su médico si tiene algún problema o pregunta. Si tiene implantes cocleares, debe mantener alejado el ■ control remoto de la parte externa de dichos implantes. Esto ayudará a evitar y/o reducir los clics audibles no deseados. Algunos equipos pueden generar señales, llamadas ■ interferencias electromagnéticas (Electromagnetic Interference, EMI).
  • Seite 157: Uso Y Cuidados Recomendados

    Uso y cuidados recomendados Qué debe hacer Lleve consigo el control remoto en todo momento, por si necesita ajustar la estimulación o comprobar el estado de la batería del estimulador. Para guardar su control remoto, póngalo en un lugar fresco y seco alejado del calor y la luz directa. Limpie el control remoto con un paño húmedo y suave cuando sea necesario. Lleve el control remoto a todas las visitas a su médico.
  • Seite 158 Uso y cuidados recomendados Qué no debe hacer No sumerja el control remoto en ningún líquido ni lo limpie ✕ con limpiadores fuertes. No deje caer el control remoto y trátelo con cuidado para ✕ que no se deteriore. No use el control remoto cerca de gases inflamables o ✕ explosivos. No deje que otras personas usen su control remoto. ✕...
  • Seite 159: Cómo Usar El Control Remoto

    Controlar la carga del estimulador (solo PS) ■ Cambiar el programa de estimulación (solo TS) ■ Recibir avisos de error del control remoto o del estimulador ■ Nota: no haga cambios de estimulación regularmente. Su médico deberá cambiar las configuraciones de estimulación si es necesario. Axonics recomienda que usted cambie la estimulación solo si presenta molestias...
  • Seite 160: Resumen De Botones Y Luces

    Resumen de botones y luces Nivel de estimulación Programa activo Subir Conectar Bajar Error del Estimulador sistema Estado de la batería...
  • Seite 161 Resumen de botones y luces Nivel de Muestra la potencia de la estimulación. estimulación Subir Sube el nivel de estimulación o enciende la estimulación en el nivel por defecto. Conectar Conecta o desconecta el control remoto del estimulador. Bajar Baja el nivel de estimulación o apaga la estimulación. Programa Muestra el programa de estimulación que está activo activo. Error del Muestra si hay un error en el control remoto o sistema en el estimulador. Estimulador Para el TS, muestra cuánto tiempo falta para que Estado de la la batería se agote.
  • Seite 162 Cómo se comunica el control remoto con el estimulador El control remoto envía y recibe señales del estimulador. El control remoto debe estar cerca del estimulador para enviar y recibir señales. Solo el control remoto que le ha entregado el médico puede enviar y recibir señales desde y hacia el estimulador. Para usar el control remoto, sujételo frente a usted de una forma que le resulte cómoda. Sujete el control remoto junto al mismo lado del cuerpo que el estimulador.
  • Seite 163: Situaciones De Uso

    Situaciones de uso Las siguientes páginas describen Nota: si tiene cómo usar el control remoto para: problemas para usar el control remoto, 1) Conectar con el estimulador. consulte la sección de 2) Ver el estado del estimulador. Solución de problemas de este manual. Para 3) Bajar el nivel de estimulación. obtener asistencia, 4) Subir el nivel de estimulación. póngase en contacto 5) Apagar la estimulación. con su médico. 6) Encender la estimulación.
  • Seite 164: Conectar Con El Estimulador

    1) Conectar con el estimulador...
  • Seite 165 1) Conectar con el estimulador Sujete el control remoto junto al mismo lado del cuerpo que el estimulador. Pulse el botón de conectar en el centro del control remoto. Las luces del nivel de estimulación parpadearán. Las luces parpadeantes significan que el control remoto está intentando conectarse con el estimulador.
  • Seite 166: Ver El Estado Del Estimulador

    2) Ver el estado del estimulador Nivel de estimulación Programa activo Estado de la batería del estimulador...
  • Seite 167 2) Ver el estado del estimulador Luces del estado de la batería del estimulador Verde fijo: la batería del estimulador durará 4 o más días Verde parpadeante (solo PS): la batería del estimulador se está cargando Naranja fijo: la batería del estimulador durará de 2 a 4 días Naranja parpadeante: 2 días o menos de batería Luces del nivel de estimulación Ninguna estimulación Nivel predeterminado configurado por su médico Nivel máximo...
  • Seite 168 2) Ver el estado del estimulador Programa activo El programa 1 está activo El programa 2 está activo (solo TS)
  • Seite 170: Bajar El Nivel De Estimulación

    3) Bajar el nivel de estimulación...
  • Seite 171 3) Bajar el nivel de estimulación Si tiene molestias, puede usar el control remoto para bajar la estimulación. El control remoto tiene que estar conectado al estimulador (consulte Conectar con el estimulador). Pulse el botón «Bajar» una vez. 2 A. Estimulador permanente: vigile que las luces del nivel de estimulación disminuyan en un nivel. El control remoto vibrará. Esto puede costar 3 segundos Estimulador de prueba: el control remoto vibrará y las luces del nivel de estimulación parpadearán. Después de varios ajustes, el nivel de estimulación puede cambiar. Esto puede costar 3 segundos.
  • Seite 172: Subir La Estimulación

    4) Subir la estimulación...
  • Seite 173 4) Subir la estimulación El control remoto tiene que estar conectado al estimulador (consulte Conectar con el estimulador). Pulse el botón «Subir» una vez. 2 A. Estimulador permanente: vigile que las luces del nivel de estimulación aumenten en un nivel. El control remoto vibrará. Esto puede costar 3 segundos. Estimulador de prueba: El control remoto vibrará y las luces del nivel de estimulación parpadearán. Después de varios ajustes, las luces del nivel de estimulación pueden cambiar. Esto puede costar 3 segundos. Nota: el nivel de estimulación solo se puede aumentar de uno en uno.
  • Seite 174: Apagar La Estimulación

    5) Apagar la estimulación (MANTENER PULSADO)
  • Seite 175 5) Apagar la estimulación Si presenta demasiadas molestias, puede usar su control remoto para apagar la estimulación. El control remoto tiene que estar conectado al estimulador (consulte Conectar con el estimulador). Mantenga pulsado el botón «Bajar» durante 5 segundos. Vigile que las luces del nivel de estimulación se apaguen todas. El control remoto vibrará. Esto puede costar 3 segundos.
  • Seite 176: Encender El Nivel De Estimulación

    6) Encender el nivel de estimulación (MANTENER PULSADO)
  • Seite 177 6) Encender el nivel de estimulación El control remoto tiene que estar conectado al estimulador (consulte Conectar con el estimulador). Mantenga pulsado el botón «Subir» durante 5 segundos. Vigile que las luces del nivel de estimulación se enciendan. El control remoto vibrará. Esto puede costar 3 segundos. Nota: el nivel de estimulación estará en el nivel configurado antes de apagar el estimulador. Nota: no debería tener que encender y apagar continuamente la estimulación.
  • Seite 178: Solo El Estimulador De Prueba

    7) Cambiar el programa de estimulación: solo el estimulador de prueba...
  • Seite 179 7) Cambiar el programa de estimulación: solo el estimulador de prueba El control remoto le permite cambiar el programa activo (que proporciona estimulación) si su médico ha configurado 2 programas para su estimulador de prueba externo. Cambie el programa solamente si se lo indica su médico. El control remoto tiene que estar conectado al estimulador (consulte Conectar con el estimulador).
  • Seite 180: Controlar El Estado De Carga

    8) Controlar el estado de carga solo el estimulador permanente La luz del estado de la batería de estimulación parpadeará en verde cuando el estimulador se esté cargando. Cuando la carga haya terminado o si esta se detiene por cualquier motivo, la luz del estado de la batería de estimulación dejará de parpadear. Consulte el manual del sistema de carga para obtener más información sobre cómo cargar el estimulador.
  • Seite 181: Ver Un Error Del Sistema

    9) Ver un error del sistema Cuando intente conectar con el estimulador, el control remoto comprobará si hay errores. Estimulador permanente: Llame a su médico si se enciende la luz roja de error. Estimulador de prueba: la luz roja puede significar que el estimulador está desconectado del cable. Compruebe que el estimulador todavía esté...
  • Seite 182: Apagar El Control Remoto

    10) Apagar el control remoto...
  • Seite 183 10) Apagar el control remoto El control remoto tiene que estar conectado al estimulador (consulte Conectar con el estimulador). Pulse y suelte el botón «Conectar». Vigile que todas las luces del control remoto se apaguen. Eso significa que el control remoto ha dejado de comunicarse con el estimulador y que está apagado. Nota: el control remoto se apagará automáticamente después de 12 segundos sin actividad por parte del usuario.
  • Seite 184: Solución De Problemas

    Solución de problemas Esta sección le ayudará a solucionar problemas con el control remoto. Póngase en contacto con su médico si necesita ayuda. Resumen de problemas abordados en esta sección: El control remoto no se comunica con el estimulador. ■ La luz de error del sistema está encendida. ■ No se puede cambiar el nivel de estimulación. ■ No se puede cambiar el programa de estimulación. ■ El control remoto está dañado. ■ Molestias o dolor debidos a la estimulación. ■...
  • Seite 185 Situaciones de solución de problemas Problema Presentación Resolución El control remoto Las luces del control Mueva el control no se conecta al remoto rotan y remoto más cerca del estimulador. luego se apagan. El estimulador y vuelva a indicador de estado intentar conectarlos. de la batería no está...
  • Seite 186 Situaciones de solución de problemas Problema Presentación Resolución La luz de error Desconecte el control remoto del indicador roja parpadea estimulador; pulse los botones de error durante 12 «Subir» y «Bajar» para comprobar si segundos y están atascados; vuelva a conectar el sistema luego se estimulador. está...
  • Seite 187 Situaciones de solución de problemas Problema Presentación Resolución No se puede El control remoto se conecta Póngase en ajustar el al estimulador, pero no contacto con su nivel de se puede subir ni bajar la médico. estimulación estimulación. Las luces del control remoto Vuelva a conectar el rotan o no están encendidas.
  • Seite 188 Situaciones de solución de problemas Problema Presentación Resolución Control remoto El control remoto Deje de usar el control dañado. parece estar remoto. Póngase en dañado contacto con su médico físicamente. para reemplazarlo. Molestias o Dolor constante Bajar el nivel de la dolor debidos a o molestias en la estimulación.
  • Seite 189: Información Adicional

    Información adicional...
  • Seite 190: Reemplazo Y Eliminación

    Reemplazo y eliminación Reemplazo: si se pierde el control remoto o no funciona, póngase en contacto con su médico para obtener un control remoto nuevo. Se espera que la batería del control remoto dure hasta un máximo de 5 años. Cuando la batería se agote, debe obtener un nuevo control remoto. Eliminación: siga las normas gubernamentales locales para eliminar el control remoto. Si ya no necesita el dispositivo y este todavía funciona, devuélvalo a su médico. Advertencia: no tire el control remoto al fuego, ya que la batería podría explotar.
  • Seite 191: Especificaciones

    Especificaciones Artículo Especificación Condiciones de funcionamiento Temperatura 5°C - 40°C (41°F – 104°F) Presión 70kPa – 106kPa Humedad 15% - 95% Condiciones de almacenamiento y envío Corto plazo (3 días o menos) Temperatura -25°C - 70°C (-13°F – 158°F) Presión 57kPa – 106kPa Humedad 15% - 95% Condiciones de almacenamiento y envío Largo plazo (más de 3 días) Temperatura 20°C - 30°C (68°F –...
  • Seite 192 Peso Duración 5 años esperada de la batería* Comunicación Telemetría de radiofrecuencia Modelo: 2301 IC: 20225-P Calidad del servicio inalámbrico: Este dispositivo funciona a una frecuencia de 401-406 MHz y la potencia radiada efectiva máxima está por debajo del límite de 25 uW EREIRP según se especifica en la UE: EN ETSI 301-839 y EN ETSI 302-537 y en EE. UU.: FCC 47 CFR Parte 95;...
  • Seite 193 Tierra, y debe aceptar cualquier interferencia recibida, incluidas las interferencias que puedan producir un funcionamiento no deseado. Nota: los cambios y las modificaciones del control remoto no autorizados por Axonics podrían anular la certificación de la FCC e IC y cancelar su autoridad para usar el producto.
  • Seite 194: Información De Contacto De Axonics

    Información de contacto de Axonics Póngase en contacto con su médico si tiene preguntas sobre su salud o el tratamiento con el sistema Axonics SNM. Asistencia al paciente de Axonics Axonics, con sede en Irvine, CA (EE. UU.), puede ayudarle a responder preguntas o preocupaciones sobre el tratamiento con el sistema Axonics SNM. Tenga en cuenta que Axonics no puede comentar ni opinar sobre su afección médica. Llame al: + 1-949-396-6320 ■ Horario: L-V, 8:00 - 17:00 horas (hora del Pacífico de EE. UU.) ■...
  • Seite 195: Símbolos De La Etiqueta

    Símbolos de la etiqueta Símbolo Descripción Control remoto Manual de usuario del control remoto (este documento) Número de serie del producto Fabricante Número de modelo del producto Fecha de fabricación IEC 60601-1/EN60601-1, Equipo tipo BF Radiación electromagnética no ionizante Conformité Européenne (European Conformity): 2018. Este símbolo significa que el dispositivo cumple totalmente la Directiva AIMD 90/385/CEE (Organismo notificado revisado) y la Directiva RED 2014/53/CE ( autocertificado)
  • Seite 196 Símbolos de la etiqueta Símbolo Descripción Clasificación CSA en relación con la seguridad Solo para EE. UU. Precaución: la legislación federal de EE. UU. restringe la venta de este dispositivo a un !USA Rx ONLY médico o por prescripción facultativa Consulte las instrucciones de uso (Consulte los documentos adjuntos) Limitación de temperatura Limitación de humedad Limitación de presión...
  • Seite 197 Telecomando Axonics SNM System® Manuale per l’utente Modello 2301 !USA Rx ONLY Modulation Technologies...
  • Seite 198 Axonics®, Axonics Modulation®, Axonics Modulation Technologies®, Axonics Sacral Neuromodulation System® e r-SNM® sono marchi di Axonics Modulation Technologies, Inc., brevettati o in attesa di brevetto negli Stati Uniti e in altri paesi. Attenzione: il sistema di neuromodulazione sacrale Axonics deve essere utilizzato soltanto su prescrizione medica...
  • Seite 199 Indice Introduzione........197 Panoramica del manuale.
  • Seite 200 Dati tecnici ........234 Per contattare Axonics ......237...
  • Seite 201: Introduzione

    Introduzione La terapia di neuromodulazione sacrale Axonics (SNM) viene prescritta per alleviare i sintomi della disfunzione urinaria e fecale. Ai pazienti viene consegnato un telecomando per monitorare lo stato della batteria e le impostazioni del sistema Axonics SNM. Il presente manuale illustra come utilizzare il telecomando. Axonics raccomanda di leggere questo manuale prima di utilizzare il telecomando.
  • Seite 202: Panoramica Del Manuale

    Panoramica del manuale Questo manuale descrive le procedure da eseguire per un uso sicuro del telecomando. Il manuale comprende: Descrizione dei pulsanti, degli indicatori e delle funzioni del ■ telecomando Procedure di utilizzo del telecomando ■ Risoluzione dei problemi del telecomando ■ Informazioni aggiuntive sul telecomando ■ Nota: Il telecomando può comportarsi in modo diverso quando comunica con lo stimolatore di prova (TS) e lo stimolatore permanente (PS). Questo manuale indicherà quando un determinato comportamento è specifico per TS o PS.
  • Seite 203: Rimandi Alle Guide Alla Terapia

    Rimandi alle Guide alla terapia Faccia riferimento alle seguenti guide alla terapia fornite dal medico per ulteriori informazioni sul sistema: Guida al sistema di prova - per ulteriori informazioni sul ■ periodo di stimolazione di prova Guida alla terapia per il paziente - per ulteriori informazioni ■ sulla terapia SNM permanente...
  • Seite 204: Precauzioni Per L'uso Del Telecomando

    Precauzioni per l’uso del telecomando Il telecomando potrebbe danneggiare eventuali altri impianti ■ attivi (ad esempio un pacemaker). Si rivolga al medico se riscontra dei problemi o desidera porre delle domande. Se utilizza impianti cocleari, la porzione esterna di questi ■ ultimi deve essere tenuta lontano dal telecomando. Ciò consentirà di evitare e/o ridurre clic udibili indesiderati. Alcune apparecchiature possono generare dei segnali, detti ■ interferenze elettromagnetiche o EMI. Le EMI possono bloccare i segnali del telecomando allo stimolatore. Se ha problemi a utilizzare il telecomando, si allontani da queste fonti.
  • Seite 205: Raccomandazioni D'uso E Di Cura

    Raccomandazioni d’uso e di cura COSA FARE Porti sempre con sé il telecomando in caso debba regolare la stimolazione o controllare lo stato della batteria dello stimolatore. Se deve riporre il telecomando, lo metta in un luogo fresco e asciutto, lontano da fonti di calore e dalla luce diretta. Se necessario, pulisca il telecomando con un panno morbido e umido. Porti con sé il telecomando a tutte le visite presso il Suo operatore sanitario.
  • Seite 206 Raccomandazioni d’uso e di cura COSA NON FARE Non immerga il telecomando in un liquido e non lo pulisca ✕ con detergenti aggressivi. Non faccia cadere il telecomando e non lo manipoli in ✕ modo da danneggiarlo. Non usi il telecomando in prossimità di gas infiammabili o ✕ esplosivi. Non consenta ad altre persone di utilizzare il telecomando. ✕...
  • Seite 207: Come Usare Il Telecomando

    Monitorare lo stato di carica dello stimolatore (solo PS) ■ Cambiare il programma di stimolazione (solo TS) ■ Ricevere le notifiche di errore del telecomando o dello ■ stimolatore Nota: Non apporti modifiche di stimolazione con regolarità. Se necessario, le impostazioni di stimolazione dovrebbero essere modificate dal medico. Axonics raccomanda di modificare la stimolazione solo se si prova fastidio.
  • Seite 208: Riepilogo Dei Pulsanti E Delle Spie Luminose

    Riepilogo dei pulsanti e delle spie luminose Livello di stimolazione Programma attivo Aumento Connessione Riduzione Errore di Stimolatore sistema Stato della batteria...
  • Seite 209 Riepilogo dei pulsanti e delle spie luminose Livello di Mostra la potenza di stimolazione. stimolazione Aumento Aumenta il livello di stimolazione oppure attiva la stimolazione sul livello predefinito. Connessione Collega o scollega il telecomando dallo stimolatore. Riduzione Riduce il livello di stimolazione oppure disattiva la stimolazione.
  • Seite 210: In Che Modo Il Telecomando Comunica Con Lo Stimolatore

    In che modo il telecomando comunica con lo stimolatore Il telecomando invia e riceve segnali dallo stimolatore. Per la trasmissione dei segnali, esso deve trovarsi vicino allo stimolatore. Solo il telecomando che Le è stato consegnato dal Suo medico può inviare e ricevere segnali al e dal Suo stimolatore. Per usare il telecomando, lo impugni tenendolo dinanzi a sé dalla stessa parte del corpo in cui si trova lo stimolatore.
  • Seite 211: Scenari Di Utilizzo

    Scenari di utilizzo Le pagine seguenti spiegano come Nota: in caso di utilizzare il telecomando per: problemi nell’uso del telecomando, consulti 1) Collegarsi allo stimolatore. la sezione Risoluzione 2) Visualizzare lo stato dello dei problemi del stimolatore. presente manuale. Per ulteriore assistenza, si 3) Abbassare il livello di rivolga al Suo medico.
  • Seite 212: Collegamento Allo Stimolatore

    1) Collegamento allo stimolatore...
  • Seite 213 1) Collegamento allo stimolatore Il telecomando deve essere tenuto sullo stesso lato del corpo in cui si tiene lo stimolatore. Prema il pulsante “Connessione” al centro del telecomando. Le spie indicatrici del livello di stimolazione lampeggiano. Le spie lampeggianti indicano che il telecomando sta cercando di collegarsi allo stimolatore.
  • Seite 214: Visualizzazione Dello Stato Dello Stimolatore

    2) Visualizzazione dello stato dello stimolatore Livello di stimolazione Programma attivo Stato della batteria dello stimolatore...
  • Seite 215 2) Visualizzazione dello stato dello stimolatore Spie dello stato della batteria dello stimolatore Verde fisso: la batteria dello stimolatore durerà ancora 4 giorni o più Verde lampeggiante (solo PS): La batteria dello stimolatore è in carica Arancione fisso: la batteria dello stimolatore durerà ancora da 2 a 4 giorni Arancione lampeggiante: la batteria dello stimolatore durerà...
  • Seite 216 2) Visualizzazione dello stato dello stimolatore Programma attivo È attivo il programma 1 È attivo il programma 2 (solo TS)
  • Seite 218: Riduzione Del Livello Di Stimolazione

    3) Riduzione del livello di stimolazione...
  • Seite 219 3) Riduzione del livello di stimolazione Se prova fastidio, può utilizzare il telecomando per ridurre la stimolazione. Il telecomando deve essere collegato allo stimolatore (vedere Collegamento allo stimolatore). Prema il pulsante “Riduzione” una volta. 2 A. Stimolatore permanente: Controlli che le spie del livello di stimolazione diminuiscano di una unità. Il telecomando vibrerà. Potrebbero volerci 3 secondi Stimolatore di prova: Il telecomando vibrerà e le spie del livello di stimolazione lampeggeranno. Dopo varie regolazioni il livello di stimolazione può cambiare. Potrebbero volerci 3 secondi.
  • Seite 220: Aumento Del Livello Di Stimolazione

    4) Aumento del livello di stimolazione...
  • Seite 221 4) Aumento del livello di stimolazione Il telecomando deve essere collegato allo stimolatore (vedere Collegamento allo stimolatore). Prema il pulsante “Aumento” una volta. 2 A. Stimolatore permanente: Controlli che le spie del livello di stimolazione aumentino di una unità. Il telecomando vibrerà. Potrebbero volerci 3 secondi. Stimolatore di prova: Il telecomando vibrerà e le spie del livello di stimolazione lampeggeranno. Dopo varie regolazioni le spie del livello di stimolazione possono cambiare. Potrebbero volerci 3 secondi Nota: Il livello di stimolazione può...
  • Seite 222: Disattivazione Della Stimolazione

    5) Disattivazione della stimolazione (TENERE PREMUTO)
  • Seite 223 5) Disattivazione della stimolazione Se prova molto fastidio, può utilizzare il telecomando per spegnere la stimolazione. Il telecomando deve essere collegato allo stimolatore (vedere Collegamento allo stimolatore). Prema e tenga premuto il pulsante “Riduzione” per 5 secondi. Controlli che tutte le spie del livello di stimolazione si spengano. Il telecomando vibrerà. Potrebbero volerci 3 secondi.
  • Seite 224: Attivazione Della Stimolazione

    6) Attivazione della stimolazione (TENERE PREMUTO)
  • Seite 225 6) Attivazione della stimolazione Il telecomando deve essere collegato allo stimolatore (vedere Collegamento allo stimolatore). Prema e tenga premuto il pulsante “Aumento” per 5 secondi. Controlli che tutte le spie del livello di stimolazione si accendano. Il telecomando vibrerà. Potrebbero volerci 3 secondi. Nota: il livello di stimolazione sarà al livello impostato prima di spegnere lo stimolatore. Nota: non dovrebbe avere bisogno di attivare e disattivare regolarmente la stimolazione. Se necessario, la stimolazione dovrebbe essere modificata dal medico...
  • Seite 226: Solo Stimolatore Di Prova

    7) Modifica del programma di stimolazione solo stimolatore di prova...
  • Seite 227 7) Modifica del programma di stimolazione solo stimolatore di prova Il telecomando consente di modificare il programma attivo (per la stimolazione) se il medico ha impostato 2 programmi sullo stimolatore di prova esterno. Cambi il programma solo su indicazione del medico. Il telecomando deve essere collegato allo stimolatore (vedere Collegamento allo stimolatore).
  • Seite 228 8) Monitoraggio dello stato di carica solo stimolatore permanente Quando lo stimolatore è in carica, la spia di stato della batteria dello stimolatore sarà di colore verde e lampeggiante. Quando la carica è completa o se viene interrotta per qualsiasi motivo, la spia di stato della batteria smette di lampeggiare. Per ulteriori informazioni sulla carica dello stimolatore, consultare il manuale del sistema di ricarica.
  • Seite 229: Visualizzazione Di Un Errore Di Sistema

    9) Visualizzazione di un errore di sistema Quando viene avviato il collegamento allo stimolatore, il telecomando controllerà la presenza di errori. Stimolatore permanente: Contatti il medico se si accende la spia di errore rossa. Stimolatore di prova: La spia rossa può significare che lo stimolatore è scollegato dal cavo. Verifichi che lo stimolatore sia ancora collegato al cavo proveniente dalla schiena. Colleghi lo stimolatore al cavo, se non è...
  • Seite 230: Spegnimento Del Telecomando

    10) Spegnimento del telecomando...
  • Seite 231 10) Spegnimento del telecomando Il telecomando deve essere collegato allo stimolatore (vedere Collegamento allo stimolatore). Prema e rilasci il pulsante “Connessione”. Controlli che tutte le spie del telecomando si spengano. Questo vuol dire che il telecomando ha interrotto la comunicazione con lo stimolatore ed è spento Nota: Il telecomando si spegnerà automaticamente dopo 12 secondi di inattività dell’utente.
  • Seite 232: Risoluzione Dei Problemi

    Risoluzione dei problemi Questa sezione può essere d’aiuto per risolvere i problemi del telecomando. Si rivolga al medico se occorre aiuto. Riepilogo dei problemi trattati in questa sezione: Il telecomando non comunica con lo stimolatore. ■ La spia di malfunzionamento del sistema è accesa. ■ Non è possibile modificare il livello di stimolazione. ■ Non è possibile cambiare il programma di stimolazione. ■ Telecomando danneggiato. ■ Fastidio o dolore provocato dalla stimolazione. ■...
  • Seite 233 Scenari di risoluzione dei problemi Problema Presentazione Risoluzione Il telecomando Le spie del Avvicini il telecomando non si collega allo telecomando si allo stimolatore e stimolatore accendono in ritenti il collegamento. sequenza e poi si Solo per il PS, provi a spengono. caricare lo stimolatore. L’indicatore di stato Se il problema persiste, della batteria non è...
  • Seite 234 Scenari di risoluzione dei problemi Problema Presentazione Risoluzione L’indicatore La spia di Scolleghi il telecomando dallo di errore del errore rossa stimolatore; prema i pulsanti sistema è lampeggia per “Aumento” e “Riduzione” per visibile 12 secondi e controllare se sono bloccati; ripristini poi si spegne. il collegamento allo stimolatore.
  • Seite 235 Scenari di risoluzione dei problemi Problema Presentazione Risoluzione Impossibile Il telecomando si collega Si rivolga al medico. regolare il allo stimolatore ma non è livello di possibile aumentare o ridurre stimolazione la stimolazione. Le spie del telecomando si Lo riconnetta e accendono in sequenza ritenti la oppure non si accendono.
  • Seite 236 Scenari di risoluzione dei problemi Problema Presentazione Risoluzione Telecomando Il telecomando Interrompa l'uso del danneggiato appare fisicamente telecomando. Si rivolga danneggiato. al medico per valutare la sostituzione. Fastidio o dolore Dolore o fastidio Riduca il livello di provocato dalla costante all'inguine stimolazione Se il stimolazione o alle natiche.
  • Seite 237: Ulteriori Informazioni

    Ulteriori informazioni...
  • Seite 238: Sostituzione E Smaltimento

    Sostituzione e smaltimento Sostituzione. Se perde il telecomando o questo non funziona, si rivolga al medico per farsene consegnare uno nuovo. La durata prevista della batteria del telecomando è di un massimo di 5 anni. Quando la batteria si scarica, è necessario procurarsi un nuovo telecomando. Smaltimento. Attenersi alla normativa locale per lo smaltimento del telecomando. Se non ha più bisogno di un dispositivo funzionante, lo restituisca al medico. Attenzione: Non getti il telecomando nel fuoco perché la batteria può esplodere.
  • Seite 239: Dati Tecnici

    Dati tecnici Caratteristica Specifica Condizioni di funzionamento Temperatura 5 °C - 40 °C (41 °F – 104 °F) Pressione 70kPa – 106kPa Umidità 15% - 95% Condizioni di magazzinaggio e spedizione - Breve termine (non più di 3 giorni) Temperatura -25 °C - 70 °C (-13 °F – 158 °F) Pressione 57kPa –...
  • Seite 240 Durata prevista 5 anni della batteria* Comunicazione Telemetria a radiofrequenza Modello: 2301 IC: 20225-P Qualità del servizio wireless: Questo dispositivo opera nel campo di frequenza da 401-406 MHz e la potenza irradiata massima effettiva è inferiore al limite di 25 uW ERP/EIRP secondo quanto specificato nell’UE: EN ETSI 301-839 e EN ETSI 302-537 e negli USA: FCC 47 CFR Parte 95;...
  • Seite 241 Terra e deve accettare tutte le interferenze ricevute, comprese quelle che possono causare un funzionamento indesiderato. Nota: alterazioni e modifiche al telecomando non approvate da Axonics potrebbero invalidare la certificazione FCC e IC e il diritto all’uso del prodotto.
  • Seite 242: Per Contattare Axonics

    Contatti il Suo medico in caso di domande sulla Sua salute o sulla terapia Axonics SNM. Assistenza Axonics al paziente Axonics, azienda con sede negli Stati Uniti, a Irvine, California, può essere d’aiuto per fornire una risposta a domande o dubbi sulla terapia Axonics SNM. Tenga presente che Axonics non può discutere o commentare le Sue condizioni mediche. Chiamare il numero: +1-949-396-6320 ■ Orario: lun-ven, 8:00 - 17:00 (fuso orario del Pacifico)
  • Seite 243: Simboli Delle Etichette

    Simboli delle etichette Simbolo Descrizione Telecomando Manuale per l'utente del telecomando (il presente documento) Numero di serie del prodotto Produttore Numero di modello del prodotto Data di fabbricazione IEC 60601-1/EN60601-1, Apparecchiatura di tipo BF Radiazioni elettromagnetiche non ionizzanti Conformité Européenne (Conformità europea). 2018. Questo simbolo indica che il dispositivo è...
  • Seite 244 Simboli delle etichette Simbolo Descrizione Classificazione di CSA per la sicurezza Solo per il mercato USA !USA Attenzione: la legge federale degli Stati Uniti limita la vendita di questo prodotto a personale medico o su ONLY presentazione di prescrizione medica Fare riferimento alle istruzioni per l‘uso (consultare i documenti di accom- pagnamento) Limiti di temperatura Limiti di umidità...
  • Seite 245 Afstandsbediening voor het Axonics SNM System® Gebruikershandleiding Model 2301 !USA Rx ONLY Modulation Technologies...
  • Seite 246 Axonics®, Axonics Modulation®, Axonics Modulation Technologies®, Axonics Sacral Neuromodulation System® and r-SNM® zijn handelsmerken van Axonics Modulation Technologies, Inc., gedeponeerd of in afwachting daarvan in de VS en andere landen. Let op: Het Axonics sacraal neuromodulatiesysteem mag uitsluitend worden gebruikt op voorschrift van een arts...
  • Seite 247 Inhoudsopgave Inleiding ......... . 245 Overzicht van de handleiding .
  • Seite 248 Specificaties ........282 Contactgegevens Axonics ......285...
  • Seite 249: Inleiding

    Inleiding De Axonics sacrale neuromodulatietherapie (SNM) dient om symptomen in verband met urinaire en fecale klachten te verlichten. Patiënten krijgen een afstandsbediening om de batterijstatus en de instellingen van hun Axonics SNM-systeem te kunnen controleren. In deze handleiding wordt het gebruik van de afstandsbediening beschreven. Axonics raadt aan deze handleiding te lezen, voordat u de afstandsbediening in gebruik neemt.
  • Seite 250: Overzicht Van De Handleiding

    Overzicht van de handleiding In deze handleiding worden de stappen beschreven voor een veilig gebruik van uw afstandsbediening. De handleiding omvat: Een beschrijving van de knoppen, controlelampjes en ■ functies van de afstandsbediening Stappen voor het gebruik van uw afstandsbediening ■ Het oplossen van problemen met de afstandsbediening ■ Aanvullende informatie over de afstandsbediening ■ NB De afstandsbediening kan zich tijdens de communicatie met de proefstimulator (Trial Stimulator, TS) anders gedragen dan met de permanente stimulator (PS).
  • Seite 251: Raadpleeg Uw Therapiegidsen

    Raadpleeg uw therapiegidsen Raadpleeg de volgende therapiegidsen die u van uw arts krijgt en die meer informatie over uw systeem bevatten: Gids voor het proefsysteem – voor meer informatie over de ■ proefstimulatieperiode Therapiegids voor de patiënt – voor meer informatie over ■ permanente SNM therapie...
  • Seite 252: Voorzorgsmaatregelen Voor Het Gebruik Van De

    Voorzorgsmaatregelen voor het gebruik van de afstandsbediening Als u andere actieve implantaten hebt (zoals een pacemaker), ■ kan de afstandsbediening problemen veroorzaken met dergelijke implantaten. Neem contact op met uw arts als u problemen of vragen hebt. Als u een of meer cochleaire implantaten hebt, moet het externe ■...
  • Seite 253: Advies Voor Gebruik En Onderhoud

    Advies voor gebruik en onderhoud DOEN Neem uw afstandsbediening altijd met u mee, zodat u de stimulatie kunt aanpassen of de batterijlading van uw stimulator kunt controleren. Als u uw afstandsbediening moet opbergen, bewaar deze dan op een koele, droge plaats en vermijd licht en directe warmte. Reinig uw afstandsbediening indien nodig met een zachte, vochtige doek. Breng uw afstandsbediening mee naar alle bezoeken aan uw zorgverlener.
  • Seite 254 Advies voor gebruik en onderhoud NIET DOEN Laat de afstandsbediening niet in vloeistof vallen en maak ✕ hem niet met agressieve reinigingsmiddelen schoon. Laat de afstandsbediening niet vallen en gebruik hem niet ✕ op een manier die schade veroorzaakt. Gebruik de afstandsbediening niet in de buurt van ✕ brandbare of explosieve gassen. Sta niet toe dat andere mensen uw afstandsbediening ✕ gebruiken.
  • Seite 255: Gebruik Van Uw Afstandsbediening

    Uw stimulatieniveau verhogen of verlagen ■ Uw stimulatie in- en uitschakelen ■ De oplaadstatus van uw stimulator controleren (alleen PS) ■ Uw stimulatieprogramma veranderen (alleen TS) ■ Foutmeldingen over de afstandsbediening of de stimulator ■ ontvangen NB U mag uw stimulatie niet regelmatig veranderen. Wijzigingen in de stimulatie-instellingen moeten indien nodig door uw arts worden uitgevoerd. Axonics raadt aan uw stimulatie alleen te veranderen als u ongemak ondervindt.
  • Seite 256: Overzicht Van De Knoppen En Lampjes

    Overzicht van de knoppen en lampjes Stimulatieniveau Actief programma Omhoog Verbinding maken Omlaag Systeemfout Batterijstatus stimulator...
  • Seite 257: Stimulator

    Overzicht van de knoppen en lampjes Stimulatieniveau Geeft de sterkte van de stimulatie aan. Omhoog Het stimulatieniveau verhogen of de stimulatie op het standaardniveau inschakelen. Verbinding maken Verbinding maken of verbreken tussen de afstandsbediening en de stimulator. Omlaag Het stimulatieniveau verlagen of de stimulatie uitschakelen.
  • Seite 258 Hoe uw afstandsbediening communiceert met uw stimulator De afstandsbediening ontvangt signalen van de stimulator en zendt signalen terug. Uw afstandsbediening moet zich in de buurt van de stimulator bevinden om signalen te kunnen verzenden en ontvangen. Alleen de afstandsbediening die u van uw arts hebt ontvangen, kan signalen naar en van uw stimulator sturen en ontvangen. Om uw afstandsbediening te gebruiken, houdt u deze vóór u. De afstandsbediening dient aan dezelfde zijde van het lichaam te worden gehouden als de stimulator.
  • Seite 259: Gebruiksscenario's

    Gebruiksscenario’s Op de volgende pagina’s wordt NB Als u problemen beschreven hoe u de afstandsbediening hebt met uw afstandsbediening, gebruikt voor de volgende functies: raadpleeg dan 1) Verbinding maken met uw het gedeelte over stimulator. het oplossen van problemen in 2) Status van de stimulator bekijken. deze handleiding. 3) Uw stimulatieniveau verlagen. Raadpleeg uw arts 4) Uw stimulatieniveau verhogen. voor meer hulp.
  • Seite 260: Verbinding Maken Met Uw Stimulator

    1) Verbinding maken met uw stimulator...
  • Seite 261 1) Verbinding maken met uw stimulator Houd de afstandsbediening aan dezelfde zijde van uw lichaam als de stimulator. Druk op de knop Verbinden op de afstandsbediening. De stimulatieniveaulampjes knipperen. Knipperende lampjes geven aan dat de afstandsbediening probeert verbinding te maken met de stimulator. Het kan maximaal 22 seconden duren voordat de afstandsbediening verbinding heeft met de stimulator.
  • Seite 262: Status Van De Stimulator Bekijken

    2) Status van de stimulator bekijken Stimulatieniveau Actief programma Batterijstatus van de stimulator...
  • Seite 263 2) Status van de stimulator bekijken Statuslampjes van de stimulatorbatterij Blijft groen branden: De batterij van de stimulator blijft nog 4 dagen of langer werken Knippert groen (alleen PS): De batterij van de stimulator wordt opgeladen Blijft oranje branden: De batterij van de stimulator blijft nog 2 tot 4 dagen werken Knipperend oranje: De batterij van de stimulator blijft nog 2 dagen of korter werken Lampjes voor het stimulatieniveau Geen stimulatie...
  • Seite 264 2) Status van de stimulator bekijken Actief programma Programma 1 is actief Programma 2 is actief (alleen TS)
  • Seite 266: Uw Stimulatieniveau Verlagen

    3) Uw stimulatieniveau verlagen...
  • Seite 267 3) Uw stimulatieniveau verlagen Als u ongemak voelt, kunt u de afstandsbediening gebruiken om de stimulatie te verlagen. De afstandsbediening moet verbinding hebben met de stimulator (zie Verbinding maken met uw stimulator). Druk één keer op de knop Omlaag. 2 A. Permanente stimulator: Kijk of het aantal lampjes voor het stimulatieniveau met één afneemt. De afstandsbediening trilt. Dit kan 3 seconden duren. Proefstimulator: De afstandsbediening trilt en de lampjes voor het stimulatieniveau knipperen. Na meerdere aanpassingen kan het stimulatieniveau veranderen. Dit kan 3 seconden duren.
  • Seite 268: Uw Stimulatieniveau Verhogen

    4) Uw stimulatieniveau verhogen...
  • Seite 269 4) Uw stimulatieniveau verhogen De afstandsbediening moet verbinding hebben met de stimulator (zie Verbinding maken met uw stimulator). Druk één keer op de knop Omhoog. 2 A. Permanente stimulator: Kijk of het aantal lampjes voor het stimulatieniveau met één toeneemt. De afstandsbediening trilt. Dit kan 3 seconden duren. Proefstimulator: De afstandsbediening trilt en de lampjes voor het stimulatieniveau knipperen. Na meerdere aanpassingen kan het aantal lampjes voor het stimulatieniveau veranderen. Dit kan 3 seconden duren. NB Het stimulatieniveau kan per keer maar met één niveau worden verhoogd. Het duurt maximaal 30 seconden voordat het stimulatieniveau volledig verhoogd is. Dit hangt af van de stimulatie- instellingen.
  • Seite 270: Uw Stimulatie Uitschakelen

    5) Uw stimulatie uitschakelen (INGEDRUKT HOUDEN)
  • Seite 271 5) Uw stimulatie uitschakelen Als u enorm ongemak ervaart, kunt u de afstandsbediening gebruiken om de stimulatie uit te schakelen. De afstandsbediening moet verbinding hebben met de stimulator (zie Verbinding maken met uw stimulator). Houd de knop Omlaag gedurende 5 seconden ingedrukt. Kijk of alle lampjes voor het stimulatieniveau uitgaan. De afstandsbediening trilt. Dit kan 3 seconden duren.
  • Seite 272: Uw Stimulatie Inschakelen

    6) Uw stimulatie inschakelen (INGEDRUKT HOUDEN)
  • Seite 273 6) Uw stimulatie inschakelen De afstandsbediening moet verbinding hebben met de stimulator (zie Verbinding maken met uw stimulator). Houd de knop Omhoog gedurende 5 seconden ingedrukt. Kijk of de lampjes voor het stimulatieniveau gaan branden. De afstandsbediening trilt. Dit kan 3 seconden duren. NB Het stimulatieniveau heeft het niveau waarop het was ingesteld voordat u de stimulator uitschakelde. NB Normaal gesproken hoeft u de stimulatie niet regelmatig in en uit te schakelen. Aanpassing van de stimulatie moet indien nodig door uw arts worden uitgevoerd.
  • Seite 274 7) Uw stimulatieprogramma veranderen Alleen proefstimulator...
  • Seite 275 7) Uw stimulatieprogramma veranderen Alleen proefstimulator Met de afstandsbediening kunt u het actieve (stimulatie)programma veranderen als uw arts 2 programma’s heeft ingesteld op uw externe proefstimulator. Verander uw programma alleen als u daartoe opdracht hebt gekregen van uw arts. De afstandsbediening moet verbinding hebben met de stimulator (zie Verbinding maken met uw stimulator).
  • Seite 276: Alleen Permanente Stimulator

    8) Oplaadstatus controleren Alleen permanente stimulator Het lampje voor de batterijstatus op de batterij knippert groen wanneer uw stimulator wordt opgeladen. Als het opladen is voltooid, of wanneer opladen om welke reden dan ook is gestopt, houdt het lampje voor de batterijstatus van de stimulator op met knipperen. Raadpleeg de handleiding voor het oplaadsysteem voor meer informatie over het opladen van uw stimulator.
  • Seite 277: Een Systeemfout Bekijken

    9) Een systeemfout bekijken Wanneer u verbinding probeert te maken met uw stimulator, controleert de afstandsbediening op eventuele fouten. Permanente stimulator: Bel uw arts als het rode foutlampje brandt. Proefstimulator: Het rode lampje kan betekenen dat uw stimulator is losgeraakt van de kabel. Controleer of de stimulator nog is aangesloten op de kabel die van uw rug komt. Als dit niet het geval is, sluit u de stimulator op de kabel aan.
  • Seite 278: Uw Afstandsbediening Uitschakelen

    10) Uw afstandsbediening uitschakelen...
  • Seite 279 10) Uw afstandsbediening uitschakelen De afstandsbediening moet verbinding hebben met de stimulator (zie Verbinding maken met uw stimulator). Houd de knop Verbinden ingedrukt. Kijk of alle lampjes op de afstandsbediening uitgaan. Dit betekent dat de afstandsbediening niet langer met de stimulator communiceert en uit staat. NB De afstandsbediening schakelt automatisch uit wanneer de gebruiker deze 12 seconden niet heeft gebruikt.
  • Seite 280: Problemen Oplossen

    Problemen oplossen Dit deel helpt u problemen met uw afstandsbediening oplossen. Neem contact op met uw arts als u hulp nodig hebt. Overzicht van problemen die in dit deel worden behandeld: De afstandsbediening communiceert niet met de stimulator. ■ Systeemfoutlampje brandt. ■ Kan stimulatieniveau niet veranderen. ■ Kan stimulatieprogramma niet veranderen. ■ Afstandsbediening is beschadigd. ■ Ongemak of pijn als gevolg van stimulatie. ■...
  • Seite 281 Scenario’s voor het oplossen van problemen Probleem Verschijnsel Oplossing Controlelampjes op de Houd de afstandsbediening afstandsbediening afstandsbediening dichter maakt geen gaan een voor een aan bij de stimulator en verbinding met de en uit en gaan dan uit. probeer opnieuw stimulator Lampje voor de verbinding te maken. batterijstatus brandt Alleen voor de PS: niet.
  • Seite 282 Scenario’s voor het oplossen van problemen Probleem Verschijnsel Oplossing Controlelampje Rode Verbreek de verbinding tussen de voor een controlelampje afstandsbediening en de stimulator. systeemfout knippert Druk op de knoppen Omhoog en brandt gedurende 12 Omlaag om te controleren of ze seconden en vastzitten. Maak opnieuw verbinding gaat dan uit. met de stimulator. Als u 2 programma’s hebt, probeert u over te schakelen naar het andere programma.
  • Seite 283 Scenario’s voor het oplossen van problemen Probleem Verschijnsel Oplossing Stimulatieniveau kan De afstandsbediening heeft Neem contact op niet worden gewijzigd verbinding met de stimulator, met uw arts maar de stimulatie kan niet worden verhoogd of verlaagd. De controlelampjes op de Maak opnieuw afstandsbediening gaan een verbinding en voor een aan en uit of branden probeer het niet.
  • Seite 284 Scenario’s voor het oplossen van problemen Probleem Verschijnsel Oplossing Afstandsbediening is De afstandsbediening Stop het gebruik van de beschadigd ziet er beschadigd afstandsbediening. Neem uit. contact op met uw arts om met deze over vervanging te praten. Ongemak of pijn Constante pijn of Verlaag het als gevolg van ongemak in de lies of stimulatieniveau. Als stimulatie...
  • Seite 285: Aanvullende Informatie

    Aanvullende informatie...
  • Seite 286: Vervangen En Afvoeren

    Vervangen en afvoeren Vervangen: Als de afstandsbediening zoekraakt of als de afstandsbediening niet werkt, vraagt u een nieuwe afstandsbediening aan uw arts. De batterij van de afstandsbediening heeft naar verwachting een levensduur van maximaal 5 jaar. Wanneer de batterij leeg is, hebt u een nieuwe afstandsbediening nodig. Afvoeren: Volg de regels van de plaatselijke overheid om de afstandsbediening af te voeren. Als u een werkend apparaat niet meer nodig hebt, geeft u het terug aan uw arts. Waarschuwing: Werp de afstandsbediening niet in vuur. De batterij kan exploderen...
  • Seite 287: Specificaties

    Specificaties Item Specificatie Bedrijfsomstandigheden Temperatuur 5 °C - 40 °C (41 °F - 104 °F) Druk 70 kPa - 106 kPa Vochtigheid 15% - 95% Condities voor opslag en verzending – Kortetermijn (3 dagen of minder) Temperatuur -25 °C - 70 °C (-13 °F - 158 °F) Druk 57 kPa - 106 kPa Vochtigheid 15% - 95% Condities voor opslag en verzending – Langetermijn (meer dan 3 dagen) Temperatuur 20 °C - 30 °C (68 °F - 86 °F) Druk 70 kPa - 106 kPa...
  • Seite 288 Gewicht 60 g Verwachte 5 jaar levensduur van de batterij* Communicatie Telemetrie via radiofrequentie Model: 2301 IC: 20225-P Kwaliteit van de draadloze service: Het apparaat werkt op een frequentie tussen 401-406 MHz en het maximale, effectieve stralingsvermogen ligt onder de EU gespecificeerde limiet van 25 uW ERP/EIRP: EN ETSI 301-839 en EN ETSI 302-537 en VS: FCC 47 CFR deel 95, subdeel I. Voor succesvolle communicatie moet de afstandsbediening zich binnen 1 meter van de stimulator bevinden.
  • Seite 289 (ESSS, Earth Exploration Satellite Services), en moet alle inkomende interferentie accepteren, inclusief storingen die een ongewenste werking kunnen veroorzaken. NB Veranderingen en aanpassingen aan de afstandsbediening die niet door Axonics zijn geautoriseerd, kunnen de FCC- en IC-certificering ongeldig maken en uw bevoegdheid om het product te gebruiken,...
  • Seite 290: Contactgegevens Axonics

    Contactgegevens Axonics Neem contact op met uw arts als u vragen hebt over uw gezondheid of de Axonics SNM-therapie. Axonics patiëntenondersteuning Axonics, dat is gevestigd in Irvine, CA (VS), kan uw vragen en kwesties m.b.t. uw Axonics SNM-therapie helpen beantwoorden. Houd er rekening mee dat Axonics geen uitspraken kan doen over uw medische situatie. Bel: +1-949-396-6320 ■ Uren: Ma-vr, 8.00 uur - 17.00 uur (Pacific Time) ■...
  • Seite 291: Etiketsymbolen

    Etiketsymbolen Symbool Beschrijving Afstandsbediening Gebruikershandleiding voor de afstandsbediening (dit document) Serienummer van product Fabrikant Modelnummer van product Productiedatum IEC 60601-1/EN60601-1, Type BF-apparaat Niet-ioniserende elektromagnetische straling Conformité Européenne (Europese conformiteit). 2018. Dit symbool betekent dat het apparaat volledig voldoet aan de AIMD-richtlijn 90/385/ EEG (geëvalueerd door aangemelde instantie) en RED 2014/53/EU (eigen verklaring) Certificaatnummer Industry Canada Geclassificeerd door CSA m.b.t.
  • Seite 292 Etiketsymbolen Symbool Beschrijving Uitsluitend voor de VS Let op: Krachtens de federale wetgeving (VS) mag dit hulpmiddel alleen door of in !USA Rx ONLY opdracht van een arts worden verkocht Raadpleeg de gebruiksaanwijzing (raadpleeg begeleidende documenten) Temperatuurbegrenzing Vochtigheidslimiet Druklimiet Niet gebruiken als de verpakking is beschadigd Erkende vertegenwoordiger in de Europese Gemeenschap Bescherming tegen de hoeveelheid stof die kan interfereren met de IP57 werking van het apparaat.
  • Seite 296 Modulation Technologies HealthLink Europe Services BV Axonics Modulation Technologies, Inc. De Tweeling 20-22 26 Technology Drive 5215 MC ’s - Hertogenbosch Irvine, CA 92618 (USA) The Netherlands www.axonicsmodulation.com Tel. +1-949-396-6320 Fax +1-949-396-6321 All Rights Reserved. Copyright 2018. Axonics Modulation Technologies, Inc. 110-0051 rE...

Inhaltsverzeichnis