Werbung
Verfügbare Sprachen
Verfügbare Sprachen
Quicklinks
Wire-Free Video Doorbell
Timbre con video sin cables
Sonnette vidéo sans fil
Campanello con video senza cavo
Kabelloses Video-Türklingel
SWIFI-DOORBELL
Quick Start Guide
EN
Guida rapida
IT
Guía de inicio rápido
ES
Schnellstartanleitung
DE
Guide de démarrage rapide
FR
EN
1
Werbung

Inhaltszusammenfassung für Swann SWIFI-DOORBELL
- Seite 1 Wire-Free Video Doorbell Timbre con video sin cables Sonnette vidéo sans fil Campanello con video senza cavo Kabelloses Video-Türklingel SWIFI-DOORBELL Quick Start Guide Guía de inicio rápido Guide de démarrage rapide Guida rapida Schnellstartanleitung...
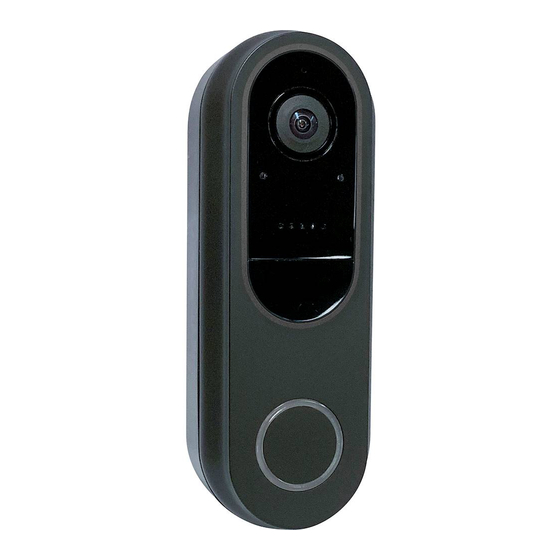
- Seite 2 VIDEO DOORBELL OVERVIEW Remember to remove the protective film from the front of the Video Doorbell before use. Microphone Night detection sensor LED indicator Speaker Infrared LEDs (for night vision) Passive infrared motion sensor Wire terminals (for optional external power supply (12-24VAC, 50/60Hz, 0.5A)) Light ring Doorbell...
- Seite 3 CHIME OVERVIEW Pair button Melody Select button Volume button Speaker Installing Batteries Remove the battery compartment cover using Battery compartment a small Phillips screwdriver and insert two new, high quality "AA" alkaline batteries, matching the polarity markings (+ and -) shown inside the battery compartment.
- Seite 4 CHARGE THE VIDEO DOORBELL Before using the Video Doorbell for the first time, charge it for at least two hours with the included USB charging cable. Open the rubber cover of the micro USB port at the back of the Video Doorbell. Insert the smaller end of the USB charging cable into the micro USB port on the Video Doorbell, and the larger end into a USB wall charger such as the USB power adapter that came with your phone.
- Seite 5 SET UP THE CHIME Pairing with the Video Doorbell Pair button on the Chime. The Chime beeps once to indicate that it is in Briefly press the pairing mode. Within 10 seconds, press the Doorbell button on front of the Video Doorbell. You’ll hear the Chime sound the ring melody, indicating pairing is complete.
- Seite 6 Apple App Store® or Google Play™ Store on your iOS or Android device. Simply search for "Swann Security". Open the app and create your Swann Security account. You will need to activate your account by confirming the email sent to the registered email account.
- Seite 7 SET UP THE VIDEO DOORBELL Launch the Swann Security app and sign in. Tap the Pair Device button on the screen (or open Menu and select Pair Device) and follow the in-app instructions to set up your new Video Doorbell. Before you begin, be close to your router or access point and have your Wi-Fi network information (including password) handy.
- Seite 8 MOUNT THE VIDEO DOORBELL The Video Doorbell can be mounted on the wall using the provided bracket as shown below. Before mounting the Video Doorbell, you should ensure the desired installation location has good, reliable Wi-Fi reception. Using the app, try streaming live video from the Video Doorbell there. If you don’t experience any video streaming issues (buffering, etc), you’ve found a good place for your device.
- Seite 9 TIPS Answering a call When someone presses the Video Doorbell, the Chime will sound and you’ll get a Swann Security notification on your phone. Simply open the notification to see who’s at the door and start talking. LED indicator guide The LED light on the front of your Video Doorbell helps inform you of what is happening with the device.
- Seite 10 DESCRIPCIÓN DEL TIMBRE CON VIDEO Recuerde retirar la película de protección de frente de la cámara antes de usar. Micrófono Sensor de detección Indicador LED nocturna Altavoz LED infrarrojos (para visión nocturna) Sensor infrarrojo pasivo de movimiento Terminales de cables (para la fuente de alimentación externa (12-24VAC, 50/60Hz,...
-
Seite 11: Descripción De La Campana
DESCRIPCIÓN DE LA CAMPANA Botón Vincular Botón de selección de melodía Botón de volumen Altavoz Instalación de las baterías Retire la cubierta del compartimiento de ba- Compartimiento baterías terías con un pequeño destornillador Phillips e inserte dos baterías alcalinas nuevas "AA" de alta calidad, observando las marcas de polaridad (+ y -) que figuran en el interior del compartimiento de baterías. - Seite 12 CARGUE EL TIMBRE CON VIDEO Antes de usar el timbre con video por primera vez, cárguelo por al menos dos horas con el cable de carga USB incluido. Abra la cubierta de goma del puerto micro USB en la parte posterior del timbre con video. Inserte el extremo más pequeño del cable de carga USB en el puerto micro USB del timbre con video, y el extremo más grande en un cargador de pared USB como el adaptador de corriente USB que vino con su teléfono.
- Seite 13 CONFIGURE LA CAMPANA Vinculación con el timbre con video Presione brevemente el botón Pair (Vincular) en la campana. La campana suena una vez para indicar que está en modo de vinculación. Dentro de 10 segundos, presione el botón del timbre en el frente del timbre con video. Escuchará que la campana emite una melodía, para indicar que se ha completado la vinculación.
- Seite 14 Play™ Store en su dispositivo con iOS o Android. Simplemente busque "Swann Security". Abra la aplicación e cree su cuenta de Swann Security. Deberá activar su cuenta confirmando el correo electrónico enviado a la cuenta de correo electrónico registrada antes de poder iniciar...
- Seite 15 CONFIGURE EL TIMBRE CON VIDEO Abra la aplicación Swann Security e inicie sesión. Toque el botón Vincular dispositivo en la pantalla (o abra el Menú y seleccione Vincular dispositivo) y siga las instrucciones en la aplicación para configurar su nuevo timbre con video. Antes de comenzar, manténgase cerca de su enrutador o punto de acceso y conserve la información de su red Wi-Fi (incluida la contraseña) a mano.
- Seite 16 MONTE EL TIMBRE CON VIDEO El timbre con video se puede montar en la pared usando el soporte provisto como se muestra a continuación. Antes de montar el timbre con video, debe asegurarse de que la ubicación deseada de instalación tenga una recepción buena y confiable de Wi-Fi.
- Seite 17 Cómo responder una llamada Cuando una persona presiona el timbre con video, la campana sonará y recibirá una notificación de Swann Security en su teléfono. Simplemente abra la notificación para ver quién está en la puerta y comenzar a hablar.
- Seite 18 VUE D'ENSEMBLE DE LA SONNETTE VIDÉO N'oubliez pas de retirer le film protecteur de l'avant de l'appareil avant de l'utiliser. Microphone Capteur de détection Indicateur LED de nuit Haut-parleur LED infrarouges (pour la vision nocturne) Capteur de mouvement infrarouge passif Bornes filaires (pour alimentation externe (12-24VAC, 50/60Hz,...
- Seite 19 PRÉSENTATION DU CARILLON Bouton Lier Bouton Choix de mélodie Bouton Volume Haut- parleur Installation des piles Retirez le couvercle du compartiment des Compartiment à piles piles à l’aide d’un petit tournevis cruciforme et insérez deux nouvelles piles alcalines "AA" de haute qualité, en respectant les indications de polarité...
- Seite 20 CHARGEMENT DE LA SONNETTE VIDÉO Avant d’utiliser la sonnette vidéo pour la première fois, chargez-la pendant au moins deux heures à l’aide du câble de chargement USB fourni. Ouvrez le cache en caoutchouc du port micro USB situé à l’arrière de la sonnette vidéo. Insérez la plus petite extrémité...
- Seite 21 INSTALLATION DU CARILLON Liaison avec la sonnette vidéo Lier situé sur le carillon. Le carillon émet un bip sonore Appuyez brièvement sur le bouton pour indiquer qu'il est en mode de liaison. Dans les 10 secondes qui suivent, appuyez sur le bouton Sonnette situé à l'avant de la sonnette vidéo Vous entendrez le carillon sonner sur la mélodie choisie, indiquant que la liaison est terminée.
- Seite 22 Téléchargez la dernière version de Swann Security depuis l'Apple App Store® ou le Google Play™ Store sur votre appareil iOS ou Android. Il suffit de rechercher " Swann Security ". Ouvrez l'application et créez votre compte Swann Security. Vous devrez activer votre compte en...
- Seite 23 CONFIGURER LA SONNETTE VIDÉO Lancez l’application Swann Security et connectez-vous. Appuyez sur le bouton Associer appareil à l’écran (ou ouvrez le Menu et sélectionnez Associer appareil) et suivez les instructions fournies avec l'application pour configurer votre nouvelle sonnette vidéo. Avant de commencer, approchez-vous de votre routeur ou de votre point d'accès et notez les informations de votre réseau Wi-Fi (y compris votre...
- Seite 24 INSTALLATION DE LA SONNETTE VIDÉO La sonnette vidéo peut être fixée au mur à l’aide du support fourni, comme indiqué ci-dessous. Avant de monter la sonnette vidéo, vous devez vous assurer que la réception Wi-Fi est correcte et fiable à l'emplacement d'installation souhaité. À l'aide de l'application, essayez de regarder en streaming des vidéos en direct depuis la sonnette vidéo.
- Seite 25 ASTUCES Répondre à un appel Lorsque quelqu'un sonne, le carillon retentit et vous recevez une notification Swann Security sur votre téléphone. Ouvrez simplement la notification pour voir qui est à la porte et commencez à parler. Guide de l'indicateur LED Le voyant LED situé...
- Seite 26 PANORAMICA DEL CAMPANELLO VIDEO Ricordarsi di rimuovere la pellicola protettiva dal lato anteriore della telecamera prima dell’uso. Microfono Sensore di rilevamento Indicatore a LED del notturno Altoparlante LED a infrarossi (per visione notturna) Sensore di rilevamento del movimento a raggi infrarossi passivo Terminali cablati (per alimentazione...
- Seite 27 PANORAMICA DEL SUONERIA Pulsante di abbinamento Pulsante Selezione melodia Pulsante Volume Altoparlante Installazione delle batterie Togliere il coperchio del vano batteria usando Vano batteria un piccolo giravite Philips e inserire due batterie alcaline “AA” di alta qualità e nuove, rispettando i segni corretti della polarità (+ e -) indicati all’interno del vano batteria.
- Seite 28 CARICARE IL CAMPANELLO CON VIDEO Prima di utilizzare il campanello con video per la prima volta, caricarlo per almeno due ore con il caricatore USB in dotazione. Aprire il coperchio in gomma della porta micro USB sul lato posteriore del campanello con video. Inserire l'estremità...
- Seite 29 CONFIGURAZIONE DELLA SUONERIA Abbinamento con il campanello con video Abbinamento sulla Suoneria. La Suoneria emette un bip per Premere brevemente il pulsante indicare che è in modalità di abbinamento. Entro 10 secondi premere il pulsante Campanello presente sul lato anteriore del Campanello con video.
- Seite 30 Scaricare la versione più recente dell’app Swann Security dal’Apple App Store® o da Google Play™ Store sul dispositivo iOS o Android. Basta cercare "Swann Security". Aprire l'app ed creare l'account Swann Security. Prima di poter accedere bisogna attivare l'account confermando l'email inviata all'account email fornito.
- Seite 31 CONFIGURAZIONE DEL CAMPANELLO CON VIDEO Aprire l’app Swann Security e eseguite l’accesso. Toccate il tasto Abbina dispositivo sullo schermo (o aprire Menu e selezionare Abbina dispositivo) e seguire le istruzioni dell’app per configurare il nuovo Campanello con video. Prima di iniziare avvicinarsi al router o punto di accesso e tenere a portata di mano le informazioni della rete Wi-Fi (inclusa la password).
- Seite 32 MONTAGGIO DEL CAMPANELLO CON VIDEO Il campanello con video può essere montato a parete usando la staffa in dotazione come mostrato. Prima di montare il campanello con video verificare che a posizione di installazione scelta abbia una ricezione Wi-Fi buona ed affidabile. Usando l’app, provare a mostrare video dal vivo dal campanello con video.
- Seite 33 SUGGERIMENTI Rispondere ad una chiamata Quando qualcuno preme il campanello con video, la suoneria suonerà e si riceverà una notifica Swann Security sul telefono. Aprire semplicemente la notifica per vedere chi è alla porta e iniziare a parlare. Guida dell'indicatore LED La luce LED sul lato anteriore del campanello con video informa su cosa accade con il dispositivo.
- Seite 34 VIDEO-TÜRKLINGEL IM ÜBERBLICK Entfernen Sie bitte vor Gebrauch die Schutzfolie auf der Vorderseite der Kamera. Mikrofon Nacht-Bewegungssensor LED-Anzeige Lautsprecher Infrarot-LEDs (für Nachtsicht) Passiv-Infrarot Bewegungssensor Kabelklemmen (für optimale, externe Stromversorgung (12- 24VAC, 50/60Hz, 0.5A)) Leises Klingeln Klingel-knopf Reset-Taste OPEN Schaltfläche Reset „Koppeln“...
- Seite 35 ÜBERSICHT DER KLINGELTÖNE Schaltfläche „Koppeln“ Melodieauswahltaste Lautstärkeregler Lautsprecher Batterien einlegen Entfernen Sie den Deckel zum Batteriefach Batteriefach mit Hilfe eines kleinen Kreuzschlitzschrau- bendrehers und legen zwei neue, hochwertige „AA“ Alkalibatterien ein, wobei Sie die Aus- richtung (+ und -) im Fach beachten. Bringen Sie die Abdeckung wieder an.
- Seite 36 VIDEO-TÜRKLINGEL LADEN Die Video-Türklingel muss vor der ersten Verwendung mindestens 2 Stunden mit dem mitgelieferten USB-Ladekabel geladen werden. Öffnen Sie den Gummideckel des USB-Anschlusses auf der Rückseite der Video-Türklingel. Schließen Sie das kleinere Ende des USB-Ladekabels in den Mikro-USB-Anschluss der Video- Türklingel und das größere Ende in ein USB-Wandladegerät, z.B.
-
Seite 37: Klingelton Einstellen
KLINGELTON EINSTELLEN Koppeln mit der Video-Türklingel Koppeln auf der Klingel. Die Klingel gibt zwei Töne ab, wenn Drücken Sie kurz auf die Taste sie sich in Kopplungsmodus befindet. Drücken Sie innerhalb von 10 Sekunden den Klingelknopf vorn an der Video-Türklingel. Sie hören den Klingelton, was die vollständige Kopplung anzeigt. - Seite 38 Google Play™ Store auf dem iOS- oder Android-Gerät. Suchen Sie einfach nach „Swann Security“. Öffnen Sie die App und erstellen ein Swann Security Konto. Sie müssen vor der Anmeldung Ihr Konto aktivieren, indem Sie die E-Mail bestätigen, die an die registrierte E-Mail gesendet wurde.
- Seite 39 EINRICHTEN DER VIDEO-TÜRKLINGEL Starten Sie die Swann Security App und melden sichan. Tippen Sie auf die Schaltfläche Gerät verknüpfen auf dem Bildschirm (oder öffnen Sie das Menü und wählen Gerät verknüpfen) und befolgen die Anweisungen zum Einrichten der neuen Video-Türklingel. Bevor Sie beginnen sollten Sie dicht an Ihrem Router oder Access Point stehen und die WLAN-Daten zur Hand haben (einschließlich dem Passwort).
- Seite 40 VIDEO-TÜRKLINGEL MONTIEREN Die Video-Türklingel kann mit Hilfe der mitgelieferten Halterung an der Wand angebracht werden. Bevor Sie die Video-Türklingel montieren, sollten Sie sicherstellen, dass die ausgewählte Stelle guten, zuverlässigen WLAN-Empfang hat. Versuchen Sie von dieser Stelel aus mit Hilfe der App, Live-Video von der Video-Türklingel zu streamen.
- Seite 41 TIPPS Anruf beantworten Wenn jemand die Video-Türklingel drückt, ertönt der Klingelton und Sie erhalen eine Swann Security Benachrichtigung auf Ihrem Handy. Öffnen Sie einfach die Benachrichtigung, um zu sehen, wer an der Tür ist, und beginnen, zu sprechen. LED-Anzeigenleitfaden Die LED-Anzeige vorn an der Video-Türklingel informiert Sie über den Zustand des Geräts.
- Seite 42 NOTES...
- Seite 43 NOTES...
- Seite 44 (1) this device may not cause interference, and (2) this device must accept any Siehe www.swann.com/uk/compliance. Das Produkt in der EU nicht im Hausmüll entsorgt werden darf. Um interference, including interference that may cause undesired operation of the device.