
Inhaltszusammenfassung für Harrier G2000
- Seite 1 LADDER RACK Use and maintenance PORTASCALA Uso e manutenzione L’utilisation et l’entretien PORTE-ECHELLE Uso y mantenimiento PORTAESCALERA Benutzung – und Wartung LEITERTRÄGER PORTA-ESCADAS Uso e manutenção Issued on 01/12/2018...
- Seite 3 G2000 HARRIER USER MANUAL G2000 HARRIER USER MANUAL Ladder retainer assembled (see the specific assembly Ladder retainer assembled (see the specific assembly instruction) Ladder retainer assembled (see the specific assembly instruction) instruction) Retaining loop assembled (see the specific assembly instructions) Arceaux pour blocage échelle assemblés (voir...
- Seite 4 Arco trava-escada montado Дугообразный кронштейн установлен Дугообразный кронштейн установлен Adjustable side holders assembled (see the specific assembly instruction) Adjustable side holders assembled (see the specific Cross member assembled (see the specific assembly assembly instruction) instructions) Supports réglables pour échelle (voir instructions d’assemblage dédiées) (x2) Soportes de escalera ajustables (consulte las...
- Seite 5 Die Dachtraversen auf dem Fahrzeugdach nach der vehículo haciendo referencia a las instrucciones de spezifischen Montageanleitung und dem instructions de montage spécifiques et le mode d’emploi G2000 HARRIER USER MANUAL Fahrzeughersteller Handbuch installieren. montaje específicas y al manual del fabricante del du fabricant du véhicule.
- Seite 6 Insert 6 bolts (M8x16) to underside of each individual side rail. Insert 6 bolts (M8x16) to underside of each individual Insert 6 bolts (M8x16) to the underside of each side rail. Insérer 6 vis (M8x16) dans la partie inférieure de chaque individual side rail longeron latéral.
- Seite 7 Fixer le porte-échelle aux barres de toit à l’aide des étriers fournis. NE PAS SERRER A FOND (voir 10 et 11). Fijen el portaescalera a las barras utilizando los soportes suministrados. NO APRIETEN COMPLETAMENTE Attach ladder rack to roof bars using brackets (véanse las imágenes 10 y 11).
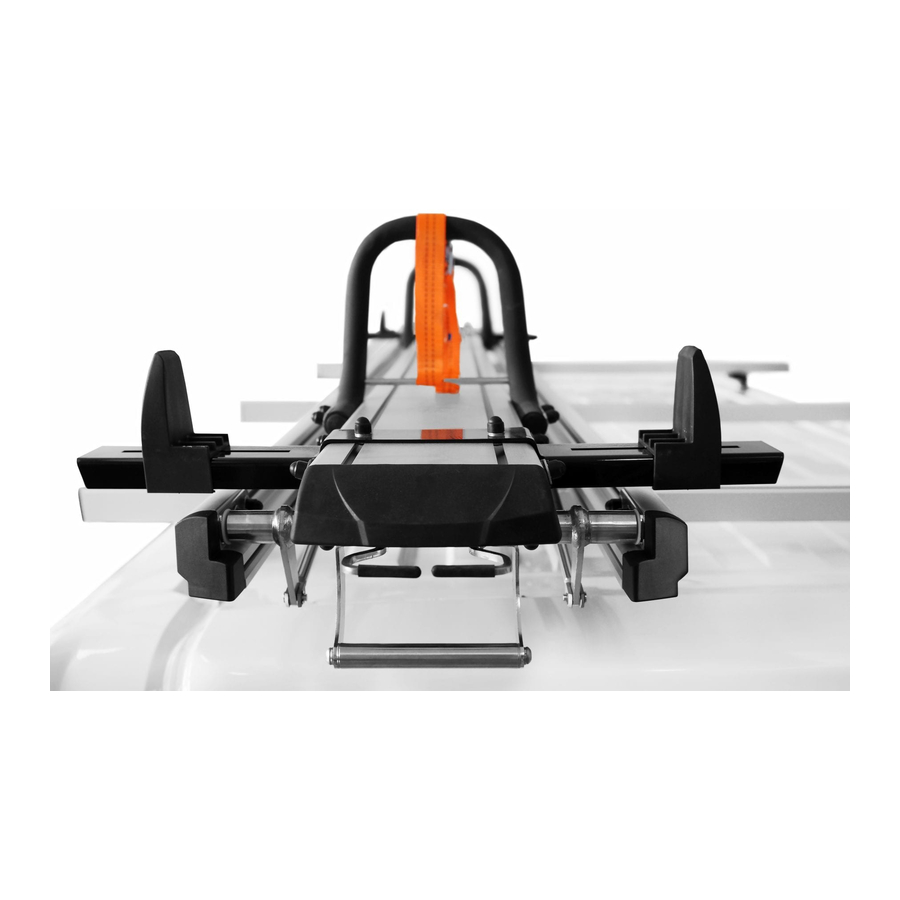
- Seite 8 Ladder rack is now secured to roof bars. Ladder rack is now secured to roof bars. Ainsi le porte-échelle est fixé aux barres de toit. Ladder rack is now secured to roof bars. Ladder rack is now secured to roof bars Ahora, el portaescalera está...
- Seite 9 With handle still on securing catches, pull system backwards, slightly, until the catches are beyond the With handle still on securing catches, pull system retaining point and release hook. backwards, slightly, until the catches are beyond the retaining point and release hook. Avec la perche à...
- Seite 10 To deploy the system down, pull it downwards (still using the main rear bar) until appropriate height, To deploy the system down, pull it downwards (still using To deploy the system down, pull it downwards (still using where the hydraulics will allow system to fully descend the main rear bar) until appropriate height, where the the main rear bar) until appropriate height, where the hydraulics will allow system to fully descend.
- Seite 11 How to correctly secure the ladder on retainer (A) Echelle fixée correctement sur l’arceau avant (A) How to correctly secure the ladder on retainer (B) Echelle fixée correctement sur l’arceau arrière (B Echelle fixée correctement sur l’arceau avant (A) Fiijación correcta de la escalera en el arco delan How to correctly secure the ladder on retainer (A) Echelle fixée correctement sur l’arceau arrière (B) How to correctly secure the ladder on retainer (A)
- Seite 12 Do not climb onto the ladder rack Ne pas monter sur l’échelle Do not climb onto the ladder rack No suban por la escalera Ne pas monter sur l’échelle Nicht auf die Leiter steigen No suban por la escalera Nicht auf die Leiter steigen Klim niet op de trap Non salire sulla scala Non salire sulla scala...
- Seite 13 Manutenzione / Maintenance Lubrication of the safety catch mechanism once a year or when needed Lubrication of the safety catch mechanism once a year or when needed (WD40 lubricant or similar) Graisser le mécanisme de fermeture une fois par an ou plus si nécessaire (WD40 lubrifiant ou similaire) Lubrication of the safety catch mechanism once a year or when needed...
- Seite 14 Lubrication of the lateral gas struts and central damper once a year Lubrication of the lateral gas struts and central damper once a year Lubrication of the lateral gas struts and central damper once a year (WD40 lubricant or similar) Graisser les vérins à...
- Seite 15 Check that the side holders bearer arms are properly secured in place once a year (M8 screw tightened at 16 Check that the cross members are properly secured in Check that the side holders bearer arms are properly place once a year (M8 screw tightened at 16 Nm) secured in place once a year (M8 screw tightened at 16 Vérifier le serrage des supports pour échelle une fois par an...
- Seite 16 Check the integrity of the ladder retainers once a year Check the integrity of the retaining loops once a year Check the integrity of the ladder retainers once a year Vérifier l’intégrité des arceaux pour blocage échelle une fois par an Comprobar el ajuste de los arcos de detencion escaleras una vez al año 1-mal jährlich die Integrität der Leiter Rückhaltebügel...
- Seite 17 Replace the strap with a new one once a year or when needed. Replace the strap with a new one once a year or when Replace the strap with a new one once a year or when needed. needed. Remplacer la sangle une fois par an ou plus si nécessaire Reemplace la correa de sujeción una vez al año o cuando sea necesario...
- Seite 18 Maintenance schedule When needed Every year Lubrication of the safety catch mechanism Lubrication of the central mechanism wheels Lubrication of the running track front wheels Lubrication of the lateral gas struts and central damper Check the integrity of the end stops Check that the end stops are properly secured Check that the cross members are properly secured Check that the pull down handle assembly is properly secured...
- Seite 19 Quando Periodicidad de las intervenciones Cada año necesario Lubricación del mecanismo de cierre Lubricación del conjunto movimiento de ruedas Lubricación de las ruedas deslizantes delanteras Lubricación de las muelles de gas y amortiguador Verificación de la integridad de los terminales de contención lateral Verificación del apriete de los terminales de contención laterales.
- Seite 20 Periodicità degli interventi quando occorre ogni anno Lubrificazione del meccanismo di chiusura Lubrificazione ruote gruppo di movimento Lubrificazione delle ruote di scorrimento anteriori Lubrificazione molle a gas ed ammortizzatore Verifica dell’integrità dei terminali di contenimento laterale Verifica del serraggio dei terminali di contenimento laterale Verifica del serraggio dei supporti scala Verifica del serraggio della maniglia posteriore Verifica dell’integrità...
- Seite 21 - Thoroughly clean vehicle roof mounting fixings and follow the assembly instructions contained in the manual. - When the G2000 Harrier is assembled on the vehicle, the overall weight and height of the vehicle are increased. Take it into consideration when going under a low underpass or entering a garage, etc.
-
Seite 22: Available Versions
Available versions: G2000 HARRIER (slide only) G2000 HARRIER - SINGLE (slide and cross-bars) G2000 HARRIER - DOUBLE (2 slides and cross-bars) G2000 HARRIER WITH RETAINER AND ROLLER Technical specifications: G2000 HARRIER TYPE 1 LENGTH 2500 MM (98.42 IN) WEIGHT KG 39 (79 LB) G2000 HARRIER TYPE 2 LENGTH 2850 MM (112.20 IN) - Seite 23 DU VEHICULE 1) Garantie Le porte-échelle G2000 Harrier est livré avec une garantie de 3 ans à compter de la date de livraison. Pendant la durée de la garantie, Gentili Technology Equipment s’engage à remplacer gratuitement, auprès de son siège ou d’un centre agréé, les parties ayant des défauts de fabrication. Tout défaut sera évalué...
-
Seite 24: Versions Disponibles
- Ne pas utiliser les produits Gentili pour toute utilisation autre que celle indiquée dans le mode d’emploi. Versions disponibles: G2000 HARRIER (rail uniquement) G2000 HARRIER INDIVIDUEL (rail et traverses) G2000 HARRIER DOUBLE (2 rails et traverses) G2000 HARRIER AVEC KIT RIDELLE ET ROULEAU Spécifications techniques: G2000 HARRIER TYPE 1... -
Seite 25: Instalación
- Tenga en cuenta que, después de la instalación de un portaescalera G2000 Harrier, el peso total y la altura del vehículo aumentan. Este factor debe tenerse en cuenta en relación al pasaje por debajo de puentes bajos, garajes, etc. -
Seite 26: Versiones Disponibles
- Los productos Gentili no deben ser utilizados para fines diferentes a los mencionados. Versiones disponibles: G2000 HARRIER (sólo patín) G2000 HARRIER INDIVIDUAL (patín + travesaños) G2000 HARRIER DOBLE (2 patines + travesaños) G2000 HARRIER CON KIT BORDE Y RODILLO Especificaciones técnicas: G2000 HARRIER TYPE 1... - Seite 27 FAHRZEUGS AUF 1) Garantie Für den Leiterträger G2000 Harrier wird eine 3 jährige Garantie ab Lieferdatum gewährleistet. Innerhalb der Garantiedauer verpflichtet sich die Firma Gentili Technology Equipment im eignen Firmensitz oder in einer autorisierten Werkstatt, kostenlos jene Teile zu ersetzen die Herstellungsfehler aufweisen. Die Mängelbewertung erfolgt durch die Firma Gentili Technology Equipment oder durch autorisiertes,...
-
Seite 28: Verfügbare Modelle
Montageanleitungen des Handbuchs befolgen. - Bitte beachten Sie dass nach der Montage eines Leiterträgers G2000 Harrier, das Gesamtgewicht und die Höhe des Fahrzeugs zunehmen. Bitte denken Sie daran, vor allem was die Höhe angeht, wenn niedrige Brücken befahren werden oder wenn Sie in eine Garage usw. fahren. -
Seite 29: Installazione
VEICOLO 1) Garanzia Sul portascala G2000 Harrier viene rilasciata garanzia di 3 anni a partire dalla data di consegna. Entro il periodo di garanzia la Gentili Technology Equipment si impegna a sostituire gratuitamente, presso la propria sede o altro centro autorizzato, parti di ricambio che evidenziano difetti di fabbricazione. -
Seite 30: Versioni Disponibili
- I prodotti Gentili non devono essere utilizzati per usi diversi da quelli indicati. Versioni Disponibili: G2000 HARRIER (solo slitta) G2000 HARRIER SINGOLO (slitta più traverse) G2000 HARRIER DOPPIO (2 slitte più traverse) G2000 HARRIER CON KIT SPONDINA E RULLO Specifiche tecniche: G2000 HARRIER TYPE 1... - Seite 31 GUARDE ESTE MANUAL NO INTERIOR DO SEU VEÍCULO 1) Garantia Para o porta-escada G2000 Harrier é passada uma garantia de 3 anos, a contar a partir da data da entrega. Até ao final do período de validade da garantia, a Gentili Technology Equipment encarrega- se de substituir gratuitamente, junto da própria sede ou em outro centro autorizado, as peças...
-
Seite 32: Caraterísticas Técnicas
Versões Disponíveis: G2000 HARRIER (apenas rack de escada) G2000 HARRIER INDIVIDUAL (carrilamento com travessas) G2000 HARRIER DUPLO (2 carrilamentos com travessas) G2000 HARRIER COM KIT RACK DE TEJADILHO E ROLLER Caraterísticas técnicas: G2000 HARRIER TYPE 1 COMPRIMENTO 2500 MM PESO KG 39... - Seite 33 G2000 HARRIER has been tested by the company prior to commissioning and fully complies with Directive 2006/42/EC. The person authorised to compile the technical file is the Technical Manager of the company Gentili Tecnology Equipment di Gentili Aldo e Ernesto S.a.s.
- Seite 34 Note...
- Seite 35 Note...
- Seite 36 Gentili Technology Equipment Via Balitrona, 12 47042 Cesenatico (FC) ITALY T. +39 0547 311206 F. +39 0547 311636 gentili@flligentili.com www.flligentili.com www.flligentili.com...