Herunterladen Diese Seite drucken

Werbung

Verfügbare Sprachen
  • DE

Verfügbare Sprachen

  • DEUTSCH, seite 18
MINI CUNA "NOON"
MINI COT "NOON"
MINI-BERCEAU « NOON »
MINI-WIEGE "NOON"
MINI CULLA "NOON"
MINI BERÇO "NOON"

Werbung

loading

Inhaltszusammenfassung für JANE NOON

  • Seite 1 MINI CUNA “NOON” MINI COT “NOON” MINI-BERCEAU « NOON » MINI-WIEGE “NOON” MINI CULLA “NOON” MINI BERÇO “NOON”...
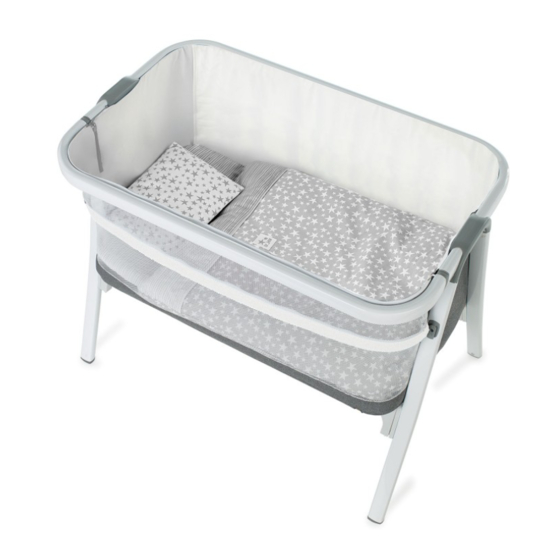
  • Seite 2 COMPONENTES PARTS A Conjunto estructura y vestimenta textil A Set of structure and fabric cover B Soporte vertical B Support vertical C Barra inferior extraíble C Detachable lower bar D Colchón D Mattress COMPOSANTS TEILE A Ensemble structure et revêtement textile A Ensemble aus Rahmen und Textilverkleidung B Support vertical B Beine vertikal...
  • Seite 3: Mantenimiento Y Limpieza

    MINI CUNA “NOON” IMPORTANTE. CONSERVAR PARA FUTURAS CONSULTAS. LEER ATENTAMENTE ADVERTENCIAS -ADVERTENCIA: N o utilizar el producto sin haber leído las instrucciones. -ADVERTENCIA: Cuando un niño pueda sentarse, arrodillarse o levantarse solo, la cuna no deberá utilizarse más por ese niño.
  • Seite 4: Instrucciones De Uso

    INSTRUCCIONES DE USO MONTAJE DE LA MINI CUNA Retirar el colchón, el edredón y la almohada y colocar la cuna bocabajo sobre una mesa o superficie plana y limpia. Insertar las 4 patas en los soportes de plástico encajando el orificio lateral de la pata con la pestaña del soporte de plástico (imagen 2).
  • Seite 5 A continuación colocar los travesaños horizontales insertando simultáneamente sus 2 anclajes laterales hacia arriba por las guias hasta encajarlos completamente. Insertarlos desde abajo hacia arriba hasta oír los 2 “clicks” de seguridad. Repetir el mismo proceso con el segundo travesaño. “CLICK”...
  • Seite 6 Ocultar toda la malla sobrante a lo largo de toda la barrera debajo de la cremallera. Cerrar totalmente la cremallera horizontal para terminar el proceso de descenso de la barrera. CLOSE POSICIÓN 2 (BARANDA BLOQUEADA EN LA POSICIÓN BAJA ADVERTENCIAS: Únicamente utilizar esta posi- ción con la supervisión permanente de un adulto y hasta los 4 meses.
  • Seite 7 Introducir la barrera en los dos anclajes superiores, de arriba abajo hasta oír oír los “click” de seguridad. “CLICK” “CLICK” “CLICK” Y finalmente, cerrar las 2 cremalleras verticales para terminar. CLOSE CLOSE...
  • Seite 8 “NOON” MINI COT IMPORTANT. KEEP FOR FUTURE REFERENCE. READ CAREFULLY WARNINGS -WARNING: D o not use this product without reading the instructions first. -WARNING: The cot should no longer be used when the child can sit up, kneel up or stand up unaided.
  • Seite 9 INSTRUCTIONS FOR USE ASSEMBLING THE MINI COT Remove the mattress, the duvet and the pillow and place the cot face down on a table or a clean, flat surface. Insert the 4 legs into the plastic supports aligning the side orifice on the leg with the plastic support flange (diagram 2).
  • Seite 10 Next, fit the crosspieces by simultaneously inserting the 2 side connectors upwards into the guides until they are slotted in fully. Insert them from the bottom to the top until they have both clicked into place. Repeat the same process with the second crosspiece. “CLICK”...
  • Seite 11 Conceal all the surplus netting along the rail under the zip. Fully close the horizontal zip to finish the rail lowering process. CLOSE POSITION 2 (RAIL LOCKED IN THE LOWER POSITION) WARNINGS: Only use this position when an adult is permanently supervising the child and only up to the age of 4 months.
  • Seite 12 Insert the rail into the 2 upper anchor points, from top to bottom, until you hear the safety clicks. “CLICK” “CLICK” “CLICK” Lastly, close the 2 vertical zips to finish the process. CLOSE CLOSE...
  • Seite 13 MINI-BERCEAU « NOON » IMPORTANT. CONSERVER POUR DE FUTURES CONSULTATIONS. LIRE ATTENTIVEMENT MISES EN GARDE -MISE EN GARDE : N’ utilisez pas le mini-berceau sans avoir lu le mode d’emploi. -MISE EN GARDE : N’utilisez plus le mini-berceau dès que votre enfant sera capable de s’asseoir, de s’agenouiller ou de se lever tout seul.
  • Seite 14 MODE D’EMPLOI MONTAGE DU MINI-BERCEAU Retirez le matelas, la couette et l’oreiller et retournez le mini-berceau sur une table ou une surface plate et propre. Introduisez les 4 pieds dans les supports en plastique en emboîtant l’orifice latéral du pied dans l’onglet du sup- port en plastique (image 2).
  • Seite 15 Posez ensuite les traverses horizontales en introduisant simultanément leurs 2 ancrages latéraux vers le haut dans les guides pour les emboîter complètement. Introduisez-les du bas vers le haut jusqu’à ce que vous entendiez les 2 clics de verrouillage. Recommencez l’opération avec la deuxième traverse. “CLICK”...
  • Seite 16 Rangez la partie du filet qui dépasse tout le long de la barrière de sécurité sous la fermeture éclair. Fermez com- plètement la fermeture éclair horizontale pour finir l’opération de réglage de la hauteur de la barrière de sécurité. CLOSE POSITION 2 (BARRIÈRE BLOQUÉE SUR LA POSITION LA PLUS BASSE) AVERTISSEMENTS :...
  • Seite 17 ntroduisez la barrière dans les deux ancrages supérieurs du haut vers le bas jusqu’à ce que vous entendiez les clics de verrouillage. “CLICK” “CLICK” “CLICK” Enfin, fermez les 2 fermetures éclair verticales pour finir l’opération de réglage de la hauteur de la barrière de sécurité.
  • Seite 18 MINI-WIEGE “NOON“ WICHTIG. FÜR ZUKÜNFTIGE NACHFRAGEN AUFBEWAHREN. SORGFÄLTIG DURCHLESEN HINWEISE -HINWEIS: V erwenden Sie das Produkt nicht, ohne die Anweisungen gelesen zu haben. -HINWEIS: Wenn ein Kind alleine sitzen, knien oder aufstehen kann, sollte die Wiege von diesem Kind nicht mehr benutzt werden.
  • Seite 19: Montage Der Miniwiege

    BEDIENUNGSANLEITUNG MONTAGE DER MINIWIEGE Entfernen Sie die Matratze, die Bettdecke und das Kissen und legen Sie die Wiege kopfüber auf einen Tisch oder eine flache und saubere Oberfläche. Setzen Sie die 4 Beine in die Kunststoffhalter ein, indem Sie die seitliche Öffnung des Beins in der Lasche des Kunststoffhalters einrasten (Abbildung 2).
  • Seite 20 Bringen Sie anschließend die horizontalen Querstangen an, indem Sie gleichzeitig ihre 2 seitlichen Befestigungen über die Führungen nach oben schieben, bis sie vollständig einrasten. Führen Sie sie von unten nach oben ein, bis Sie die 2 Sicherheitsklicks hören. Wiederholen Sie diesen Vorgang mit der zweiten Querstange. “CLICK”...
  • Seite 21: Umstellung Der Gitterhöhe Auf Die Obere Position

    Verstecken Sie das ganze verbleibende Netz entlang des gesamten Gitters unter dem Reißverschluss. Schließen Sie den horizontalen Reißverschluss vollständig, um das Absenken des Gitters abzuschließen. CLOSE POSITION 2 (IN DER UNTEREN STELLUNG VERRIEGELTES GELÄNDER) HINWEISE: Verwenden Sie diese Position nur unter ständiger Aufsicht eines Erwachsenen und bis zum Alter von 4 Monaten.
  • Seite 22 Führen Sie das Gitter in die zwei oberen Befestigungen von oben nach unten ein, bis Sie das Sicherheitsklicken hören. “CLICK” “CLICK” “CLICK” Zum Schluss schließen Sie die 2 vertikalen Reißverschlüsse. CLOSE CLOSE...
  • Seite 23 MINI CULLA “NOON” IMPORTANTE. CONSERVARE PER CONSULTAZIONI FUTURE. LEGGERE ATTENTAMENTE AVVERTENZE -AVVERTENZA: N on utilizzare il prodotto senza aver letto le istruzioni. -AVVERTENZA: smettere di utilizzare la culla quando il bambino è in grado di sedersi, mettersi in ginocchio o alzarsi da solo.
  • Seite 24: Istruzioni Per L'uso

    ISTRUZIONI PER L’USO MONTAGGIO DELLA MINI CULLA Rimuovi il materasso, la trapunta e il cuscino e posiziona la culla rivolta verso il basso sopra un tavolo una super- ficie piana e pulita. Inserisci le 4 gambe nei supporti di plastica incastrando il foro laterale della gamba nel perno del supporto di plastica (figura 2).
  • Seite 25 In seguito, posiziona le traverse orizzontali inserendo contemporaneamente i due blocchi laterali verso l’alto tramite le guide fino a inserirli completamente. Inseriscili dal basso verso l’alto fino a sentire i 2 “clic” di sicurezza. Ripeti lo stesso procedimento con la seconda traversa. “CLICK”...
  • Seite 26 Nascondi tutta la rete in eccedenza lungo tutto la barriera sotto la cerniera. Chiudi completamente la cerniera orizzontale per concludere il procedimento di abbassamento della barriera. CLOSE POSIZIONE 2 (SPONDA BLOCCATA NELLA POSIZIONE BASSA) AVVERTENZE: utilizzare questa posizione solo con la supervisione permanente di un adulto e no ai 4 mesi.
  • Seite 27 Introduci la barriera sui due ancoraggi superiori, dall’alto in basso, fino a sentire i “clic” di sicurezza. “CLICK” “CLICK” “CLICK” Infine, chiudi le 2 cerniere verticali per concludere. CLOSE CLOSE...
  • Seite 28: Manutenção E Limpeza

    MINI BERÇO “NOON” IMPORTANTE. CONSERVAR PARA FUTURAS CONSULTAS. LEIA ATENTAMENTE -ADVERTÊNCIAS -ADVERTÊNCIA: N ão utilizar o produto sem ter lido as instruções. -ADVERTÊNCIA: Quando uma criança conseguir sentar-se, ajoelhar-se ou levantar-se sozinha, o berço não deverá ser utilizado por esta criança.
  • Seite 29: Instruções De Utilização

    INSTRUÇÕES DE UTILIZAÇÃO MONTAGEM DO MINI BERÇO Retirar o colchão, o edredão e a almofada e colocar o berço virado para baixo sobre uma mesa ou superfície plana e limpa. Inserir os 4 pés nos suportes de plástico encaixando o orifício lateral do pé com a aba do suporte de plástico (imagem 2).
  • Seite 30 A seguir colocar as travessas horizontais inserindo simultaneamente as suas 2 fixações laterais para cima pelas guias até as encaixar completamente. Inseri-las de baixo para cima até ouvir os 2 “clicks” de segurança. Repetir o mesmo processo com a segundo travessa. “CLICK”...
  • Seite 31 Ocultar toda a rede sobrante ao longo de toda a barreira debaixo do fecho de correr. Fechar totalmente o fecho de correr horizontal para terminar o processo de descida da barreira. CLOSE POSIÇÃO 2 (REDE BLOQUEADA NA POSIÇÃO BAIXA) AVISOS: Utilizar esta posição apenas com a super- visão permanente de um adulto e até...
  • Seite 32 Introduzir a barreira nas duas fixações superiores, de cima para abaixo até ouvir os “click” de segurança. “CLICK” “CLICK” “CLICK” E finalmente, fechar os 2 fechos de correr verticais para terminar. CLOSE CLOSE...
  • Seite 36 JANÉ, S.A. Pol. Industrial Riera de Caldes C/. Mercaders, 34 08184 Palau de Plegamans - Barcelona (SPAIN) Tel. +34 93 703 18 00 Fax. +34 93 703 18 04 www.janeworld.com UNE EN 16890:2018 IM 2118...