Herunterladen Inhalt Inhalt Diese Seite drucken
Inhaltsverzeichnis

Werbung

Verfügbare Sprachen
  • DE

Verfügbare Sprachen

  • DEUTSCH, seite 50
SIGHTLINE
USER
MANUAL
English / Français / Deutsch / Español / Italiano / Русский
N450
N455
N470
N475

Werbung

Inhaltsverzeichnis
loading

Inhaltszusammenfassung für Yukon Advanced Optics SIGHTLINE N450

  • Seite 1 SIGHTLINE N450 N455 N470 N475 USER MANUAL English / Français / Deutsch / Español / Italiano / Русский...
  • Seite 2 English Electromagnetic compliance This product complies with EU Standard EN 55032:2015, Class A. Warning! Operation of this equipment in a residential environment could cause radio interference. Attention! Sightline rifescopes require a license if exported outside your country. Français Compatibilité électromagnétique Ce produit est conforme à...
  • Seite 3 Digital Riflescope Sightline English 2-23 Lunette numérique Sightline Français 24-47 Digital-Zielfernrohr Sightline Deutsch 48-70 Visor digital Sightline Español 72-94 Cannocchiale digital Sightline Italiano 96-119 Цифровой прицел Sightline Русский 120-143...
  • Seite 4: Specifications

    ENGLISH Specifications 26401 26402 26403 26404 MODEL SIGHTLINE N450 N455 N470 N475 OPTICAL CHARACTERISTICS Optical magnification, x Continuous zoom 4-8x / 4-16x 6-12x / 6-24x Relative aperture, D/f’ 1/1.2 1/1.2 1/1.2 1/1.2 Field of view, degree / m at 100m, 5.5 / 9.6 5.5 / 9.6 4.1 / 7.1...
  • Seite 5: Package Contents

    Package Contents • Riflescope Sightline • Carrying case • Yukon DNV Battery Pack • Battery charger with mains charger • Mount (with screws and hex-nut wrench)* • Quick start guide • Lens cloth • Warranty card *Models 26401X, 26402X, 26403X, 26404X are supplied without mount. The design and firmware of this product are subject to change for development purposes.
  • Seite 6: External View And Components

    • Stadiametric rangefinder • Wide range of operating temperature • Display-off mode • Side incline indication • Automatic shut-down function External View and Components Objective lens Lens cover Controller Button “ON” Eyepiece adjustment ring Eyeshade DNV Battery Pack Video output (microHDMI port) Weaver lateral rail Lens focus knob Built-in IR Illuminator...
  • Seite 7: Description Of Controls

    Fig. Description of Controls Controls Operating mode First short Other short Long press Rotation press presses Button Riflescope off Power — Turn display — ON (4) riflescope on Turn riflescope Display off Turn display — Turn riflescope — Riflescope on, —...
  • Seite 8: Guidelines For Operation

    Guidelines for Operation The riflescope has been designed for long-term use. To ensure long perfor- mance, please adhere to the following: • Before use make sure that you have installed and fixed the mount according to the instructions of the section “Installation of mount”. •...
  • Seite 9: Storage And Maintenance

    Fig. Charging • Only use the charger supplied with the Battery Pack. The use of another charger may irreparably damage the Battery Pack or the charger and may cause fire. • Never use a modified or damaged charger. • Charging current and voltage must comply with the parameters outlined in the specifications table.
  • Seite 10: Operation

    Installing “AA” type rechargeable batteries To use “AA” type batteries, please purchase an accessory “Yukon DNV Battery Holder” (SKU#29116). WARNING! Please use only rechargeable type “AA” (LR06) batteries. The use of regular (non-rechargeable) batteries drastically reduces rifle- scope’s operating time. •...
  • Seite 11 Fig. • Rotate the dioptre adjustment ring (5) to see a crisp image of the aiming reticle and the status bar icons. Once this adjustment is done, there is no need to rotate the dioptre adjustment ring for distance or any other conditions.
  • Seite 12 12.0x-24.0x * Change step examples: for Sightline N450 - 4.0x; 4.2x ; 4.4x ; 4.6x etc. for Sightline N470 - 12.0x; 12.5x ; 13.0x ; 13.5x etc. Continuous zoom value will be shown in the quick menu and in the status bar in the lower part of the display.
  • Seite 13 • Holding the reticle in the aiming point, rotate the controller Windage to move the auxiliary cross horizontally or vertically relative to the reticle until the auxiliary cross matches the point of impact. Attention! Not to hold the reticle in the aiming point, you can use the FREEZE function –...
  • Seite 14: Menu Structure

    Main Menu • Enter the main menu with a long press of the controller (3). • Toggle between main menu options by rotating the controller. • Main menu navigation is cyclical: as soon as the last menu option is reached, first menu option starts.
  • Seite 15: Zeroing Profile

    Zeroing profile This main menu option allows you to select between one of the three profiles. Each profile includes the following: • Set of distances with zeroing coordinates for each. • Reticle color • Reticle type Various profiles can be used when employing the riflescope on different rifles and when shooting different cartridges.
  • Seite 16 Reticle type • Hold down the controller (3) to enter the main menu. • Rotate the controller to select option “Reticle setup”. Press briefly the controller. • Select the desired reticle shape out of the list by rotating the controller. The reticle types change as the cursor goes down the reticle list.
  • Seite 17 • Enter the option “Operating the distances” and enter it with a short press of the controller – distances at which zeroing has been done will be shown. • The values (for example, +7.0) shown on the right of the distance values, stand for the number of clicks along the Y axis, at which the reticle position at other distances differs from the reticle position in the primary distance.
  • Seite 18 Freeze Function FREEZE is designed to zero your riflescope. The highlight of the function is that, unlike in the “one shot zeroing” method, you do not need to hold the riflescope in the aiming point. • Having selected a zeroing distance and having entered the menu option, enter the submenu FREEZE with a short press of the M button or press briefly the ON button when in the zeroing mode.
  • Seite 19: General Settings

    • Hold down the controller (3) to enter the main menu. • Rotate the controller to select option “Sensors”. Press briefly the controller. • Rotate the controller to select option “Side incline”. • Select “On” by rotating the controller to activate side incline; “Off” to deactivate.
  • Seite 20 • Rotate the controller to select unit of measurement – metres or yards, press briefly the controller. • Exit to “General settings” will take place automatically. Note: unit of measurement is used both for the stadiametric rangefinder and the zeroing distances. When changing the unit of measurement, distance titles change too.
  • Seite 21: Status Bar

    Status Bar 4.0x 1min 02:50 100m The status bar is located in the lower part of the display and shows informa- tion on the actual operating status of the riflescope, including: Actual zeroing profile (A;B;C) Zeroing distance (Distance is not shown before zeroing is done) IR Illuminator’s power level (for example level 3) Full magnification (optical + digital zoom) Function “Auto shutdown”...
  • Seite 22: Video Output

    Function DISPLAY OFF The Display off function deactivates transmission of image to the display by minimizing its brightness. This prevents accidental disclosure. The riflescope and the built-in IR Illuminator keep running. • When the riflescope is on, hold down the ON (4) button. Display goes out, message “Display off”.
  • Seite 23: Technical Inspection

    Technical Inspection Please check before every hunt: • External view (there should be no cracks on the housing). • Correct mounting of the riflescope on your rifle (clearances are not allowed). • Correct functioning of the controls. • Ensure that the objective lens, eyepiece, IR illuminator are free of cracks, grease spots, dirt, water stains and other residue.
  • Seite 24: Troubleshooting

    Troubleshooting Listed below are some potential problems that may occur when using the scope. Carry out the recommended checks and troubleshooting steps in the order listed. Please note that the table does not list all of the possible problems. If the problem experienced with the scope is not listed, or if the suggested action meant to correct it does not resolve the problem, please contact your seller.
  • Seite 25 PROBLEM POSSIBLE CAUSE СORRECTIVE ACTION The riflescope will not focus. Wrong settings. Adjust the riflescope according to the instructions given in the Section 9 “OPERATION” and check the surfaces of the eyepiece and objective lenses and clean them if necessary from dust, condensation, frost, etc;...
  • Seite 26 FRANÇAIS Specifications 26401 26402 26403 26404 MODÈLE SIGHTLINE N450 N455 N470 N475 CARACTÉRISTIQUES OPTIQUES Grossissement optique, x Zoom continu 4-8x / 4-16x 6-12x / 6-24x Ouverture relative, D/f' 1/1.2 1/1.2 1/1.2 1/1.2 Champ de vision, degré/m à 100 m 5,5 / 9,6 5,5 / 9,6 4,1 / 7,1 4,1 / 7,1...
  • Seite 27: Contenus De L'emballage

    Contenus de l’emballage • Lunettes de carabine Sightline • Mallette de transport • Bloc batterie Yukon DNV • Batterie avec chargeur secteur • Support (avec vis et clé pour écrou hexagonal)* • Guide de mise en route rapide • Chiffon pour objectif •...
  • Seite 28 • Sortie vidéo MicroHDMI • Télémètre stadiamétrique • Large plage de température de fonctionnement • Mode affichage éteint • Indication d’inclinaison latérale • Fonction d’arrêt automatique Vue extérieure et composants Lentille d’objectif Couvercle de lentille Commande Bouton “ON” Bague de réglage d’oculaire Visière Bloc batterie DNV Sortie vidéo (port microHDMI)
  • Seite 29: Description Des Commandes

    Fig. Description des commandes Organe de Mode opératoire Premier appui Autres appuis Appui long Rotation commande court courts Bouton ON Lunette éteinte Lunette sous — Éteignez — (MARCHE) tension l'affichage/ éteignez la lunette. Extinction de Allumez — Éteignez la — l'affichage l'affichage.
  • Seite 30: Recommandations Pour L'utilisation

    Recommandations pour l’utilisation La lunette a été conçue pour une utilisation de longue durée. Pour pouvoir utiliser longtemps la lunette, respectez ce qui suit : • Avant utilisation, vérifiez que vous avez installé et fixé le support conformément aux instructions de la section “Installation du support”. •...
  • Seite 31: Stockage Et Maintenance

    Fig. • Ne pas démonter ni déformer le bloc batterie. • Conservez hors de portée des enfants. Charge • Utilisez uniquement le chargeur fourni avec le bloc batterie. L’utilisation d’un autre chargeur peut endommager définitivement le bloc batterie ou le chargeur et peut provoquer un incendie.
  • Seite 32: Installation Du Support

    Installation de batteries rechargeables type “AA” Pour utiliser les batteries type “AA”, veuillez acheter un accessoire “Support de batterie Yukon DNV” (SKU#29116). AVERTISSEMENT ! Veuillez utiliser uniquement des batteries rechargeables type “AA” (LR06). L’utilisation de piles (non rechargeables) diminue considérablement la durée d’utilisation de la lunette de carabine.
  • Seite 33 Fig. • Faites tourner la bague de réglage dioptrique (5) pour obtenir une image bien contrastée du réticule de visée et des icônes sur la barre d’état. Ensuite, il n’est pas nécessaire de faire tourner la bague de réglage de dioptre pour la distance ou d’autres conditions.
  • Seite 34 12,0x-24,0x * Exemple de pas (intervalles) de changement : pour les modèles Sightline N450 – 4,0x ; 4,2x ; 4,4x ; 4,6x etc. pour les modèles Sightline N470 – 12,0x ; 12,5x ; 13,0x ; 13,5x etc. La valeur du zoom continu sera affichée dans le menu rapide et dans la barre d’état en bas de l’écran.
  • Seite 35: Quick Menu

    • Lancez le sous-menu en appuyant rapidement sur le bouton de commande • Sélectionnez l’icône en faisant tourner le bouton de commande. Appuyez sur le bouton de commande pour confirmer. • Un menu supplémentaire pour le paramétrage de réglage du tir apparaît sur l’écran.
  • Seite 36: Menu Principal

    Luminosité – faites tourner le bouton de commande pour changer la luminosité de l’écran de 00 à 20. Contraste – faites tourner le bouton de commande pour faire varier le contraste de l’écran de 00 à 20. Information sur le profil réel et la distance du tir de réglage (zérotage) A100 , sur laquelle le tir de réglage a été...
  • Seite 37: Structure Du Menu

    Structure du menu Menu Profil d'ajustage Luminosité graphique Mode PiP Configuration du réticule Réglage de l'arme Accéléromètre Configurations generales Français Information d'appareil Profil de tir de réglage L’option du menu principal vous permet de faire une sélection entre l’un des trois profils.
  • Seite 38 Luminosité du graphique • Maintenez enfoncé le bouton de commande (3) pour lancer le menu principal. • Faites tourner le bouton de commande pour sélectionner l’option • Appuyez rapidement sur le bouton de commande pour lancer l’option. • Faites tourner le bouton de commande pour régler le niveau de luminosité souhaité...
  • Seite 39 • Sélectionnez la couleur souhaitée de réticule : blanc ou noir en faisant tourner le bouton de commande. • Confirmez votre sélection en appuyant rapidement sur le bouton de commande. Luminosité du réticule • Maintenez enfoncé le bouton de commande (3) pour lancer le menu principal. •...
  • Seite 40 • Pour régler à nouveau le zéro sur une distance, sélectionnez la distance souhaitée et appuyez rapidement sur le bouton de commande. • L’écran Zeroing (tir de réglage) apparaîtra et vous permettra de modifier les coordonnées du tir de réglage. Changement de la distance primaire.
  • Seite 41 Freeze (gel) La fonction FREEZE est conçue pour le tir de réglage de votre lunette. Contrairement à la méthode “tir de réglage avec un seul tir”, cette fonction ne vous oblige pas à maintenir la lunette sur le point de visée. •...
  • Seite 42: Réglages Généraux

    Il y a trois modes d’inclinaison latérale : 5°-10° - flèche sur secteur 1 ; 10°-20° - flèche sur secteur 2 ; >20° - flèche sur secteur 3 ; Fig. Une inclinaison latérale inférieure à 5° n’est pas affichée. • Maintenez enfoncé...
  • Seite 43 Réglage de l’heure • Maintenez enfoncé le bouton de commande (3) pour lancer le menu principal. • Faites tourner le bouton de commande pour sélectionner l’option “General Settings” (paramètres généraux). • Appuyez rapidement sur le bouton de commande (3) pour lancer l’option du menu. •...
  • Seite 44 • Si « Non » est sélectionné, l’action est abandonnée et le sous-menu est rappelé. • Les réglages suivants seront rétablis sur leurs valeurs initiales avant les changements effectués par l’utilisateur : • Luminosité affichage - 10 • Profil tir de réglage - А •...
  • Seite 45 * La distance n’est pas affichée tant que le tir de réglage (zérotage) n’est pas effectué. La barre d’état indique la distance à laquelle le tir de réglage (zérotage) a été initialement effectué. Une fois que plusieurs distances de tir de réglage (zérotage) ont été...
  • Seite 46 Sortie video La lunette dispose d’une sortie vidéo (type HDMI) conçue pour transmettre l’image à un écran de contrôle et pour connecter un enregistreur vidéo externe. Transmission de l’image à un écran de contrôle : • Branchez une prise jack du câble vidéo HDMI au port micro HDMI (8) de la lunette.
  • Seite 47: Maintenance Technique

    Maintenance technique La maintenance technique doit être effectuée au moins deux fois par an, et comprendre les étapes suivantes : • Nettoyez les surfaces extérieures en métal et en plastique pour enlever la poussière, la saleté et l’humidité ; essuyez la lunette avec un chiffon tendre et non-pelucheux.
  • Seite 48: Dépannage

    Dépannage La liste ci-dessous indique les problèmes pouvant survenir pendant l’util- isation de la lunette. Exécutez les vérifications et les étapes de dépannage recommandées dans l’ordre indiqué. Prière de ne noter que le tableau n’in- dique pas tous les problèmes possibles. Si le problème concernant la lunette ne figure pas sur la liste, ou si la mesure proposée ne corrige pas le problème, contactez votre vendeur.
  • Seite 49 PROBLÈME CAUSE POSSIBLE MESURE CORRECTIVE La lunette ne peut pas être Mauvais réglages. Réglez la lunette en suivant les mise au point. instructions données dans la Section 9 “UTILISATION” et véri- fiez les surfaces de l'oculaire et les lentilles de l'objectif, et nettoyez-les si nécessaire pour enlever la poussière, la con- densation, le givre, etc ;...
  • Seite 50: Technische Daten

    DEUTSCH Technische Daten LAGEREINHEIT (SKU) 26401 26402 26403 26404 MODELL SIGHTLINE N450 N455 N470 N475 OPTISCHE EIGENSCHAFTEN Optische Vergrößerung, x Stufenloser Zoom 4-8x / 4-16x 6-12x / 6-24x Relatives Öffnungsverhältnis, D/f‘ 1/1.2 1/1.2 1/1.2 1/1.2 Sichtfeld, Grad/m bei 100 m 5,5 / 9,6 5,5 / 9,6 4,1 / 7,1...
  • Seite 51 Packungsinhalt • Zielfernrohr Sightline • Tragetasche • Yukon DNV-Akkupack • Akkuladegerät mit Netzteil • Halterung (mit Schrauben und Sechskantschlüssel)* • Schnellstartanleitung • Objektivtuch • Garantiekarte * Modelle 26401X, 26402X, 26403X, 26404X werden mit einer Halterung geliefert. Das Design und die Firmware dieses Produkts können zu Entwicklungszwecken geändert werden.
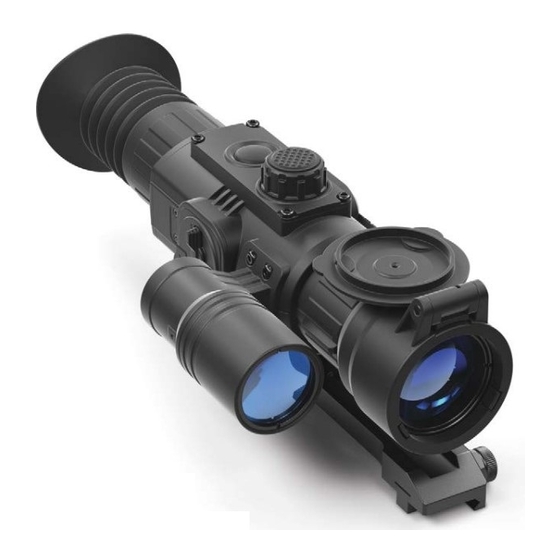
  • Seite 52: Aussenansicht Und Komponenten

    • Stadiametrischer Entfernungsmesser • Großer Betriebstemperaturbereich • Display-Aus-Modus • Seitenneigungsanzeige • Automatische Ausschaltfunktion Aussenansicht und Komponenten Objektiv Objektivschutz Regler Taste „ON“ Okularstellring Augenschirm DNV-Akkupack Video-Ausgang (Micro-HDMI-Anschluss) Weaver-Seitenschiene Objektiv-Fokussierknopf Integrierter IR-Strahler IR-Strahler-Taste Abb. OPEN...
  • Seite 53: Beschreibung Der Bedienelemente

    Abb. Beschreibung der Bedienelemente Steuer- Betriebsmodus Erstes kurzes Anderes kur- Langes Drehen organ Drücken zes Drücken Drücken Taste ON Zielfernrohr aus Zielfernrohr — Display — (EIN) (4) einschalten ausschalten / Zielfernrohr ausschalten Display aus Display ein- — Zielfernrohr — schalten ausschalten Zielfernrohr ein, —...
  • Seite 54: Wiederaufladbarer Akku

    Bedienungsanleitung Das Zielfernrohr wurde für den Langzeitbetrieb konzipiert. Um eine lange Lebensdauer zu gewährleisten, beachten Sie bitte folgende Punkte: • Vergewissern Sie sich, dass Sie vor dem Gebrauch die Halterung gemäß den Anweisungen im Abschnitt „Montage der Halterung“ montiert und befestigt haben.
  • Seite 55 Abb. • Setzen Sie den Akkupack keinem Feuer aus und entsorgen Sie ihn nicht darin. • Der Akkupack ist nicht wasserdicht. • Akkupacks sind kurzschlusssicher. Situationen, die einen Kurzschluss verursachen können, sollten jedoch vermieden werden. • Zerlegen oder verformen Sie den Akkupack nicht. •...
  • Seite 56: Betrieb

    Aufbewahrung und Wartung • Bewahren Sie den Akkupack an einem kühlen, trockenen, gut belüfteten Ort auf. • Lagern Sie den Akkupack in geladenem Zustand. • Nehmen Sie den Akkupack beim Lagern/Transport aus dem NV-Gerät. Einlegen von wiederaufladbaren akkus vom typ „AA“ Um Akkus vom Typ „AA“...
  • Seite 57: Integrierter Ir-Strahler

    Abb. länger als eine Sekunde gedrückt. • Das ausgeschaltete Display zeigt die Meldung „Display off“. • Um das Display auszuschalten, drücken Sie kurz auf die Taste ON. • Um das Zielfernrohr auszuschalten, halten Sie die Taste ON länger als drei Sekunden gedrückt.
  • Seite 58 8,0x - 16x 12,0x-24,0x * Beispiele für Änderungsschritt: für Sightline N450 – 4,0x; 4,2x; 4,4x; 4,6x usw. für Sightline N470 – 12,0x; 12,5x; 13,0x; 13,5x usw. Der stufenlose Zoomwert wird im Schnellstartmenü und in der Symbolleiste im unteren Bereich des Displays angezeigt.
  • Seite 59 • Rufen Sie das Untermenü „Einschießen“ auf, indem Sie den Regler drehen. Drücken Sie zum Bestätigen auf den Regler. • Stellen Sie den Einschießentfernungswert ein (siehe Hauptmenüoption „Einschießen“ => Untermenü „Neue Entfernung hinzufügen“ • Gehen Sie durch kurzes Drücken auf den Regler in das Untermenü...
  • Seite 60 • Drehen Sie den Regler, um zwischen den unten angegebenen Funktionen umzuschalten. • Zum Verlassen des Schnellstartmenüs halten Sie den Regler gedrückt. Nach 5 Sekunden Inaktivität erfolgt ein automatisches Beenden (Bedienungselemente werden nicht benutzt). Helligkeit – drehen Sie den Regler, um die Displayhelligkeit von 00 bis 20 ändern.
  • Seite 61 Structure du menu Menü Einschiessenprofil Grafikhelligkeit PiP Modus Absehenseinstellung Einschiessen Accelerometer Allgemeine Einstellungen Deutsch Geräteinformation Einschießprofil Diese Hauptmenüoption ermöglicht es Ihnen, eines der drei Profile zu wählen. Jedes Profil enthält Folgendes: • Einen Satz verschiedener Entfernungen mit Einschießkoordinaten für jede Entfernung.
  • Seite 62: Einstellung Des Fadenkreuzes

    Grafikhelligkeit • Halten Sie den Regler (3) gedrückt, um das Hauptmenü aufzurufen. • Drehen Sie den Regler, um die Option auszuwählen. • Drücken Sie zum Aufrufen kurz auf den Regler. • Drehen Sie den Regler, um die gewünschte Helligkeitsstufe (der Menü- und Symbolleistensymbole) von 1 bis 10 einzustellen.
  • Seite 63: Fadenkreuzhelligkeit

    Fadenkreuzhelligkeit • Halten Sie den Regler (3) gedrückt, um das Hauptmenü aufzurufen. • Drehen Sie den Regler, um die Option „Einstellung des Fadenkreuzes” aufzurufen. Drücken Sie kurz auf den Regler. • Drehen Sie den Regler, um die Option „Fadenkreuzhelligkeit” auszuwählen. Drücken Sie kurz auf den Regler.
  • Seite 64 • Drücken Sie kurz auf den Regler. • Das Symbol neben der ausgewählten Entfernung bestätigt die Änderung der primären Entfernung. • Beim Ändern der primären Entfernung wird die Anzahl der Klicks entlang der Y-Achse automatisch für die Anzahl der Klicks, die von der neuen Basisentfernung abweicht, neu berechnet.
  • Seite 65 Entfernungstitel bearbeiten In diesem Untermenü können Sie den Wert der aktuellen Entfernung ändern. • Rufen Sie nach der Auswahl einer Einschießentfernung und dem Aufrufen des Untermenüs durch kurzes Drücken auf den Regler das Untermenü „Entfernungstitel bearbeiten“ auf. • Wählen Sie Werte für jede Zahl aus, indem Sie den Regler drehen. Schalten Sie durch kurzes Drücken auf den Regler zwischen den Zahlen um.
  • Seite 66: Allgemeine Einstellungen

    Allgemeine Einstellungen Auswahl der Oberflächensprache • Halten Sie den Regler (3) gedrückt, um das Hauptmenü aufzurufen. • Drehen Sie den Regler, um die Option „Allgemeine Einstellungen” auszuwählen. • Drücken Sie kurz auf den Regler (3), um die Menüoption aufzurufen. • Drehen Sie den Regler, um die Option „Sprache“...
  • Seite 67 Sie kurz auf den Regler. • Drehen Sie den Regler, um die Maßeinheit – Meter oder Yards – auszuwählen. Drücken Sie kurz auf den Regler. • Der Wechsel zu „Allgemeine Einstellungen“ erfolgt automatisch. Hinweis: Die Maßeinheit wird sowohl für den stadiametrischen Entfernungs- messer als auch für die Einschießentfernungen verwendet.
  • Seite 68: Stadiametrischer Entfernungsmesser

    • Seriennummer • Softwareversion • Hardwareversion • Serviceinformationen 15. Symbolleiste 4.0x 1min 02:50 100m Die Symbolleiste befindet sich im unteren Teil des Displays und zeigt Informa- tionen über den tatsächlichen Betriebsstatus des Zielfernrohrs einschließlich der folgenden an: Tatsächliches Einschießprofil (A;B;C) Einschießentfernung* IR-Strahler-Leistungsstufe (zum Beispiel Stufe 3) Vollständige Vergrößerung (optisches und digitales Zoom)
  • Seite 69: Video-Ausgang

    • Wenn die Erfassung nicht innerhalb von 10 Sekunden erfolgt, verschwinden die Informationen vom Display. • Um die Maßeinheit auszuwählen (Meter oder Yards), gehen Sie zur jeweiligen Menüoption. • Bevor sie auf dem Display erscheint, wird eine gemessene Entfernung für größere Werte auf 5 m aufgerundet und für kleinere Werte auf 1 m abgerundet.
  • Seite 70: Verwenden Der Weaver-Schiene

    Verwenden der Weaver-Schiene Das Zielfernrohr ist mit einer Weaver-Schiene (9) ausgestattet, mit welcher der Benutzer zusätzliches Zubehör befestigen kann, wie: • LED IR-Strahler Pulsar-805/Pulsar-940/Pulsar- X850 (#79071/79076/79074) • IR-Strahler Pulsar AL915 (#79132) Technische Inspektion Bitte überprüfen Sie Folgendes vor jeder Jagd: •...
  • Seite 71: Fehlerbehebung

    Fehlerbehebung Unten sind einige mögliche Probleme aufgeführt, die bei der Verwendung des Zielfernrohrs auftreten können. Führen Sie die empfohlenen Kontrollen und Fehlerbehebungsschritte in der aufgeführten Reihenfolge aus. Bitte beachten Sie, dass die Tabelle nicht alle möglichen Probleme enthält. Wenn ein mit dem Zielfernrohr aufgetretenes Problem nicht aufgeführt ist oder die vorgeschlagene Maßnahme das Problem nicht behebt, wenden Sie sich bitte an Ihren Verkäufer.
  • Seite 72 PROBLEM MÖGLICHE URSACHE KORREKTURMASSNAHME Das Zielfernrohr fokussiert Falsche Einstellungen. Justieren Sie das Zielfernrohr nicht. gemäß den Anweisungen im Abschnitt 9 „BETRIEB“ und prüfen Sie die Oberflächen der Okular- und der Objektivlinse und reinigen Sie sie bei Bedarf von Staub, Kondenswasser, Frost, usw.
  • Seite 74: Especificaciones

    ESPAÑOL Especificaciones 26401 26402 26403 26404 MODELO SIGHTLINE N450 N455 N470 N475 CARACTERÍSTICAS ÓPTICAS Aumento óptico, x Zoom continuo 4-8x / 4-16x 6-12x / 6-24x Apertura relativa, D/f' 1/1.2 1/1.2 1/1.2 1/1.2 Campo de visión, grado / m a 100 m 5,5 / 9,6 5,5 / 9,6 4,1 / 7,1...
  • Seite 75: Contenido Del Paquete

    Contenido del paquete • Visor de rifle Sightline • Maletín de transporte • Paquete de pilas DNV Yukon • Cargador de batería con cargador de red • Soporte (con tornillos y llave de tuerca hexagonal)* • Guía de inicio rápido •...
  • Seite 76 • Telémetro estadiamétrico • Amplio rango de temperaturas de funcionamiento • Modo de pantalla APAGADO (Display off) • Indicación de inclinación lateral • Función de apagado automática Visión externa y componentes Lente del objetivo Tapa de la lente Controlador Botón de ON Anillo de ajuste de visor Visera Paquete de pilas DNV...
  • Seite 77: Descripción De Los Controles

    Fig. Descripción de los controles Órgano de Modo de Primera Siguientes Pulsación Rotación control funcionamiento pulsación pulsaciones prolongada breve breves Botón de Visor de rifle Encender visor — Apagar — ON (ENCEN- apagado de rifle pantalla / DIDO) (4) Apagar visor de rifle Pantalla apagada Encender...
  • Seite 78: Batería Recargable

    Directrices para el funcionamiento El visor de rifle se ha diseñado para utilizarse a largo plazo. Para garantizar un rendimiento prolongado, cumpla lo siguiente: • Antes del uso, asegúrese de haber instalado y fijado el soporte según las instrucciones de la sección «Instalación del soporte» •...
  • Seite 79: Almacenamiento Y Mantenimiento

    Fig. Carga • Utilice únicamente el cargador que se suministra con el paquete de pilas. La utilización de otro cargador podría dañar de forma irreparable el paquete de pilas o el cargador y podría provocar un incendio. • No utilice nunca un cargador modificado o dañado. •...
  • Seite 80: Instalación Del Soporte

    Instalación de pilas recargables tipo «AA» Para utilizar pilas de tipo «AA», adquiera el accesorio «Compartimento para pilas DNV Yukon» (n.º SKU 29116). ¡ADVERTENCIA! Utilice únicamente pilas recargables de tipo «AA» (LR06). El uso de pilas (no recargables) normales reduce drásticamente el tiempo de funcionamiento del visor de rifle.
  • Seite 81 Fig. • Gire el anillo de ajuste de dioptrías (5) hasta ver nítidamente la retícula de mira y los iconos de la barra de estado. Una vez realizado este ajuste, no hay necesidad de girar el anillo de ajuste de dioptrías para la distancia ni ninguna otra condición.
  • Seite 82 12,0x-24,0x * Ejemplos de paso de cambio: para Sightline N450: 4,0x; 4,2x ; 4,4x ; 4,6x etc. para Sightline N470: 12,0x; 12,5x ; 13,0x ; 13,5x etc. El valor de zoom continuo se mostrará en el menú rápido y en la barra de estado en la parte inferior de la pantalla.
  • Seite 83: Menú Rápido

    • Vaya al submenú pulsando brevemente el controlador • Seleccione el icono girando el controlador. Pulse el controlador para confirmar. • Un menú adicional para la configuración de los parámetros del reglaje de tiro aparece en la pantalla. . • Una cruz auxiliar aparece en el centro de la pantalla y las coordinadas de la cruz auxiliar X e Y aparecen en la esquina...
  • Seite 84: Menú Principal

    Información sobre el perfil real y la distancia de reglaje de tiro A100 , en qué reglaje de tiro se realizó este perfil (por ejemplo, perfil A, distancia de reglaje de tiro de 100 m). Alterne entre las combinaciones de perfil y distancia disponibles (si hay más de una), distancias de reglaje de tiro girando el controlador.
  • Seite 85: Estructura Del Menú

    Estructura del menú Menú Perfil de reglaje de tiro Luminosidad de gráfico Modo PiP Reglaje de la retícula Reglaje de tiro Acelerómetro Ajustes generales Español Acerca del dispositivo Perfil de reglaje de tiro Esta opción del menú principal le permite seleccionar uno de los tres perfiles. Cada perfil incluye lo siguiente: •...
  • Seite 86 Brillo de gráficos • Mantenga pulsado el controlador (3) para entrar en el menú principal. • Gire el controlador para seleccionar la opción • Pulse brevemente el controlador para entrar. • Gire el controlador para ajustar el nivel de brillo deseado (del menú y los iconos de la barra de estado) de 1 a 10.
  • Seite 87 Brillo de la retícula • Mantenga pulsado el controlador (3) para entrar en el menú principal. • Gire el controlador para seleccionar la opción «Configuración de la retícula». Pulse brevemente el controlador. • Gire el controlador para seleccionar la opción «Brillo de la retícula». Pulse brevemente el controlador.
  • Seite 88 • El icono junto a la distancia seleccionada confirma el cambio de la distancia primaria. • Al cambiar la distancia primaria, el número de clics a lo largo del eje Y se vuelven a calcular automáticamente para el número de clics diferente de la nueva distancia básica.
  • Seite 89 Este submenú le permite cambiar el valor de la distancia actual. • Una vez haya seleccionado una distancia de reglaje de tiro y haya entrado en el submenú, seleccione el submenú «Editar título de distancia» pulsando brevemente el controlador. • Seleccione los valores de cada dígito girando el controlador.
  • Seite 90: Ajustes Generales

    Ajustes generales Selección del idioma de la interfaz • Mantenga pulsado el controlador (3) para entrar en el menú principal. • Gire el controlador para seleccionar la opción «Ajustes generales». • Pulse brevemente el controlador (3) para entrar en la opción de menú. •...
  • Seite 91 • Saldrá de los «Ajustes generales» automáticamente. Nota: la unidad de medición se utiliza tanto para el telémetro estadiamétrico y las distancias de reglaje de tiro. Al cambiar la unidad de medición, también cambiarán los títulos de distancia. Restaurar los valores predeterminados •...
  • Seite 92: Barra De Estado

    Barra de estado 4.0x 1min 02:50 100m La barra de estado está ubicada en la parte inferior de la pantalla y muestra información del estado de funcionamiento real del visor de rifle que incluye: Perfil de reglaje de tiro real (A;B;C) Distancia de reglaje de tiro* Nivel de potencia de iluminador IR (por ejemplo, nivel 3) Aumento completo (zoom óptico + digital)
  • Seite 93: Salida De Vídeo

    Función de pantalla apagada La función de Pantalla apagada desactiva la transmisión de imagen a la pan- talla minimizando su brillo. Esto evita la revelación accidental. El visor de rifle y el iluminador IR integrado continúan funcionando. • Cuando el visor de rifle está encendido, mantenga pulsado el botón de ON (4) La pantalla se apaga, mensaje «Display off»...
  • Seite 94: Mantenimiento Técnico

    Inspección técnica Antes de cada caza, compruebe: • visualmente el exterior (no debería haber grietas en el alojamiento); • el montaje correcto del visor en su rifle (no se permiten holguras); • el funcionamiento correcto de los controles; • que la lente del objetivo, visor e iluminador IR no presenten grietas, puntos de grasa, suciedad, manchas de agua ni cualquier otro residuo: •...
  • Seite 95: Solución De Problemas

    Solución de problemas A continuación, se enumeran algunos de los posibles problemas que pueden producirse al utilizar el visor. Realice las comprobaciones recomendadas y siga los pasos de solución de problemas en el orden indicado. Tenga en cuenta que la tabla no puede enumerar todos los posibles problemas. Si el problema que experimenta con el visor no está...
  • Seite 96 PROBLEMA POSIBLE CAUSA MEDIDA CORRECTORA El visor de rifle no enfoca. Ajustes incorrectos. Ajuste el visor de rifle según las instrucciones indicadas en la sección 9 «FUNCIONAMIEN- TO», compruebe las superficies del visor y la lente del objetivo y, en caso necesario, limpie el polvo, la condensación, la escarcha, etc., para evitar el empañamiento en tiempo frío,...
  • Seite 98 ITALIANO Specifiche 26401 26402 26403 26404 MODELLO SIGHTLINE N450 N455 N470 N475 CARATTERISTICHE OTTICHE Ingrandimento ottico, x Zoom continuo 4-8x / 4-16x 6-12x / 6-24x Apertura relativa, D/f' 1/1.2 1/1.2 1/1.2 1/1.2 Campo visivo, grado/m a 100m, 5,5 / 9,6 5,5 / 9,6 4,1 / 7,1 4,1 / 7,1...
  • Seite 99: Contenuto Della Confezione

    Contenuto della confezione • Cannocchiale da puntamento Sightline • Custodia • Gruppo batteria DNV Yukon • Caricabatterie con collegamento di rete • Attacco (con viti e chiave per dado esagonale)* • Guida rapida di avviamento • Panno per la pulizia della lente •...
  • Seite 100 • Ampia gamma di temperature di esercizio • Modalità a display spento • Indicazione inclinazione laterale • Funzione di spegnimento automatico Aspetto esterno e componenti Lente dell’obiettivo Coperchio della lente Controller Tasto “ON” Ghiera per regolazione dell’oculare Visiera Gruppo batteria DNV Uscita video (porta microHDMI) Binario laterale Weaver Manopola di messa a fuoco della lente...
  • Seite 101: Descrizione Dei Comandi

    Fig. Descrizione dei comandi Organo di Modalità di Prima Altre pressioni Pressione Rotazione comando funzionamento pressione brevi prolungata breve Tasto ON Cannocchiale Accensione — Spegnimento — spento cannocchiale display / Spegnimento puntamento cannocchiale puntamento Display spento Accensione — Spegnimento — display cannocchiale puntamento...
  • Seite 102: Batteria Ricaricabile

    Linee guida per il funzionamento il cannocchiale da puntamento è progettato per un utilizzo a lungo termine. Per preservarne le prestazioni nel tempo, rispettare le seguenti indicazioni: • Prima dell’uso, assicurarsi di avere installato e fissato l’attacco secondo le istruzioni indicate nel paragrafo “Installazione dell’attacco”. •...
  • Seite 103: Conservazione E Manutenzione

    Fig. Ricarica • Utilizzare unicamente il caricabatterie fornito in dotazione con il gruppo batteria. L’uso di un altro caricabatterie potrebbe danneggiare in modo irreparabile il gruppo batteria o il caricabatterie stesso, o addirittura provocare un incendio. • In nessun caso utilizzare un caricabatterie danneggiato o modificato. •...
  • Seite 104: Funzionamento

    Installare batterie ricaricabili di tipo “AA” per utilizzare le batterie di tipo “AA”, acquistare un accessorio specifico: il portabatteria “Yukon DNV Battery Holder” (SKU#29116). AVVERTENZA! Utilizzare esclusivamente batterie ricaricabili di tipo “AA” (LR06). L’utilizzo di normali batterie (non ricaricabili) riduce drasticamente l’autono- mia di funzionamento del cannocchiale da puntamento.
  • Seite 105 Fig. • Ruotare la ghiera per la regolazione diottrica (5) per ottenere un’immagine nitida del reticolo di mira e delle icone della barra di stato. Una volta eseguita questa regolazione, non è più necessario ruotare la ghiera per la regolazione diottrica in base alla distanza o ad altre condizioni. •...
  • Seite 106 12,0x-24,0x * Esempi di incremento della modifica: per Sightline N450 - 4,0x; 4,2x ; 4,4x ; 4,6x ecc. per Sightline N470 - 12,0x; 12,5x ; 13,0x ; 13,5x ecc. Il valore dello zoom continuo è mostrato nel menu rapido e nella barra di stato presente nella parte inferiore del display.
  • Seite 107: Menu Rapido

    • Passare al sottomenu esercitando una breve pressione sul controller Selezionare l’icona ruotando il controller. Premere il controller per confermare. • Sul display viene visualizzato un menu aggiuntivo per l’impostazione dei parametri di taratura. . • Nel centro del display compare una croce ausiliaria con le relative coordinate X e Y nell’angolo in alto a destra (fig.
  • Seite 108: Menu Principale

    Contrasto – ruotare il controller per modificare il contrasto del display da 00 a 20. Informazioni sul profilo effettivo e sulla distanza di taratura A100 , al momento della taratura in questo profilo (ad esempio, profilo A, distanza di taratura 100 m). Commutare tra le combinazioni disponibili di profilo e distanza (se ce ne sono diverse) delle distanze di taratura, ruotando il controller.
  • Seite 109: Struttura Del Menu

    Struttura del menu Menu Zeroing profile Graphics Brightness PiP mode Reticle setup Zeroing Sensor General setting Device infomation Profilo di taratura Questa opzione del menu principale consente all’utente di scegliere uno dei tre profili disponibili. Ciascun profilo comprende: • Serie di distanze con coordinate di taratura per ciascuna. •...
  • Seite 110 Luminosità della grafica • Tenere premuto il controller (3) per accedere al menu principale. • Ruotare il controller per selezionare l’opzione • Premere brevemente il controller per accedere. • Ruotare il controller per impostare il livello desiderato di luminosità (del menu e delle icone della barra di stato) da 1 a 10. •...
  • Seite 111 Luminosità del reticolo • Tenere premuto il controller (3) per accedere al menu principale. • Ruotare il controller per selezionare l’opzione “Impostazione del reticolo”. Premere brevemente il controller. • Ruotare il controller per selezionare l’opzione “Luminosità del reticolo”. Premere brevemente il controller. •...
  • Seite 112 • Selezionare l’icona : distanza primaria. • Premere brevemente il controller. • L’icona accanto alla distanza selezionata conferma la modifica della distanza primaria. • Al cambio della distanza primaria, il numero di clic lungo l’asse Y è ricalcolato automaticamente per il numero di clic diverso dalla nuova distanza di base.
  • Seite 113 • Premere brevemente il controller e verrà eseguito un fermo immagine (screen shot) e comparirà l’icona sul display. • Per una descrizione dettagliata della procedura di taratura, fare riferimento al paragrafo 9 “Taratura”. Modifica del valore della distanza corrente Questo sottomenu consente all’utente di modificare il valore della distanza corrente.
  • Seite 114: Impostazioni Generali

    • Tenere premuto il controller (3) per accedere al menu principale. • Ruotare il controller per selezionare l’opzione “Sensori”. Premere brevemente il controller. • Ruotare il controller per selezionare l’opzione “Inclinazione laterale”. • Ruotando il controller, selezionare “On” per attivare l’inclinazione laterale, “Off”...
  • Seite 115 • Ruotando il controller, selezionare il valore dei minuti. • Salvare la data impostata e uscire dal sottomenu esercitando una pressione prolungata sul controller. Scelta dell’unità di misura • Tenere premuto il controller (3) per accedere al menu principale. • Ruotare il controller per selezionare l’opzione “Impostazioni generali”.
  • Seite 116: Barra Di Stato

    Informazioni sul dispositivo • Tenere premuto il controller (3) per accedere al menu principale. • Ruotare il controller per selezionare l’opzione “Informazioni sul dispositivo”. Premere brevemente il controller. Quest’opzione consente all’utente di visualizzare le informazioni seguenti relative al cannocchiale: • Nome completo •...
  • Seite 117: Uscita Video

    Lepre: altezza 0,3 m Cinghiale: altezza 0,7 m Cervo: altezza 1,7 m Spostare la barra fissa inferiore sotto l’ogget- to obiettivo e, ruotando il controller, spostare la barra orizzontale superiore relativa alla barra fissa inferiore finché l’oggetto non sia completamente tra le due barre. La distanza dell’oggetto viene ricalcolata automatica- mente man mano che l’utente sposta la linea superiore.
  • Seite 118: Manutenzione Tecnica

    • Scaricare sullo smartphone un’applicazione di terza parte per il convertitore. • Accendere il cannocchiale da puntamento esercitando una breve pressione sul tasto ON. • Lanciare l’applicazione presente sullo smartphone. Seguire le istruzioni riportate nell’applicazione per registrare il video. Attenzione! La risoluzione d’uscita del dispositivo HDMI deve supportare 1024x768p50 (1024x768, p- scansione progressiva, 50 –...
  • Seite 119: Risoluzione Dei Problemi

    Conservazione • Riporre sempre il cannocchiale da puntamento nella custodia e conservarlo in un luogo asciutto e ben ventilato. • Se il dispositivo non verrà utilizzato per un periodo prolungato, rimuovere il gruppo batteria. Risoluzione dei problemi Di seguito sono elencati alcuni problemi che potrebbero presentarsi durante l’uso del cannocchiale.
  • Seite 120 PROBLEMA CAUSA POSSIBILE AZIONE CORRETTIVA Il cannocchiale da puntamento Il cannocchiale da puntamento Controllare che il cannocchiale non mette a fuoco. non è montato in modo sicuro da puntamento sia stato mon- o l’attacco non è stato fissato tato in modo sicuro, assicurar- con sigillante specifico sulla si che si utilizzino le pallottole filettatura.
  • Seite 121 PROBLEMA CAUSA POSSIBILE AZIONE CORRETTIVA Sono presenti diversi La presenza dei puntini è causata da particolarità tecnologiche puntini (pixel) chiari o neri di produzione del sensore o del display e non costituisce un sul display o sul sensore del difetto. cannocchiale.
  • Seite 122: Технические Характеристики

    РУССКИЙ Технические характеристики 26401 26402 26403 26404 МОДЕЛЬ SIGHTLINE N450 N455 N470 N475 ОПТИЧЕСКИЕ ХАРАКТЕРИСТИКИ Оптическое увеличение, крат Плавный цифровой зум 4-8x / 4-16x 6-12x / 6-24x Относительное отверстие, D/f' 1/1.2 1/1.2 1/1.2 1/1.2 Поле зрения, град/м на 100м 5,5 / 9,6 5,5 / 9,6 4,1 / 7,1 4,1 / 7,1...
  • Seite 123: Комплект Поставки

    Комплект поставки • Прицел Sightline • Чехол • Аккумуляторная батарея Yukon DNV Battery Pack • Контейнер для зарядки аккумуляторной батареи c cетевым зарядным устройством • Кронштейн (с винтами и шестигранным ключом)* • Краткая инструкция по эксплуатации • Салфетка для чистки оптики •...
  • Seite 124 • Видеовыход microHDMI • Стадиометрический дальномер • Широкий диапазон эксплуатационных температур • Функция отключения дисплея • Индикация бокового завала оружия • Настраиваемое автоотключение прицела Элементы и органы управления Объектив Крышка объектива Контроллер Кнопка “ON” Кольцо диоптрийной настройки окуляра Наглазник Аккумуляторная батарея DNV Battery Pack Видеовыход...
  • Seite 125 Рис. Работа органов управления Орган Режим работы Первое крат- Последую- Длительное Вращение управления кое нажатие щие краткие нажатие нажатия Кнопка Прицел выключен Включение — Отключение — ON (4) прицела дисплея / Выключение прицела Дисплей вы- Включение — Выключение — ключен дисплея...
  • Seite 126: Особенности Эксплуатации

    Особенности эксплуатации Прицел ночного видения предназначен для длительного использования. Для обеспечения долговечности и полной работоспособности придерживайтесь следующих рекомендаций: • Перед началом эксплуатации прицела убедитесь, что Вы установили и зафиксировали кронштейн согласно указаниям раздела “Установка кронштейна”. • Выключите прицел после использования. •...
  • Seite 127 Рис. • Не подвергайте аккумуляторную батарею (АБ) воздействию высоких температур и открытого огня. • Не допускайте контакта АБ с водой. • Не допускайте короткого замыкания! • Не разбирайте и не деформируйте АБ. • Храните АБ в месте, недоступном для детей. Зарядка...
  • Seite 128: Уход И Хранение

    Уход и хранение • Храните АБ в прохладном, сухом и хорошо вентилируемом месте. • АБ должен храниться в заряженном состоянии. • Извлеките АБ из прицела при хранении или транспортировке. Установка аккумуляторных батарей типа “АА” Для того чтобы использовать аккумуляторные батареи типа “AA”, приобретите...
  • Seite 129 Рис. Включение и настройка изображения • Откройте крышку (2) объектива. • Включите прицел кратким нажатием кнопки ON (4). Через несколько секунд на дисплее появится изображение. • Для отключения дисплея во время работы прицела нажмите и удерживайте кнопку ON более одной секунды. •...
  • Seite 130 12,0x-24,0x * Примеры изменения шага увеличения: для Sightline N450 - 4.0x; 4.2x ; 4.4x ; 4.6x и т.д. для Sightline N470 - 12.0x; 12.5x ; 13.0x ; 13.5x и т.д. Значение плавного зума отображается в меню быстрого доступа и в строке...
  • Seite 131 • Настройте прицел согласно рекомендации раздела 9 «Эксплуатация. Включение и настройка». • Выберите профиль пристрелки (см. пункт основного меню «Профиль пристрелки» • Прицельтесь в центр мишени и сделайте выстрел. • Если точка попадания не совпала с точкой прицеливания (с центром прицельной...
  • Seite 132 Меню быстрого доступа Меню быстрого доступа позволяет управлять основными настройкам прицела (регулировка яркости, контраста, плавного зума, работа стадиометрического дальномера) и менять дистанцию пристрелки (при наличии нескольких) на другую в текущем профиле. • Войдите в меню быстрого доступа кратким нажатием контроллера (3). •...
  • Seite 133: Основное Меню

    Основное меню • Войдите в основное меню длительным нажатием контроллера (3). • Для перемещения по пунктам основного меню вращайте контроллер. • Навигация по основному меню происходит циклично, при достижении последне- го пункта первой вкладки происходит переход к первому пункту второй вкладки. •...
  • Seite 134 Профиль пристрелки Данный пункт основного меню позволяет выбрать для использования один из трех профилей. Каждый профиль включает следующие параметры: • Набор дистанций с координатами пристрелки для каждой. • Цвет метки • Тип метки Различные профили могут использоваться при использовании прицела на различном...
  • Seite 135 Тип метки • Нажмите и удерживайте контроллер (3) для входа в основное меню. • Вращением контроллера выберите подменю. “Настройка метки”. Кратко нажмите контроллер. • Вращением контроллера выберите нужную конфигурацию прицельной метки из появившегося списка. Перемещение курсора по списку сопровождается отображением меток на дисплее. •...
  • Seite 136 Работа с дистанциями • Нажмите и удерживайте контроллер (3) для входа в основное меню. • Выберите пункт меню и войдите в него кратким нажатием контроллера. • Выберите пункт подменю работы с дистанциями и войдите в него кратким нажатием контроллера – будут отображаться дистанции, на...
  • Seite 137 Увеличение • Данный пункт меню позволяет использовать цифровой зум прицела во время его пристрелки, что уменьшает цену клика. Это позволяет повысить точность пристрелки. • После того как вы выбрали дистанцию пристрелки и вошли в подменю, кратко нажмите контроллер (3) для входа в подменю «Увеличение». •...
  • Seite 138: Общие Настройки

    Функция “Боковой завал оружия” Данный пункт позволяет включить либо отключить функцию индикации горизонтального (бокового) завала оружия. Индикация завала отображается “секторными” стрелками справа и слева от прицельной метки. Стрелки обозначают направление, в котором необходимо наклонить оружие для устранения завала. Имеется три режима индикации завала: 5°-10°...
  • Seite 139 • Вращением контроллера выберите подменю «Время» кратким нажатием контроллера. • Вращением контроллера выберите формат времени – 24 или PM/AM. • Для перехода к настройке значения часа нажмите контроллер. • Вращением контроллера выберите значение часа. • Для перехода к настройке значения минут нажмите контроллер. •...
  • Seite 140 • Автоотключение – выключено • ИК-осветитель – выключен Пользовательские данные (профили пристрелки и дистанций, найстройки даты/времени) сохраняются в памяти прицела. Информация о прицеле • Нажмите и удерживайте контроллер (3) для входа в основное меню. • Вращением контроллера выберите подменю “Информация о прицеле”. Подтвердите...
  • Seite 141 Имеется три предустановленных значения для объектов: Заяц – высота 0,3 м Кабан – высота 0,7 м Олень – высота 1,7 м Поместите нижний неподвижный штрих под объектом и, вращением контроллера перемещайте верхний штрих относительно нижнего горизонтального неподвижного так, чтобы объект располагался непосредственно...
  • Seite 142: Технический Осмотр

    • Включите прицел кратким нажатием кнопки ON. • Запустите приложение на смартфоне. Для записи видео следуйте инструкциям в приложении. Внимание! Входное разрешение HDMI устройства должно поддерживать 1024x768p50 (где 1024x768, p- прогрессивная развертка, 50 – частота в Гц). Использование планки WEAVER Прицел...
  • Seite 143: Выявление Неисправностей

    Хранение • Храните прицел всегда только в чехле, в сухом, хорошо вентилируемом помещении. • При длительном хранении обязательно извлеките аккумуляторную батарею из прицела. Выявление неисправностей В таблице приведен список возможных проблем, которые могут возникнуть при эксплуатации прицела. Произведите рекомендуемую проверку и исправление в порядке, указанном в таблице. При наличии дефектов, не...
  • Seite 144 ПРОБЛЕМА ВОЗМОЖНАЯ ПРИЧИНА ИСПРАВЛЕНИЕ При стрельбе сбивается Нет жесткости установки Проверьте жесткость метка. прицела на оружии установки прицела на или крепление не оружии и надежность зафиксировано резьбовым фиксации крепления к фиксатором. прицелу. Убедитесь, что Вы используете именно тот тип патронов, которым ранее...
  • Seite 145 ПРОБЛЕМА ВОЗМОЖНАЯ ПРИЧИНА ИСПРАВЛЕНИЕ На дисплее появились В процессе эксплуатации После прекращения полосы либо изображение на прибор воздействовало воздействия статического исчезло. статическое напряжение. напряжения прибор может самостоятельно перезагрузиться либо выключите и повторно включите прибор. На дисплее или сенсоре Наличие таких пикселей связано с технологией видны...

Diese Anleitung auch für:

Sightline n455Sightline n470Sightline n475

Inhaltsverzeichnis