Herunterladen Inhalt Inhalt Diese Seite drucken

Teleco MeTer SDC-MT Bedienungsanleitung

Messgerät für solar-laderegler mit doppelbatterie für freizeitfahrzeuge, caravans und boote

Werbung

Verfügbare Sprachen
  • DE

Verfügbare Sprachen

IT
MANUALE D'ISTRUZIONI
MISURATORE per regolatore di carica solare per due batterie
Per VR, caravan e imbarcazioni
CONTENUTO:
Dispositivo per montaggio a parete (ad incasso oppure direttamente a parete). Cavo da 10 metri.
DIMENSIONI DI MONTAGGIO:
4 FORI DI MONTAGGIO ø 4,0 mm (0,16)
mm (pollici)

Werbung

Inhaltsverzeichnis
loading

Inhaltszusammenfassung für Teleco MeTer SDC-MT

  • Seite 1 MANUALE D’ISTRUZIONI MISURATORE per regolatore di carica solare per due batterie Per VR, caravan e imbarcazioni CONTENUTO: Dispositivo per montaggio a parete (ad incasso oppure direttamente a parete). Cavo da 10 metri. DIMENSIONI DI MONTAGGIO: 4 FORI DI MONTAGGIO ø 4,0 mm (0,16) mm (pollici)
  • Seite 2 DISPLAY DEL MISURATORE REMOTO: Icona del pannello solare Icona della batteria Icona del sensore remoto di temp. Indicatore dell’unità di misura Icona del sensore locale di temp. Icona delle impostazioni Indicatore di errore Indicatore dell'autotest Icona della retroilluminazione Indicatore di circuito LED del display LCD 1.
  • Seite 3 Istruzioni per l'impostazione dei dati: Premere il pulsante K4 per impostare i dati, scorrere le impostazioni e salvare i dati modificati. Premere K1 per visualizzare i dati successivi poi K2 e K3 per modificare i dati. Pulsante K4 per impostazioni Unità...
  • Seite 4 3. Ripetizione dei dati: automatica o manuale. Le opzioni sono le seguenti: Auto ogni set di dati viene ripetuto ogni 3 secondi; premere K1 per il set successivo. Premere K2 o K3 per ripetere i dati di un set. i dati non vengono ripetuti in automatico a meno che non si prema K2 o K3 oppure K1 per il set di dati successivo.
  • Seite 5 ALTRE ISTRUZIONI Specifiche: Tensione nominale: 12 V, tensione min. (consigliata) 8,0 V Retroilluminazione intensa attiva: < 23 mA Retroilluminazione ridotta attiva: < 20 mA Retroilluminazione e indicatore LED spenti: < 17 mA Temperatura d’esercizio: - 40 ~ +60 Temperatura d’esercizio del display LCD: -10 C°+40 C°...
  • Seite 6 NOTE...
  • Seite 7: Dimensions Pour Le Montage

    GUIDE D’UTILISATION MESUREUR pour régulateur de charge solaire pour deux batteries. Pour Véhicules de Loisirs, caravanes et bateaux CONTENU: Dispositif pour installation murale (encastrable ou directement sur la paroi). Câble de 10 mètres. DIMENSIONS POUR LE MONTAGE: 4 TROUS DE MONTAGE ø 4,0 mm (0,16) mm (pouces)
  • Seite 8 AFFICHEUR DU MESUREUR À DISTANCE Icône du panneau solaire Icône de la batterie Icône du capteur de température à distance Indicateur de l’unité de mesure Icône du capteur local de température Icône des paramétrages Indicateur d’erreur Indicateur d’autotest Icône du rétro-éclairage Indicateur de circuit LED de l’afficheur LCD 1.
  • Seite 9 Instruction pour le réglage des données Appuyez sur le bouton-poussoir K4 pour régler les données, faire défiler les réglages et sauvegarder les données modifiées. Appuyez sur K1 pour visualiser les données suivantes puis sur K2 et K3 pour modifier les données. K4 poue les réglages Unité...
  • Seite 10 3. Répétition des données : automatique ou manuelle. Les options sont les suivantes : Auto chaque ensemble de données est répété toutes les 3 secondes ; appuyez sur K1 pour l’ensemble suivant. Appuyez sur K2 ou K3 pour répéter les données d’un ensemble. les données ne sont pas automatiquement répétées, à...
  • Seite 11: Autres Instructions

    AUTRES INSTRUCTIONS Spécifications : Tension nominale: 12 V, tension mini (conseillée) 8,0 V Rétro-éclairage intense activé : < 23 mA Rétro-éclairage réduit activé : < 20 mA Rétro-éclairage et indicateur LED éteints : < 17 mA Température de service : -40~ +60 Température de service de l’afficheur LCD : -10 C°+40 C°...
  • Seite 12: Mounting Dimensions

    INSTRUCTION MANUAL Dual-battery solar charge controller METER For RVs, caravans and boats CONTENTS: Wall-mounting system (for recessed-mounting or wall-mounting). 10-metre cable. MOUNTING DIMENSIONS: 4 MOUNTING HOLES 4.0 mm (0.16) ø mm (inches)
  • Seite 13 REMOTE METER DISPLAY: Solar icon Battery icon remote temp icon unit indicator local temp. Sensor icon setting icon error indicator self-test indicator backlight icon circle indicator LCD display LEDs 1. Charging LED: green light indicates that charging is in progress 2.
  • Seite 14 Data setting instructions: Press the key K4 to set data, scroll through settings and store modified data. Press the key K1 to display the next data and then K2 and K3 to modify the data. K4 for setting Temperature Units (from degree to Fahrenheit Black Light Timer default: 30 seconds...
  • Seite 15 3. Data repeat: automatic or manual. The possible options are: Auto each data set is repeated every 3 seconds; press K1 for the next set. Press K2 or K3 to repeat the data in a set. data are not repeated automatically unless K2 or K3 are pressed, or K1 can be pressed for the next set of data.
  • Seite 16: Other Instructions

    OTHER INSTRUCTIONS Specifications: Rated voltage: 12 V, min voltage (recommended) 8.0 V Bright backlighting on: < 23 mA Low-brightness backlighting on: < 20 mA Backlighting and LED indicator off: < 17 mA Operating temperature: -40 ~ +60 LCD operating temperature: -10 C°+40 C°...
  • Seite 17: Montageabmessungen

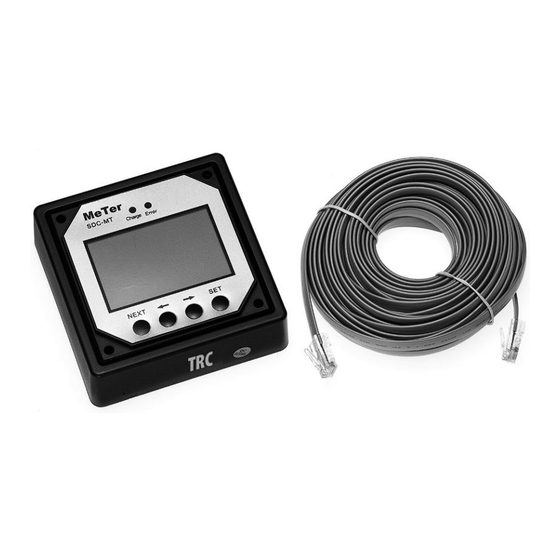
    BEDIENUNGSANLEITUNG MESSGERÄT für Solar-Laderegler mit Doppelbatterie für Freizeitfahrzeuge, Caravans und Boote INHALT: Wandbefestigungssystem (für Wandeinlassung oder Montage direkt an der Wand). 10 Meter langes Kabel. MONTAGEABMESSUNGEN: 4 MONTAGEBOHRUNGEN ø 4,0 mm (0,16) mm (Zoll)
  • Seite 18 DISPLAY DES FERNMESSGERÄTS: Solarmodulsymbol Batteriesymbol Symbol für Ferntemperatursensor Anzeige der Maßeinheit Symbol für lokalen Temperatursensor Einstellungssymbol Fehleranzeige Selbsttestanzeige Hintergrundbeleuchtungssymbol Kreislaufanzeige LED des LCD-Displays 1. Lade-LED: das grüne Licht zeigt den laufenden Ladevorgang an 2. Fehler-LED: das rote Licht zeigt das Vorhandensein eines Fehlers an BEDIENUNGSANLEITUNG DES FERNMESSGERÄTS Tasten (von links nach rechts): K1-K4 entweder Weiter , Links...
  • Seite 19 Anleitung für die Dateneingabe: Die Taste K4 drücken, um die Daten einzugeben, die Einstellungen durchzuscrollen und die geänderten Daten zu speichern. Auf K1 drücken, um die nächsten Daten anzuzeigen. Dann auf K2 und K3 drücken, um die Daten zu ändern. Taste K4 für Einstellungen Maßeinheit der Temperatur (von Grad Celsius auf Fahrenheit)
  • Seite 20 3. Datenwiederholung: automatisch oder manuell. Mögliche Optionen: Auto Jeder Datensatz wird alle 3 Sekunden wiederholt, für den nächsten Datensatz auf K1 drücken. Auf K2 oder K3 drücken, um die Daten eines Satzes zu wiederholen. Es findet keine automatische Wiederholung der Daten statt, sofern nicht auf K2 oder K3 gedrückt wird oder sofern für den nächsten Datensatz nicht auch auf K1 gedrückt wird.
  • Seite 21: Sonstige Angaben

    SONSTIGE ANGABEN Spezifikationen: Nennspannung: 12 V, Mindestspannung (empfohlen) 8,0 V Starke Hintergrundbeleuchtung aktiv: < 23 mA Reduzierte Hintergrundbeleuchtung aktiv: < 20 mA Hintergrundbeleuchtung und LED-Anzeige ausgeschaltet: < 17 mA Betriebstemperatur: - 40 ~ +60 -10 C°+40 C° Betriebstemperatur des LCD-Displays: Feuchtigkeit: 0-100 % RJ45 (8 Pin),...
  • Seite 22: Gebruiksaanwijzing

    GEBRUIKSAANWIJZING METER voor zonne-energie laadregelaar voor twee accu’s Voor recreatievoertuigen, caravans en boten INHOUD: Apparaat voor wandmontage (inbouw of rechtstreeks aan de wand) Kabel van 10 meter MONTAGEMATEN: 4 MONTAGEGATEN ø 4,0 mm (0,16) mm (inch)
  • Seite 23 DISPLAY VAN DE METER OP AFSTAND: Pictogram van het Pictogram van de accu zonnepaneel Pictogram van de temperatuursensor op afstand Maateenheidindicator Pictogram van de lokale temperatuursensor Pictogram van de instellingen Foutindicator Zelftestindicator Pictogram van de Circuitindicator achtergrondverlichting Leds van het LCD-scherm 1.
  • Seite 24 Aanwijzingen voor het instellen van gegevens: druk op de knop K4 om de gegevens in te stellen, de instellingen te doorlopen en de veranderde gegevens in het geheugen op te slaan. Druk op K1 om de volgende gegevens te tonen en daarna K2 en K3 om de gegevens te veranderen. Knop K4 voor instellingen Maateenheid van de temperatuur (van graden Celsius tot Fahrenheit)
  • Seite 25 3. Herhaling van gegevens: automatisch of handmatig. De opties zijn als volgt: Auto elke gegevensset wordt om de 3 seconden herhaald; druk op K1 voor de volgende set. Druk op K2 of K3 om de gegevens van een set te herhalen. de gegevens worden niet automatisch herhaald tenzij er op K2, K3 of K1 gedrukt wordt voor de volgende gegevensset.
  • Seite 26 OVERIGE AANWIJZINGEN SSpecificaties: Nominale spanning: 12 V, min. spanning (geadviseerd) 8,0 V Sterke achtergrondverlichting actief: < 23 mA Verminderde achtergrondverlichting actief: < 20 mA Achtergrondverlichting en ledindicator uit: < 17 mA Bedrijfstemperatuur: -40~ +60 Bedrijfstemperatuur LCD-scherm: -10 C°+40 C° Vochtigheid: 0-100% Communicatiekabel: RJ45 (8 pins), 10 meter...
  • Seite 27 NOTE...
  • Seite 28 Tel. +31 ( 0 ) 341 722450 - Fax +31 ( 0 ) 341 722451 fillsrocha@fillsrocha.com e-mail: info@karmantrading.eu www.karmantrading.eu ÖSTERREICH - TELECO GmbH 82041 Deisenhofen - Deutschland FRANCE - TELECO SAS Tel. 0049 8031 98939 - Fax. 0049 8031 98949 3, impasse des ILES - ZA La Maladière...

Inhaltsverzeichnis