Inhaltszusammenfassung für Stage Line MULTI RAY LED-812DMX
Seite 1
LED-DMX-LICHTEFFEKTGERÄT LED DMX LIGHT EFFECT UNIT JEU DE LUMIÈRE DMX À LED UNITÀ DMX PER EFFETI DI LUCE CON LED “MULTI RAY” LED-812DMX Best.-Nr. 38.4080 BEDIENUNGSANLEITUNG • INSTRUCTION MANUAL MODE D’EMPLOI • ISTRUZIONI PER L’USO • GEBRUIKSAANWIJZING MANUAL DE INSTRUCCIONES • INSTRUKCJA OBSŁUGI SIKKERHEDSOPLYSNINGER •...
Seite 2
Before switching on … Wir wünschen Ihnen viel Spaß mit Ihrem neuen We wish you much pleasure with your new “img Gerät von „img Stage Line“. Bitte lesen Sie diese Stage Line” unit. Please read these operating Bedienungsanleitung vor dem Betrieb gründlich instructions carefully prior to operating the unit.
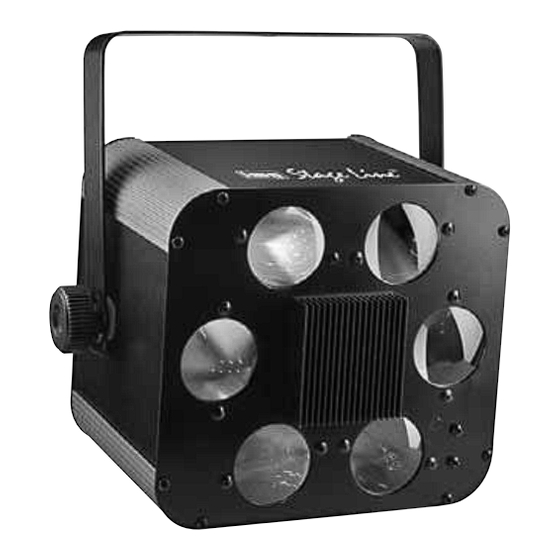
Seite 3
SPECIAL FUNCTION 1 2 3 4 5 6 7 8 9 10 START ADDRESS SELECT MANUAL MODE DIRECTION SPEED ADJUSTMENT 2 LICHT SHOW FUSE ONLY FOR REMOTE CONTROL POWER INPUT INPUT OUTPUT ...
Auf der ausklappbaren Seite 3 finden Sie alle be - 13 Taste MODE zum Umschalten zwischen schriebenen Bedienelemente und Anschlüsse. Stroboskop-Modus (LED der Taste leuchtet nicht) Chase-Modus (LED der Taste leuchtet) Hinweis: Zur Steuerung über die Fernbedienung darf am Eingang DMX INPUT (7) kein DMX-Signal anliegen. 1 Übersicht der Bedienelemente und Anschlüsse 2 Hinweise für den sicheren Gebrauch...
über ein 3-poliges XLR-Kabel (z. B. Serie Beachten Sie, dass sehr schnelle Licht- MEC-... oder MECN-... aus dem Sortiment von „img wechsel bei fotosensiblen Menschen Stage Line“) mit dem Anschluss DMX INPUT (7) und Epileptikern epileptische Anfälle des ersten Nebengerätes verbinden. aus lösen können! 2) Den Anschluss DMX OUTPUT des ersten Neben- Zum Einschalten des Gerätes das beiliegende Netz-...
Beispiele für die Startadressen 1, 6 und 104: Zur Bedienung über ein Lichtsteuergerät mit DMX512- Protokoll (z. B. DMX-1440 oder DMX-510USB von „img Stage Line“) verfügt das LED-812DMX über drei ← Schalternummer Steuerkanäle. Das LED-812DMX kann aber auch über ← Stellenwert nur einen Kanal gesteuert werden, wenn die zuge - ordneten Funktionen genügen.
Am einfachsten ist es, vom größtmöglichen Stellen- 9.1 DMX-Kanäle wert auszugehen und die kleineren Werte dazuzuad- dieren, bis sich als Summe die Startadresse ergibt. 1-Kanal-Betrieb 2) Mit dem DIP-Schalter Nr. 10 die Anzahl der DMX- DMX-Wert Funktion Kanäle einstellen. Die Anzahl der DMX-Kanäle hängt von den benötigten Funktionen ab und even- 0 –...
All operating elements and connections can be 2 Safety Notes found on the fold-out page 3. The unit corresponds to all required directives of the EU and is therefore marked with 1 Operating Elements and Connections WARNING The unit uses dangerous mains voltage (230 V~).
Seite 9
3 Applications The light effect unit is suited for applications on stage, in discotheques or party rooms. Its light source is a super bright LED (10 W) with a low power consumption and a long life. The light effect unit is designed for control via a Fig.
100 m. For cable lengths exceeding 150 m it is recom- The easiest way is to start from the highest possible mended to insert a DMX level matching amplifier (e. g. place value and to add the smaller values until the SR-103DMX by “img Stage Line”). start address will result.
2) Adjust the number of DMX channels with DIP switch 9.1 DMX channels No. 10. The number of DMX channels depends on 1-channel mode the functions required and may also depend on the number of available control channels. Please refer DMX value Function to chapter 9.1 for information on the corresponding...
Vous trouverez sur la page 3, dépliable, les élé- Conseil : Pour une gestion via la télécommande, aucun signal DMX ne doit être présent à lʼentrée DMX INPUT (7). ments et branchements. 1 Eléments et branchements 2 Conseils dʼutilisation et de sécurité Lʼappareil répond à...
4 Montage Si le jeu de lumière ne reçoit pas de signal de com- mande DMX, les faisceaux brillent. Les modèles de Placez toujours lʼappareil de telle sorte quʼune cir- lumière tournent, changent la couleur, le sens de rota- culation dʼair suffisante soit assurée pendant le tion se modifie occasionnellement.
Pour une utilisation via un contrôleur avec protocole DMX512 (par exemple DMX-1440 ou DMX-510USB de ← numéro de lʼinterrupteur “img Stage Line”), le LED-812DMX dispose de trois ← valeur de position canaux de commande. Le LED-812DMX peut égale- ment être géré via uniquement 1 canal lorsque les fonctions attribuées suffisent.
Le plus simple est toujours de partir de la valeur de 9.1 Canaux DMX position la plus grande et dʼy ajouter les valeurs plus petites jusquʼà obtenir avec la somme Mode 1 canal lʼadresse de démarrage. Valeur DMX Fonction 2) Avec lʼinterrupteur DIP N 10, réglez le nombre de canaux DMX.
A pagina 3, se aperta completamente, vedrete sempre 13 Tasto MODE per cambiare fra gli elementi di comando e i collegamenti descritti. modo stroboscopio (LED del tasto spento) modo chase (LED del tasto acceso) Nota: Per il comando tramite il telecomando, allʼingresso DMX INPUT (4) non deve essere presente nessun segnale DMX.
Tenete presente che i veloci cavo XLR a 3 poli (p. es. serie MEC-... o MECN-... cambi di luce possono provocare del programma di “img Stage Line”). attacchi dʼepilessia presso per- 2) Collegare il contatto DMX OUTPUT del primo appa-...
Per il funzionamento attraverso unʼunità di comando luce con protocollo DMX512 (p. es. DMX-1440 o DMX- ← Numero switch 510USB di “img Stage Line”), il LED-812DMX dispone ← Valore di tre canali di comando DMX. Tuttavia, il LED- 812DMX può essere comandato anche per mezzo di un solo canale se sono sufficienti le funzioni assegna- tegli.
Il sistema più semplice è di partire sempre dal mas- 9.1 Canali DMX simo valore possibile aggiungendo i valori minori fino a raggiungere, come somma, lʼindirizzo di start. Funzionamento a 1 canale 2) Con il dip-switch n. 10 impostare il numero dei Valore DMX Funzione canali DMX.
Op de uitklapbare pagina 3 vindt u een overzicht 13 Toets MODUS voor het wisselen tussen van de bedieningselementen en de aansluitingen. stroboscoopmodus (LED van de toets licht niet op) chasemodus (LED van de toets licht op) Opmerking: Voor de besturing via de afstandsbediening 1 Overzicht van de bedienings- mag er geen DMX-signaal naar de ingang DMX INPUT (7) elementen en aansluitingen...
Seite 21
MEC-... of MECN-... uit het gamma van “img leptische aanvallen kunnen veroor- Stage Line”) met de aansluiting DMX INPUT (7) van zaken! het eerste randapparaat. 2) Verbind de aansluiting DMX OUTPUT van het eer-...
Voorbeelden voor startadressen 1, 6 en 104: Voor de bediening via een lichtregelaar met DMX512- protocol (b.v. DMX-1440 of DMX-510USB van “img Stage Line”) beschikt de LED-812DMX over drie bestu- ← schakelaarnummer ringskanalen. LED-812DMX kan echter ook via slechts ← plaatswaarde één kanaal worden geregeld, als de toegewezen func-...
Het is het makkelijkst om uit te gaan van de grootst 9.1 DMX-kanalen mogelijke plaatswaarde en de kleinere waarden erbij 1-kanaalbedrijf op te tellen: de resulterende som is dan het startadres. 2) Stel met de DIP-schakelaar nr. 10 het aantal DMX- DMX-waarde Functie kanalen in.
Puede encontrar todos los elementos de funciona- 12 Botón FUNCTION para seleccionar varias funcio- miento y las conexiones que se describen en la nes dependiendo del modo de funcionamiento seleccionado con el botón MODE (13) página 3 desplegable. 13 Botón MODE para conmutar entre Modo estroboscopio (LED del botón apagado) Modo Chase (LED del botón encendido)
ADVERTENCIA No mire nunca el haz de luz direc- modelos MEC-… o MECN-… de la gama de pro- tamente; puede provocar daños ductos de “img Stage Line”) a la entrada DMX oculares. INPUT (7) de la primera unidad Slave. Tenga en cuenta que los cambios 2) Conecte la salida DMX OUTPUT de la primera uni- rápidos de iluminación, como por...
DMX o utilice el tapón Master mediante el control remoto. adecuado (p. ej. DLT-123 de “img Stage Line”). 4) El botón STAND BY (11) permite activar/desactivar el haz de luz. Con los haces desactivados, el LED junto 7.2 Ajuste de la dirección de inicio...
El modo más fácil es empezar por el valor más alto 9.1 Canales DMX posible e ir añadiendo valores más pequeños hasta Modo 1 canal dar con la dirección de inicio. 2) Ajuste del número de canales DMX con el interrup- Valor DMX Función tor DIP 10.
Proszę otworzyć niniejszą instrukcję na stronie 3. 13 Przycisk MODE do przełączania pomiędzy trybami Pokazano tam rozkład elementów operacyjnych i Stroboskopu (dioda przycisku zgaszona) złączy. Chase (dioda przycisku włączona) Uwaga: Przy sterowaniu z pilota nie można równocześnie podawać sygnału DMX na wejście DMX (7). 1 Elementy użytkowe i gniazda połączeniowe 2 Środki bezpieczeństwa...
3-pino- diody, silne światło może uszkodzić wymi XLR (np. serii MEC-... lub MECN-... marki wzrok. “img Stage Line”) z gniazdem DMX INPUT (7) Efekt stroboskopu i szybkie zmiany pierwszego urządzenia podrzędnego. światła mogą być groźne dla osób wraż- liwych na światło oraz chorych na epi-...
Do sterowania wymagany jest kontroler z protokołem DMX512 (np. DMX-1440 lub DMX-510USB marki ← Wartość “img Stage Line”). Możliwe jest także sterowanie efek- tem LED-812SDMX poprzez tylko jeden kanał, jeżeli w trybie tym dostępne są wszystkie potrzebne funkcje. Rys. 6 Adres startowy 1: Efekt posiada 3 kanały sterujące DMX.
Seite 31
Najprostszą metodą jest zacząć od przełącznika o 9.1 Kanały DMX najwyższej liczbie a następnie dodawać mniejsze Tryb 1-kanałow wartości aż do uzyskania żądanej liczby. 2) Ustawić liczbę kanałów DMX za pomocą przełącz- Wartość DMX Funkcja nika DIP nr 10. Liczba kanałów DMX zależy od ilo- ści funkcji, wymaganych do sterowania urządze- 0 –...
Seite 32
Lyseffektenhed LED-812DMX Ljuseffektenhet LED-812DMX Læs nedenstående sikkerhedsoplysninger grundigt Läs igenom säkerhetsföreskrifterna innan enheten tas igennem før ibrugtagning af enheden. Bortset fra sik- i bruk. Ytterligare information återfinns på övriga språk kerhedsoplysningerne henvises til den engelske tekst. i manualen. Vigtige sikkerhedsoplysninger Säkerhetsföreskrifter Denne enhed overholder alle nødvendige EU-direkti- Enheten uppfyller alla krav enligt EU och har därför för-...
Seite 33
Valoefektilaite LED-812DMX Ole hyvä ja tutustu seuraaviin ohjeisiin varmistaaksesi tuotteen turvallisen käytön. Tarvitessasi lisätietoja tuot- teen käytöstä löydät ne muun kielisistä käyttöohjeista. Turvallisuudesta Asennus Laite vastaa kaikkia vaadittuja EU direktiivejä, joten se Asenna laite aina siten, että riittävä ilmankierto on on varustettu merkinnällä.