Eaton i-wifi01 Installationsanleitung
Gleichspannungswandler
Inhaltsverzeichnis
Verfügbare Sprachen
Verfügbare Sprachen
Quicklinks
i-wifi01
DC-DC Converter
Gleichspannungswandler
Convertisseur CC-CC
Convertitore CC-CC
DC/DC-gelijkstroomomvormer
UK
Introduction
The i-wifi01 Wi-Fi module allows
Eaton control units that have an RJ-45
ethernet port to connect wirelessly to
a network.
Before you Start
Note: This product must be installed
by qualified service personnel.
These instructions must be read in
conjunction with the control unit's
installation instructions.
Check the following points before
you start:
Wi-Fi-enabled device – You will need
•
a laptop, smart phone or tablet to
set up and configure the i-wifi01.
Mobile data – If you are using a
•
mobile phone, it is advisable to
disable mobile data during the
configuration process.
SSID and WI-Fi password – You will
•
need the name and password of the
Wi-Fi network. The password must
not contain special characters, such
as "@" and "!" .
Repeaters – If there are Wi-Fi
•
repeaters in the property, power
them down before attempting to link
the i-wifi01 to the main router.
DHCP – The router should have
•
DHCP enabled (the default for most
routers) to enable the router to
assign an IP address automatically to
the i-wifi01. DHCP is recommended
for all network devices, including the
control panel.
Band steering – Band steering allows
•
a router to move devices between
2.4GHz and 5GHz if the devices
support the two frequencies. It is
advisable to switch off band steering
in the router settings (if supported),
as it can cause unwanted
disconnections of the i-wifi01, even
though the i-wifi01 supports only
2.4GHz.
i-wifi01 − Installation Instructions
UK
i-wifi01 − Installationsanleitung
DE
i-wifi01 − Guide d'installation
FR
i-wifi01 − Istruzioni per l'installazione
IT
i-wifi01 − Installatiehandleiding
NL
Installing the Module
Step 1 – Mount and Connect the
i-wifi01
1. Disconnect mains power from the
control unit, open the lid of the
control unit and disconnect its
backup battery.
2. Mount the i-wifi01:
i-on40H and i-on30R – Mount
•
in the area to the side of the
battery (not on the battery).
i-on Style – Mount on the
•
bottom side of the battery
compartment.
i-on Compact – Mount on
•
the right side of the battery
compartment.
The i-wifi01 must not be mounted
near any source of heat or near
radio antenna.
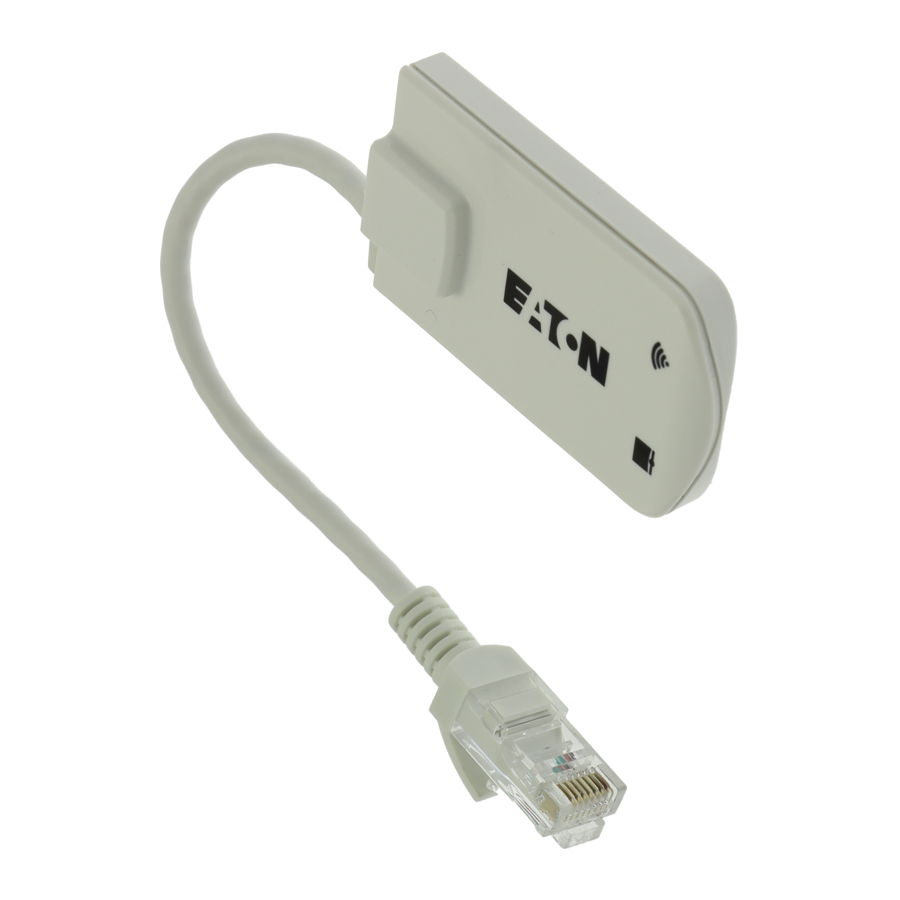
3. Connect the DC-DC converter:
Red wire to AUX 12Vdc at the
•
control unit.
Black wire to 0V at the control
•
unit.
Jack plug to i-wifi01.
•
Do not connect the i-wifi01
network cable (you will do this
later).
Note: Do not replace the DC-DC
converter with an alternative power
supply.
4. Reconnect the backup battery, then
switch on the mains supply.
WARNING: Mains voltages are
present on the shrouded heads
of the mains terminal screws and
on the fuse holder connections.
Please refer to the control unit's
installation instructions for
details of the locations of these
components.
Step 2 – Access the Web Interface
1. Reconnect the backup battery, refit
the lid, then switch on the mains
supply.
2. Using a Wi-Fi-enabled laptop
or other device, connect to the
"secureconnectwifi" wireless
network using the security key
"12345678" . You may need to wait
for up to two minutes before you
can see the network.
You may see a message such as
"Connected, No Internet" . This is
normal.
3. Open a browser and in the address
bar, enter:
http://secureconnectwifi.cfg.
4. When prompted, log in to the
module's web interface. The default
username and password are both
"eaton" (lowercase).
5. Click System Settings , and change
the username and password of
the web interface. Record this
information securely for future
reference.
6. Click Apply . "Configuration
Successfully" is displayed briefly.
Note: Do not change any settings
in the LAN Settings page.
Step 3 – Connect to a
Wi-Fi Network
1. Click Scan Hotspots , and select the
customer's wireless network you
want the control unit to use:
If the network is not displayed,
click Scan Hotspots again.
2. Check the signal strength. If Signal
is less than 50, the connection to
the router may be unstable.
3. Click Next .
4. Enter the password of the network
you selected (no indication of an
incorrect password will be given,
so check that it is correct), then
click Apply .
Do not change other settings.
Inhaltsverzeichnis

Inhaltszusammenfassung für Eaton i-wifi01
-
Seite 3: Zusatzinformationen
Netzstromversorgung ein. Einstellungen. Gleichspannungswandler: 2. Verbinden Sie sich mit einem Eingang 100 mA max. bei 12 V DC, 5. Der i-wifi01 versucht, sich mit dem WLAN-fähigen Laptop oder Router zu verbinden. Wenn der Ausgang 220 mA max. bei 5 V DC anderem geeigneten Gerät unter Verbindungsaufbau erfolgreich ist, Verwendung des Sicherheits- Eingangsstrom i-wifi01: 220 mA max.